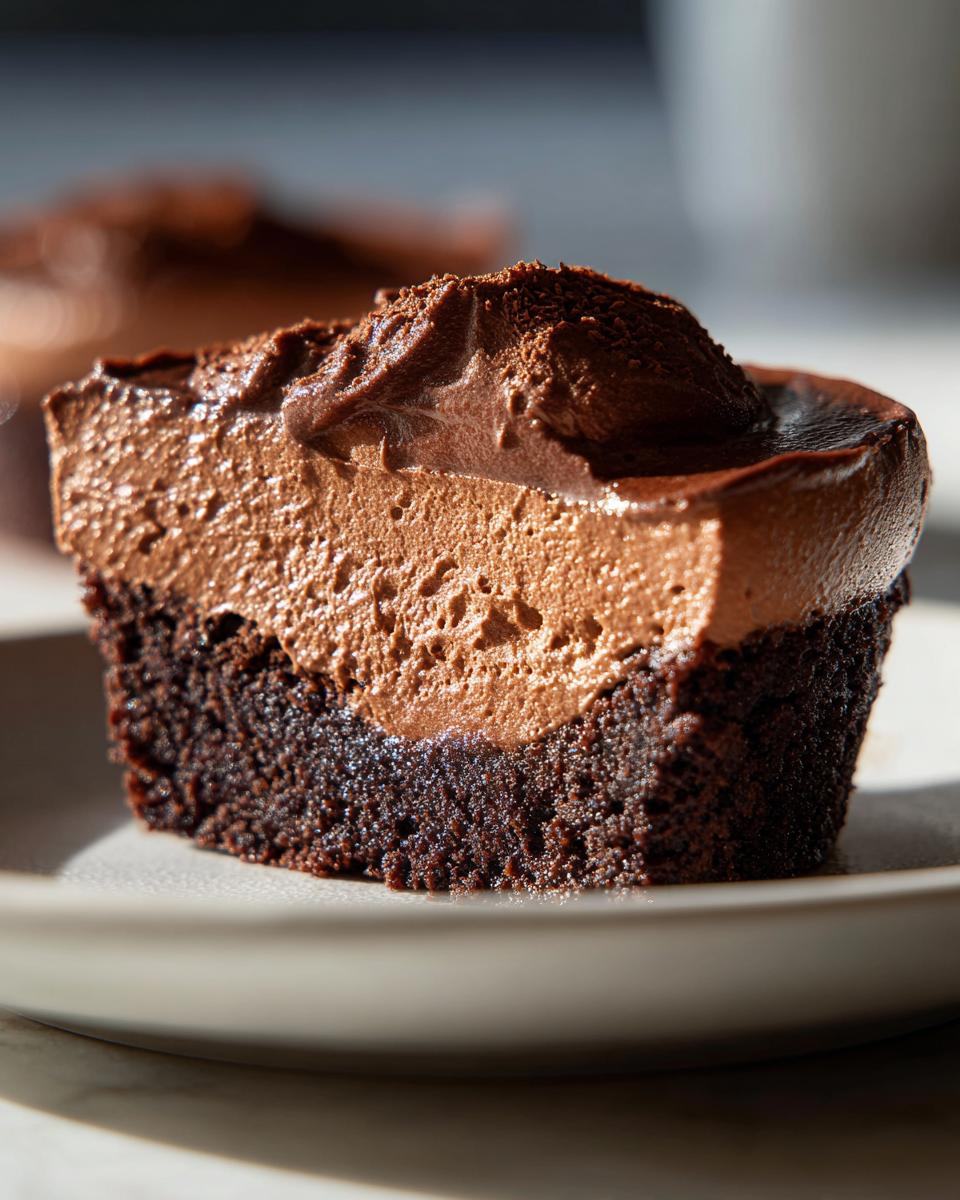
Okay, let’s talk about pure chocolate bliss. I’m obsessed with these Rich Chocolate Mousse Brownies, and trust me, they are a game-changer. I first whipped these up on a rainy Tuesday when the craving for something decadent but surprisingly easy hit hard. My kids practically inhaled the first batch – that’s how you know it’s a winner!
What makes them so special? You get that super fudgy brownie base, then this ethereally light, creamy chocolate mousse on top. It’s like getting two amazing desserts in one bite! Seriously, if you’re looking to impress without spending hours in the kitchen, you’ve found your recipe. Get ready to fall in love.
Why You’ll Love These Rich Chocolate Mousse Brownies
- Dual Texture Delight: You get that crazy fudgy brownie base hugging a pillow of light, airy chocolate mousse. It’s a textural party in your mouth!
- Surprisingly Simple: Don’t let the fancy layers fool you. These come together faster than you’d think, with straightforward steps for both the brownie part and the mousse.
- Pure Chocolate Heaven: Made with real cocoa and chocolate chips, these are seriously chocolatey. It’s the ultimate treat for any chocolate lover.
- Perfect for Sharing (or Not!): They look impressive enough for guests, but honestly, they’re so good you might want to keep them all to yourself.
Ingredients for Rich Chocolate Mousse Brownies
- 1/2 cup unsalted butter, melted (this is key for fudgy brownies!)
- 1 cup granulated sugar
- 2 large eggs, at room temperature if you can remember (it helps them incorporate better!)
- 1 teaspoon pure vanilla extract
- 1/3 cup unsweetened cocoa powder (I like to use a good quality one for the best flavor)
- 1/2 cup all purpose flour
- 1/4 teaspoon salt
- 1 cup heavy whipping cream, divided (this is for the fluffy mousse part!)
- 1 cup semisweet chocolate chips, divided (you’ll use some for the ganache and some for the mousse)
- 2 tablespoons powdered sugar (for sweetening up that mousse!)
Step-by-Step Instructions for Rich Chocolate Mousse Brownies
Step 1: Get your oven fired up to 350°F and line an 8 x 8 inch baking pan with parchment paper. This makes getting them out so much easier later, trust me! If you’re a brownie enthusiast, you might want to check out my fudgy homemade brownies for more tips.
Step 2: In a medium bowl, whisk together that melted butter and sugar until they’re buddies. It’s the start of something delicious!
Step 3: Now, toss in your two large eggs and that teaspoon of vanilla extract. Mix it all up until it looks nice and smooth. You’re doing great!
Step 4: Time for the dry stuff! Stir in the cocoa powder, flour, and salt. Just mix until everything is combined and you don’t see any flour streaks. Don’t overmix, though – a gentle hand is best here. For a different twist, maybe try my black cocoa brownies sometime! Or perhaps you’d love my chocolate chip cookie brownies too!
Step 5: Spread this glorious batter evenly into your prepared pan. Make sure it reaches all the corners so you get a nice, even brownie base. A little love goes a long way! If you’re curious about brownie variations, my easy banana bread brownies are also a hit.
Step 6: Bake for about 22 to 25 minutes. You want the center to look set, not jiggly. When it’s done, let those brownies cool completely. This is super important – if they’re warm, the mousse will melt right off! Patience is a virtue, especially with dessert. Need a smaller batch? My small batch brownies might be just the thing. And if you’re after that perfect crackly top, check out my crack brownies!
Step 7: While your brownies are getting nice and cool, let’s make the mousse! Heat 1/2 cup of the heavy whipping cream in a small saucepan. Just get it hot, like steaming, but definitely don’t let it boil.
Step 8: Pour that hot cream over the semisweet chocolate chips in a separate bowl. Let it sit for a couple of minutes to let the chocolate melt. Then, give it a good stir until it’s all smooth and glossy. Let this cool slightly. If you love all things chocolate, you might also enjoy my brownie hearts.
Step 9: In another clean bowl, beat the remaining heavy whipping cream with the powdered sugar until you get soft peaks. It should look light and fluffy, like a cloud!
Step 10: Gently fold that slightly cooled chocolate mixture into the whipped cream. Be gentle here – you want to keep that airy mousse texture. Fold until it’s all one beautiful color. This is where the magic happens, transforming it into a silky mousse.
Step 11: Spread this lovely chocolate mousse evenly over your completely cooled brownies. Smooth it out so you have a nice, even layer. It looks so good already!

Step 12: Pop the whole pan into the refrigerator for at least 2 hours. This lets the mousse set up perfectly. Seriously, the wait is worth it! For another delicious layered treat, you might like my chocolate chip cookie brownies recipe.
Serving Suggestions for Your Rich Chocolate Mousse Brownies
These decadent brownies are amazing on their own, but a few additions can make them even more special! Try these ideas:
Fresh Berries: A handful of fresh raspberries or strawberries cuts through the richness beautifully with their bright, tart flavor. My strawberry yogurt bark or strawberry ice cream would be divine alongside!
Raspberry Coulis: A simple drizzle of raspberry sauce adds a beautiful color and a burst of fruity goodness that just sings with chocolate.
A Tiny Scoop of Guacamole: Trust me on this one! A tiny spoonful of easy guacamole adds a surprising creamy, rich note that complements the chocolate. It sounds weird, but it works like magic!

Storage and Reheating Tips for Rich Chocolate Mousse Brownies
Keeping these Rich Chocolate Mousse Brownies fresh is pretty easy, but there are a few tricks I’ve learned. Since they have that lovely mousse topping, they *absolutely* need to live in the refrigerator. I’ve found they stay delicious for up to 4 days when stored in an airtight container. This is great for meal prep – you can make them a day or two ahead of when you plan to serve them!
Now, about reheating – honestly, you don’t want to! They’re best served chilled straight from the fridge. Microwaving would definitely mess with that wonderful mousse texture. But if you’re like me and sometimes forget to take them out ahead of time, just let them sit on the counter for about 15-20 minutes to take the chill off a bit so they aren’t rock solid. They remind me of some of the other fantastic no-bake desserts that are perfect year-round. And for more inspiration on lighter treats, check out these light summer desserts.
Frequently Asked Questions about Rich Chocolate Mousse Brownies
Can I make the brownie base ahead of time?
Absolutely! You can bake the brownie base a day or even two in advance, let it cool completely, and then cover it tightly. Then, all you have to do is make the mousse and spread it on when you’re ready. It’s a great way to break up the process. For more brownie baking tips, check out my chocolate mousse brownies recipe blog.
What’s the secret to that light, airy mousse?
The key is a gentle touch! When you fold the melted chocolate into the whipped cream, do it slowly and avoid overmixing. You want to keep all those lovely air bubbles that make the mousse so fluffy. Over-whipping the cream initially can also make it too stiff, so aim for soft peaks.
Can I use a different type of chocolate?
You definitely can! While semisweet chocolate chips are my favorite for that nice balance, you could try bittersweet chocolate for a more intense chocolate flavor. Just be aware that using a darker chocolate might make the mousse less sweet, so you might want to slightly increase the powdered sugar in the mousse if you go that route!
Enjoy Your Rich Chocolate Mousse Brownies!
I really hope you give these Rich Chocolate Mousse Brownies a try soon! They’re honestly one of my favorite desserts to whip up when I want something special but still manageable. Maybe serve them with a scoop of my easy strawberry ice cream or some strawberry yogurt bark! Let me know in the comments how yours turn out – I love seeing your creations! And if you enjoyed them, a quick share on Facebook or a pin on Pinterest would totally make my day!
Print
Rich Chocolate Mousse Brownies
- Total Time: 2 hours 45 minutes
- Yield: 9 brownies
- Diet: Vegetarian
Description
Fudgy homemade brownie base topped with light creamy chocolate mousse for a rich layered dessert.
Ingredients
- 1/2 cup unsalted butter, melted
- 1 cup granulated sugar
- 2 large eggs
- 1 teaspoon vanilla extract
- 1/3 cup unsweetened cocoa powder
- 1/2 cup all purpose flour
- 1/4 teaspoon salt
- 1 cup heavy whipping cream
- 1 cup semisweet chocolate chips
- 2 tablespoons powdered sugar
Instructions
- Preheat your oven to 350°F. Line an 8 x 8 inch baking pan with parchment paper.
- In a medium bowl, whisk together the melted butter and sugar.
- Add the eggs and vanilla extract, mixing until smooth.
- Stir in the cocoa powder, flour, and salt until fully combined.
- Spread the batter evenly into the prepared baking pan.
- Bake for 22 to 25 minutes until the center is set. Cool the brownies completely.
- Heat 1/2 cup of the heavy whipping cream in a small saucepan until hot but not boiling.
- Pour the hot cream over the chocolate chips and let sit for 2 minutes. Stir until smooth and cool slightly.
- In a separate bowl, beat the remaining heavy whipping cream and powdered sugar until soft peaks form.
- Fold the chocolate mixture gently into the whipped cream until fully combined.
- Spread the chocolate mousse evenly over the cooled brownies.
- Refrigerate for at least 2 hours before slicing and serving.
Notes
- Use a warm knife wiped clean between cuts for neat brownie slices.
- Prep Time: 20 min
- Cook Time: 25 min
- Category: Dessert
- Method: Baking
- Cuisine: American