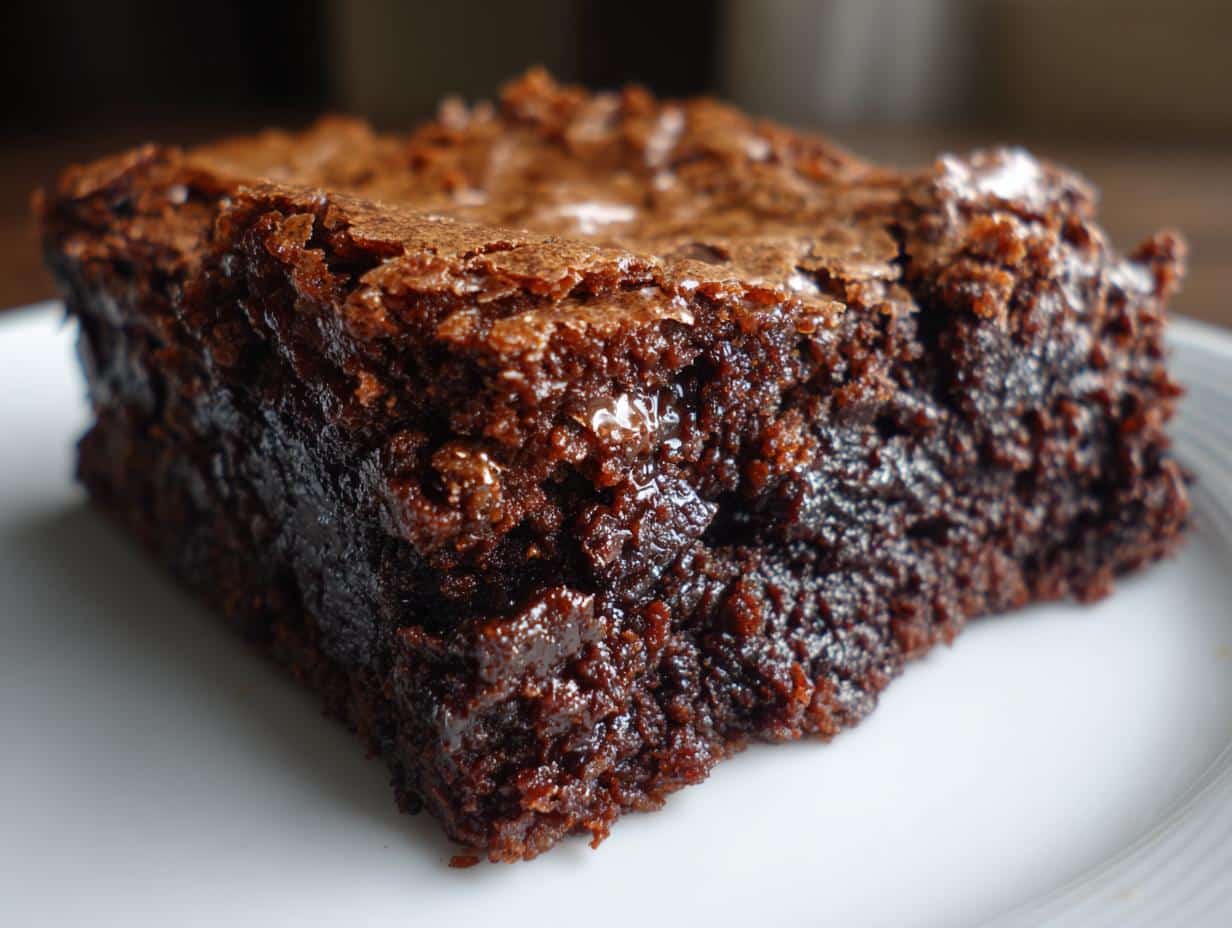
Oh, brownies! You know, there’s just something about a homemade brownie that store-bought stuff can never, ever touch. They’re rich, they’re decadent, and honestly, they’re just pure comfort. This fudgy homemade brownie recipe is my absolute go-to. It’s honestly so simple, and the results are just incredible. You get that perfect deep chocolate flavor and that irresistible gooey center every single time. Trust me, once you try these, you’ll never go back!
Why You’ll Love These Fudgy Homemade Brownies
Seriously, what’s not to love? These brownies are:
- Super rich and gooey – just like they should be!
- Incredibly easy to whip up, even on a weeknight.
- Guaranteed to be a crowd-pleaser for literally everyone.
- Packed with that deep, satisfying chocolate flavor you crave.
A Baker’s Journey: My Fudgy Homemade Brownies Story
I remember the first time I made these fudgy homemade brownies. It was for a friend’s birthday, and I was so nervous! I’d always bought them before, but I wanted to try making them myself. I followed this recipe, and when I pulled them out of the oven, the whole kitchen smelled like heaven. My friends devoured them in minutes, and I felt like a total baking rockstar! Now, they’re my secret weapon for any occasion, or just when I need a serious chocolate fix.
Gathering Your Ingredients for Fudgy Homemade Brownies
Okay, so to get these amazing fudgy homemade brownies to turn out just right, you really want to make sure you’ve got all your ducks in a row ingredient-wise. It’s not complicated, but using the good stuff makes all the difference, trust me! We’re talking good quality cocoa for that deep chocolate flavor, and the right kind of sugar to get that perfect chewy texture. Don’t skip the vanilla, it really rounds everything out. Here’s exactly what you’ll need to grab from your pantry or the store:
Essential Ingredients for Perfect Fudgy Homemade Brownies
| 1/2 cup unsalted butter, melted and slightly cooled |
| 1 cup granulated sugar |
| 1/2 cup packed light brown sugar |
| 2 large eggs, at room temperature |
| 1 teaspoon pure vanilla extract |
| 1/2 cup all-purpose flour |
| 1/3 cup unsweetened cocoa powder |
| 1/4 teaspoon salt |
Step-by-Step: Crafting Your Fudgy Homemade Brownies
Alright, let’s get down to business! Making these fudgy homemade brownies is honestly super straightforward, but there are a few little tricks that make them extra special. You want that perfect texture, right? That rich, gooey center? We’re going to get it. Just follow along!
Preparing Your Baking Station
First things first, let’s get our oven all fired up. You’ll want to preheat it to 350°F (that’s 175°C). While it’s warming up, grab your baking pan. An 8×8 inch square pan is perfect for this recipe. Now, you can either give it a good grease-up with butter or cooking spray, or my favorite trick for easy cleanup and guaranteed no-stick brownies: line it with parchment paper! Just let a little bit hang over the sides like little handles. This makes lifting the whole slab of brownies out so much easier later. Seriously, it’s a game-changer!

Mixing the Fudgy Brownie Batter
Okay, grab a medium-sized saucepan and melt your butter over low heat. You don’t want it to brown, just melt! Once it’s all liquid, take it off the heat and let it cool down just a tiny bit – we don’t want to cook our eggs. Now, into a mixing bowl, whisk together that slightly cooled melted butter with both the granulated sugar and the packed brown sugar. Whisk it until it looks nice and creamy, like a smooth, sweet river. Next, beat in your two large eggs, one at a time, making sure each one is mixed in before you add the next. Then, stir in that pure vanilla extract for extra flavor. In a separate bowl, give your flour, unsweetened cocoa powder, and salt a quick whisk or sift – this just helps get rid of any lumps. Now, gently fold those dry ingredients into the wet mixture. And here’s the super important part: **don’t overmix!** Just fold until you don’t see any more dry streaks. Overmixing makes brownies tough, and we want fudgy perfection!
Baking Your Fudgy Homemade Brownies to Perfection
Once your batter is all combined and looking gorgeous, pour it into that prepared 8×8 inch pan. Spread it out evenly so it fills the pan nicely. Now, into the preheated oven they go! You’ll want to bake them for about 20 to 25 minutes. How do you know they’re ready? The edges will start to look set, and the center might look a little soft, which is exactly what we want. The best way to check is with a toothpick. Stick a toothpick right into the center – if it comes out with some moist, fudgy crumbs clinging to it, they’re perfect! If it comes out totally clean, they might be a little overdone, and if it’s got wet batter, they need a few more minutes. Just keep an eye on them. Once they pass the toothpick test, take them out and let them cool completely in the pan. This is crucial for that fudgy texture!

Tips for Unforgettable Fudgy Homemade Brownies
You know, even with a great recipe, a few little things can make your fudgy homemade brownies go from good to absolutely mind-blowing. It’s all about those little details that really make a difference. I’ve learned a few tricks over the years that guarantee that perfect, rich, gooey texture every single time. Let’s make sure yours are just as amazing!
Achieving the Perfect Fudgy Texture
So, the secret to that signature fudgy texture really comes down to a few key things. First, make sure your eggs and butter are at room temperature – this helps them combine beautifully without needing to overmix. Speaking of mixing, when you add the dry ingredients, just fold them in until they’re *just* combined. Seriously, a few streaks of flour are better than overmixing, which can make your brownies cakey instead of fudgy. And when it comes to baking time, don’t bake them too long! That toothpick test is your best friend here – pull them out when you see those moist crumbs, not dry ones. That’s where the magic happens.
Cooling and Cutting Your Fudgy Brownies
This is honestly the hardest part – waiting! But you *have* to let your brownies cool completely in the pan before you even think about cutting them. If you try to cut them while they’re still warm, they’ll just crumble into a gooey mess (which, okay, might still taste good, but won’t look pretty!). Letting them cool allows them to set up properly, making them easier to slice and giving you those clean, sharp edges. I usually let mine cool for at least an hour, maybe even two. For the cleanest cuts, use a sharp knife, and wipe it clean between each slice. It makes all the difference!
Frequently Asked Questions about Fudgy Homemade Brownies
Got questions about making the best fudgy homemade brownies? I get it! Baking can be a science, but it’s also an art, and sometimes you just need a little clarification. Here are some of the things people ask me most often about this recipe.
How do I know when my fudgy brownies are done?
This is probably the biggest question! The key is that toothpick test. You want to insert a toothpick right into the center of the brownies. If it comes out with moist, fudgy crumbs clinging to it – not completely clean and not with wet batter – then they’re perfect! A completely clean toothpick means they might be a little overbaked and could end up dry. If there’s wet batter, they need a few more minutes. That little bit of moist crumb is exactly what gives you that signature fudgy texture.
Can I use different types of cocoa powder for these fudgy brownies?
For the best fudgy results, I always stick with unsweetened natural cocoa powder. It gives you that classic deep chocolate flavor. You *can* try Dutch-processed cocoa, but it can sometimes make the brownies a little less fudgy and more cake-like because it’s been alkalized. Stick with natural unsweetened for that rich, classic brownie taste!
How should I store leftover fudgy homemade brownies?
Storing these fudgy beauties is super simple! Once they’ve cooled completely, just pop them into an airtight container. You can keep them at room temperature for up to 3 days, and they’ll stay wonderfully moist. If you want them to last a bit longer, you can store them in the refrigerator, but let them come back to room temperature before you dive in so they don’t get too hard. Honestly, though, they usually disappear way before storage becomes an issue!
Understanding the Nutritional Information of Fudgy Homemade Brownies
Just so you know what you’re working with, here’s a little rundown of the estimated nutritional information for these delicious fudgy homemade brownies. Remember, these are just estimates, and they can vary a bit depending on exactly how you make them, but it gives you a good idea!
Estimated Nutritional Information Per Serving
| Serving Size | 1 brownie |
| Calories | 200 kcal |
| Fat | 11 g |
| Saturated Fat | 7 g |
| Unsaturated Fat | 4 g |
| Trans Fat | 0 g |
| Carbohydrates | 25 g |
| Fiber | 2 g |
| Sugar | 25 g |
| Protein | 3 g |
| Cholesterol | 45 mg |
| Sodium | 100 mg |
Serving and Storing Your Delicious Fudgy Homemade Brownies
Okay, so you’ve baked them, you’ve cooled them, and now it’s time for the best part: enjoying them! These fudgy homemade brownies are honestly amazing all on their own. Seriously, just a plain brownie can be pure bliss. But if you’re feeling fancy, they are *divine* with a cold glass of milk, or maybe a scoop of vanilla ice cream melting into that gooey center. A cup of hot coffee or tea is also a perfect companion for these rich chocolate treats!
Delicious Ways to Serve Fudgy Homemade Brownies
Honestly, these brownies are stars all by themselves! But if you want to take them up a notch, try them warm with a scoop of vanilla bean ice cream – the contrast is just heavenly. A little sprinkle of sea salt on top before serving can also really make that chocolate flavor pop. They’re also great for dunking into a hot beverage like coffee or tea. But really, don’t overthink it; they’re perfect just as they are!
Keeping Your Fudgy Homemade Brownies Fresh
Now, if by some miracle you have leftovers, you’ll want to store them properly to keep that fudgy texture. Once they’re completely cool, pop them into an airtight container. You can keep them at room temperature for about 3-4 days, and they’ll stay nice and moist. If you want them to last even longer, stash them in the fridge, but definitely let them warm up a bit before you eat them so they don’t get too firm. You can even freeze them! Wrap them up really well in plastic wrap, then maybe a layer of foil or a freezer bag. They’ll keep for a couple of months that way, just thaw them on the counter when a craving strikes!


Amazing Fudgy Homemade Brownies: 1 Secret
- Total Time: 40 minutes
- Yield: 16 brownies
- Diet: Vegetarian
Description
Rich and gooey homemade brownies, simple enough for your family to love.
Ingredients
- 1/2 cup unsalted butter
- 1 cup granulated sugar
- 1/2 cup brown sugar
- 2 large eggs
- 1 tsp vanilla extract
- 1/2 cup all-purpose flour
- 1/3 cup unsweetened cocoa powder
- 1/4 tsp salt
Instructions
- Preheat oven to 350°F (175°C). Grease an 8×8 inch baking pan or line with parchment paper.
- Melt butter in a saucepan over low heat. Remove from heat and let cool slightly.
- In a bowl, whisk together melted butter, granulated sugar, and brown sugar until creamy.
- Beat in eggs one at a time, then stir in vanilla extract.
- In a separate bowl, sift together flour, cocoa powder, and salt. Gently fold dry ingredients into wet ingredients until just combined. Do not overmix.
- Pour batter into prepared pan. Bake for 20-25 minutes, or until a toothpick inserted into the center comes out with moist crumbs. Let cool before cutting.
Notes
- For easy removal, line the baking pan with parchment paper.
- A toothpick inserted into the center should come out with moist, fudgy crumbs for doneness.
- Prep Time: 15 minutes
- Cook Time: 25 minutes
- Category: Dessert
- Method: Baking
- Cuisine: American