No heading needs to be written for the introduction. If you’ve ever looked at a tray of brownies and thought, “I could never get that perfect crackly top with the rich, fudgy center,” then stop right there! I’m here to tell you that making spectacular **Brownie Hearts** is totally achievable, even if your oven only recently stopped being scary. This isn’t some fussy, complicated recipe that requires artisanal chocolate imported from a mountaintop. Nope! This recipe uses simple melting techniques to build incredible depth of flavor right from the start.
We’re talking about brownies so rich they practically melt in your mouth, topped with a gorgeous pink drizzle that makes them look fancy. But trust me, the process is surprisingly straightforward. I’ve tinkered with this formula until it’s foolproof, meaning even if you’re new to baking, you’re going to end up with those dense, intensely chocolatey squares—or in our case, perfect little hearts—every single time. Get ready for your new favorite chocolate fix! 
Why This Brownie Hearts Recipe is a Beginner Favorite
When I first started baking, brownies were my nemesis. They always turned out cakey, or worse, raw in the middle. I almost gave up entirely! But this recipe was the turning point for me. It relies on melted chocolate and butter, not creaming, which cuts down on technique worry right away. You just mix, pour, and bake.
The beauty of these **Brownie Hearts** is the guaranteed result. When you cool them completely, they cut out so cleanly! I’ve made these for friends who swore they couldn’t bake a thing, and they brought them back empty, asking for the recipe. Seriously, the fudgy texture is non-negotiable here, and this method locks it in every time. It’s pure chocolate confidence in an 8×8 pan.
Gathering Your Ingredients for Perfect Brownie Hearts
Alright, let’s get organized! The secret to these intensely fudgy **Brownie Hearts** starts the moment you pull out your measuring cups. Because this recipe relies so heavily on the quality of the chocolate, taking a moment to gather the right stuff makes all the difference. Don’t try to cheat on the chocolate bar itself; that melted goodness is what creates that signature dense texture we’re after.
I always lay everything out on the counter before I even turn the oven on. It saves so much panic later on when you realize you’re missing the salt or the vanilla. We need two kinds of chocolate for this, plus a few things for our pretty pink topping later. Trust me, having everything ready means you can focus on the mixing, which is the fun part! 
Essential Components for Fudgy Brownie Hearts
When you look at the list, you’ll see we have ingredients for the base and then a separate set for the drizzle. Pay close attention to the eggs—they must be large! Also, for the best dark color and flavor, we are definitely using Dutch process cocoa powder today. That’s non-negotiable for that deep chocolate punch.
Ingredient Table
| Ingredient | Amount | Notes |
|---|---|---|
| Unsalted Butter | 10 tablespoons | Plus a little extra for greasing |
| Semi-Sweet Chocolate Bar | 4 ounces | Roughly chopped for melting |
| Granulated Sugar | 1 cup | For structure and sweetness |
| Large Eggs | 2 | Must be large, room temperature is best |
| Alcohol-Free Vanilla Flavoring | 1 teaspoon | Use alcohol-free if you prefer |
| All-Purpose Flour | 2/3 cup | Sifted before measuring is ideal |
| Dutch Process Cocoa Powder | 1/4 cup | For that deep, dark color |
| Fine Sea Salt | 1/2 teaspoon | Don’t skip this; it balances the sugar! |
| Semi-Sweet Chocolate Chips | 1/2 cup | Stirred into the batter |
| White Chocolate Chips | 1/2 cup | For the pink drizzle |
| Coconut Oil | 1 teaspoon | Helps the drizzle stay smooth |
| Pink Gel Food Coloring | 2 drops | Gel works better than liquid |
Ingredient Notes and Substitutions
I want to stress the cocoa powder here. Regular cocoa works in a pinch, but Dutch process cocoa gives you that super dark, almost black color and a much smoother, less acidic chocolate flavor, which is perfect for fudgy brownies. Also, please use alcohol-free vanilla extract if you have kids helping out; we want the chocolate flavor to shine through, not alcohol notes!
For the drizzle, the coconut oil is key when melting the white chocolate chips. It keeps the mixture from seizing up into a hard lump, ensuring you get a lovely, pourable ribbon over your cooled **Brownie Hearts**.
Preparing the Ultimate Brownie Hearts Batter
Now for the fun part—making the batter! This is where we build that incredible fudgy foundation. Remember, we’re not creaming butter and sugar like we would for a cake; we are melting things together for density. The whole process moves pretty quickly once you get into the rhythm. Just make sure you have that 8×8 pan lined and ready to go, because once that chocolate melts, things move fast!
Melting Chocolate and Butter Base
First things first, we need that rich chocolate base. Chop up your semi-sweet chocolate bar into smaller pieces; this helps it melt evenly. Pop the chopped chocolate and the butter into a heatproof bowl. I always use the microwave for this because it’s fast and requires less cleanup than a double boiler. Zap it in 30-second bursts. Don’t walk away! After each burst, give it a really good stir. Keep going until it looks completely smooth and glossy, like thick, melted velvet. If you burn it even a little, you’ll taste it, so stir often!
Creating the Glossy Egg Mixture for Brownie Hearts
While that chocolate mixture is cooling just slightly—we don’t want to scramble those eggs—move to your second bowl. This step is crucial for the crackly top! You need to whisk the sugar vigorously with your two large eggs. I mean *really* whisk. You’re aiming for pale yellow and thick, which usually takes a solid three minutes of dedicated beating. If you stop too soon, your **Brownie Hearts** won’t get that beautiful shiny crust on top. Keep whisking until you feel the mixture lighten up under your whisk.
Folding Techniques for Fudgy Texture
Once the egg mixture looks glossy, pour in that slightly cooled chocolate mixture and the vanilla. Whisk just enough to incorporate everything beautifully. Now, the most important part for fudgy results: the dry ingredients. Sift the flour, cocoa powder, and salt right over the top. Grab your rubber spatula and fold gently! I cannot stress this enough: fold, don’t stir! You are just trying to incorporate the flour until you see no white streaks left. Overmixing develops gluten, and gluten makes a cakey brownie. We want fudgy, so fold minimally. Finally, stir in those extra chocolate chips just until they are evenly spaced throughout the batter.
Baking and Cooling Your Brownie Hearts Slab
Okay, the batter is ready, and our oven should be preheated to 350°F. Remember that parchment paper overhang we put in the 8×8 pan? That’s your best friend for lifting the whole slab out later! Spread that gorgeous, thick batter into the pan evenly. We’re looking for a bake time of about 25 minutes.
During baking, keep an eye on the edges; they should start to look set. But don’t trust just your eyes! You need to check the internal temperature—aim for 160°F. If you don’t have a thermometer, a toothpick inserted should come out with moist crumbs attached, not pure wet batter. When it hits that mark, pull it out immediately! These **Brownie Hearts** need to cool completely in the pan. Seriously, don’t rush this. If you try to cut them warm, you’ll just get chocolate soup, and we want perfect shapes!
Cutting and Decorating Your Brownie Hearts
This is the moment of truth! If you managed to keep your hands off the warm brownie slab—and I know that is the hardest part—you are rewarded now with a perfectly set, intensely chocolatey square. The cooling process firms up all that melted chocolate we used, making the structure stable enough for cutting. If you skip the cooling, you’ll just smudge the fudgy goodness everywhere, and your **Brownie Hearts** won’t look nearly as sharp as they should!
Once totally cool, use the parchment overhang to lift the entire slab out onto a cutting board. Now you can use your heart-shaped cutter. Press down firmly and cleanly. If the cutter sticks, run the bottom under hot water for just a second, wipe it dry, and try again. This two-step process ensures you get beautiful, defined shapes ready for decoration.
Mastering the Heart Shape Cut
I’m going to say it again because it’s that important: Complete cooling is your secret weapon for clean edges! If you cut them prematurely, the soft interior drags, and your hearts look ragged. Wait until they are completely cooled to room temperature—I sometimes even chill mine in the fridge for 30 minutes before cutting. This extra chill time makes the chocolate base firm up perfectly, giving you those crisp, professional-looking edges on every single **Brownie Heart**.
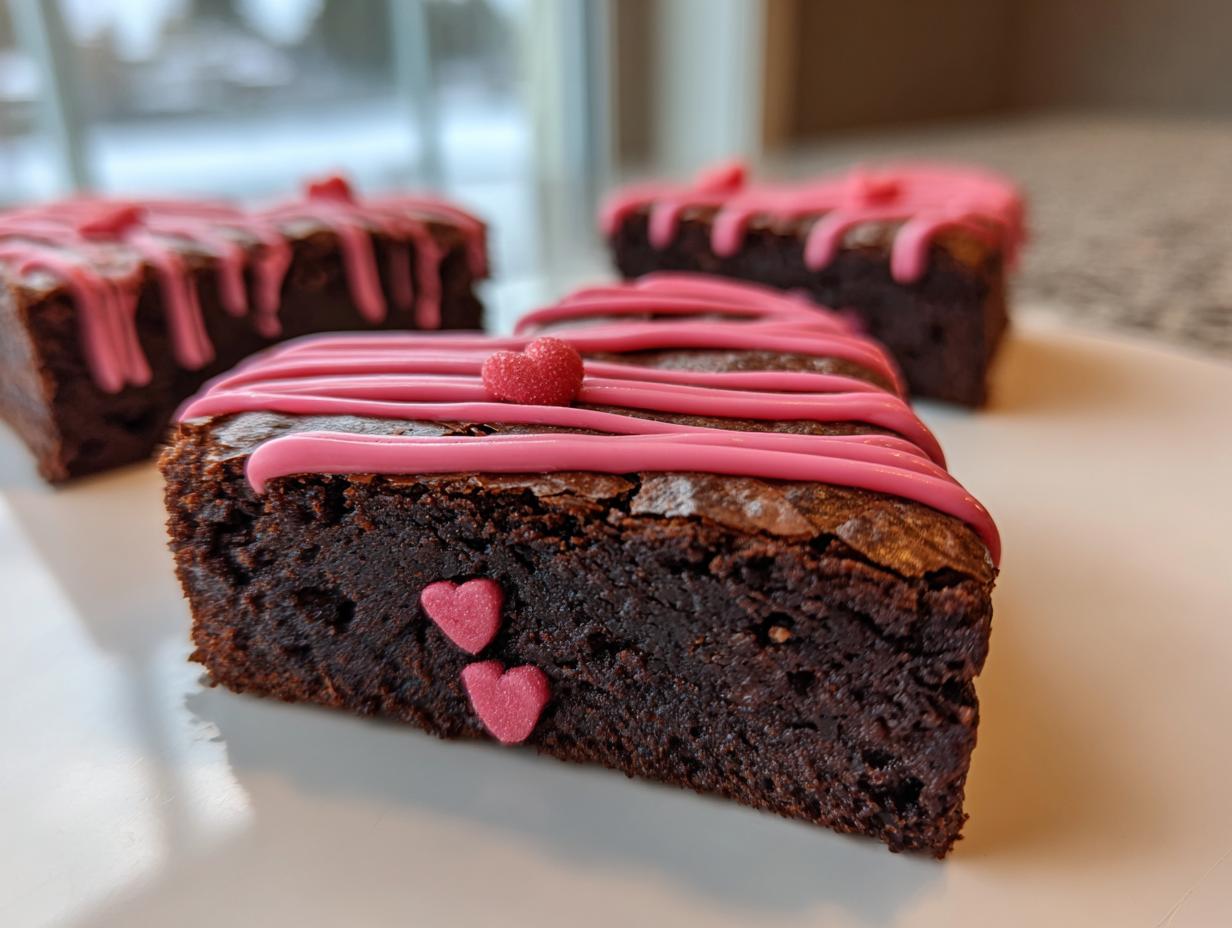
Creating the Smooth Pink Chocolate Drizzle for Brownie Hearts
Time to make them pretty! We are using white chocolate chips for our pink color. Melt the white chocolate chips together with that tiny bit of coconut oil. Again, use short bursts in the microwave, stirring well between each time, because white chocolate burns faster than the semi-sweet stuff. Once it’s smooth, take it off the heat and stir in just two drops of pink gel food coloring. Gel coloring is best because it won’t thin out your chocolate too much. You want a thick, luxurious pink ribbon. Drizzle this right over the tops of your cut-out hearts. It sets up quickly, giving you that final pop of color!
Tips for Success with Brownie Hearts
Baking these rich **Brownie Hearts** is easy, but avoiding common pitfalls guarantees that perfect fudgy texture. My biggest tip, which I learned the hard way, is about pan preparation. Don’t rely just on butter and flour for an 8×8 pan; the sugar content makes them prone to sticking. Always use that parchment paper sling with an overhang on all sides. It’s your safety net for getting the whole slab out in one piece.
Secondly, when checking for doneness, remember that these are meant to be fudgy—they shouldn’t come out dry! If your toothpick looks totally clean, the brownies are probably overbaked, and you’ll lose that melt-in-your-mouth center. Aim for moist crumbs clinging to the stick, and trust the 160°F internal temperature check if you have a thermometer. That little bit of residual heat will finish cooking them as they cool, ensuring you get the best, fudgiest **Brownie Hearts** possible!
Storing and Reheating Your Brownie Hearts
These are best eaten the day you make them, but honestly, they stay wonderfully fudgy for days if you store them right. The key is keeping the air out so they don’t dry around the edges. I keep mine in a single layer if I can, or separated by parchment paper if I have to stack them. They are so decadent, you probably won’t have many left over anyway!
Storage Table
| Condition | Duration | Notes |
|---|---|---|
| Airtight Container (Room Temp) | 3-4 days | Keeps the fudginess locked in |
| Airtight Container (Refrigerator) | Up to 1 week | May firm up slightly |
| Reheating Tip | 10 seconds in the microwave | Makes the chocolate chips gooey again |
Frequently Asked Questions About Brownie Hearts
I know you might have a few lingering questions before you dive into making these, so I gathered the ones I hear most often. Getting these little details right is what separates a good brownie from a truly spectacular, fudgy one. Don’t worry if you mess up the first time; baking is all about learning!
Can I make these Brownie Hearts ahead of time?
Yes, you absolutely can! In fact, I think they taste even better the next day once all those chocolate flavors have settled in. Cool them completely, cut them into your **Brownie Hearts**, and store them in an airtight container at room temperature. They stay wonderfully moist for at least three days. If you need them for a party, this is a lifesaver!
What cutter size works best for this pan?
Since we get nine brownies out of this 8×8 pan, you are aiming for three rows of three. If you use a standard, medium-sized heart cutter—about 2.5 to 3 inches across—you should get nine clean shapes with minimal scraps. If your cutter is a little bigger, you might only get six or seven, but those scraps are still delicious for taste-testing!
Why are my Brownie Hearts not fudgy?
If your **Brownie Hearts** came out cakey instead of fudgy, I can almost guarantee it was one of two things. First, you might have overmixed after adding the flour; remember, we only fold until the streaks disappear! Second, you might have overbaked them slightly. Always pull them when the toothpick still has moist crumbs attached. That slight underbaking is what guarantees that beautiful, dense, melt-in-your-mouth texture.
Share Your Perfect Brownie Hearts
I truly hope you loved making this recipe as much as I love sharing it with you! Now that you’ve experienced the fudgy magic of these **Brownie Hearts**, I’d love to know what you thought. Did they turn out perfectly crackly on top? Let me know how they tasted in the comments below, and feel free to share a picture of your beautiful pink drizzle! You can also follow along for more great recipes on Facebook or save this idea on Pinterest.
Print
Guaranteed 9 Fudgy Brownie Hearts Tastes Great
- Total Time: 50 minutes
- Yield: 9 brownies
- Diet: Omnivore
Description
Bake rich, fudgy brownie hearts with a crackly top and a smooth pink chocolate drizzle. This dessert uses melted chocolate and butter for an ultra-rich texture.
Ingredients
- 10 tablespoons unsalted butter
- 4 ounces semi-sweet chocolate bar
- 1 cup granulated sugar
- 2 large eggs
- 1 teaspoon alcohol-free vanilla flavoring
- 2/3 cup all-purpose flour
- 1/4 cup Dutch process cocoa powder
- 1/2 teaspoon fine sea salt
- 1/2 cup semi-sweet chocolate chips
- 1/2 cup white chocolate chips
- 1 teaspoon coconut oil
- 2 drops pink gel food coloring
Instructions
- Preheat your oven to 350°F. Line an 8 by 8 inch square baking pan with parchment paper, leaving an overhang on all sides.
- Chop the semi-sweet chocolate bar roughly. Place it in a heatproof bowl with the butter.
- Melt the butter and chocolate in the microwave in 30 second intervals, stirring thoroughly between each burst until completely smooth.
- Whisk the sugar and eggs in a separate large bowl vigorously for 3 minutes until the mixture turns pale yellow and thickens.
- Pour the slightly cooled melted chocolate mixture and alcohol-free vanilla flavoring into the egg mixture and whisk until glossy.
- Sift the all-purpose flour, Dutch process cocoa powder, and sea salt directly into the wet ingredients.
- Fold the dry ingredients gently with a rubber spatula just until no streaks of flour remain.
- Stir in the semi-sweet chocolate chips until they are evenly distributed.
- Spread the batter into the prepared pan in an even layer. Bake for 25 minutes.
- Check that the edges are set and the internal temperature reaches 160°F. Remove from the oven.
- Cool the brownie slab completely in the pan. Lift it out using the parchment paper.
- Press a heart shaped cutter into the brownies. Drizzle with white chocolate chips melted with coconut oil and pink coloring.
Notes
- Cool the brownies completely before cutting to ensure clean heart shapes.
- Use Dutch process cocoa for a darker color and smoother flavor.
- Prep Time: 25 minutes
- Cook Time: 25 minutes
- Category: Dessert
- Method: Baking
- Cuisine: American