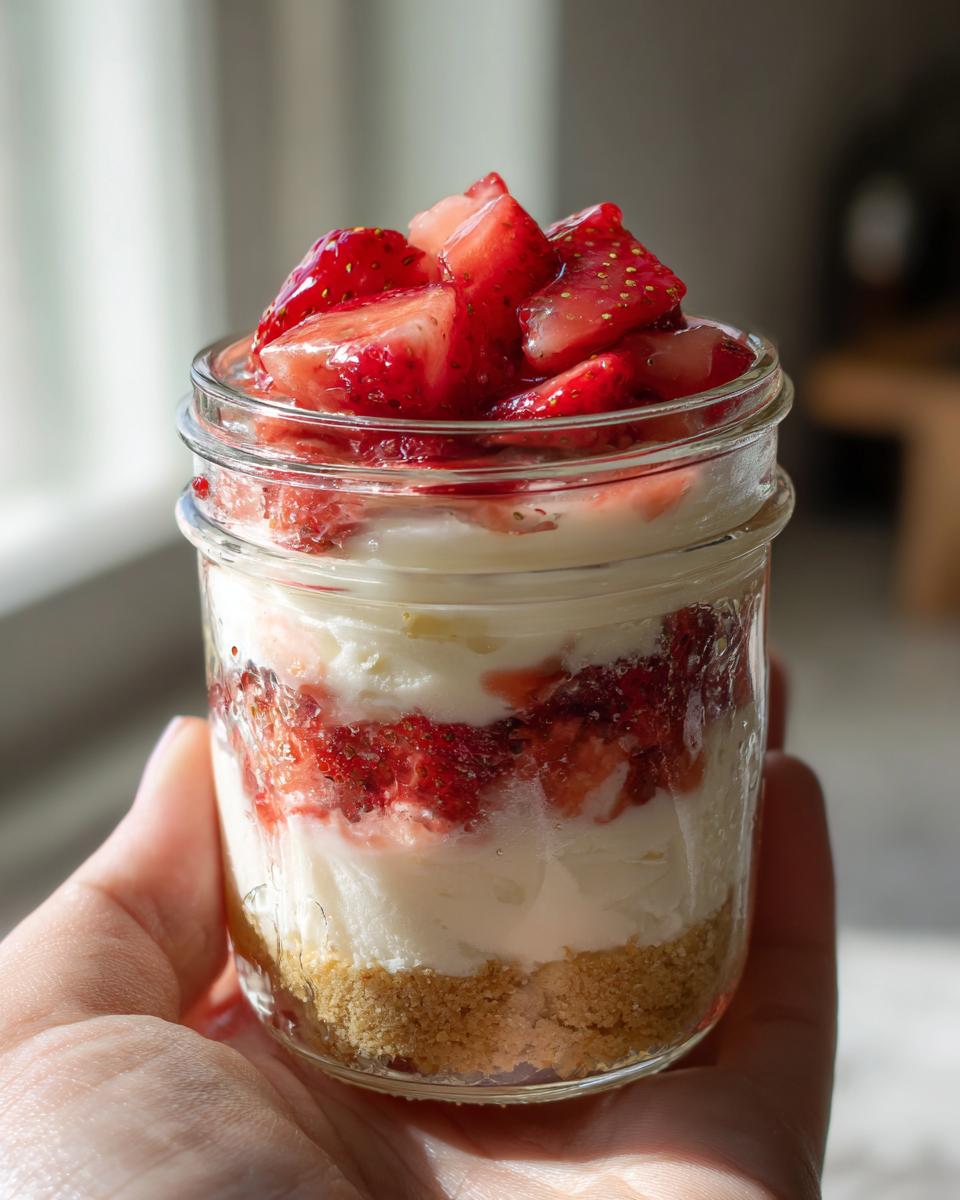
If you need a dessert that looks elegant but requires absolutely zero oven time, you’ve come to the right place! I always keep a batch of these strawberry cheesecake jars in the fridge for those unexpected company moments. Last week, my neighbor popped over needing a quick sweet fix, and I pulled these gorgeous layers right out of the cooler—she thought I’d spent hours on them!
The best part is how easy the layering is, and having them in individual jars means zero slicing mess later. Seriously, you get that perfect bite of buttery crust, cool cream cheese, and bright strawberries every single time. Keep reading because I’m sharing my secret for folding the cream just right to keep these totally light and airy.

Why You Will Love These No Bake strawberry cheesecake jars
Honestly, these are my secret weapon for summer potlucks. The fact that you don’t have to turn on a single burner or oven is reason enough to love them, but the individual servings make serving so much easier!
When I first started making these during a massive heatwave last July, I realized how much stress they took out of entertaining. Everyone gets their own perfectly portioned treat, and they look so impressive sitting on a platter.
- Absolutely No Bake required, saving you time and keeping the kitchen cool.
- Super fast prep time—you can mix up the layers in under 20 minutes!
- Portion control is built right in since they are served in individual jars.
- They hold up beautifully in the fridge for impromptu sweet cravings.
I’ve served these at three different neighborhood gatherings, and they disappear first every time. Making these ahead of time is a game-changer for hosting, which is why I always share this recipe when people ask for easy desserts like those listed here: 12 No Bake Desserts for Hot Summer Days.
Gathering Ingredients for Your strawberry cheesecake jars
When making no bake recipes, the quality of your ingredients really shouts through since there’s no oven magic to hide anything! Focus especially on getting good, full-fat heavy whipping cream; low-fat just won’t whip up right for the texture we need here.
It’s all about these individual layers, so make sure you’ve got everything measured out before you start assembling your strawberry cheesecake jars. Don’t grab the cream cheese straight from the fridge, though; that’s the biggest mistake people make. It has to be completely soft so you don’t end up with little lumps in your gorgeous filling.
For the Graham Cracker Base
- 1.5 cups graham cracker crumbs (make sure they are fine!)
- 0.25 cup melted butter
- 2 tablespoons granulated sugar
For the Creamy Cheesecake Filling
- 8 ounces cream cheese, make sure it’s nice and soft
- 0.5 cup powdered sugar
- 1 teaspoon vanilla extract
- 1 cup heavy whipping cream (Full fat is the secret sauce here!)
For the Fresh Strawberry Topping
- 2 cups fresh strawberries, make sure they are nicely diced
- 2 tablespoons granulated sugar
- 1 teaspoon lemon juice
Assembling Perfect strawberry cheesecake jars Step-by-Step
This is the fun part where everything comes together! Remember my note about chilling between layers? It makes such a difference for sharp, clean lines in your jars, so try to take those little breaks!
Step 1: Prepare the Base Crust. In a medium bowl, mix your graham cracker crumbs, the melted butter, and the 2 tablespoons of granulated sugar until everything looks like wet sand. Don’t overmix; just get it combined evenly.
Step 2: Set the First Layer. Divide this crumb mixture evenly among your 6 jars. Use the back of a small spoon or a tiny measuring cup to gently press the mixture down to create a dense, solid base. I usually put these in the fridge while I work on the filling, maybe 15 minutes, just to help them firm up.
Step 3: Make the Cheesecake Filling Base. Get your softened cream cheese in a stand mixer or a large bowl. Beat it until it’s completely smooth—this is crucial! Then, beat in your powdered sugar and vanilla extract until it’s one uniform, creamy mixture. No lumps allowed!
Step 4: Whip the Cream. In a separate, very clean bowl (any grease will stop this from whipping!), whip your heavy cream until you achieve stiff peaks. You want it able to hold its shape when you lift the whisk. This adds all the airy texture to our filling.
Step 5: Gently Fold. Take about one-third of that whipped cream and fold it gently into the cream cheese mixture to lighten it up. Then, fold in the remaining whipped cream until everything is just combined and looks light and fluffy. Be gentle here; we don’t want to deflate all that air we just created!
Step 6: Layer the Filling. Spoon or pipe this glorious cheesecake filling right over the crust layer in each jar. If you use a piping bag with a wide tip, you get a much cleaner look. Once layered, pop these back into the fridge for another 15 minutes. This chilling time is so helpful before adding the wet strawberries!

Step 7: Prepare the Strawberry Syrup. While the jars chill, combine your diced strawberries, the remaining 2 tablespoons of sugar, and the lemon juice in a small bowl. Give it a quick stir and let it sit on the counter for about 10 minutes while the filling sets. The sugar will pull the juices out, creating a wonderful little syrup.
Step 8: Top and Finish. Once the filling is slightly firm, spoon that gorgeous strawberry mixture evenly over the top of your cheesecake layer in all the jars. This recipe works best when you give it a final chill! You need to refrigerate your wonderful strawberry cheesecake jars for at least 2 hours before serving so everything sets up properly. If you have time, letting them chill overnight makes the flavors even better!
If you’re looking for more individual dessert inspiration, check out my thoughts on No Bake Strawberry Cheesecake Cups for a slightly different presentation style.
Expert Tips for Next-Level strawberry cheesecake jars
I’ve learned a few things over the years trying to make these look picture-perfect, especially when I’m in a rush. Trust me, taking these extra little steps really pays off on presentation!
Presentation is everything here. If you want those clean, professional-looking layers, you absolutely must use a piping bag fitted with a large, round tip to put in the cheesecake filling. Spooning always ends up messy and drags the crumbs up into the white layer, which ruins the look!
When folding in that whipped cream, you have to be gentle—think like you’re tucking a baby into bed. If you’re too aggressive, you lose all the air, and the filling goes from light and fluffy to dense, sort of like soft putty. I once rushed this step because the kids were starving, and it honestly tasted fine, but the texture was just heavy. Lesson learned!
Also, if you are trying to incorporate more bright flavors, swapping out some of the strawberries for fresh raspberries or pairing them with a hint of citrus is fantastic. These go really well with other bright flavors, kind of like the ones I talk about in my favorite strawberry lemon desserts!
Serving Suggestions for Your strawberry cheesecake jars
Since these jars are rich and creamy, you want accompaniments that cut through that sweetness perfectly. Keep it light and refreshing!
These individual desserts are pretty much a complete treat on their own, but sometimes you need a little something extra on the side, especially if you’re serving them after a big meal. I always lean towards things that are either light and bubbly or require no extra cooking.
Iced Coffee or Cold Brew: The slight bitterness of a strong black coffee really complements the sweet strawberry and buttery crust without adding more sugar to the mix. It’s perfect for an evening treat.
Sparkling Lemonade Mocktails: If you need a fun summer pairing, making up a homemade sparkling lemonade or one of the simple summer mocktails I’ve shared cuts through the richness nicely. Plus, they look just as pretty!
Simple Vanilla Wafer Cookies: If you absolutely must have another crunchy item, skip the heavy chocolate chip cookies and opt for plain vanilla wafers. They offer a nice textural difference without fighting the dominant strawberry cheesecake flavor.
Storing and Reheating Your beautiful strawberry cheesecake jars
This is where the jar presentation really shines because these are fantastic for meal prepping! The only thing you need to remember is that these are definitely not getting reheated.
Because these are packed with fresh dairy and fruit, we keep them strictly cold. They need that minimum two-hour chill time after assembly, but honestly, they taste even better after they’ve sat in the fridge overnight. The crust gets slightly softer and melds beautifully with the filling.
If you’re making these ahead of time—which I highly recommend for easy grab-and-go snacks—they hold up perfectly in the fridge for about three days, provided you keep the lids sealed tight. I usually make a triple batch on Sunday night when I’m doing other container prep, like for my quick protein snack boxes.
Crucially, we don’t reheat these at all! There’s no baking involved, so warming them up would just melt the cream cheese into soup, which sounds a little scary, right? Freezing is an option, though! If you plan to freeze them, only freeze the crust and filling layers; add the strawberry topping right before you serve them once they thaw.
Frequently Asked Questions About strawberry cheesecake jars
I get asked constantly about switching things up in these jars, mostly because people have allergy concerns or just run out of graham crackers halfway through a recipe. Don’t panic if you need a substitute!
Can I use something other than graham crackers for the crust?
Yes, absolutely! If you run out of graham crackers, vanilla wafers or even shortbread cookies work really well for the base of your no bake cheesecake. You might need slightly less melted butter if you switch to a pre-sweetened cookie, so start by mixing just half the butter in and then add more as needed to get that perfect sand texture.
How far ahead of time can I assemble these individual desserts?
I find that the sweet spot for the perfect texture is prepping them the day before serving, maybe 12 to 24 hours out. This gives the crust a little time to soften slightly but keeps the whipped topping firm. If you go beyond two days, the fresh strawberries might start breaking down too much, even with the chilling time.
Do I need to use a piping bag for the filling?
While I recommend it for the prettiest look, you definitely don’t have to. If you don’t have a piping bag, just use two spoons for layering the cheesecake filling. Just be careful when spooning the layer over the crust so you don’t disturb it too much before setting. These are for eating, not just looking at, after all! If you need more layered ideas, take a look at some other great dessert cakes recipes.
Enjoy Making These Simple strawberry cheesecake jars
I really hope you give these strawberry cheesecake jars a try soon! They are so satisfying to pull out of the fridge when you need a quick but fancy-feeling treat. Snap a picture of your beautiful layers and let me know how they turned out in the comments below, or leave me a star rating so I know you loved them!
Print
No Bake Strawberry Cheesecake Jars
- Total Time: 20 min
- Yield: 6 servings
- Diet: Vegetarian
Description
Simple no bake dessert layered with a buttery graham cracker base, creamy cheesecake filling, and fresh strawberry topping in individual jars.
Ingredients
- 1.5 cups graham cracker crumbs
- 0.25 cup melted butter
- 2 tablespoons granulated sugar
- 8 ounces cream cheese, softened
- 0.5 cup powdered sugar
- 1 teaspoon vanilla extract
- 1 cup heavy whipping cream
- 2 cups fresh strawberries, diced
- 2 tablespoons granulated sugar
- 1 teaspoon lemon juice
Instructions
- Mix graham cracker crumbs, melted butter, and granulated sugar until evenly combined. Divide the mixture between jars and press gently to form the base.
- Beat the cream cheese until smooth. Add powdered sugar and vanilla extract and mix until creamy.
- Whip the heavy cream until stiff peaks form, then fold it into the cream cheese mixture until light and fluffy.
- Spoon or pipe the cheesecake filling over the graham cracker layer in each jar.
- Combine diced strawberries, granulated sugar, and lemon juice in a small bowl. Let sit for 10 minutes until slightly syrupy.
- Spoon the strawberry mixture over the cheesecake layer.
- Chill the jars in the refrigerator for at least 2 hours before serving.
Notes
- Chill between each step for about 15 minutes before adding the next layer for cleaner layers.
- Prep Time: 20 min
- Cook Time: 0 min
- Category: Dessert
- Method: No Bake
- Cuisine: American