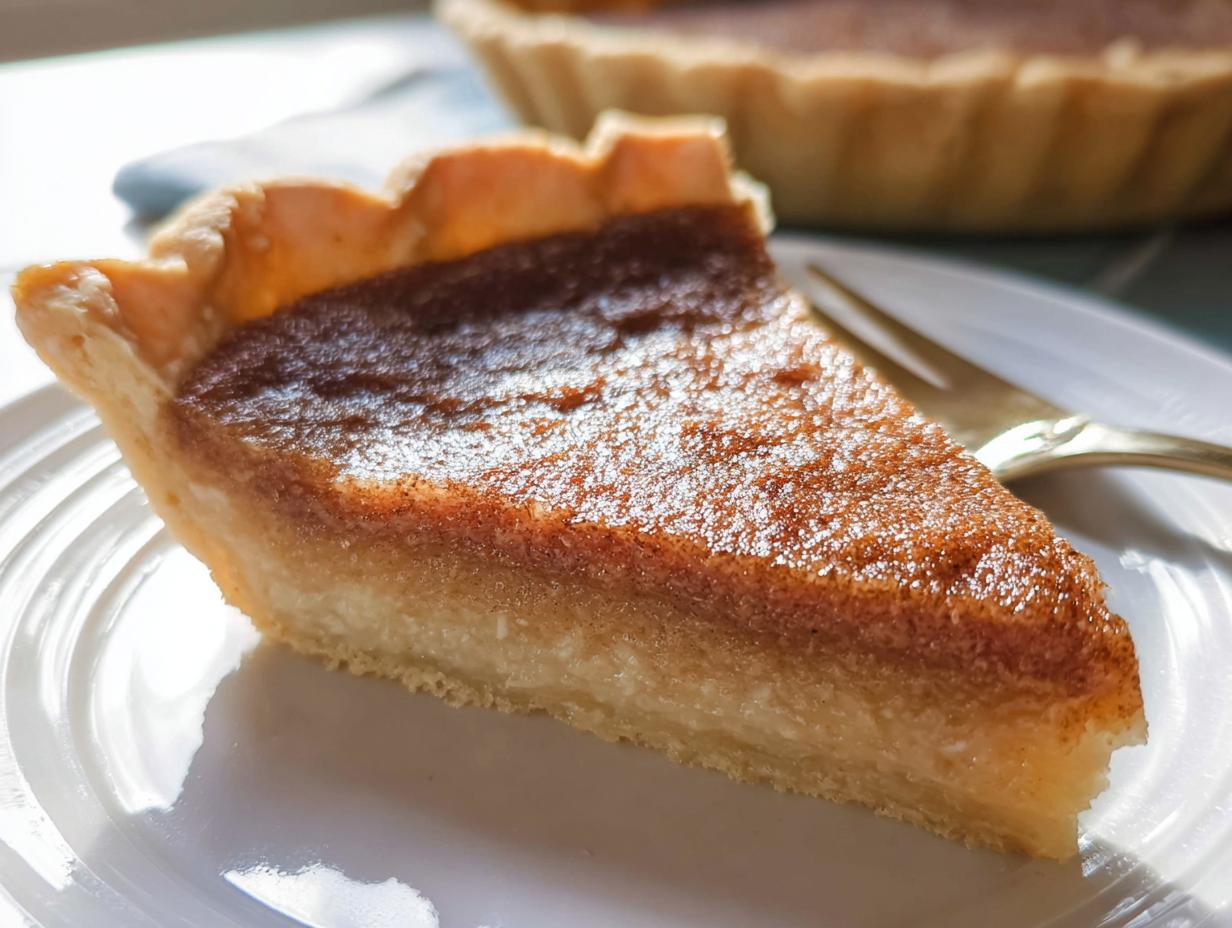
Listen, if you’ve ever looked at a traditional pumpkin pie and thought, “That seems like a lot of work for one dessert,” I have *the* answer for you. This Apple Butter Pie With Custard Style Filling is going to change your holiday baking game forever. Seriously, it’s so simple, I almost feel guilty calling it a recipe!
When I first started baking—and trust me, there were some kitchen disasters back then—custard pies felt intimidating. I thought you needed complicated techniques to get that perfect, silky texture. But this recipe cracked the code. It uses rich, concentrated apple butter instead of mashed pumpkin, giving you that deep, spiced flavor we all crave in the fall, but with way less fuss.
It’s really my go-to for when I need a showstopper dessert but only have about ten minutes to actually assemble it. You just whisk everything together, pour it in, and bake. That’s it! I’ve tested this a dozen times to make sure the ratios of eggs to milk are spot-on, so you get that beautiful, firm-but-creamy set every single time, just like a classic custard. Welcome to your new favorite easy apple dessert!

Why You’ll Love This Apple Butter Pie With Custard Style Filling
Honestly, what’s not to love here? This pie is pure efficiency wrapped in autumn spice. You get that deep, intense apple flavor that usually takes hours of simmering down apples, all thanks to the magic of apple butter. It’s rich, it’s smooth, and frankly, it tastes way more complicated than it is.
The texture is the real star—it sets up beautifully firm yet melts in your mouth, just like a perfect custard pie. If you think baking is hard, this Apple Butter Pie With Custard Style Filling proves you wrong. It’s fast, it’s foolproof, and it’s ready to impress.
Quick Preparation Timeline
This is where this recipe really shines, especially if you’re new to baking or just running short on time. You truly only need about ten minutes of active work before this pie heads into the oven. Ten minutes! You’re just whisking things together in one bowl. Forget peeling, chopping, and messy layering. You mix the dry stuff, whisk in the wet stuff, dump it in the crust, and you’re done assembling. It’s the ultimate low-stress dessert for busy weeknights or last-minute gatherings.
Essential Ingredients for Apple Butter Pie With Custard Style Filling
Okay, let’s talk about what makes this pie work. Because the filling is so simple—basically just stirring things together—the quality of your ingredients really matters. The absolute hero here is the apple butter. It carries all that concentrated apple flavor and spice, so make sure you use a brand you genuinely love the taste of. It’s doing the heavy lifting that fresh apples usually do!
We need structure, right? That’s why we use eggs and cornstarch. They work together to create that beautiful, smooth custard set without needing any gelatin or complicated steps. My rule is always to measure everything exactly once before you start mixing. This prevents that frantic searching midway through the process! If you need more inspiration on easy baking, check out our guide on cinnamon swirl banana bread with vanilla icing.
This recipe is designed to be easy, which means we rely on common pantry staples. You’ll see the full list below, but trust me, having these items on hand means you can whip up an entire Apple Butter Pie With Custard Style Filling anytime the craving hits. No fancy trips to the store required! Feel free to share your baking successes with us on Facebook.
Ingredient Clarity and Unambiguous Descriptions
When you look at the exact list, notice how specific I’ve been about the measurements. This isn’t the time to guess! You absolutely need an unbaked 9-inch pie crust—don’t try to use a graham cracker crust here; the custard needs that sturdy pastry base to hold up. Also, please use whole milk; skim milk just doesn’t give you the richness needed for a proper custard texture.
Here is exactly what you need on your counter before you even think about preheating that oven:
- 1 unbaked 9 inch pie crust
- 2 large eggs
- ½ cup granulated sugar
- 2 tablespoons cornstarch
- 1 teaspoon ground cinnamon
- ½ cup apple butter
- 2 cups whole milk
Equipment Needed for Your Apple Butter Pie With Custard Style Filling
I always tell people that a good baker is only as good as their tools, especially when you’re dealing with a delicate custard. Don’t worry, you don’t need anything wild for this one! Just grab your standard baking gear. Having a good whisk is crucial here because we are avoiding lumps at all costs. Trust me on this one; a whisk beats a fork every time for blending liquids smoothly.
- 9-inch pie dish
- Medium mixing bowl
- Whisk
- Measuring cups and spoons
- Wire cooling rack

Step-by-Step Instructions for the Apple Butter Pie With Custard Style Filling
Now we get to the fun part—putting this gorgeous Apple Butter Pie With Custard Style Filling together! The entire process is about layering flavors and whisking out any potential lumps. If you follow these steps exactly, you’ll have a pie that looks like it took hours, not minutes, to make. Remember, we are aiming for that creamy, smooth texture, so keep that whisk moving!
Preparing the Crust and Dry Mix
First things first, get your oven ready. Preheat it to 375 degrees Fahrenheit. We want that heat ready to go when the pie is assembled. Next, take your unbaked pie crust and gently nestle it into your 9-inch pie dish. Crimp those edges however you like—Grandma always said pretty edges make the pie taste better! Set that crust aside for a moment while you work on the filling.
In a medium bowl, grab your whisk and beat those two eggs until they look pale and perfectly smooth. This is the base of our custard structure, so don’t rush this part! Now, add in your dry ingredients: the granulated sugar, the cornstarch, and that warm cinnamon. Whisk everything together thoroughly until you see no more white specks of sugar or cornstarch hiding anywhere. It should look uniform.
Creating the Smooth Custard Base
This is where the flavor bomb drops! Add your half-cup of apple butter right into that dry mixture. You’ll need to incorporate it well, whisking constantly until the color is rich and everything is blended. It might look a little thick at this stage, and that’s totally fine. Don’t panic! If you’re looking for other simple bread recipes, check out how to make easy no-knead peasant bread.
Now, here is the absolute key to avoiding lumps in your custard: you must add the milk slowly. Pour in just a tiny splash of the two cups of whole milk while whisking like crazy. Once that splash is completely incorporated and smooth, you can start adding the rest of the milk in a slow, steady stream. Keep whisking constantly until the entire mixture—your Apple Butter Pie With Custard Style Filling—is silky smooth. If it’s lumpy now, it will be lumpy when baked, so give it a good 30 seconds of vigorous whisking here!
Baking and Setting the Apple Butter Pie With Custard Style Filling
Carefully pour that beautiful, smooth filling right into your prepared pie crust. Don’t just dump it in! Once it’s all in there, take a clean spoon and gently stir the surface once or twice. This just helps settle the custard and ensures there are no weird air pockets under the surface. Place the pie on a rack positioned in the lower third of your oven.
Bake this treasure for 60 to 65 minutes. You’ll know it’s done because the edges will look firm and set, but the very center should still have a tiny, slight jiggle when you gently nudge the pan. It shouldn’t look like water; it should look like thick gelatin. Once you see that, pull it out immediately. Do not overbake it, or you’ll end up with a rubbery texture instead of a creamy one!
Pro Tips for Perfect Apple Butter Pie With Custard Style Filling
Even though this pie is super simple to put together, the magic really happens after it leaves the oven. That little bit of jiggle in the center when you pull it out? That’s your clue that you need patience now. If you rush to slice into this beautiful Apple Butter Pie With Custard Style Filling while it’s still warm, you’re going to have soup, not pie. And nobody wants warm apple butter soup! For more dessert ideas, see our peanut butter and jelly trail mix.
Think of it like a pumpkin pie—it relies on that cooling time to firm up completely. The eggs and cornstarch are doing their job baking, but the structure solidifies as it cools down to room temperature. I know it’s hard standing there waiting while that amazing spiced scent fills your kitchen, but trust the science behind this custard! You can find more baking tips on our Pinterest page.
Mastering the Cool Down Process
This is non-negotiable for the best texture. You must let this pie cool completely on a wire rack. Cooling on a rack allows air to circulate underneath, preventing the bottom crust from getting soggy from trapped steam. I usually let mine sit out on the counter for at least three or four hours. Once it hits room temperature, you can actually see the center firm up beautifully.
If you’re planning on serving this pie the next day—which I highly recommend, as the flavors deepen overnight—cover it loosely with plastic wrap once it’s totally cooled and put it in the fridge. When it’s fully chilled, slicing becomes a dream. You’ll get those clean, perfect wedges of Apple Butter Pie With Custard Style Filling that look like they came from a professional bakery. Just be patient; the reward is worth the wait!
Answering Common Questions About Apple Butter Pie With Custard Style Filling
I get so many messages asking about tweaks and substitutions for this recipe, and honestly, it’s because it’s so straightforward that people want to know how far they can push it! I try to keep things simple, but sometimes you just don’t have whole milk on hand. Let’s clear up a few things so you can make the most of your Apple Butter Pie With Custard Style Filling.
I’ve gathered the most common things I hear about, especially when people are trying to adapt this for dietary needs or just plain pantry shortages. Knowing these little details will ensure your pie sets perfectly every time, whether you’re using whole milk or something else!
How Do I Substitute the Milk?
Since the milk is a major part of the liquid in this custard, you need something with a decent fat content. You can absolutely substitute the whole milk with an equal amount of 2% milk, but you might find the texture is slightly less rich. If you want to go dairy-free, I’ve had success using unsweetened, full-fat oat milk or cashew milk. They generally incorporate without changing the flavor profile too much. Please avoid thin almond milk, though; it just doesn’t have the body needed to support the custard structure of this Apple Butter Pie With Custard Style Filling.
Can I Make This Ahead of Time?
Yes, you absolutely can! This pie actually tastes better the next day, just like most custards. If you bake the whole pie, let it cool completely on the counter, and then cover and refrigerate it, it will hold up beautifully for about three days. If you want to prep even further, you can mix the entire filling—eggs, sugar, apple butter, milk, everything—and keep it covered in the fridge for up to 24 hours. Just give it one quick whisk before pouring it into your crust and baking!
Storage and Enjoyment of Your Apple Butter Pie With Custard Style Filling
Once you’ve managed to let this pie cool completely—which, trust me, is the hardest part—you’ll want to make sure you store it right so those lovely custard edges stay perfect. This pie is fantastic the next day; the spices seem to deepen overnight, making it even better for breakfast or an afternoon treat with coffee. You don’t want to mess up all that hard work by leaving it on the counter! You can read more about our recipes on Medium.
Reheating this pie isn’t really necessary, as it’s designed to be served cool or at room temperature. If you absolutely must warm up a slice, do it gently! Microwaving it for just a few seconds can sometimes make the custard a bit watery, so I recommend letting the slice sit on the counter for about 20 minutes to take the chill off instead.
Storing Leftovers Safely
For safety and texture, this pie needs to go into the fridge. Once it’s completely cooled down on the rack, cover the pie dish loosely with plastic wrap or foil. Make sure the wrap isn’t touching the surface of the pie unless you put a little wax paper barrier down first. Stored properly in the refrigerator, your delicious Apple Butter Pie With Custard Style Filling will keep well for up to three or four days. It’s dense, so it holds up well, but the fresher, the better!
Here’s the quick rundown for keeping those slices perfect:
- Refrigerate promptly after cooling completely.
- Keep covered to prevent drying out.
- Enjoy within 3 to 4 days for best texture.
Understanding the Estimated Nutritional Profile
Now, I know some of you are tracking your macros or just curious about what’s in this treat. Since we are using whole milk and sugar, this isn’t exactly a diet food, but honestly, a single slice of this rich Apple Butter Pie With Custard Style Filling is totally worth it! These numbers are just a general guide based on the standard ingredients listed, so please remember they are estimates.
Baking is chemistry, but nutrition tracking is even more complex, especially when you factor in the exact brand of apple butter you use! Don’t use these figures for strict medical planning. We bake for joy here, not for perfect adherence to a spreadsheet. But it’s good to have a baseline idea of what you’re enjoying!
Reviewing the Estimated Serving Data
To make this easy to read, I’ve laid out the basic estimates from the recipe details below. See how the protein is surprisingly high? That’s thanks to the eggs and milk doing their custard job! Here’s what you can generally expect in one slice:
| Metric | Approximate Value |
|---|---|
| Calories | 180 |
| Fat | 7 g |
| Carbohydrates | 26 g |
| Protein | 4 g |

Amazing Apple Butter Pie With Custard Style Filling
- Total Time: 1 hour 15 minutes
- Yield: 8 servings
- Diet: Vegetarian
Description
A smooth, lightly spiced pie with a custard-like texture and deep apple flavor. This pie offers an easy apple butter alternative to traditional pumpkin pie.
Ingredients
- 1 unbaked 9 inch pie crust
- 2 large eggs
- ½ cup granulated sugar
- 2 tablespoons cornstarch
- 1 teaspoon ground cinnamon
- ½ cup apple butter
- 2 cups whole milk
Instructions
- Preheat your oven to 375°F. Position a rack in the lower third of the oven.
- Place the unbaked pie crust into a 9 inch pie dish and crimp the edges. Set the dish aside.
- In a medium bowl, whisk the eggs until they are smooth.
- Add the granulated sugar, cornstarch, and cinnamon. Whisk until completely combined.
- Whisk in the apple butter until the mixture is smooth and evenly blended.
- Slowly pour in the whole milk while whisking constantly until the filling is completely smooth.
- Pour the filling into the prepared pie crust. Gently stir once with a spoon to distribute the custard evenly.
- Bake for 60 to 65 minutes. The edges should be set and the center just slightly jiggly.
- Remove from the oven. Cool the pie completely on a wire rack before slicing.
Notes
- The pie firms up more as it cools, similar to a pumpkin pie.
- Prep Time: 10 minutes
- Cook Time: 1 hour 5 minutes
- Category: Dessert
- Method: Baking
- Cuisine: American