Okay, listen up, because I have cracked the code on the most decadent, ridiculously easy dessert for two that you never knew you needed! We are talking about Gluten Free Chocolate Lava Cakes for Two, and trust me, these are life-changing. Forget complicated baking projects; this small batch dessert is designed specifically for those nights when you deserve something truly special without spending hours in the kitchen.
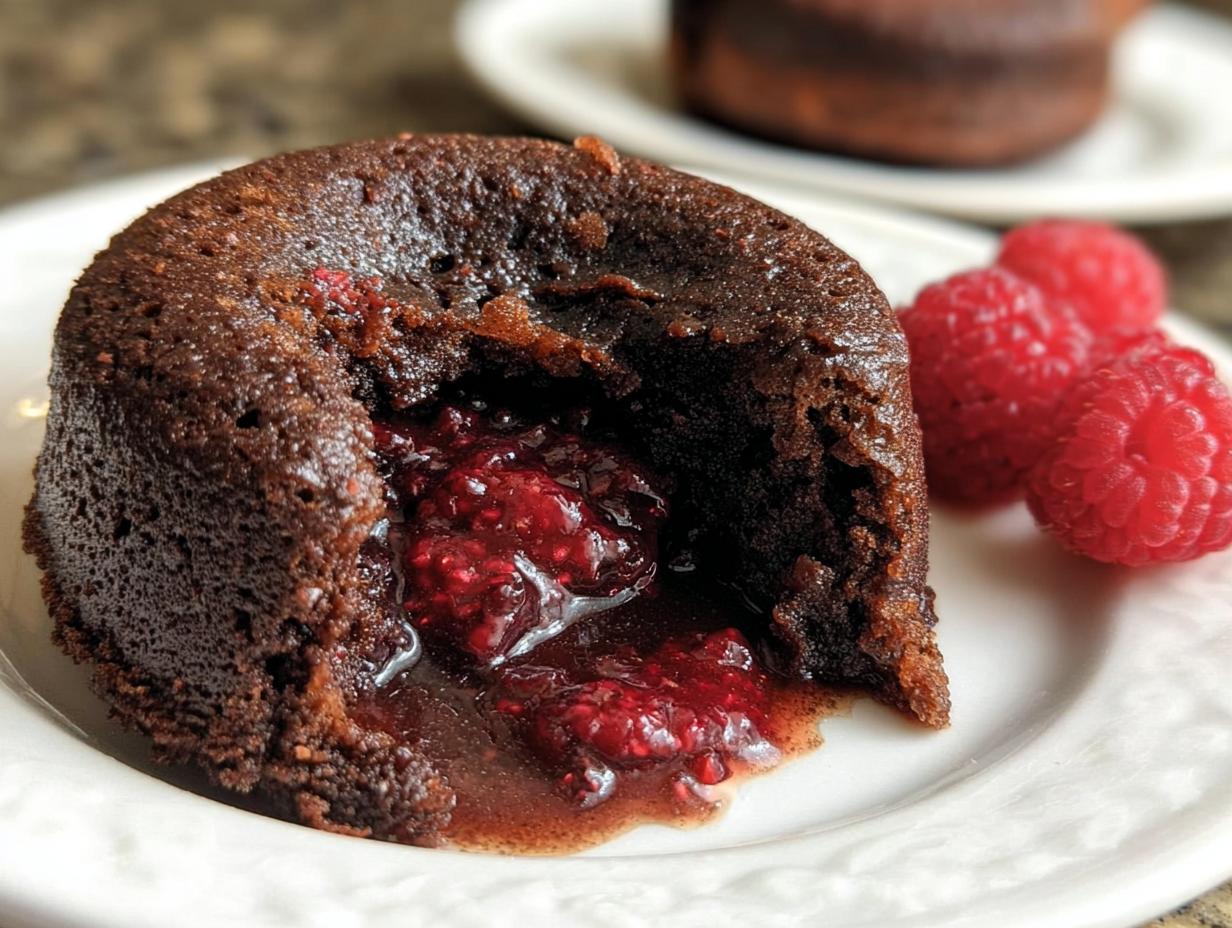
The real magic here isn’t just that they are gluten-free—it’s that warm, gooey core. I added a little secret weapon: a tiny dollop of mashed fresh raspberries right in the middle! When you cut into that rich, molten chocolate, you get this surprising burst of bright berry flavor. It takes the entire experience up about ten notches.

If you are new to baking, especially gluten-free baking, don’t panic! This recipe is so straightforward. The measurements are small, which means less room for error. I promise, even if your kitchen looks like a disaster zone after mixing, the result when you flip that ramekin onto the plate is pure restaurant-quality perfection. You’ve got this!
Why You Will Love These Gluten Free Chocolate Lava Cakes for Two
Honestly, I developed this recipe because sometimes you just need two perfect, decadent desserts, and you need them fast. There is absolutely no guilt involved in making this small batch dessert just for you and your favorite person. It proves that gluten-free baking can be utterly luxurious. If you are looking for other easy dessert ideas, check out my recipe for vanilla frozen custard.
Here’s the quick rundown on why this little recipe is going straight into your favorites folder:
- It’s lightning fast—you’re looking at maybe 15 minutes of actual work before it goes into the oven.
- The yield is perfect for two, meaning zero leftovers tempting you at 10 PM!
- You get that incredible, rich, slightly dusty texture from the buckwheat flour, but nobody will guess it’s gluten-free.
Quick Prep and Cook Times
From grabbing the chocolate chips to sliding the ramekins into the oven, we are talking less than 20 minutes of active time. Seriously! The total time, including that crucial resting period, clocks in right around 32 minutes. That means you can decide you want molten chocolate cake halfway through dinner and still have it ready for dessert. It’s perfect for those spontaneous date nights at home.
Flavor Profile and Texture
This is where the real excitement is. When you slice into the cake, you get that classic, slightly firm outer shell, and then—BOOM—the warm, liquid chocolate center flows out. It’s rich, deep, and intensely satisfying. That tiny bit of mashed raspberry I sneak in there doesn’t make it taste fruity, not really. Instead, it cuts through the richness with the tiniest hint of bright tanginess. It balances the whole thing out so beautifully!
Gathering Your Ingredients for Gluten Free Chocolate Lava Cakes for Two
Okay, now that we know how fast these Gluten Free Chocolate Lava Cakes for Two come together, we need to talk about the ingredients. Because this is such a small batch dessert, precision matters way more than when you are making, say, a giant batch of cookies. Every single teaspoon counts here to get that perfect molten texture!
It looks like a short list, which is great, but please don’t try to eyeball the sugar or the flour. We need accuracy for the gluten-free element to work properly and for that lava center to form just right. Measure twice, mix once—that’s my motto for small-scale baking! You can see more of my baking tips on my Medium profile.
Essential Dry and Wet Components
When you look at the list below, you’ll see we are dealing with the basics: sugar, eggs, butter, and chocolate. But pay close attention to how the wet and dry parts are separated in the instructions. We mix the eggs and sugar first until they are light and fluffy—that’s crucial for structure. Then we melt the solids (butter and chocolate) separately. Keeping them separate until the last minute prevents the eggs from scrambling or seizing up when the hot chocolate hits them.
Ingredient Notes and Substitutions for Gluten Free Chocolate Lava Cakes for Two
Let’s talk about that flour for a second. I chose buckwheat flour here, and I know that might sound unusual, but trust me on this one! It lends a wonderful, slightly earthy depth that pairs unbelievably well with dark chocolate, and it bakes up beautifully without any weird gummy texture you sometimes get with other GF flours. It’s one of the secrets to keeping this a truly great molten chocolate cake.
For the chocolate chips, use the best semi-sweet or dark chocolate you can find, whatever you love to eat on its own. Since there are so few ingredients, the quality really shines through. If you use milk chocolate, it might be too sweet and won’t melt as richly as the semi-sweet variety does.
Equipment Needed to Make Gluten Free Chocolate Lava Cakes for Two
You don’t need a fancy stand mixer for these little gems, which is another reason I love them so much! The main thing you absolutely must have are two small ramekins. I use 6-ounce ceramic ones—they are the perfect size for baking these Gluten Free Chocolate Lava Cakes for Two and getting that beautiful lift before they settle into that molten center.
You will also need:
- A medium mixing bowl for the eggs and sugar.
- A separate, microwave-safe bowl for melting the chocolate and butter (be careful with this part!).
- A whisk, or even just a sturdy fork, for whipping the eggs.
- A rubber spatula for gently folding in that buckwheat flour.
That’s it! No big cleanup tonight, just two little dishes to wash after you enjoy your perfect molten chocolate cake. If you need more quick dinner ideas, try my easy oven baked fries while you wait!
Step-by-Step Instructions for Gluten Free Chocolate Lava Cakes for Two
Alright, let’s get baking! This process is quick, but we need to be mindful of the heat and how gently we treat the batter. Remember, we are building structure with the eggs but keeping everything light enough to ooze later. Don’t rush the preheating, and definitely don’t skip greasing those ramekins!
Preparation and Batter Mixing
First things first, get your oven humming at 350°F. While it’s heating up, take those two 6-ounce ramekins and grease them generously. I mean *generously*—maybe even dust them lightly with cocoa powder after greasing, just to be extra safe against sticking. This is your insurance policy for these delicate cakes!
Now for the wet base. In your medium bowl, whisk together the sugar, the whole egg, that extra egg yolk, vanilla extract, and the salt. You want to whisk this until it looks smooth and slightly pale, almost like a thin ribbon forms when you lift the whisk. It should be well combined.
In a separate, microwave-safe bowl, melt your butter and chocolate chips together. I always do this in 30-second blasts on half power. If you go full blast, the chocolate seizes up, and then we have a problem! Stir it well between each blast until it’s glossy and completely smooth. Pour that warm chocolate mixture right into your egg mixture and stir only until it looks like one unified, dark batter. Don’t beat it up!
Finally, sprinkle the buckwheat flour over the top. Grab your rubber spatula—this is not a whisk job! Gently fold the flour in. I mean *gently*. Stop folding the second you see the last dry streak of white disappear. Overmixing here is what ruins the lava effect, so be conservative!
Filling and Baking the Molten Center
Time to layer! Spoon slightly more than a quarter of the batter into the bottom of each prepared ramekin. This gives us a nice base layer. Now for the fun part: take your mashed raspberries—just a small spoonful of the mashed fruit—and gently place that right in the center of the batter. Try to keep the fruit concentrated in the middle so it doesn’t touch the sides of the ramekin.
Divide the rest of the batter evenly on top, making sure that little berry mound is totally covered. We don’t want any fruit peeking out when it bakes!
Pop them into the preheated oven. Bake these for 15 to 17 minutes. You are looking for the tops to look set—they should look firm around the edges—but you want the center to still look a little soft, maybe even jiggly if you nudge the pan lightly. That jiggle means lava!

Resting and Serving Your Gluten Free Chocolate Lava Cakes for Two
This next step is the hardest one, but you absolutely must follow it! Take the ramekins out and let them rest on a cooling rack for a full 15 minutes. I know, I know, they smell amazing, but this resting time allows the exterior structure to firm up enough so the cake doesn’t collapse when you try to flip it.
When the 15 minutes are up, run a thin, flexible knife gently around the edge of the cake inside the ramekin. Place your serving plate upside down over the top of the ramekin, hold them together tightly, and flip! Gently lift the ramekin off. If you greased well, it should slide out perfectly, revealing your beautiful, tiny molten chocolate cake ready for serving warm.
Tips for Success with Your Gluten Free Chocolate Lava Cakes for Two
These Gluten Free Chocolate Lava Cakes for Two are so simple, but they rely on a couple of key moments going exactly right. Don’t worry if your first one isn’t perfect; troubleshooting these small pitfalls is how we master any recipe! Mostly, it comes down to being gentle when mixing and being patient when resting. For more baking tips, follow me on Pinterest.
Avoiding Overmixing the Batter
Remember when I told you to stop folding the flour the second you couldn’t see white streaks? That’s the most important rule here. Because we aren’t using traditional wheat flour, there’s no gluten to worry about developing, right? Wrong! Even buckwheat flour, when agitated too much, can cause the batter to become tough or dense. If you overmix, you knock out all those lovely air bubbles created when you whisked the eggs and sugar. A dense cake won’t have that signature flow when you cut into it.
Achieving the Perfect Molten Core
The visual cue for doneness is everything. You are baking this cake until it is just barely set. If you wait until the whole top is firm and looks totally baked through, you’ve gone too far, and you’ll have a lovely dark chocolate cake, but no lava! You want the edges firm, but the very center should still look a little wet or glossy. And please, please respect the 15-minute rest time. If you try to flip it too soon, the structure hasn’t set up properly, and you’ll end up with chocolate soup on your plate instead of a beautiful, inverted cake.
Storing and Reheating Your Gluten Free Chocolate Lava Cakes for Two
The great news about these rich desserts is that if you happen to have any leftovers—which is rare in my house, I admit—they store beautifully! You can keep these little molten wonders in the refrigerator for up to two full days. This makes them fantastic for making ahead for a dinner party or a special weekend treat.
When you are ready to enjoy them again, you need to reheat them gently. We want that center to melt back into lava, not turn into a hockey puck, so the microwave is your best friend here, used sparingly, of course.
Here is the easiest way to manage leftovers:
| Action | Details |
|---|---|
| Storage | Covered tightly in the refrigerator (up to 2 days). |
| Reheating | Microwave on medium power for 20-30 seconds. |
Just watch them closely when reheating. You only need enough time to warm the cake through and get that center gooey again. Too long, and you’ll cook the lava right out of it!
Common Questions About Gluten Free Chocolate Lava Cakes for Two
I get so many messages about these little cakes! It seems like once people try this Gluten Free Chocolate Lava Cake for Two recipe, they want to know how to tweak it or how to manage the timing. Since it’s such a specific small batch dessert, the details really matter, so let’s clear up the most common things folks ask me about! If you want to see what others are saying, check out my Facebook page.
Can I make this recipe ahead of time?
Yes, you absolutely can! I’ve mentioned it before, but it’s worth repeating because it’s such a lifesaver. You can assemble the cakes right in the greased ramekins, cover them tightly with plastic wrap, and keep them in the fridge for up to two days. When you are ready to serve that molten chocolate cake, just add about 5 to 10 minutes to the baking time since they are going in cold. Seriously, make them ahead of time and forget about dessert until the moment you want it!
What if I don’t have buckwheat flour?
This is a great question! Buckwheat flour adds that beautiful, slightly nutty, earthy flavor that complements dark chocolate so well, but I know it’s not always in everyone’s pantry. If you need a substitute for these Gluten Free Chocolate Lava Cakes for Two, you can substitute it 1-to-1 with an all-purpose gluten-free flour blend that contains xanthan gum. If your blend doesn’t have gum, add just a tiny pinch—like an eighth of a teaspoon—to the batter. That will help hold the structure since we aren’t relying on wheat gluten.
How do I know when the cake is done?
This is the absolute key to success for any molten chocolate cake! Don’t trust the timer completely; trust your eyes. You’re looking for the edges of the cake to be set and firm, maybe even slightly pulling away from the side of the ramekin. But the very center, right in the middle, should still look a little glossy or soft. If you gently shake the ramekin, the very center should wobble a bit. If the whole top is firm, you’ve baked it too long and you’ll lose the lava!
Sharing Your Gluten Free Chocolate Lava Cakes for Two
I truly hope these little bites of heaven make your evening special! Seriously, when you manage to flip that perfect Gluten Free Chocolate Lava Cake for Two onto the plate, I want to know about it! Please leave a rating below and tell me how it went. Did you use fresh raspberries or maybe a dab of salted caramel instead? Drop a comment and share your results!
Print
Decadent 2-Minute Gluten Free Chocolate Lava Cakes
- Total Time: 32 minutes
- Yield: 2 servings
- Diet: Gluten Free
Description
Rich, gooey gluten free chocolate lava cakes with a warm berry center. This small batch dessert is perfect for special occasions.
Ingredients
- 1/4 cup granulated sugar
- 1 large egg
- 1 large egg yolk
- 1/8 teaspoon salt
- 2 teaspoons vanilla extract
- 2/3 cup semi sweet chocolate chips
- 3 tablespoons unsalted butter
- 3 tablespoons buckwheat flour
- 3 tablespoons fresh raspberries lightly mashed (for fruit center)
Instructions
- Preheat the oven to 350°F. Generously grease two 6 ounce ramekins.
- Whisk together the sugar, egg, egg yolk, vanilla extract, and salt in a medium bowl until smooth.
- Melt the chocolate chips and butter in a microwave safe bowl using 30 second intervals at half power. Stir between intervals until smooth.
- Pour the melted chocolate mixture into the egg mixture. Stir just until combined.
- Sprinkle the buckwheat flour over the batter. Gently fold in until no dry streaks remain. Do not overmix.
- Spoon slightly more than one quarter of the batter into each ramekin.
- Place half of the mashed raspberries in the center of each ramekin, keeping them concentrated in the middle.
- Divide the remaining batter evenly over the top, covering the fruit completely.
- Bake for 15 to 17 minutes until the tops are set but the centers remain soft.
- Remove from the oven and let rest for 15 minutes. Run a knife around the edges and invert onto plates. Serve warm.
Notes
- These cakes can be refrigerated for up to 2 days and gently reheated before serving.
- Prep Time: 15 minutes
- Cook Time: 17 minutes
- Category: Dessert
- Method: Baking
- Cuisine: American