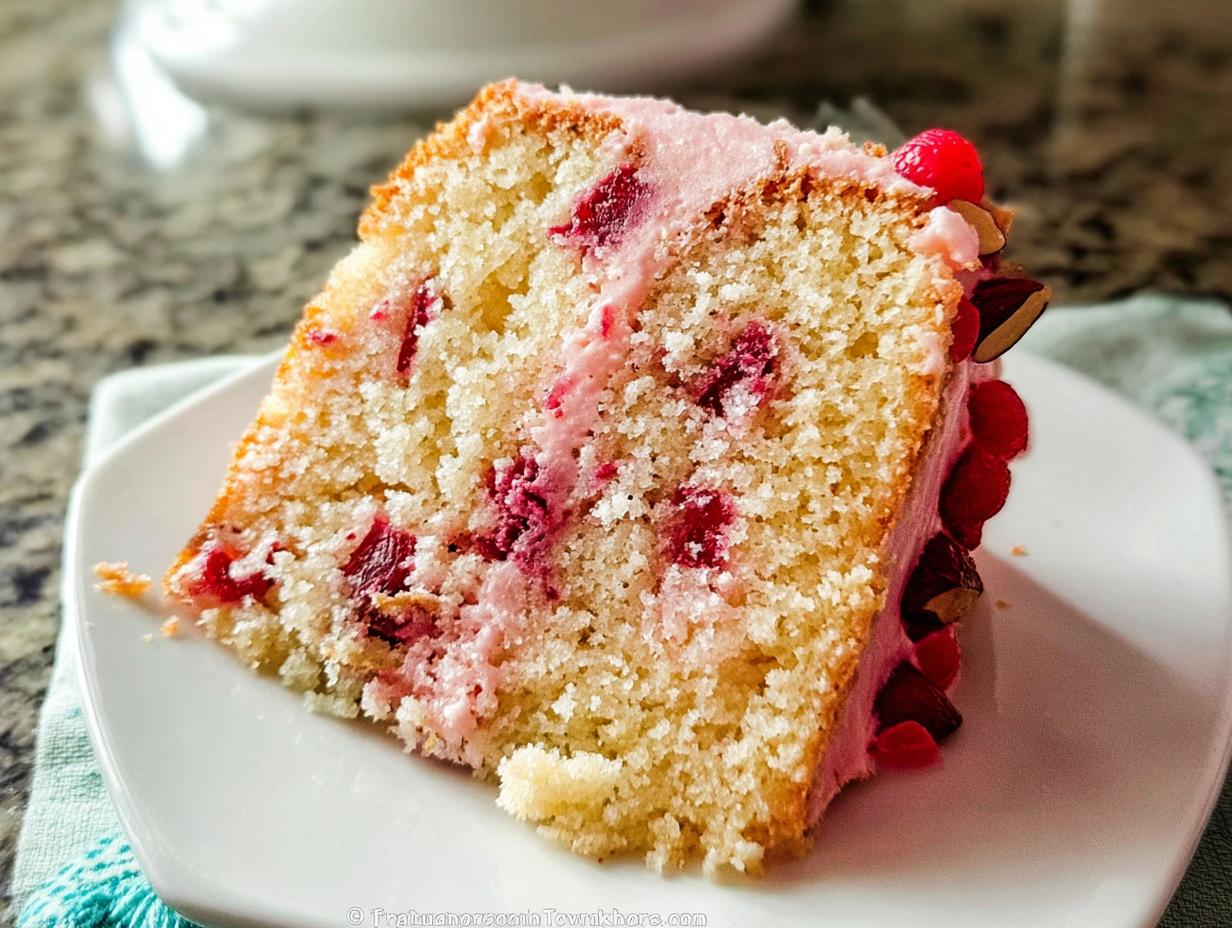
I have a confession to make: I used to be terrified of baking cakes from scratch. Seriously! Everything I tried came out dense, dry, or just completely flat. Then I found this recipe, and everything changed. I’m talking about the most glorious Cherry Almond Cake With Tender Crumb you will ever put in your mouth. It tastes like it came from a fancy bakery, but honestly, it’s so straightforward, even I couldn’t mess it up the first time.
It’s the flavor marriage of sweet cherries and that deep, nutty almond scent—it just screams celebration. I’ve made this cake for birthdays, potlucks, and just because it was Tuesday. The best part is how simple the steps are. Forget complicated layering or weird techniques; this is real-life baking magic that delivers a spectacular result every single time.

Why This Cherry Almond Cake With Tender Crumb Is Your New Go-To
If you’ve ever felt intimidated by baking, this is the recipe that proves you can do it! It’s truly beginner-friendly because the technique is foolproof. We use simple creaming methods, and the result is that unbelievably tender crumb I brag about. It’s buttery, it’s rich, and it stays moist for days, which is a miracle for any cake, right?
I used to struggle getting that perfect texture, always ending up with something heavy. But this recipe cracked the code for me by using finely ground almonds right in the batter. It adds structure without weighing things down. Trust me, once you nail this, you’ll be making it every single week!
Gathering What You Need for Your Cherry Almond Cake With Tender Crumb
Okay, let’s talk about getting organized before we start whipping things up. Baking is so much more fun when you aren’t scrambling around looking for the baking powder halfway through! For this fantastic Cherry Almond Cake With Tender Crumb, we need just a few key players. Nothing too exotic, I promise.
The real secret to success here is making sure your butter and eggs are at room temperature. That might sound fussy, but it makes the creaming step so much easier and is the first big step toward that light, fluffy texture we are aiming for.
Essential Ingredients for a Perfect Cherry Almond Cake With Tender Crumb
When you gather these items, pay close attention to the details—that’s where the magic hides for this particular cake. We aren’t just using almonds; we need them finely ground to melt right into the batter. And those cherries? They need a quick toss in flour first so they don’t sink straight to the bottom like little lead weights!
I always lay everything out on the counter before I even turn on the oven. It really helps me keep track. Make sure your butter is truly softened—you should be able to press your finger into it easily without going straight through. Also, those cherries must be pitted! Nobody wants to bite into a pit, trust me.
- 1 cup unsalted butter that is softened, not melted!
- 1 3/4 cups granulated sugar—the white stuff works perfectly here.
- 4 large eggs, and they absolutely must be at room temperature.
- 2 1/2 cups all-purpose flour, measured correctly.
- 1/2 cup finely ground almonds—this is crucial for the flavor base.
- 2 teaspoons baking powder for that gentle lift.
- 1/2 teaspoon salt to balance all the sweetness.
- 3/4 cup whole milk—don’t try to substitute with skim here!
- 2 cups chopped sweet cherries, make sure they are pitted.
- 2 tablespoons all-purpose flour reserved just for coating the cherries.
Equipment Checklist
You don’t need a fancy stand mixer, but you will need a good sturdy bowl and beaters, whether by hand or electric. Make sure your 9 by 13 inch baking dish is clean and ready to go before you start mixing. A sifter or whisk for the dry ingredients is also helpful!
- 9 x 13 inch baking dish
- Large mixing bowl and a medium bowl
- Electric mixer or a strong arm and a good wooden spoon
- Whisk or fork
- Spatula for folding
- Toothpicks for testing doneness

Step-by-Step Guide to Making Your Cherry Almond Cake With Tender Crumb
Alright, now for the fun part! This is where we actually bring the batter together. If you followed the ingredient gathering advice, this process moves really smoothly. We are building flavor and structure layer by layer to ensure we get that famous Cherry Almond Cake With Tender Crumb. Don’t rush the creaming step; it’s your foundation!
Preparation and Mixing the Wet Ingredients
First things first: get that oven fired up to 350°F. While it’s warming, grease up that 9 by 13 inch baking dish really well. I like using a little butter and then dusting it lightly with flour, just to be safe.
Next, tackle those cherries. Chop them up if you need to, making sure every single pit is gone—I can’t stress that enough! Toss those lovely chopped cherries with those two tablespoons of reserved flour right in a small bowl. This step is non-negotiable; it stops them from sinking! Set them aside.
Now for the main event in the mixer. In your large bowl, beat that softened butter and the sugar together for a full three minutes. You want it light, pale yellow, and fluffy. If you stop too early, your cake will be denser than you want. I always scrape down the sides halfway through! Once it looks like pale whipped cream, start adding your room temperature eggs, one at a time. Mix until each egg is completely incorporated before adding the next one. If you dump them all in at once, the batter might curdle a bit, and we don’t want that!
Combining Dry Elements and Alternating with Milk
While your wet ingredients are chilling out, grab your medium bowl and whisk together everything dry except those floured cherries: the 2 1/2 cups of regular flour, the ground almonds, baking powder, and salt. Whisk it really well so the leavening agents are evenly distributed.
This next part builds that tender crumb. We alternate! Add about half of your dry mix to the butter mixture and mix on low speed just until it’s barely combined. Then, pour in all the milk and mix briefly. Finally, add the rest of the dry ingredients. Mix only until you see the last streaks of flour disappear. Seriously, stop mixing then! Overmixing at this stage develops gluten, and gluten makes bread, not cake!
Folding in Cherries and Baking Times
Now, put the mixer away! Grab your spatula. Gently fold in those floured cherries. You want them evenly spread throughout the batter, but don’t stir them aggressively. We want to keep all the air we just worked so hard to create.
Pour that beautiful batter into your prepared 9×13 dish and spread it out evenly. Pop it into your preheated 350°F oven. It usually takes about 40 to 45 minutes. You’ll know it’s done because the edges will start pulling slightly away from the pan, and a toothpick inserted right in the center should come out clean, maybe with a few moist crumbs clinging to it, but no wet batter.
Let it cool completely in the pan on a wire rack. Seriously, don’t even think about slicing it when it’s hot, or it will crumble apart on you!
Tips for Achieving the Best Cherry Almond Cake With Tender Crumb Texture
If you want to guarantee that melt-in-your-mouth experience, you have to pay attention to two things: temperature and mixing speed. These are the non-negotiables for a truly spectacular Cherry Almond Cake With Tender Crumb. Forget rushing these steps; they are worth the patience.
First, the butter and eggs must be room temperature, like I mentioned before. If your butter is too cold, it won’t cream properly with the sugar, and you won’t get those tiny air pockets. Those air pockets are literally what make the cake light! Cold eggs added to room-temperature butter will shock the mixture and cause it to curdle or look grainy.
Second, when you add the flour mixture in, use the lowest speed on your mixer, or fold gently by hand. The moment you see the last dry streak vanish, STOP! Seriously, lift your hands away from the bowl. Overmixing activates the gluten in the flour, and gluten is what makes chewy bread, not a delicate, tender crumb. It’s that simple, but it makes all the difference between an okay cake and the best almond cake you’ve ever made.
Ingredient Notes and Simple Substitutions
I get asked a lot about the almonds, since we call for them finely ground. This isn’t the same as using almond flour, though you could certainly try that! Finely ground almonds—I usually pulse them in the food processor until they look like coarse cornmeal—incorporate better into the batter. They add that deep, buttery almond flavor without making the cake heavy or gritty. It truly melts into the background, ensuring that light texture.
Now, about those cherries. If you can’t get fresh sweet cherries when you bake this, frozen works fine, but you must thaw them completely and pat them very dry before tossing them in the flour. Canned cherries are usually too soft and loaded with syrup, which messes with our precise liquid ratios. Since this is a vegetarian cake, we don’t need to worry about meat substitutes, but sticking to the whole milk is important for richness!
Frequently Asked Questions About This Cherry Almond Cake
I always get questions after people try this recipe for the first time, usually about how to make the flavor even stronger or if they can prep it early. Here are a few things I hear most often when people are aiming for perfection!
Q1. How can I boost the almond flavor in this cake?
That’s an easy fix! If you want that almond punch to really sing, use 1 teaspoon of pure almond extract along with your vanilla when mixing the wet ingredients. It blends beautifully with the ground almonds already in there and really enhances the overall flavor profile without changing the texture.
Q2. Can I make this cake a day ahead of time?
Yes, you absolutely can! It’s actually better the next day, honestly. The flavors settle in overnight. Just make sure you let it cool completely before covering it tightly with plastic wrap. Don’t put the frosting on (if you add one!) until serving time, but for this simple cake, it’s great plain.
Q3. I only have a round cake pan. What do I do?
This recipe is designed for a 9×13 for ease, but if you use two 8-inch or 9-inch round pans, you’ll need to reduce the baking time slightly—check them around the 30-minute mark. The batter volume is usually just about right for two standard layers!
Q4. Will canned cherries work instead of fresh?
If fresh aren’t in season, you can use canned, but you have to drain them really, really well and pat them dry before you toss them in that tablespoon of flour. Too much liquid will throw off the balance needed for that tender crumb.
Storing and Serving Your Baked Creation
Once this gorgeous cake has cooled completely—and I mean completely, don’t rush it!—it’s time to think about storage. The great news is that this buttery cake is sturdy enough to handle sitting out on the counter for a little while. Since this recipe is naturally moist, we don’t have to panic about it drying out right away.
If you plan on eating it within two days, just cover it loosely with foil or plastic wrap and keep it right there on the counter at room temperature. If you need it to last longer, say up to four days, pop it into the fridge. That cold temperature keeps everything nice and firm.
When you pull it out of the fridge, let it sit on the counter for about 30 minutes before slicing. That little bit of time lets the butter soften up again, making every slice taste fresh and buttery, just like you pulled it out of the oven!
| Storage Method | Duration |
|---|---|
| Room Temperature (Covered) | Up to 2 days |
| Refrigerated (Airtight Container) | Up to 4 days |
Sharing Your Baking Experience
I truly hope this recipe brings as much joy to your kitchen as it does to mine! I’ve poured all my tips and tricks into this guide so you can achieve that perfect slice.
Now it’s your turn! Did you try it? Did the tender crumb live up to the hype? Please leave me a comment below and let me know how it turned out for you. A quick rating helps other bakers know this recipe is a keeper! You can also follow our baking adventures on Pinterest.
Print
Best Cherry Almond Cake With Tender Crumb Recipe
- Total Time: 1 hour
- Yield: 12 servings
- Diet: Vegetarian
Description
This cherry almond cake features a soft, buttery texture, juicy cherries, and deep almond flavor. It is a simple from-scratch cake suitable for any event.
Ingredients
- 1 cup unsalted butter softened
- 1 3/4 cups granulated sugar
- 4 large eggs room temperature
- 2 1/2 cups all-purpose flour
- 1/2 cup finely ground almonds
- 2 teaspoons baking powder
- 1/2 teaspoon salt
- 3/4 cup whole milk
- 2 cups chopped sweet cherries pitted
- 2 tablespoons all-purpose flour
Instructions
- Preheat the oven to 350°F and grease a 9 by 13 inch baking dish.
- In a medium bowl, toss the chopped cherries with 2 tablespoons flour and set aside.
- In a large bowl, beat the butter and sugar for 3 minutes until light and fluffy.
- Add the eggs one at a time, mixing well after each addition.
- In a separate bowl, whisk together the flour, ground almonds, baking powder, and salt.
- Add the dry ingredients to the batter in two additions, alternating with the milk, mixing just until smooth.
- Gently fold the floured cherries into the batter until evenly distributed.
- Spread the batter evenly into the prepared baking dish.
- Bake for 40 to 45 minutes until the center is set and a toothpick inserted comes out clean.
- Cool completely before slicing and serving.
Notes
- Store covered at room temperature for up to 2 days.
- Refrigerate for up to 4 days.
- Prep Time: 15 minutes
- Cook Time: 45 minutes
- Category: Dessert
- Method: Baking
- Cuisine: American