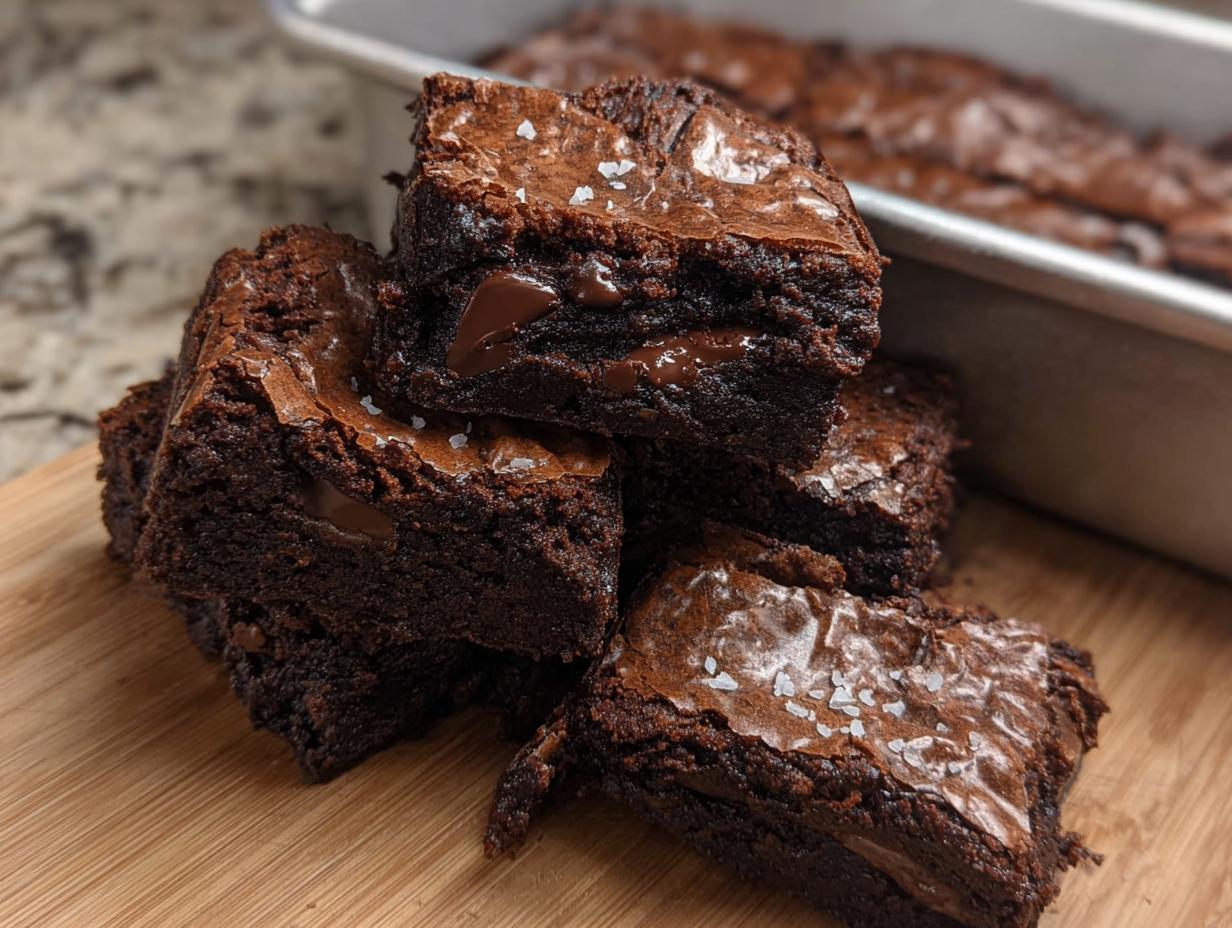
Listen, I get it. Sometimes you just need that chocolate fix, but you absolutely do not need a whole 9×13 pan of fudgy goodness staring you down from the counter for a week. That’s why I spent years perfecting these small batch brownies. They hit all the right notes: that unbelievably crackly, shiny top, a center that is perfectly chewy—not cakey, never dry—and they bake up beautifully right in a standard loaf pan!
I remember when I first started baking, big recipes felt so overwhelming. If I messed up a huge batch, I felt like I wasted so much time and ingredients. These little guys changed everything! They are the perfect cure for a sudden, intense chocolate craving. Over time, I’ve learned the exact science needed to get that perfect texture with just a few key ingredients, and I promise you, once you try this recipe, you’ll never go back to the boxed stuff.
We’re talking real, deep chocolate flavor here, thanks to the cocoa powder and those lovely chunks of chocolate I fold in right at the end. This recipe is my go-to when I need something small, quick, and guaranteed to impress (or just make my own afternoon amazing!).

Essential Ingredients for Your Small Batch Brownies
You might think making small batch brownies means cutting corners, but nope! Every single ingredient here plays a huge role in getting that amazing crackly top and that rich, fudgy interior. We’re keeping the ingredient list short and sweet, focusing on quality over quantity since this is such a small recipe.
It’s crucial that you pay attention to temperatures when mixing, especially that one crucial item. If you follow the table below exactly, you’ll be set up for success!
Gathering for Your Small Batch Brownies Components
I like to separate things mentally into fats/sugars, the binder/flavorings, and then the dry structure ingredients. Honestly, just having everything measured out before you start whisking makes the process so much smoother. Just look down at the list below and get everything ready to go!
Ingredient Table for Small Batch Brownies
| Amount | Ingredient | Notes |
|---|---|---|
| 4 tablespoons | Unsalted Butter | Must be melted |
| 1 tablespoon | Vegetable Oil | Helps keep them tender |
| 1/3 cup | Granulated Sugar | For shine and structure |
| 1/4 cup | Packed Light Brown Sugar | Adds chewiness and depth |
| 1 large | Egg | Room temperature is a must! |
| 1 teaspoon | Vanilla Extract | The good stuff! |
| 1/4 teaspoon | Fine Salt | For balancing the sweetness |
| 1/4 cup | All-Purpose Flour | Don’t overmeasure this! |
| 1/3 cup | Unsweetened Cocoa Powder | Use a good quality one |
| 1/4 cup | Semisweet Chocolate Chunks | Fold these in last |
| Pinch | Sea Salt Flakes | Optional, for topping |
Equipment Needed for Small Batch Brownies
Thankfully, you don’t need a whole arsenal of fancy gear for these small batch brownies. Since we are making them in a loaf pan, that’s the star piece of equipment! You absolutely need a standard 9×5 inch loaf pan, or maybe an 8×5 if that’s what you have on hand. The size really dictates how thick they bake up.
Beyond that, grab a microwave-safe bowl for melting your fats, a whisk for getting that glossy sugar base going, and a sturdy rubber spatula for folding everything together gently. Oh, and don’t forget the parchment paper; it’s the secret to lifting these perfectly set little brownies right out of the pan without any drama!
Step-by-Step Instructions for Small Batch Brownies
Okay, now for the fun part! Making these small batch brownies is incredibly fast—prep time is barely ten minutes. The most important thing you can do right now is get your oven warming up. We want everything ready to go when the batter is mixed, because we don’t want this beautiful batter sitting around too long before it hits the heat.
Preparing the Pan and Melting Fats
First things first: Preheat your oven to 325 degrees Fahrenheit. Then, grab that loaf pan. I want you to line it with parchment paper, but here’s the trick: leave about two inches of overhang on two opposite sides. These flaps are your handles later on so you can lift the whole thing out cleanly. Trust me, you’ll thank me when it’s time to slice!
Next, we handle the fats. Put your butter and vegetable oil into a microwave-safe bowl. I usually use short, 15-second bursts. You only want the butter melted, not sizzling hot. Stir them together until they look completely smooth and combined. That oil helps keep the final texture super tender, which is a bonus!
Developing the Glossy Sugar Base
This step is where the magic starts for that crackly top! Pour both your granulated sugar and that packed brown sugar right into the melted fat mixture. Now, grab your whisk and get to work. You need to whisk this vigorously for a solid minute or two. Keep going until the mixture looks noticeably thicker and develops a beautiful, deep glossiness. That shine is the sugar dissolving and starting to emulsify with the fats—it’s the secret sauce for the crust!
Once it looks glossy, toss in your room-temperature egg and the vanilla extract. Whisk it again, but don’t go crazy this time—just about 30 seconds until the mixture lightens up just a bit in color. It should look creamy and incorporated.
Combining Dry Ingredients and Folding in Chocolate
Time to get the dry stuff in there. Take your flour, cocoa powder, and salt and sift them right over the wet mixture. Sifting is key here to prevent any lumps of cocoa powder. Now, switch to your spatula. You need to whisk very gently, just until you can’t see any more dry streaks of flour remaining. Stop mixing the second they disappear! Overmixing flour develops gluten, and we want fudgy, not tough, brownies. If you are looking for other great baking recipes, check out these hot chocolate cookies recipe.
Finally, gently fold in those semisweet chocolate chunks. Use slow, deliberate motions to distribute them evenly. Then, scrape all that glorious batter into your prepared loaf pan and use the spatula to spread it into one nice, even layer across the bottom. If you want that extra salty crunch on top, sprinkle those sea salt flakes on now!

Baking and Cooling Small Batch Brownies
Pop that pan into the 325°F oven and set your timer for 22 minutes. Around the 25-minute mark, it’s time to test for doneness. Forget the clean toothpick test you use for cake! For fudgy brownies, you want the toothpick to come out with a few moist crumbs clinging to it, but absolutely no wet, gooey batter. If it’s still wet, give it three more minutes and check again.
The hardest part comes next, but you cannot skip it! Once they are perfectly baked, take the pan out and let them cool completely on a wire rack. I mean it—at least 45 minutes in the pan. If you try to lift them out early, they will crumble into chocolatey dust. Patience rewards you with perfect slices! If you are looking for more quick dessert ideas, you might enjoy these edible cookie dough bites.
Tips for Achieving Fudgy Small Batch Brownies
These small batch brownies are all about texture, right? We’re aiming for that chewy center that melts in your mouth and that signature shiny, crackly top that looks like it took hours of effort. It’s actually super simple once you know the few non-negotiables for this loaf pan recipe. It all comes down to how you treat the sugar and how long you let them rest! If you want to see more of my baking adventures, follow me on Pinterest.
Mastering the Perfect Bake Time
Because this is a small batch recipe baked in a deeper loaf pan, timing is tricky. If you pull them out too soon, you just have hot fudge, not a brownie! If you bake them too long, you lose that beautiful chewiness. My biggest tip here is to trust the visual cue more than the clock. If your toothpick comes out with wet batter, it needs more time, period. But if it comes out with just a few moist crumbs, stop immediately! That residual heat will finish the center perfectly as it cools down.
Why Cooling is Key for Small Batch Brownies
This is the hardest part, but listen to your old friend here: Do not rush the cooling! When these fudgy brownies come out of the oven, they are very fragile because the structure hasn’t fully set yet. If you try to slice them warm, the center will just ooze out, and your slices will look messy. Letting them cool completely in the pan, using those parchment handles to lift them onto a rack, allows the fats and sugars to firm up properly. This is what gives you those clean, sharp edges when you finally slice into them!
Storing and Reheating Your Small Batch Brownies
Since this is a small batch brownies recipe, hopefully, they don’t last too long! But if you manage to have leftovers—which I highly doubt—storage is super simple. Because we used a good amount of fat and sugar, they stay surprisingly fresh just sitting on the counter. They are best eaten within the first couple of days, but they hold up well for almost a week. For more recipe ideas, check out my Medium page.
When you do reheat them, you want to bring back that fresh-from-the-oven gooeyness without drying them out. A quick zap in the microwave is usually all it takes to restore that perfect, fudgy texture.
Storage and Reheating Table for Small Batch Brownies
| Condition | Duration | Reheating Suggestion |
|---|---|---|
| Countertop (Airtight Container) | Up to 4 days | 10-15 seconds in the microwave |
| Refrigerator | Up to 1 week | Let sit at room temperature for 15 minutes before serving, or microwave briefly |
Common Questions About Small Batch Brownies
I always get a flood of questions when I post about these little guys, mostly because people are worried about messing up the texture. Since these are fudgy brownies made in a specific pan size, a few tweaks can change everything. I’ve gathered the most common things folks ask me about when they are planning to bake their own batch of these wonderful loaf pan brownies.
Don’t stress too much about swaps, though! This recipe is pretty solid, but I know everyone’s pantry looks different. I’ve tried a few things myself over the years when I was out of an ingredient, so I can give you the real scoop on what works and what definitely doesn’t. If you want to connect about recipes, feel free to visit my Facebook page.
Can I Double This Small Batch Brownies Recipe?
This is the number one question! Honestly, I don’t recommend doubling it exactly. When you double the batter, you drastically change the depth in the loaf pan, and it won’t bake correctly—you’ll end up with a raw middle or burnt edges. If you want more than 8 brownies, it’s much better to make two separate, single batches. That way, you maintain the perfect ratio of fat to flour for that signature crackly top!
What if I do not have a loaf pan for these small batch brownies?
If you don’t have a loaf pan, don’t panic! The key is keeping the depth of the batter similar. The best substitute is an 8×8 square pan. If you use an 8×8, you’ll have thinner brownies, which means they bake faster—probably closer to 18 to 20 minutes. You might lose a tiny bit of that chewy center height, but they will still be delicious! Just watch them closely!
Enjoying Your Homemade Small Batch Brownies
There you have it—the secret to perfect, small-scale chocolate indulgence! Now that you have these rich, fudgy squares, the real question is how you’re going to eat them. Since they are so intensely chocolatey, they pair wonderfully with simple things that cut through the richness. Don’t let these sit around too long without being enjoyed! If you are interested in other small-scale baking projects, check out these walnut banana muffins recipe.
Serving Suggestions for Small Batch Brownies
My absolute favorite way to eat one of these small batch brownies is slightly warmed up with a tiny scoop of vanilla bean ice cream melting right on top. If you’re feeling a little healthier, a handful of fresh raspberries or strawberries on the side adds the perfect tart contrast. And of course, a strong cup of black coffee makes these the ultimate afternoon treat. Once you’ve had one, come right back here and leave me a comment telling me how the crackly top turned out!
Print
Amazing 8 small batch brownies Fudgy Cure
- Total Time: 35 minutes
- Yield: 8 servings
- Diet: Omnivore
Description
Small batch brownies made in a loaf pan with crackly tops, chewy centers, and rich chocolate chunks. Perfect when you want just a few brownies.
Ingredients
- 4 tablespoons unsalted butter
- 1 tablespoon vegetable oil
- 1/3 cup granulated sugar
- 1/4 cup packed light brown sugar
- 1 large egg, room temperature
- 1 teaspoon vanilla extract
- 1/4 teaspoon fine salt
- 1/4 cup all-purpose flour
- 1/3 cup unsweetened cocoa powder
- 1/4 cup semisweet chocolate chunks
- Sea salt flakes, for topping
Instructions
- Preheat oven to 325°F and line a 9×5 or 8×5 loaf pan with parchment paper, leaving some overhang for easy lifting.
- Place butter and vegetable oil in a microwave-safe bowl and heat in short bursts until the butter is just melted, then stir until smooth.
- Whisk in granulated sugar and brown sugar until the mixture looks thick and glossy.
- Add egg and vanilla extract and whisk for about 30 seconds until slightly lighter in color.
- Sift in flour, cocoa powder, and salt, then whisk gently just until no dry streaks remain.
- Fold in chocolate chunks with a spatula, then scrape the batter into the prepared loaf pan and spread into an even layer.
- Sprinkle a pinch of sea salt flakes over the top if desired, then bake for 22 to 26 minutes, or until a toothpick inserted in the center comes out with a few moist crumbs but no wet batter.
- Place the pan on a wire rack and let the brownies cool completely in the pan for at least 45 minutes, then use the parchment overhang to lift and slice into 8 pieces.
Notes
- Eggs in baked desserts should be cooked until the center is set and no raw batter remains to ensure safety.
- Prep Time: 10 minutes
- Cook Time: 25 minutes
- Category: Dessert
- Method: Baking
- Cuisine: American