Tree Cake Truffles with Little Debbies Cakes are exactly what I needed back when I first tried to host a cookie exchange. I was so overwhelmed trying to make complicated, scratch-baked gingerbread from my aunt’s ancient cookbook—it was a disaster! Flour everywhere, cookies breaking, and I almost gave up on holiday baking entirely. That’s when I realized that for us beginners, success often comes from simplifying the foundation. This recipe proves you don’t need hours of work or advanced pastry skills to create something that looks spectacular and tastes amazing. We take the structure from those perfect little sponge cakes and turn them into decadent, festive bites. It’s fast, it’s fun, and honestly, it’s the easiest way to look like a baking genius at any potluck this season. Trust me, if you can unwrap a snack cake, you can master this!

Essential Ingredients for Tree Cake Truffles with Little Debbies Cakes
When you’re starting out, the ingredient list needs to be short and sweet, which is why this recipe for Tree Cake Truffles with Little Debbies Cakes is such a lifesaver. We aren’t making anything from scratch here, which means the quality of the pre-made items really shines through. You only need five core things to get started, plus a couple of optional extras if you want to get fancy with the decoration later on. I always keep these items stocked in the pantry during December, just in case I need a last-minute treat! If you are looking for more quick holiday ideas, check out our holiday toffee.
Gathering Your No-Bake Dessert Components
The foundation of these truffles is super simple, but let’s talk about making the best choice for the base and the coating. For the cake, you need one whole box of Little Debbie Tree Cakes—that’s about five individual cakes. Don’t try to substitute these with something else; the specific texture of that spongy cake mixed with the filling is what creates the perfect dough consistency when you break it down.
For the coating, grab 8 ounces of white chocolate or candy melts. I usually lean toward candy melts because they set up firmer and they are designed to melt beautifully without seizing up, which is a huge win for beginners! For the decorations, you’ll want 3 tablespoons of festive sprinkles mixed right into the dough for texture and color. Then, have 3 tablespoons of red candy melts ready if you want that drizzle effect, and a little container of green sanding sugar for the final sparkle.
- 1 box Little Debbie Tree Cakes (exactly 5 cakes)
- 8 ounces white chocolate or candy melts
- 3 tablespoons festive sprinkles (for mixing in)
- 3 tablespoons red candy melts (optional drizzle)
- Green sanding sugar (for finishing)
Equipment Needed for Perfect Tree Cake Truffles with Little Debbies Cakes
One of the best parts about making Tree Cake Truffles with Little Debbies Cakes is that I don’t have to drag out a single specialized gadget. If you have basic mixing tools, you are good to go! Seriously, this is beginner-level stuff. You’ll need one large bowl for mixing everything up. A handheld electric mixer makes quick work of crushing those cakes, but honestly, you can use a sturdy fork if you don’t mind a little arm workout. For more easy dessert ideas, see our snacks section.
You absolutely must have parchment paper to line a baking sheet—this stops sticky messes! Finally, grab a tablespoon for scooping and a microwave-safe bowl for melting the coating. That’s it! No stand mixers, no fancy dipping tools required for this easy no-bake dessert.
Step-by-Step Instructions for Making Tree Cake Truffles with Little Debbies Cakes
Okay, this is where the magic happens, and I promise you, it’s almost too easy. We’re moving fast here, so make sure your baking sheet is ready and lined with parchment paper before you even unwrap the cakes. Since this is a no-bake dessert, everything moves quickly, which is fantastic for getting these done before guests arrive! You can find more helpful tips on our Pinterest page.
Preparing the Cake Base and Forming the Truffles
First things first: unwrap all five of your Little Debbie Tree Cakes. Toss them right into your large mixing bowl. Now, if you have that handheld mixer, use the beaters and just go to town! You want to mix these until they completely break down into fine crumbs. If you’re using a fork, press down hard and mash them until you have a texture similar to wet sand. This is crucial; you don’t want big chunks of cake left over.
Once the cakes are crumbly, toss in those 3 tablespoons of festive sprinkles. Mix them in just until they are evenly distributed throughout the crumbs. Now, you need to test the dough consistency. It should feel moist and hold together perfectly when you squeeze it in your hand. If it feels too dry—which can happen if your cakes were sitting out a while—just add a tiny splash of milk, like half a teaspoon at a time, until it sticks. You’re aiming for a consistency that lets you roll little balls without them crumbling apart.
Grab your tablespoon measure. Use it to scoop out uniform amounts of the dough. Roll each scoop firmly between the palms of your hands to form tight little balls—think the size of a large gumball. Place all those formed balls onto your waiting parchment-lined sheet. You should get about 15 truffles total. Pop this sheet into the freezer for about 10 minutes while you deal with the chocolate. Chilling them solidifies them just enough so they don’t fall apart when we dip them.
Melting and Coating the Tree Cake Truffles with Little Debbies Cakes
Time to melt the coating! For the easiest experience with these Tree Cake Truffles with Little Debbies Cakes, I always recommend the microwave. Put your 8 ounces of white chocolate or candy melts into a microwave-safe bowl. Heat it in 30-second bursts, stirring well after every single burst. Stop heating the second you see a few small lumps remaining, and just stir until the residual heat melts those last bits away. Overheating candy melts is the number one way to ruin a coating, so be patient!
Pull your chilled cake balls out of the freezer. Use a fork or a dipping tool—a regular dinner fork works fine!—to lower one ball completely into that smooth white chocolate. Gently lift it out, tilting the fork slightly to let the extra coating drip back into the bowl. If you leave too much on, the coating will be super thick. Place the coated ball back onto the parchment paper. Repeat until every single truffle is covered.
Decoration and Setting the Holiday Treats
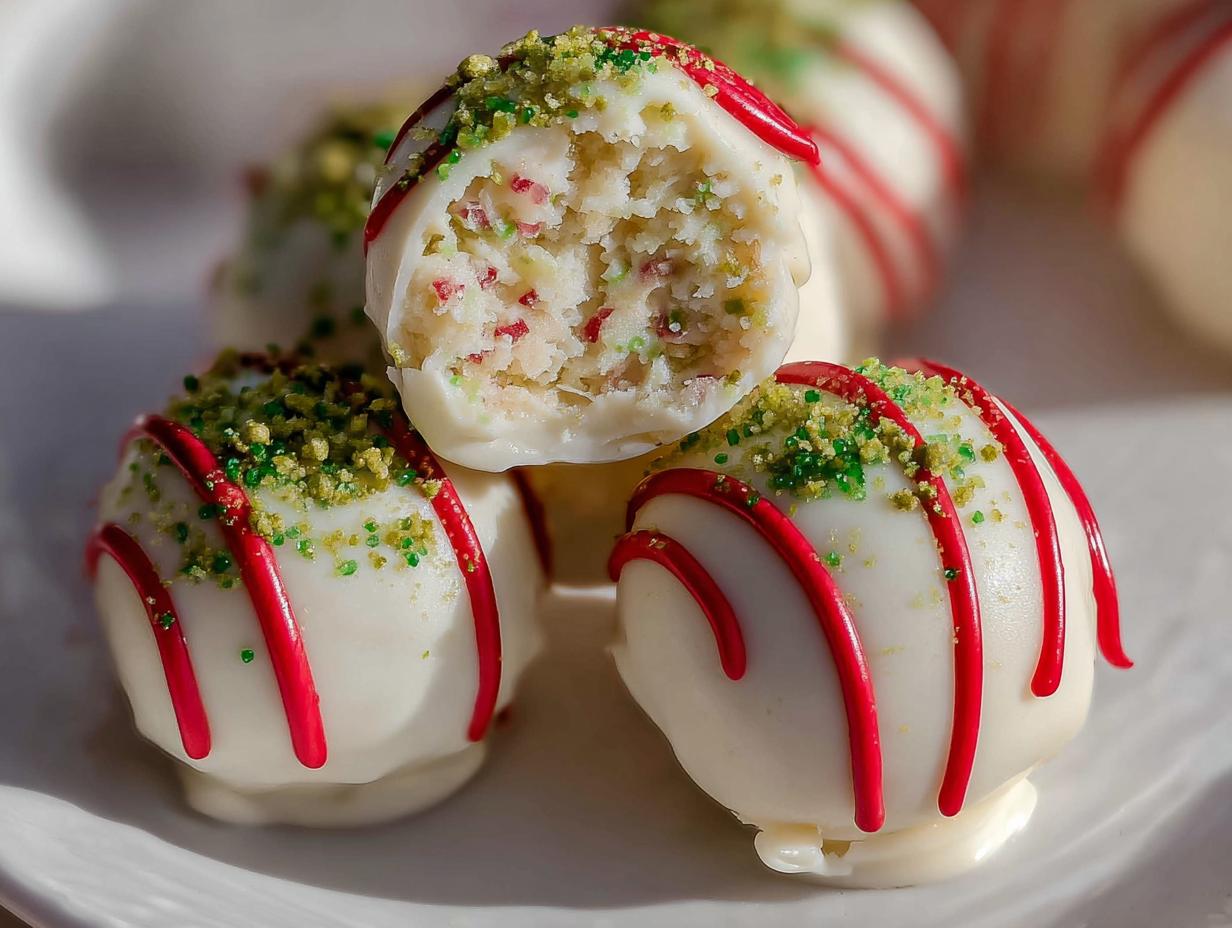
We need to work fast here because the white chocolate starts setting up almost immediately! Melt your red candy melts just like you did the white ones, but use short 15-second bursts since you only have a small amount. Once they are liquid, snip just the tiniest corner off the piping bag or Ziploc bag you put them in. You want a thin drizzle, not a blob!
Drizzle the red lines back and forth over the white coating. Right after you drizzle, grab your green sanding sugar and sprinkle it lightly over the wet red lines. The sugar needs to stick before the white chocolate hardens completely. Once everything is decorated, put the entire sheet back into the refrigerator for about 5 to 10 minutes. This final chill ensures the coating is firm and ready to handle before you serve these amazing, easy holiday treats! If you love easy holiday sweets, you might enjoy our recipe for easy jam thumbprint cookies.

Tips for Success When Making Tree Cake Truffles with Little Debbies Cakes
Even though making Tree Cake Truffles with Little Debbies Cakes is simple, a few little tricks can stop beginner hiccups dead in their tracks. First, if your cake dough seems slightly crumbly no matter what, it means you might need a tiny bit more binder—try adding just a teaspoon of softened cream cheese next time instead of milk; it really helps hold things together! If you are interested in other simple baking projects, check out our 5-ingredient buttermilk biscuits.
When dipping, make sure your cake balls are properly chilled. If they are room temperature, the white chocolate melts right off, and you end up with a thin, patchy coat. Also, don’t try to coat too many at once; work in batches of three or four, returning the unused balls to the fridge while you dip the others.
For that perfect, smooth look, always use a good quality dipping fork and gently tap the fork against the side of the bowl after lifting the truffle out. This little tap shakes off the excess melted chocolate so you don’t get those annoying little “feet” or thick drips on the bottom of your finished easy truffles.
Storing and Serving Your Homemade Truffles
Because these Tree Cake Truffles with Little Debbies Cakes rely on a set chocolate coating, storage is key to keeping them looking pretty and tasting firm! The absolute best way to keep these no-bake desserts fresh is to store them in the refrigerator. When you keep them cold, the candy coating stays crisp, and the cake center stays dense, which is what we want for the best texture. If you want to connect with us for more tips, follow us on Facebook.
Don’t leave them sitting out on the counter for hours, especially if your kitchen is warm—the coating will start to sweat and get sticky, which is a nightmare for handling. For serving, I like to pull them out of the fridge about 15 minutes before the party starts. This lets the chill come off just slightly so they aren’t rock hard, but they still hold their shape perfectly. They taste fantastic slightly cool!
Safe Storage and Reheating Instructions for Your Treats
You won’t really ever need to reheat these, since they are meant to be served cool or room temperature, but here is the best way to keep your amazing easy truffles fresh for the holidays:
| Storage Location | Container Type | Maximum Duration | Reheating Needed? |
|---|---|---|---|
| Refrigerator | Airtight container (with parchment dividers) | Up to 10 days | No |
| Freezer | Freezer bag or sealed container | Up to 2 months | Thaw overnight in fridge |
Frequently Asked Questions About Tree Cake Truffles
I get so many questions about these super quick holiday treats! Since we are relying on pre-made components for these Tree Cake Truffles with Little Debbies Cakes, people often wonder about substitutions or shelf life. Don’t worry; these are some of the easiest truffles you’ll ever make, but here are the answers to the most common things I hear from my NoobRecipe readers.
How long do Tree Cake Truffles with Little Debbies Cakes last?
Because of the moisture in the cake base and the coating, these are best kept chilled. In an airtight container in the refrigerator, they stay perfectly firm and delicious for about 10 days. If you made a huge batch for a party, you can freeze them for nearly two months! Just make sure to thaw them slowly in the fridge before serving.
Can I substitute the white chocolate for a different coating?
You definitely can! This is a great way to customize your no bake dessert. Milk chocolate or dark chocolate melts work wonderfully, though they will change the flavor profile significantly. The key is to use actual candy melts or high-quality melting chocolate, as regular chocolate chips often have stabilizers that make them seize up when melted this way. For more dessert inspiration, check out our no-bake churro cheesecake bars.
Why is my truffle dough so sticky?
This usually happens if the Little Debbie cakes were very fresh or if you accidentally added too much liquid when trying to bring the mixture together. If your dough is too sticky to roll, stop adding liquid immediately! Instead, pop the whole bowl into the freezer for about 15 minutes. That chill time firms up the fats and sugars just enough so you can roll those easy truffles without them sticking to your hands.
Understanding the Nutrition of These Easy Truffles
I always get asked about the nutrition for these quick treats, and look, these Easy Truffles are definitely a fun indulgence, not an everyday health food! Since we are using pre-made snack cakes and melting down candy coatings, we aren’t exactly tracking lean protein here. But for those of you who like to know what you’re eating, I pulled together the best estimates based on the standard ingredients listed. If you are looking for healthier options, explore our weight loss recipes.
Remember, this is just a general guide for this fantastic No Bake Dessert. The exact numbers can shift a bit depending on the brand of white chocolate you use or if your Tree Cakes were on the larger side. But this gives you a solid ballpark figure for one truffle serving!
| Nutrient | Estimated Amount (Per Truffle) |
|---|---|
| Serving Size | 1 truffle |
| Calories | Estimate 150 |
| Sugar | Estimate 15g |
| Fat | Estimate 9g |
| Saturated Fat | Estimate 6g |
| Carbohydrates | Estimate 16g |
| Protein | Estimate 1g |
Disclaimer: Nutritional information provided here is an estimate based on standard ingredient calculations and may vary slightly depending on the specific brands of Little Debbie Cakes and coating products you use.
Print
Tree Cake Truffles: 1 Amazing Recipe
- Total Time: 25 minutes
- Yield: About 15 truffles
- Diet: Vegetarian
Description
Create easy, festive Tree Cake Truffles using pre-made Little Debbie Tree Cakes, perfect for a quick holiday treat.
Ingredients
- 1 box of Little Debbie Tree Cakes (5 cakes)
- 8 ounces white chocolate or candy melts
- 3 tablespoons festive sprinkles
- 3 tablespoons red candy melts for drizzling (optional)
- Green sanding sugar for decoration
Instructions
- Unwrap the Little Debbie Tree Cakes and place them in a large bowl.
- Mix the cakes together with a handheld mixer until crumbly dough forms. Mix in the sprinkles.
- Using a tablespoon, scoop the dough and roll it between your palms. Place the dough balls on a parchment-lined baking sheet. Repeat until all dough is formed into balls.
- Melt the white chocolate or candy melts in a microwave-safe bowl or using a double boiler.
- Use a fork or dipping tool to dip each chilled cake ball into the melted white chocolate, coating it completely. Let excess chocolate drip off, then return the truffle to the baking sheet.
- Melt the red candy melts in a piping bag or a ziplock bag in the microwave in 30-second increments. Massage the bag between heating times until the red candy melts are fully liquid.
- Snip the corner of the bag and drizzle the red candy melts onto the truffles. Top with green sanding sugar. Let the truffles set in the refrigerator for a few minutes before serving.
Notes
- Keep truffles chilled until serving for best texture and appearance.
- Prep Time: 20 minutes
- Cook Time: 5 minutes
- Category: Dessert
- Method: No-Bake, Dipping
- Cuisine: American