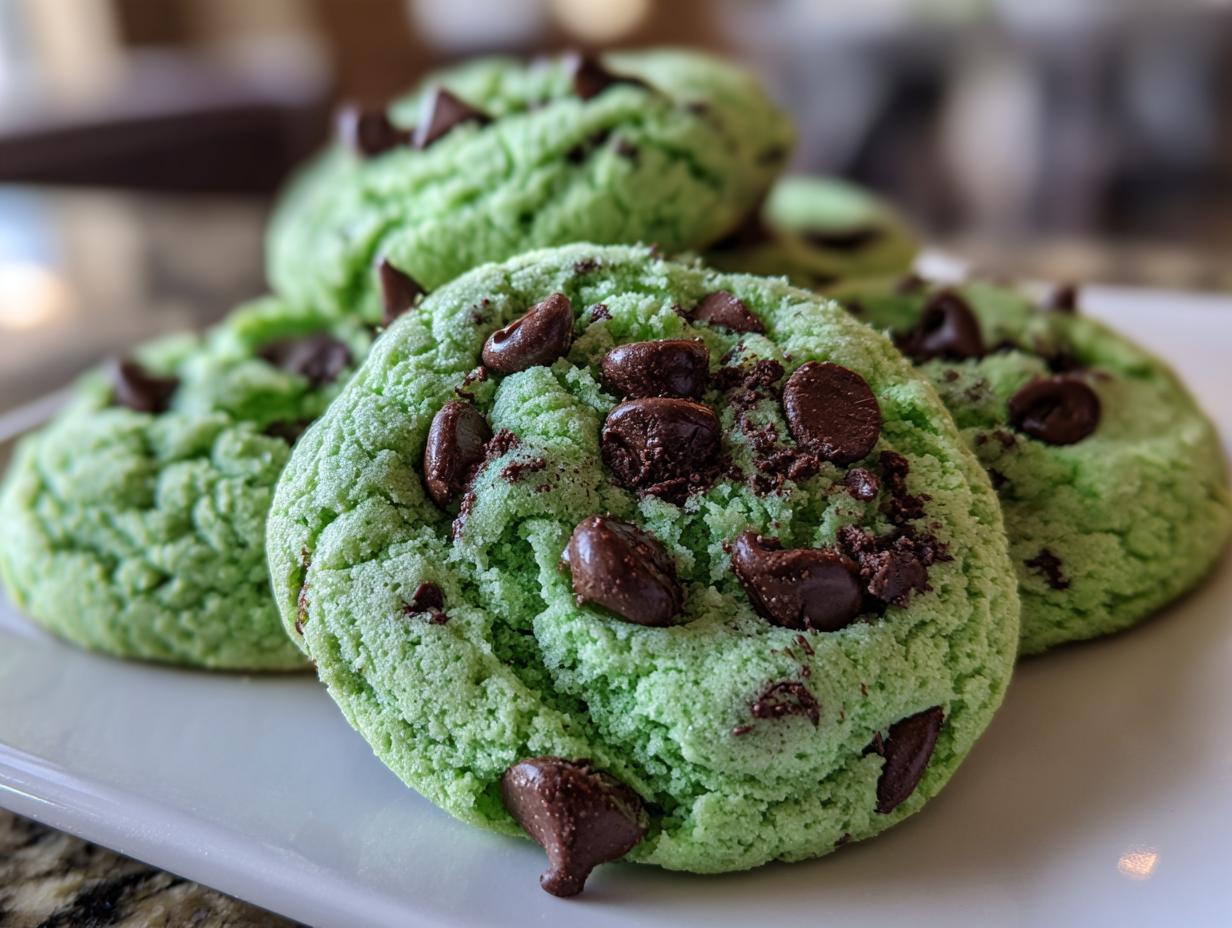
Forget everything you think you know about making bakery-style cookies! If you’ve ever stared longingly at a picture of thick, soft, perfectly green Mint Chocolate Chip Cookies only to be told you need to chill the dough for 24 hours, I have news for you: those days are over. Seriously! This recipe is my absolute favorite because it skips that whole tiresome step.
We are talking about going from pantry ingredients to warm, chewy, minty perfection in about twenty minutes flat. It’s designed for real life—for when you suddenly decide you need a massive, soft cookie *right now*. This recipe is thick, it’s wonderfully soft, and it delivers that incredible cool mint flavor balanced perfectly against the dark chocolate chips. It’s genuinely foolproof, even if you’re new to baking.

My Journey to the Perfect No-Chill Mint Chocolate Chip Cookies
Oh, the drama I used to have with cookie dough! I’m the worst at planning ahead. I’d mix up a batch, get excited, and then realize I had to wait until tomorrow just to get a decent cookie shape. I wasted so much time chilling dough only to have it still spread too thin anyway. I almost gave up on homemade cookies!
This recipe changed everything for me. It was developed out of pure, immediate craving, honestly. I tweaked the flour ratio and added a tiny bit of cornstarch—that’s my little secret weapon—to ensure the dough stayed substantial enough to bake up thick and chewy right away. It gives you that gorgeous, soft center without needing the fridge. Trust me, once you see how easy it is to get amazing Mint Chocolate Chip Cookies without the wait, you won’t look back!
Gathering Your Mint Chocolate Chip Cookies Ingredients
Okay, let’s talk ingredients. Since this recipe moves so fast, we don’t have time for the dough to rest and let flavors meld, so the quality of what you put in really matters! We are aiming for that perfect, thick, bakery-style chew, and certain items are non-negotiable if you want spectacular Mint Chocolate Chip Cookies.
Don’t try to substitute the peppermint oil for extract; the oil is much more potent and gives that true ice cream flavor without adding extra liquid that could make your cookies spread. Also, please, please use gel food coloring, not the liquid drops. We need that vibrant green, and gel is the only way to get it without watering down the batter. Gather everything up near your workspace before you even think about turning on the mixer!
Essential Ingredients List for Mint Chocolate Chip Cookies
Here is exactly what you need to pull off these incredible cookies. This list is precise because we are relying on chemistry here, not days of waiting for the dough to magically fix itself!
- 1 cup unsalted butter, softened (It needs to be truly soft, not melted!)
- 1 1/4 cups granulated sugar
- 1 large egg, room temperature (This helps it mix in smoothly)
- 1/2 teaspoon peppermint oil (This is the flavor bomb!)
- 1/2 teaspoon green gel food coloring (For that gorgeous mint chip look)
- 2 1/4 cups all-purpose flour
- 1 tablespoon cornstarch (My secret weapon for thickness!)
- 1/2 teaspoon baking soda
- 1/2 teaspoon salt
- 1 cup semisweet mini chocolate chips (These go *in* the dough)
- 1/4 cup additional mini chocolate chips for topping (These go on top when hot!)
Equipment Needed for Baking Mint Chocolate Chip Cookies
We’re moving fast, so having your tools ready makes all the difference! Since this recipe makes such wonderfully thick Mint Chocolate Chip Cookies, you’ll need a good mixer to handle the thick dough later on. Don’t worry if you only have hand beaters; just be prepared to work those arms a little!
- Electric mixer (handheld or stand)
- Two large mixing bowls (one for wet, one for dry)
- Whisk and a sturdy rubber spatula
- Two large baking sheets
- Parchment paper (essential!)
- Cookie scoop or two spoons for uniform sizing
Preparation Steps for Your Mint Chocolate Chip Cookies Dough
Before you even look at the butter, get your oven ready. Seriously, don’t skip this! Preheat your oven to 350 degrees Fahrenheit right now. While that’s heating up, line those two large baking sheets with parchment paper. I learned the hard way that parchment paper is the only way to ensure these soft cookies don’t stick when they are fresh out of the oven.
Also, make sure your butter is softened—it should give slightly when pressed—and grab your egg so it can come up to room temperature while you measure out your dry goods. Getting these little prep steps done first means zero stopping once the mixing starts!
Step-by-Step Instructions for Amazing Mint Chocolate Chip Cookies
Now for the fun part! Since we aren’t chilling, the order we mix things in is super important to keep these cookies thick and chewy. We need to build structure quickly so they don’t melt into minty puddles on the baking sheet. Follow these steps exactly, and you’ll have the best Mint Chocolate Chip Cookies ever.
First up, grab that medium bowl and whisk together all your dry things: the flour, the cornstarch—don’t forget that magic thickener!—the baking soda, and the salt. Whisk them really well until they look uniform. Set that aside. Now we move to the heavy lifting.
Creaming Butter and Sugar for Texture
In your big mixing bowl, put in your softened butter and the granulated sugar. Turn your mixer on medium speed. You’ve got to beat this mixture for a solid two to three minutes. Don’t stop early! We are looking for it to get lighter in color—pale yellow—and fluffy. This step is crucial because it whips air into the dough, which keeps your cookies from turning into dense hockey pucks later on. It needs to look visibly lighter than when you started.
Mixing Wet and Dry Components Correctly
Once the butter and sugar look fluffy, it’s time to add the flavor and color! Add the egg, the peppermint oil, and that gorgeous green gel food coloring all at once. Beat that again until everything is completely combined and the color is perfectly uniform. If you see any streaks of yellow butter, keep mixing for just a few more seconds.
Next, this is where you need to slow down. Pour that dry flour mixture right into the wet ingredients. You must mix this on the absolute lowest speed your mixer has. We only want to mix until the flour streaks just disappear. Seriously, stop the second you can’t see dry flour anymore. Overmixing here develops gluten, and gluten means tough cookies, not soft ones!
Once it’s *just* combined, switch to your rubber spatula. Take the cup of mini chocolate chips and gently fold them in by hand. You want them distributed, but don’t stir them aggressively. We are building tender Mint Chocolate Chip Cookies here!
The Baking Process for Thick Mint Chocolate Chip Cookies
Time to scoop! Use a two-tablespoon scoop, or just use two spoons to make nice round balls. Place them about two inches apart on your parchment-lined sheets because they will spread just a tiny bit. They bake fast, so don’t walk away!
Pop them into your preheated 350°F oven for 10 to 12 minutes. You are looking for the edges to be set, maybe just barely starting to look a little golden, but the centers should still look soft—almost underdone. That’s how you guarantee a chewy cookie! As soon as they come out, immediately press those extra topping chips right onto the hot surface. They’ll stick perfectly.

Let the hot Mint Chocolate Chip Cookies sit right on that baking sheet for five full minutes. This allows them to firm up so they don’t fall apart when you move them. Then, carefully transfer them to a wire rack to cool completely. Patience now means the perfect texture later!
Tips for Success with Your Mint Chocolate Chip Cookies
I’ve made enough of these Mint Chocolate Chip Cookies to know exactly where things can go sideways, but trust me, these little tweaks make all the difference between good and absolutely incredible.
If your cookies are spreading too much, even though we skipped the chill time, check your butter temperature. If it’s too warm or greasy when you start creaming, the structure won’t hold. It should be soft, but still cool to the touch. Also, for that vibrant mint color, don’t be shy with the gel food coloring—a full half teaspoon is what gets you that perfect ice cream shade. If you use extract instead of oil, you’ll need to cut back on the flour slightly, or you risk a dry cookie. If you want more baking inspiration, check out our Pinterest page!
Remember that cooling time on the pan is non-negotiable. They are fragile when hot! Five minutes on the warm sheet lets them set up beautifully, ensuring every single Mint Chocolate Chip Cookie is perfectly chewy when you finally bite into it.
Storing and Reheating Your Mint Chocolate Chip Cookies
Because these Mint Chocolate Chip Cookies are so gloriously soft and chewy, storage is key to keeping that texture locked in. Don’t just leave them sitting out on a plate! They are best eaten the day they are made, but they keep really well if you treat them right. For more quick baking ideas, see our air fryer hot cocoa cookies.
You want to store them in an airtight container at room temperature. If you stack them, put a small piece of wax paper or parchment paper between each layer. If you try to stack them directly against each other, they will stick together, and you’ll tear the beautiful green tops!
If you need them to last longer than three days, freezing is the best bet. They freeze beautifully for up to three months. When you want one, just let it thaw on the counter for about 15 minutes. If you want that “fresh out of the oven” feeling, pop a thawed cookie into a 300°F oven for just three minutes! You can also follow us on Facebook for daily updates.
Frequently Asked Questions About Mint Chocolate Chip Cookies
I get so many messages about these cookies, and that’s wonderful! It means you’re all baking them, which makes me so happy. Here are the common questions I hear most often about getting these Mint Chocolate Chip Cookies just right. If you are looking for more cookie recipes, check out our edible cookie dough bites.
Q1. Can I use mint extract instead of peppermint oil?
You certainly can, but you’ll need to adjust things! Mint extract is mostly alcohol and water, so it’s much weaker than the oil. If you use extract, start with 1 teaspoon, but know that the flavor won’t be quite as intense as the ice cream flavor we are aiming for. You might also need to add a tiny bit more flour since you’re adding liquid.
Q2. My cookies spread way too thin! What went wrong?
This is usually due to butter that was too warm or too much liquid added overall. Since this recipe doesn’t require chilling, the butter has to be soft but cool. If your butter melts while creaming, the structure collapses in the oven. Double-check that you used the cornstarch—it’s key for thickness!
Q3. How can I make the green color even brighter in my Mint Chocolate Chip Cookies?
Gel food coloring is the main secret here! If you want that super vibrant, almost neon green, you might need to use a little more than the half teaspoon I listed, or you can mix a drop of blue gel into your green for a cooler, more authentic mint shade. Don’t use liquid drops; they just won’t give you the intensity you want for these beautiful cookies.
Q4. Can I use regular chocolate chips instead of mini ones?
You can, but I strongly suggest sticking to the mini ones for the best texture. Regular chips are too big for such a quick-mixing dough. They tend to sink to the bottom or create big holes when they melt out. The mini chips distribute evenly throughout the dough, giving you those little bursts of chocolate in every single bite of your Mint Chocolate Chip Cookies.

3 Minutes for 1 Amazing Mint Chocolate Chip Cookies
- Total Time: 22 minutes
- Yield: 18 cookies
- Diet: Vegetarian
Description
Chewy cookies capturing the flavor of mint chocolate chip ice cream. This recipe yields thick, soft, bakery-style green cookies quickly, requiring no dough chilling.
Ingredients
- 1 cup unsalted butter, softened
- 1 1/4 cups granulated sugar
- 1 large egg, room temperature
- 1/2 teaspoon peppermint oil
- 1/2 teaspoon green gel food coloring
- 2 1/4 cups all-purpose flour
- 1 tablespoon cornstarch
- 1/2 teaspoon baking soda
- 1/2 teaspoon salt
- 1 cup semisweet mini chocolate chips
- 1/4 cup additional mini chocolate chips for topping
Instructions
- Preheat your oven to 350°F and line two large baking sheets with parchment paper.
- Whisk the flour, cornstarch, baking soda, and salt together in a medium bowl until well combined.
- Cream the softened butter and granulated sugar in a large bowl with a mixer on medium speed for 2 to 3 minutes until light and fluffy.
- Add the egg, peppermint oil, and green gel food coloring to the butter mixture.
- Beat the wet ingredients on medium speed until fully incorporated and the color is evenly distributed.
- Pour the dry flour mixture into the wet ingredients and mix on low speed just until no flour streaks remain.
- Fold in the 1 cup of mini chocolate chips by hand with a spatula to distribute them evenly.
- Scoop the dough into 2-tablespoon sized balls and arrange them on the prepared baking sheets spaced 2 inches apart.
- Bake for 10 to 12 minutes until the edges are set and just barely starting to turn golden.
- Press the remaining 1/4 cup of chocolate chips gently into the tops of the hot cookies immediately upon removing them from the oven.
- Allow the cookies to cool on the baking sheet for 5 minutes to set before transferring them to a wire rack.
- Cool completely on the rack before serving or storing.
Notes
- Use gel food coloring for the most intense green color.
- Bake time may vary slightly depending on your oven.
- The cookies will be soft when they first come out of the oven.
- Prep Time: 10 minutes
- Cook Time: 12 minutes
- Category: Dessert
- Method: Baking
- Cuisine: American