If you’ve ever been intimidated by baking, I am here to tell you that these lemon crumb bars are your new best friend. Seriously! We are talking about the easiest, zesty, buttery dessert you will ever make, and trust me, I created this recipe specifically for those days when you want maximum flavor payoff with minimum fuss. I remember trying to make fancy layer cakes when I first started baking; everything cracked or collapsed!
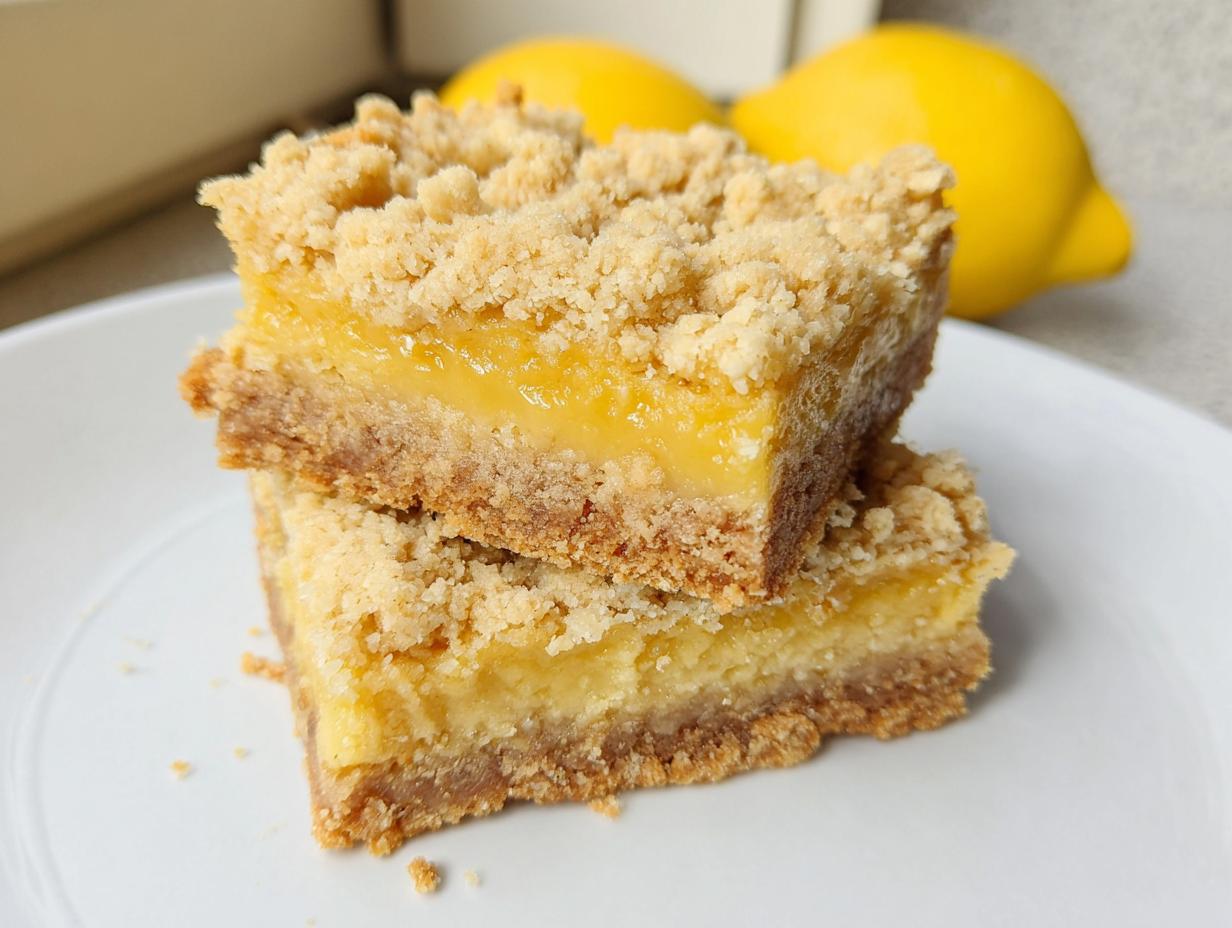
That’s why I perfected this recipe. It’s basically a dump-and-mix situation for the crust, and the filling sets up like magic. You get that perfect contrast between the crisp, oaty golden base and the bright, tangy lemon layer. These lemon crumb bars always disappear first at potlucks because they are just so undeniably satisfying. You don’t need fancy equipment or hours of time—just a little bit of love and a good 8×8 pan!

Essential Equipment for Making Lemon Crumb Bars
To make sure your baking session goes smoothly—and trust me, a smooth start means a much better finish—you need to have your tools ready before you even turn on the oven. We aren’t using a million gadgets here, but a few key items make the difference between a good crumb and a messy disaster. Laying everything out first is my secret weapon for staying calm when things get busy!
Tools Needed for Perfect Lemon Crumb Bars
- An 8×8-inch baking pan. This size is crucial for getting the right thickness for the crust and filling.
- Parchment paper. You absolutely need this for easy lifting later!
- A large mixing bowl for the crumb mixture.
- A smaller bowl just for whisking that bright lemon filling.
- A sturdy whisk and a rubber spatula.
- Measuring cups and spoons—precision matters, especially with the lemon juice!
Gathering Your Ingredients for Lemon Crumb Bars
Okay, let’s talk about the stars of the show: the ingredients! Since these lemon crumb bars rely on simple components, quality really shines through. Don’t try to skimp here; the buttery, oaty base needs to be perfect so it can hold up that gorgeous, tart center. I always check my pantry before I start prepping everything else. Having everything measured out, or *mise en place* as the fancy chefs say, prevents that frantic searching mid-recipe.
The magic is in the balance between the sweet, rich crumble and that sharp, electric lemon flavor. Make sure your oats are the old-fashioned rolled kind—the quick-cooking ones turn to mush, and we definitely don’t want that!
Crumb Base and Topping Components
This mixture does double duty, forming both the bottom crust and the top sprinkle. You’ll need your flour, oats, baking soda, and salt all whisked together first. Then, for the richness, we bring in the sugars—make sure that light brown sugar is nicely packed into your measuring cup! Finally, stir in the melted butter and vanilla until it looks like coarse, glorious, sandy crumbs. Remember, we only use half of this mixture for the base!
The Tangy Lemon Filling Ingredients
This is where the zing comes from! The base of the filling is sweetened condensed milk—that creamy goodness—but you have to balance it with real flavor. You absolutely must use fresh lemon juice and zest. That bottled stuff just doesn’t cut through the richness the way fresh zest does. Whisk these bright components with the two egg yolks until everything is completely smooth before pouring it over your pre-baked crust. That’s the secret to that perfect, set lemon layer!
Step-by-Step Instructions to Prepare Lemon Crumb Bars
Now for the fun part! Seriously, making these lemon crumb bars is so satisfying because you see them come together so quickly. Just follow these steps exactly, and you’ll be rewarded with that amazing buttery oat crust and the bright, tangy center. Don’t rush the cooling part, though—that’s the hardest step!
Preparing the Pan and Baking the Base
First things first, get your oven preheated to 350°F. I always grease my 8×8-inch pan first, and then I line it with parchment paper, making sure the paper hangs over two opposite sides like little handles. This is key for getting the bars out later without breaking them! In your large bowl, whisk together the dry crumb ingredients: the flour, oats, baking soda, salt, and both sugars. Once that’s mixed up, pour in the melted butter and vanilla extract. Use a fork or your hands to mix until it looks like coarse, slightly damp sand. Take about half of those glorious crumbs and press them firmly and evenly into the bottom of your prepared pan. We bake this base first for about 15 minutes until it just starts looking lightly golden around the edges. Don’t let it brown too much!
Creating and Adding the Lemon Filling
While that base is baking, you can whip up the filling! Grab your smaller bowl and whisk together the sweetened condensed milk, the fresh lemon zest, the fresh lemon juice, and those two egg yolks. You need to whisk this really well until it’s perfectly smooth—no lumps of yolk allowed! When the crust comes out of the oven after those 15 minutes, carefully pour that bright yellow lemon mixture right over the hot crust. Make sure you spread it as evenly as possible so every bite gets that tangy goodness.
Topping and Final Bake of Lemon Crumb Bars
Time for the grand finale on top! Take the remaining half of your crumb mixture and sprinkle it evenly over the lemon filling. Don’t press it down hard; you want it to stay crumbly so it bakes up crisp. Pop the pan back into the 350°F oven for another 20 to 22 minutes. You’ll know they are done when the topping is golden brown and the edges of the filling look set, not jiggly! This is the crucial part: let them cool completely on the counter, and then you absolutely must chill them in the fridge for at least an hour before cutting. That chilling time makes all the difference for clean, beautiful squares.

Tips for Success with Your Lemon Crumb Bars
Even though these lemon crumb bars are incredibly easy, there are a few little tricks I’ve picked up over the years that guarantee success. Baking is chemistry, right? So paying attention to temperature and timing means the difference between a perfect square and a gooey mess that falls apart when you try to serve it. Don’t worry, I’ve made all the mistakes so you don’t have to!
Achieving Clean Cuts
This is the number one question I get about these bars. If you try to cut them when they are even slightly warm, you’ll end up with lemon sludge all over your knife. The recipe calls for cooling completely and then chilling for at least an hour, but honestly? If you want those bakery-perfect edges, chill them longer, maybe even two hours. Or, here’s a pro tip: pop the whole chilled pan into the freezer for about 15 minutes right before you slice them. That firmness makes cutting through the buttery base and the set filling so much cleaner. Lift them out using those parchment paper handles!
Flavor Adjustments for Your Lemon Crumb Bars
The recipe calls for half a cup of fresh lemon juice, which gives you that perfect pucker, but if you have super tart lemons, you might want to start with a little less, say 7 tablespoons, and taste the filling mixture before adding the egg yolks. You can always add more zing, but you can’t take it away! Similarly, if you want a slightly milder lemon flavor, cut back just a touch on the zest. The structure relies heavily on the liquid ratios, so never mess with the amount of juice you add in relation to the sweetened condensed milk, but the zest is totally safe to play with to suit your own taste buds.
Storing and Serving Your Delicious Lemon Crumb Bars
These buttery lemon crumb bars are just as good, if not better, the next day once those flavors have really settled down. Presentation is everything when you serve them, especially since they are so simple looking. I love dusting them lightly with powdered sugar right before they hit the plate—it just makes that bright yellow filling pop! They look elegant, even though they were ridiculously easy to assemble.
The main thing to remember is that these need to stay cool. Because of that rich, tangy filling, they don’t fare well sitting out on the counter for hours, especially if you have company over. Keep them protected and cool so they stay perfectly firm for slicing!
Proper Storage and Reheating
You should always store leftover lemon crumb bars in the refrigerator. They firm up nicely in the cold, which is why chilling is so important for cutting them cleanly in the first place. I just layer them in an airtight container, separating the layers with a small piece of wax paper so the crumb topping doesn’t stick to the layer above it. They last beautifully for about four or five days this way. You don’t really reheat these; they are best served chilled or at cool room temperature.
| Storage Method | Duration | Serving Suggestion |
|---|---|---|
| Airtight Container (Refrigerator) | Up to 5 days | Serve chilled or let sit 15 minutes before eating |
| Freezer (Wrapped tightly) | Up to 3 months | Thaw in the fridge overnight |
Frequently Asked Questions About Lemon Crumb Bars
I always get questions after people try this recipe for the first time because they are just so surprisingly good! People want to know how to tweak them or how to make sure they don’t mess up the structure of these amazing lemon crumb bars. Here are the most common things I hear, so hopefully, this saves you a step!
Can I substitute the oats in these lemon crumb bars?
You sure can try, but you might lose some of that wonderful texture! The recipe calls for old-fashioned rolled oats because they hold their shape during the bake, giving you that satisfying chewiness in the base and topping. If you use quick oats, they will dissolve more and make the crumble layer feel almost cakey rather than crumbly. If you absolutely can’t use oats, you could try using an equal amount of finely chopped nuts, like almonds, but the structure will definitely change.
How do I know when the lemon filling is set?
This is where you have to trust your eyes! When you take the bars out for the final time, the edges of the filling should look firm and slightly opaque, and they won’t jiggle much if you gently nudge the pan. The center might still look a tiny bit soft, but that’s okay because it continues to set up as it cools on the counter. If the whole pan is still watery and liquidy after that 22 minutes, give it another five minutes and check again. The chilling time afterward does most of the heavy lifting for setting that beautiful tangy layer!
Sharing Your Lemon Crumb Bars Experience
I just love hearing from you when you make something from the blog! These lemon crumb bars are meant to be shared, so if you whip up a batch, please come back here and let me know how they turned out for you. Don’t forget to give them a rating! Share your success!
It’s so rewarding knowing my favorite easy recipe is making someone else’s day a little brighter and a lot sweeter. Happy baking! Pin this recipe for later!