If you’ve ever wanted that cozy, comforting flavor of a homemade banana muffin, but you absolutely do not have the time or the patience for scooping out individual cups—oh boy, do I have the solution for you! We are making sheet pan banana muffin bars today, and trust me, this recipe is my absolute go-to when I need something delicious fast. I’ve tested countless quick bakes, and this one never fails me; it’s that reliable, beginner-friendly magic that always turns out perfectly moist.
The best part? It’s all done on one pan, which means cleanup is practically non-existent! Seriously, you’re looking at a total time of under 35 minutes from start to finish. That’s why I love these sheet pan banana muffin bars so much—they deliver huge flavor with minimal fuss. If you’re like me and appreciate a recipe that works every single time, stick around. We are about to transform those sad, brown bananas on your counter into the easiest snack or breakfast you’ve made all week!

Essential Ingredients for Sheet Pan Banana Muffin Bars
The success of these sheet pan banana muffin bars hinges on using the right ingredients, especially the bananas! Don’t even think about using yellow ones; we need them practically black for that deep, sweet flavor. When you gather everything, remember I’m very particular about a couple of things to ensure you get the best possible texture. Make sure your brown sugar is nice and packed down when measuring, and those two eggs? They absolutely must be at room temperature so they mix in smoothly without chilling the batter.
Gathering Your Wet Ingredients for Sheet Pan Banana Muffin Bars
First up, grab those 3 large, very ripe bananas and mash them up really well. Then, whisk in the sugars—that’s 1/2 cup of packed light brown sugar and 1/3 cup of plain white granulated sugar. Keep whisking until everything looks thick and glossy before you add your 1/2 cup of oil (I prefer avocado oil here!), the 1/2 cup of Greek yogurt or sour cream, the 2 large eggs (remember, room temp!), and 2 teaspoons of vanilla extract. You want this wet base looking beautiful and smooth before moving on to the dry stuff.
Combining Dry Ingredients and Flavorings
Now for the structure and the spice magic! In a separate bowl, whisk together 2 cups of flour with the leavening agents: 1 teaspoon of baking powder and 1 teaspoon of baking soda. This is where we add the cozy flavors! Don’t skip these—we need 1 teaspoon of cinnamon, 1/4 teaspoon of nutmeg, and just a little pinch of ginger, plus 1/2 teaspoon of fine salt. Whisking these separately ensures the baking soda and spices are perfectly distributed throughout the flour so you don’t get any weird pockets later.
Why You Will Love This Sheet Pan Banana Muffin Bars Recipe
Honestly, this recipe changed my weeknight routine! If you’re looking for maximum payoff with minimal effort, you’ve found it. These bars are fantastic for so many reasons, and I promise they taste way more complicated than they are to make.
- They are incredibly fast—we’re talking 30 minutes total bake time!
- Minimal cleanup since it’s all mixed and baked in one pan.
- The flavor is pure banana bread perfection, just easier to slice.
- Perfectly soft and moist, even for total beginner bakers.

Step-by-Step Instructions for Sheet Pan Banana Muffin Bars
Alright, let’s get baking! Since these sheet pan banana muffin bars are designed to be quick, we need to move efficiently, but remember—gentle hands are key once the flour comes out. We are aiming for soft, tender bars, not hockey pucks!
Preparation and Pan Setup
First things first, get that oven hot! You need to preheat it to 350\u00b0F right now so it’s ready when the batter is mixed. Next, grab your rimmed quarter sheet pan. The size you want is about 9 by 13 inches. This is crucial for getting the right thickness for your bars. I always lightly grease the whole bottom surface, and then I line it with parchment paper. Make sure you leave an overhang—say, about two inches hanging up over two opposite sides. That overhang is your lifeline later; it’s how you lift the whole slab right out of the pan cleanly once they’re cooled down a bit. Don’t skip that parchment step!
Mixing the Batter: Wet Meets Dry
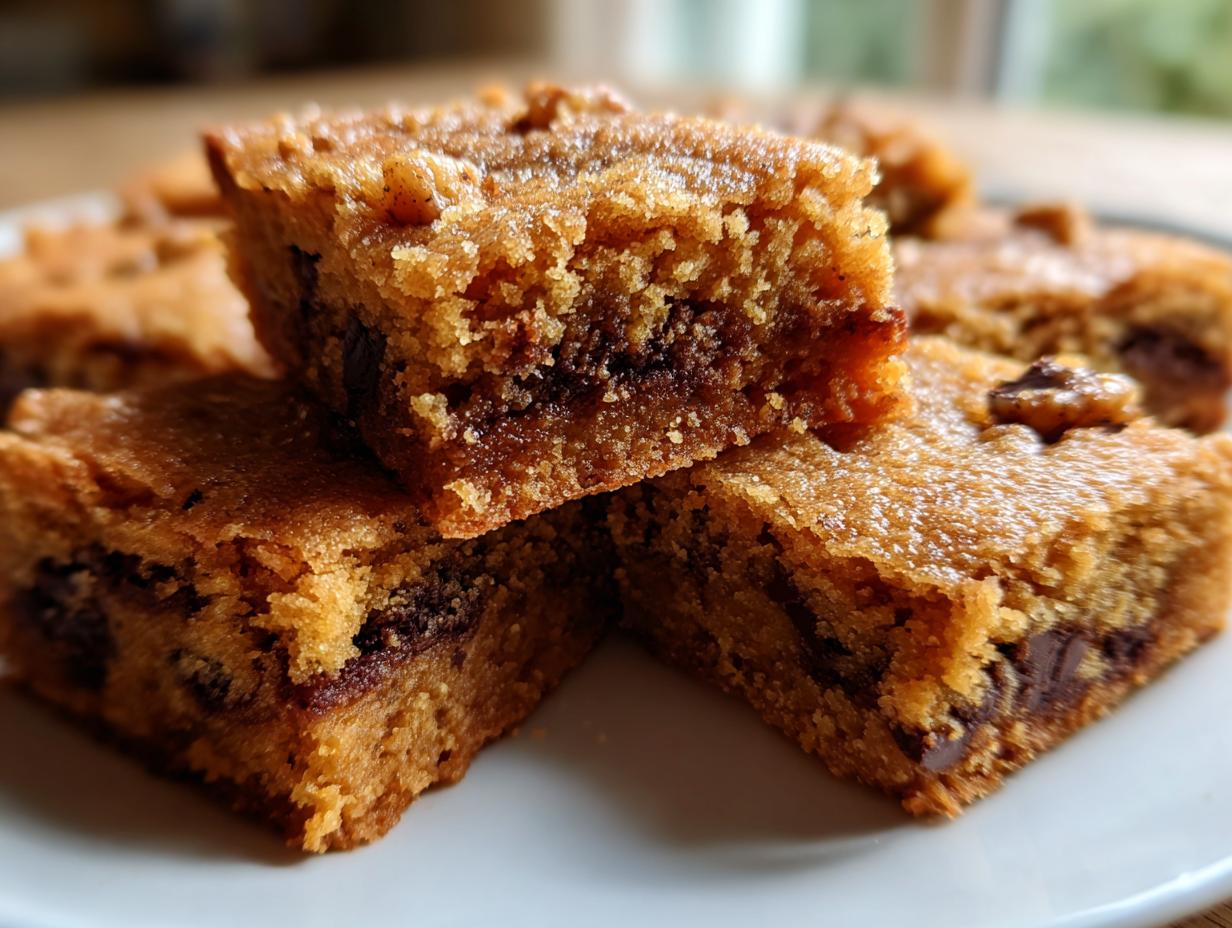
You’ve already got your wet ingredients looking glossy and beautiful, which is fantastic. Now, take your bowl with the dry ingredients—the flour, spices, and leaveners—and gently dump that entire mixture right into the wet ingredients. Here comes the most important moment for texture: you must only fold! Grab your spatula and gently fold everything together just until you can barely see any streaks of dry flour left. Seriously, stop mixing when it looks *almost* done. If you overmix, you develop the gluten, and your muffin bars will get tough. Once it’s just combined, fold in your 3/4 cup of mini chocolate chips and the 3/4 cup of walnuts or pecans. Be quick and gentle!
Topping and Baking Your Sheet Pan Banana Muffin Bars
Time to transfer that beautiful, thick batter into your prepared pan. Use the spatula to spread it out into an even layer right to the edges. Now, for the best part: that crunchy, sweet topping! In a tiny bowl, mix up the remaining 3 tablespoons of granulated sugar, 2 tablespoons of light brown sugar, and 1 teaspoon of cinnamon. Sprinkle this sandy mixture all over the top of the batter, covering it evenly. Pop that sheet pan into the 350\u00b0F oven for about 18 to 22 minutes. Keep an eye on them! You want to test doneness by sticking a toothpick right into the center. If it comes out clean or with just a few moist crumbs clinging to it, they are done. If there’s wet batter, give them two more minutes and check again.
Expert Tips for Perfect Sheet Pan Banana Muffin Bars
I’ve made batches of these sheet pan banana muffin bars more times than I care to admit, and I’ve learned a few things along the way that make the difference between good and absolutely incredible. My biggest piece of advice, hands down, is about the bananas. They have to be practically black! If they still have yellow spots, they won’t give you that deep, caramelized sweetness these bars need. Don’t try to rush them in the oven either; ripe bananas are the secret weapon here.
My other non-negotiable rule is about mixing. Once that flour goes in, you stop stirring the second you don’t see dry streaks anymore. I know it’s tempting to keep mixing to ensure everything is incorporated, but that’s how you get tough, chewy bars instead of soft muffin-like squares. Treat that batter like silk, and these bars will reward you with the softest crumb possible. If you enjoy baking quick treats like this, check out my tips for best homemade chocolate chip cookies recipe.
Ingredient Substitutions and Flavor Twists
These sheet pan banana muffin bars are super adaptable, which is why they’re perfect for meal prep. If you aren’t a fan of chocolate chips, ditch them! They add richness, but the bar is perfect without them. You can easily swap out the nuts, too. If you have a tree nut allergy, just leave the walnuts out entirely. Or, if you want a little extra texture, try using sunflower seeds instead of nuts—it gives a nice, subtle crunch!
Another fun twist I sometimes use is adding a tiny bit of citrus. Before you pour the batter into the pan, stir in the zest of one small orange. It brightens up the whole flavor profile and pairs surprisingly well with the spices and the banana. It’s a small change that makes these bars feel a little fancier. For more quick baking ideas, see my guide on chewy sugar cookies no chill dough recipe.
Equipment Needed for This Easy Sheet Pan Banana Muffin Bars Recipe
Since this is a one-pan wonder, the tool list is blessedly short! You won’t need a stand mixer or a dozen bowls for this one, which is exactly what I love about it for busy mornings.
- A rimmed quarter sheet pan (about 9×13 inches is what we use).
- Parchment paper (essential for easy lifting!).
- A large mixing bowl and a separate medium bowl.
- A whisk for the wet ingredients and a sturdy spatula for folding.
Frequently Asked Questions About Sheet Pan Banana Muffin Bars
I get so many questions about these speedy sheet pan banana muffin bars, especially since everyone wants to know how to make them fit their schedule or pantry needs. Here are the top things people ask me!
Q1. How soft should my bananas really be?
They should be very soft, almost mushy, with plenty of black spots on the peel. If they aren’t super ripe, your banana bars won’t have that deep sweetness, and you might find yourself adding extra sugar, which throws off the balance. Ripe bananas are non-negotiable for the best flavor!
Q2. Can I make these gluten-free?
Yes, you totally can adapt this! Since this is such a simple recipe, swapping the flour is easy. Just replace the 2 cups of all-purpose flour with a 1-to-1 gluten-free baking blend that already contains xanthan gum. The texture might be slightly different, but it still works great for a quick bake. If you are interested in other gluten-free options, check out my glutenfree winter spice pancakes.
Q3. My batter seems really thick after folding in the dry stuff—is that right?
It certainly should be thick! Remember, we are making banana muffin bars, not a pourable cake batter. If it’s thin, you probably overmixed it, or your bananas weren’t mashed enough. A thick batter spreads nicely into the pan and keeps those add-ins suspended so they don’t all sink to the bottom.
Q4. Can these be made without the chocolate chips or nuts?
Absolutely! If you need to avoid nuts or just aren’t feeling chocolate that day, you can leave them out entirely. The bars will still be delicious because the banana and spice flavor is so strong. They just become simpler, soft breakfast squares instead.
Storing and Serving Your Sheet Pan Banana Muffin Bars
Once you’ve cut these glorious sheet pan banana muffin bars, figuring out how to keep them fresh is the next big hurdle—though honestly, they usually disappear before I have to worry about storage!
Because these bars have that nice yogurt and oil base, they stay wonderfully soft when stored correctly. If you plan on eating them within a couple of days, keeping them right on the counter in an airtight container is perfect. They don’t need to be chilled if you’re planning on quick consumption.
But if you’re meal prepping for the week or if your kitchen is super warm, moving them to the fridge is the way to go. They last much longer that way, though I always let a bar sit out for about 15 minutes before serving if it’s been chilled—it really brings back that soft, muffin-like texture.
And if you make a giant batch? Don’t hesitate to freeze them! Cut them into individual squares first, wrap them tightly, and they freeze like a dream. It’s like having emergency breakfast bars ready to go whenever you need them! If you want to see more of my favorite quick recipes, follow me on Facebook.
| Storage Method | Duration |
|---|---|
| Airtight Container (Room Temp) | Up to 2 days |
| Airtight Container (Refrigerated) | Up to 5 days |
| Freezer (Airtight) | Up to 2 months |
Share Your Success with Our Sheet Pan Banana Muffin Bars
I truly hope you enjoyed whipping up these simple sheet pan banana muffin bars! Baking should always be fun, and I’d love to hear how they turned out for you. Did you use walnuts or pecans? Did you sneak an extra sprinkle of cinnamon on top? You can also share your creations on Pinterest!
Please take a second to leave a rating below or tell me about your experience in the comments. It helps other busy cooks know that this recipe is a winner! For more baking inspiration, check out my latest thoughts on Medium.
Print
1 Amazing sheet pan banana muffin bars
- Total Time: 28 to 32 minutes
- Yield: 16 bars
- Diet: Omnivore
Description
These 30-minute sheet pan banana muffin bars bake in one pan for fast breakfasts, snacks, and meal prep. They offer the cozy flavor of banana muffins in easy-to-slice squares.
Ingredients
- 3 large very ripe bananas, mashed
- 1/2 cup light brown sugar, packed
- 1/3 cup granulated sugar
- 1/2 cup neutral oil such as avocado or vegetable oil
- 1/2 cup plain Greek yogurt or sour cream
- 2 large eggs, at room temperature
- 2 teaspoons vanilla extract
- 2 cups all-purpose flour
- 1 teaspoon baking powder
- 1 teaspoon baking soda
- 1 teaspoon ground cinnamon
- 1/4 teaspoon ground nutmeg
- 1/4 teaspoon ground ginger
- 1/2 teaspoon fine salt
- 3/4 cup mini chocolate chips or chopped dark chocolate
- 3/4 cup chopped walnuts or pecans
- 3 tablespoons granulated sugar (for topping)
- 2 tablespoons light brown sugar (for topping)
- 1 teaspoon ground cinnamon (for topping)
Instructions
- Preheat your oven to 350°F. Lightly grease a rimmed quarter sheet pan about 9 by 13 inches and line it with parchment, leaving an overhang on two sides.
- In a large bowl, mash the bananas until mostly smooth. Whisk in the brown sugar, granulated sugar, oil, Greek yogurt, eggs, and vanilla until the mixture is thick and glossy.
- In a separate bowl, whisk together the flour, baking powder, baking soda, cinnamon, nutmeg, ginger, and salt until evenly mixed.
- Add the dry mixture to the wet mixture. Gently fold with a spatula just until no dry flour remains. Fold in the chocolate chips and chopped walnuts.
- Pour the batter into the prepared sheet pan. Spread it into an even layer, smoothing the top.
- In a small bowl, stir together the topping sugars and cinnamon until sandy. Sprinkle this mixture evenly over the batter.
- Bake at 350°F for 18 to 22 minutes. Check for doneness with a toothpick in the center; it should come out clean or with a few moist crumbs.
- Set the pan on a wire rack and let the bars cool for at least 15 minutes. Lift the slab out using the parchment overhang, then cut into squares and serve.
Notes
- Use very ripe bananas for the best flavor and sweetness.
- Avoid overmixing the batter after adding the flour to keep the bars soft.
- Cool the bars sufficiently before slicing so the crumb sets properly.
- Store cooled bars in an airtight container at room temperature for up to 2 days, or refrigerate for up to 5 days.
- You can freeze cut bars for up to 2 months.
- Prep Time: 10 minutes
- Cook Time: 18 to 22 minutes
- Category: Dessert/Snack
- Method: Baking
- Cuisine: American