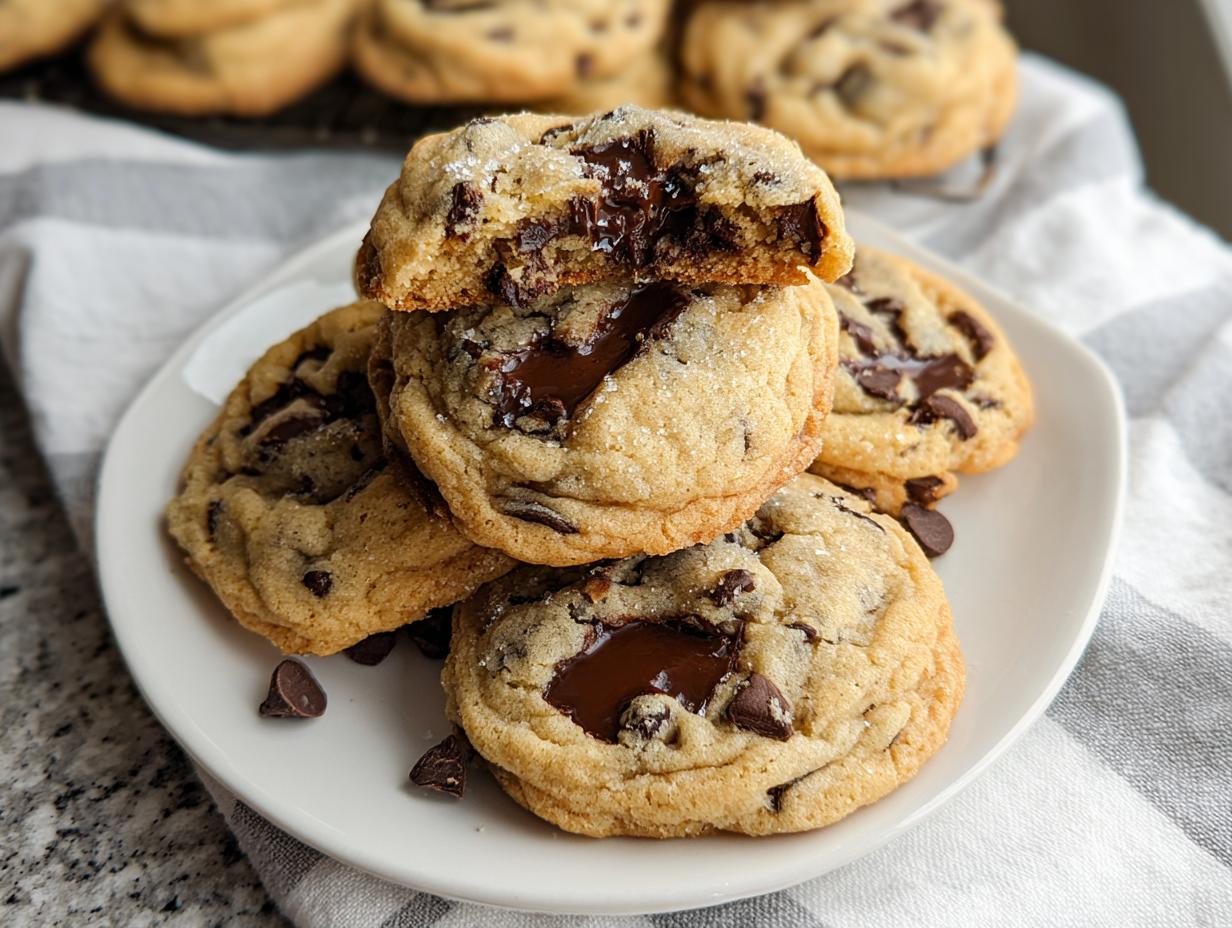
Best Homemade Chocolate Chip Cookies start right here, folks! When I first started NoobRecipes, I swear, the first batch of cookies I ever tried to make ended up looking like rock-hard hockey pucks. I followed a recipe that involved chilling dough for 24 hours and using six different kinds of fancy flour. It was a disaster! I almost gave up on baking entirely right then and there.
That’s why this recipe for Best Homemade Chocolate Chip Cookies is so important to me. It’s the one that proved you don’t need to be a seasoned pro to make something truly amazing. Seriously, it’s so straightforward—soft butter, two sugars, mix, scoop, bake! We aren’t messing around with complicated steps or obscure ingredients. This recipe is dependable, fast, and delivers that perfect soft center and slightly chewy edge every single time. If you’re a beginner baker, this is the one that will build your confidence faster than anything else. Trust me, you’ve got this!

Why You’ll Love This Recipe for the Best Homemade Chocolate Chip Cookies
I designed this recipe specifically so you could get a batch of incredible cookies without spending your entire afternoon in the kitchen. We’re talking about a recipe that respects your time but doesn’t cut corners on flavor. It’s my go-to when I need a quick fix, and it always comes out tasting exactly like the classic cookie you dream about.
- It’s lightning fast—you can have dough ready in under 20 minutes!
- The instructions are crystal clear, making it absolutely foolproof for new bakers.
- We use simple pantry staples to achieve that perfect, rich, buttery, classic chocolate chip cookie flavor.
- The texture is exactly right: soft in the middle, slightly golden on the edges.
Gather Your Ingredients for the Best Homemade Chocolate Chip Cookies
Before we even think about turning on the mixer, we need to make sure everything is ready to go. This recipe moves fast once you start, so preparation is key to staying relaxed. Don’t try to substitute the salted butter here; we need that saltiness to balance the sweet sugars!
You’ll notice we use both brown and white sugar—that’s part of the secret sauce for texture, so please don’t skip either one. Get your measuring cups ready, and make sure your butter is actually softened, not melted. That’s a rookie mistake I made way too many times!
Essential Component List
You’ll find the full list below, but for your final article, please make sure this moves into a clean, easy-to-read table format so readers can quickly check off what they need. Remember, having all your measured ingredients lined up makes the mixing process smooth sailing!
Equipment Needed for Perfect Baking
You don’t need a fancy stand mixer for this, but having the right basic tools really helps things go smoothly. I usually grab my trusty hand mixer because it’s less cleanup, but whatever you have works! Make sure you have at least two sturdy mixing bowls ready.
- Electric Mixer (handheld or stand)
- Large Mixing Bowls
- Rubber Spatula
- Cookie Scoop (or two spoons)
- Baking Sheets
- Parchment Paper or Silicone Baking Mats
Step-by-Step Instructions for the Best Homemade Chocolate Chip Cookies
Alright, this is where the magic happens! Remember how I said I almost quit baking? It was usually because I rushed this part. Take a deep breath, put on some good music, and let’s follow these steps exactly. First things first: get that oven preheated to 350°F. We want everything ready to go.
Creaming Base Ingredients
Grab your softened butter, your brown sugar, and your granulated sugar. Toss them into your mixer bowl. Now, you need to beat these together until they look really light and fluffy—we’re talking pale yellow, almost white, and visibly airy. This process whips air into the fat, which is crucial for the cookie’s structure. Don’t skimp here; this might take three or four minutes, depending on your mixer. Once it looks fluffy, scrape down the sides really well. Then, add your egg and that whole tablespoon of vanilla extract. Mix just until those wet ingredients are incorporated smoothly.
Combining Wet and Dry Mixtures
In a separate bowl, whisk together your flour, baking soda, and salt. This ensures the leavening agent is spread out evenly. Now, here’s the most important rule for soft cookies: add the dry ingredients to the wet ingredients in two or three batches, mixing on low speed. You must mix only until you see the last streak of flour disappear. If you overmix here, you develop gluten, and hello, tough cookie! We want soft! Once it’s just combined, toss in those chocolate chips and fold them in gently with a spatula. Don’t use the mixer for the chips!
Baking and Cooling the Best Homemade Chocolate Chip Cookies
Scoop your dough—I use about a tablespoon and a half per cookie—and place them about two inches apart on that parchment-lined sheet. Pop them into the preheated oven for 8 to 10 minutes. You are looking for the edges to just start turning golden brown. If they look fully brown, they are overdone for our soft goal! Pull them out right then. Do not touch them! Let them sit right there on the hot pan for a full five minutes. This lets them set up perfectly. After five minutes, gently move them to a wire rack to cool completely. That two-stage cooling process is the secret to their final texture!

Tips for Success When Making the Best Homemade Chocolate Chip Cookies
Look, baking is science, but it’s also a little bit of kitchen intuition. I’ve learned a few tricks over the years that guarantee these cookies turn out soft and chewy, just like they should. My biggest piece of advice involves what you do right when they come out of the oven. Remember that five minutes they spend cooling on the hot sheet? That’s non-negotiable! If you rush them onto the cooling rack, they might just spread out into thin, sad puddles because the structure hasn’t set yet.
Also, about those chocolate chips—use the ones you genuinely love! I prefer a mix of semi-sweet and milk chocolate for the best flavor depth. If you want an extra gooey center, try pressing a few extra chips right onto the tops of the dough balls just before they go into the oven. It looks fancy, but it’s just an extra bit of melty goodness. Following these little tweaks ensures you get the absolute best homemade chocolate chip cookies every single time you bake them! If you want to see another fantastic cookie recipe, check out our ooey gooey brown butter chocolate chip cookies.
Storing and Serving Your Cookies
These cookies are dangerously delicious, so you might need to store them! Honestly, they rarely last more than a day at my house, but for those days when you have leftovers, proper storage is key to keeping that soft texture we worked so hard for. Don’t just leave them out on the counter in a pile; they’ll go stale fast. If you want to share your baking successes, feel free to tag us on Facebook!
The best way to keep them fresh is in an airtight container at room temperature. If you’re planning ahead—maybe for a bake sale or just stocking up for the week—freezing is your best friend. You can freeze the baked cookies or even the raw dough balls, which is a huge time-saver for future cookie emergencies! You can also find more great dessert ideas on our dessert and cakes page.
Keeping Your Cookies Fresh
For baked cookies, lay them in a single layer inside a sturdy, airtight container, maybe with a piece of parchment paper between layers if you stack them too high. They stay great for about five days this way. If you need longer, pop that sealed container straight into the freezer! Frozen baked cookies are fantastic because you can just pull one out and let it thaw on the counter for about 15 minutes, and it tastes almost freshly baked.
If you freeze the raw dough balls, just make sure they are frozen solid first before sealing them up. Then, when you want cookies, you can pop them directly from the freezer onto the baking sheet and add just a couple of extra minutes to the baking time. Easy peasy! Don’t forget to save this recipe on Pinterest for later!
Frequently Asked Questions About Homemade Chocolate Chip Cookies
I get so many questions after people try this recipe for the first time, and usually, it’s about texture! Don’t worry if your first batch isn’t perfect; we all start somewhere. Here are a few things I hear most often:
Q1. My cookies spread out way too flat! What happened?
This almost always means your butter was too soft, maybe even slightly melted, when you creamed it with the sugars. Melted butter can’t hold the air bubbles needed for structure. Also, make sure you are chilling the dough for at least 15 minutes if your kitchen is really warm before scooping!
Q2. Can I use baking powder instead of baking soda?
Please stick to the baking soda for this recipe! Baking soda reacts immediately with the acidic brown sugar, helping those cookies spread just a little and get that golden color. Baking powder behaves differently and will result in a cakier, puffier cookie, which isn’t what we are going for here. If you are interested in other baking projects, check out our recipe for all butter buttermilk biscuits.
Q3. Why are my cookies hard the next day?
If they are hard, you likely overbaked them by just a minute or two, or you didn’t let them cool long enough on the hot baking sheet. The residual heat sets the final structure, so that five-minute rest is super important for keeping them soft!
Q4. Can I use regular salt instead of the amount listed?
The recipe calls for a specific amount of salt mixed with the flour. If you use standard table salt instead of the amount specified, it might taste too salty, so measure carefully! We need that specific balance.
Estimated Nutritional Data
Now, I’m Adam from NoobRecipes, so remember that all of this is just an estimate based on the standard ingredients I used. If you go heavy on the chocolate chips or use extra-large eggs, your numbers will change! This is just a guide, not a strict science breakdown for your perfect batch of cookies.
Here’s the breakdown based on my standard ingredient estimates for one cookie:
| Nutrient | Amount (Approx.) |
|---|---|
| Calories | 150 |
| Sugar | 12g |
| Fat | 8g |
| Protein | 2g |

Best Homemade Chocolate Chip Cookies: 1 Secret
- Total Time: 25 minutes
- Yield: About 2 dozen cookies
- Diet: N/A
Description
Make the Best Homemade Chocolate Chip Cookies. This simple recipe yields classic, soft cookies perfect for any beginner baker.
Ingredients
- 3/4 cup (167 g) salted butter, softened
- 1/2 cup (123 g) brown sugar
- 1/2 cup (115 g) granulated sugar
- 1 egg
- 1 tbsp vanilla extract
- 2 cups (304 g) all-purpose flour
- 1 tsp baking soda
- 1/2 tsp salt
- 1 cup (200 g) favorite chocolate chips
Instructions
- Preheat your oven to 350°F.
- Cream the softened butter, granulated sugar, and brown sugar in a mixer bowl until the mixture looks light and fluffy.
- Scrape the bowl sides. Add the egg and vanilla extract. Mix these until they combine well.
- Add the flour, baking soda, and salt. Mix until you form a soft dough that is not sticky.
- Fold in your chosen chocolate chips.
- Scoop the dough into 1½ tablespoon portions onto a cookie sheet lined with parchment paper or a silicone mat.
- Bake at 350°F for 8 to 10 minutes. Remove when the edges just start turning golden brown.
- Let the cookies cool on the pan for 5 minutes. Then, move them to a wire rack to finish cooling.
Notes
- For softer cookies, remove them from the oven as soon as the edges turn gold. Let them set on the baking sheet.
- Store finished cookies in an airtight container for up to five days. Freeze them for longer keeping.
- Prep Time: 15 minutes
- Cook Time: 10 minutes
- Category: Dessert
- Method: Baking
- Cuisine: American