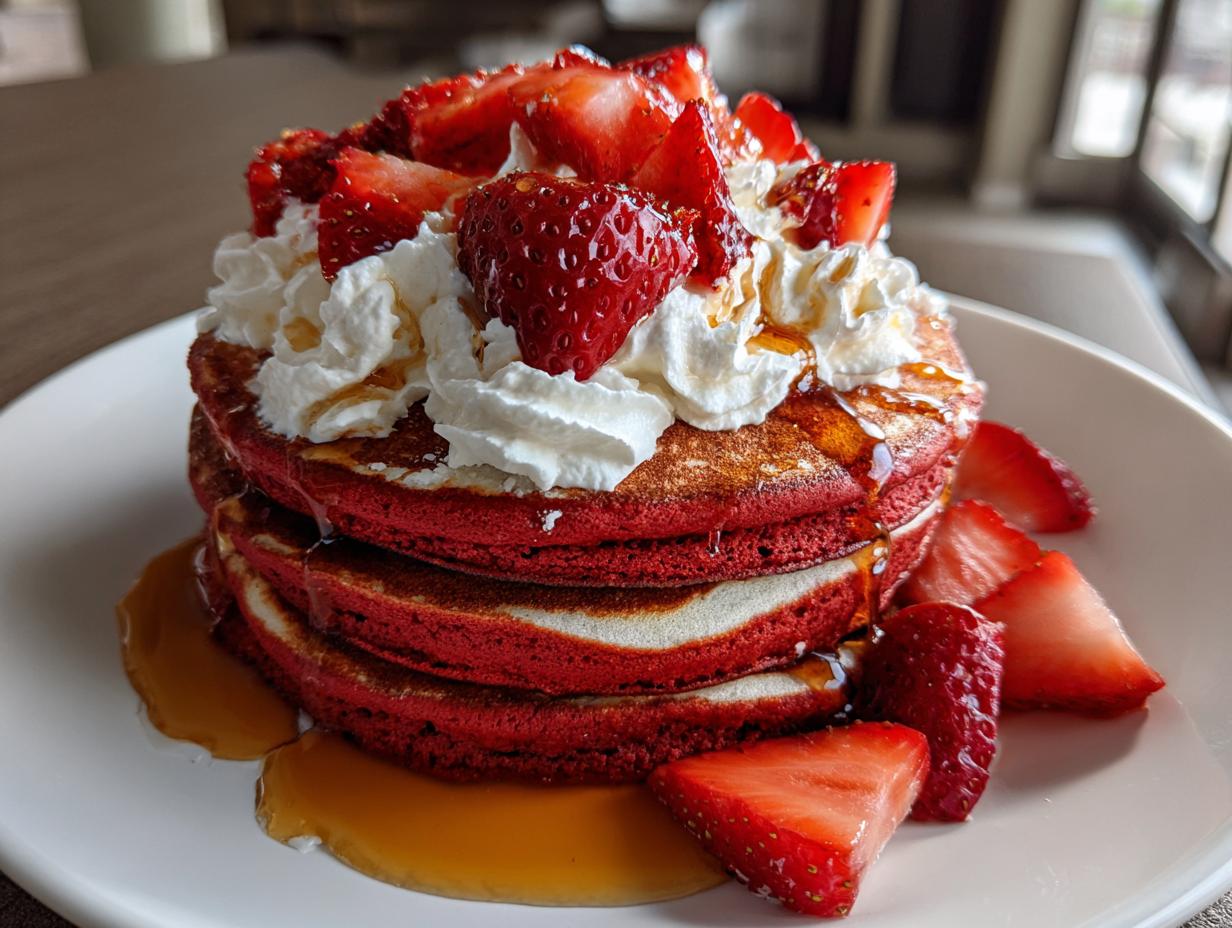
Okay, listen up, because if you think red velvet is just for cake, you are missing out on the best weekend breakfast EVER! We’re making Red Velvet Pancakes today, and I promise you, these are foolproof. I’ve tinkered with this recipe until it delivers that signature deep cocoa flavor paired with the perfect, bright tang from the buttermilk and sour cream. It’s intense, it’s gorgeous, and honestly, it makes your kitchen smell like a dream when they are cooking.
Forget those flat, sad pancakes you might have made before. My method focuses on getting that incredible fluffiness every single time. I’ve tested this against every possible mistake a beginner could make—overmixing, wrong heat—and this batter survives it all! You’re going to look like a brunch pro, even if you just started using your stove last week. Trust me, once you nail this vibrant stack, you won’t go back to plain old flapjacks.

Why You Will Love Making Red Velvet Pancakes
These aren’t just breakfast; they are an event! What I love most is how quickly they come together. You get that luxurious, slightly chocolatey taste and that beautiful, striking red color without spending half your morning in the kitchen. Seriously, who needs a complicated dessert when you can have these amazing Red Velvet Pancakes ready before noon?
They are surprisingly simple, even for someone who usually burns toast. The combination of cocoa and tanginess is addictive, and stacking them up with cream and berries? Pure magic. Plus, they photograph beautifully, which is always a bonus, right?
Quick Prep for Your Red Velvet Pancakes
You only need about ten minutes to get this batter mixed up, and that includes measuring everything out! I always tell my friends, if you can stir two bowls, you can make these pancakes. We’re talking about a total turnaround time of 30 minutes from craving to eating. It’s perfect for those weekend mornings when you want something special but don’t want to start cooking at 6 AM.
Gathering Your Ingredients for Red Velvet Pancakes
Okay, gathering the troops! Getting the right components is key to nailing that perfect texture and color in our Red Velvet Pancakes. I’ve listed everything out below, but pay attention to the wet ingredients—that’s where the magic for the tang and the texture happens. Don’t skimp on the quality here, either; good ingredients make all the difference, especially with cocoa!
When you’re laying everything out, make sure you have two separate bowls ready to go, just like we’ll talk about later. It keeps things tidy and stops you from overmixing later on. Getting your measurements right upfront makes the whole process smooth sailing!
Essential Dry Components
We need to build our base here. Make sure these are all whisked together really well so the leavening agents get distributed evenly throughout the flour. You don’t want a clump of baking soda in one bite!
- 1 cup all-purpose flour
- 1 teaspoon baking soda
- 1/4 teaspoon baking powder
- 1/4 teaspoon salt
- 2 tablespoons granulated sugar
- 2 tablespoons unsweetened cocoa powder
Wet Ingredients for Richness
This is the heart of the flavor and the fluff! The buttermilk and sour cream are non-negotiable; they react with the baking soda to give us that incredible lift and that signature slight tang that cuts through the sweetness. And yes, you absolutely need the red gel food coloring—it makes these pancakes look spectacular!
- 1 large egg
- 3/4 cup buttermilk
- 1/4 cup sour cream
- 1 tablespoon red gel food coloring
- 1 teaspoon vanilla extract
Final Additions and Toppings
Don’t forget the melted butter; that adds necessary fat and richness to the batter itself. And of course, you need the good stuff for serving. I always have fresh strawberries on hand because the acidity is a great counterpoint to the richness of the pancake.
- 3 tablespoons unsalted butter, melted (plus extra for greasing the skillet)
- Whipped cream
- Maple syrup
- Fresh strawberries, sliced
Step-by-Step Instructions for Perfect Red Velvet Pancakes
Alright, let’s get cooking! This is where we turn those piles of ingredients into the most beautiful stack of Red Velvet Pancakes you’ve ever seen. Remember, the key here is gentle handling once the wet and dry meet. Don’t get aggressive with the mixing, or we’ll lose that fluff we worked so hard to create!
Mixing the Dry Base
Step one is super simple but important. Grab your biggest bowl—the one that will hold everything eventually—and toss in all your dry components: the flour, baking soda, baking powder, salt, sugar, and that beautiful cocoa powder. Take a whisk and just go to town for about 30 seconds. We need these dry ingredients fully acquainted so that when the wet stuff hits, everything rises evenly. No lumps allowed!
Creating the Vibrant Wet Mixture
In a separate, medium-sized bowl, we build the color and the tang. Crack in your egg, then pour in the buttermilk and scoop in the sour cream. Now for the fun part: the food coloring. Dump in that tablespoon of red gel coloring. Whisk this mixture until it is completely smooth and that deep, gorgeous red color is uniform throughout. If you see white streaks, keep whisking! Add the vanilla extract in here too.
Combining Wet and Dry Batters
Now, pour that entire wet, red mixture right into your big bowl of dry ingredients. Use a spatula or wooden spoon—not an electric mixer here, please!—and gently fold everything together. You’ll stop mixing the second you no longer see streaks of dry flour. Yep, that’s it. It’s okay if it looks a little lumpy; seriously, lumps are your friends right now!
Next is the melted butter. Slowly drizzle that in while you continue to fold gently. If, after adding the butter, the batter seems way too thick—like concrete, not lava—you can thin it out by adding maybe one or two extra tablespoons of buttermilk, just until it settles into a nice, thick ribbon consistency.
Griddling Your Fluffy Red Velvet Pancakes
Time for the heat! Set a nice nonstick skillet or griddle over medium heat. You want it hot enough to sizzle when a drop of water hits it, but not so hot that it burns the outside before the middle cooks. Lightly grease it with a small dab of butter (wipe off the excess with a paper towel). This keeps them from being greasy!
Use a 1/4 cup measure to scoop the batter onto the hot surface. Give them space! Cook them for about two minutes. You’ll know they are ready to flip when you see those lovely bubbles form across the surface and the edges look dry and set. Carefully slide your spatula underneath and give them a confident flip. Cook the second side for just one or two more minutes until they are perfectly golden underneath. Stack them up on a plate and keep them warm while you finish the rest of the batter. Don’t forget to re-butter the pan lightly for each new batch!

Tips for Success with Your Red Velvet Pancakes
Even though this recipe is tough to mess up, a few little tricks I learned over the years will guarantee you that perfect, airy texture every time. Don’t skip these, or you might end up with something slightly flatter than you hoped for. It’s all about respecting the batter!
Temperature Control Matters
The absolute biggest mistake people make on the griddle is having the heat too high. If your pan is scorching hot, the outside of the pancake immediately seizes up and turns dark brown before the inside has time to rise and cook through. Keep it at a steady medium. If you notice the first batch burning too quickly, just nudge the dial down a tiny bit. Consistency is the name of the game here!
Avoiding Overmixing
I cannot stress this enough: when you combine the wet and dry ingredients, stop stirring the second you don’t see white flour anymore. Seriously, put the spoon down! Overmixing wakes up the gluten in the flour, and gluten means tough, chewy pancakes—the opposite of the soft, fluffy texture we are aiming for. A few lumps are totally fine; they’ll cook out. Don’t try to make it perfectly smooth!
Equipment Needed for Your Red Velvet Pancakes
You don’t need a ton of fancy gear to make these amazing Red Velvet Pancakes, which is another reason I love them for a quick morning treat. Just a few basics from your cupboard will do the trick. Having these items ready means you can start mixing right away!
- Two mixing bowls (one large, one medium)
- Whisk and a rubber spatula
- Measuring cups and spoons
- A nonstick skillet or griddle
- A ladle or 1/4 cup measure for scooping
Storing and Reheating Leftover Red Velvet Pancakes
If you have any of these beauties left—which I seriously doubt, but you never know!—you need to store them correctly so they don’t get soggy by morning. Since we used dairy, we have to be smart about keeping them safe and tasting great for the next day. These pancakes reheat surprisingly well, which is a huge win for busy weekdays!
Best Practices for Storage
The key here is preventing them from steaming themselves into mush. You want them chilled quickly, not sitting on the counter. Place the cooled pancakes in a single layer on a baking sheet and pop that in the freezer for about an hour until they are firm. Once frozen solid, transfer them into a heavy-duty zip-top bag or an airtight container. They should keep perfectly well in the fridge for about two days, but honestly, the freezer is better if you want to keep them longer than that.
Warming Up Your Pancakes Safely
For safety, remember that note about cooking eggs and dairy to 165°F? When reheating, we want to make sure they reach that temperature again. The microwave is the fastest way—just zap them for 20-30 seconds until they are warm all the way through. If you want to bring back some of that initial fluffiness, I prefer the oven. Lay them on a sheet pan at 350°F for about five minutes. That gentle heat warms them evenly without drying them out!
| Method | Time | Best For |
|---|---|---|
| Refrigerator | Up to 2 days | Short-term storage |
| Microwave | 20-30 seconds | Quickest reheat |
| Oven (350°F) | 5 minutes | Restoring fluffiness |
Frequently Asked Questions About Red Velvet Pancakes
I get so many questions after people try my recipe for Red Velvet Pancakes! It’s a little different from your standard buttermilk stack, so it makes sense that folks have questions. Here are the top three things I hear most often, and I’ve got the tried-and-true answers for you right here.
Can I Make Red Velvet Pancakes Without Buttermilk?
Oh, absolutely! Sometimes you just don’t have buttermilk in the fridge, and you need these pancakes *now*. If you’re out, you can make a quick substitute that works almost identically. Just take your regular milk—any kind will do—and stir in one tablespoon of white vinegar or lemon juice for every cup of milk you need. Give it a quick stir and let it sit on the counter for about five minutes until it starts to look a little curdled. That’s your instant buttermilk, and it will react perfectly with the baking soda!
How Do I Get the Brightest Red Color?
This is all about the coloring choice. If you use the standard liquid food coloring you find in the little plastic bottles, you end up needing a ton of it, and that often messes with the batter’s consistency. For the deepest, most vibrant red that really screams “velvet,” you must use the gel paste coloring. It’s super concentrated, so a little bit goes a long way, and it won’t thin out your batter. Trust me, that extra step of buying the gel is worth it for the visual payoff!
Are These Red Velvet Pancakes Healthier Than Traditional Ones?
Well, “healthier” is a tricky word when we’re talking about a sweet breakfast treat! But I will say this: I build moisture in here using sour cream instead of loading up on extra oil or shortening, which I think is a step up. Plus, we use a small amount of cocoa powder, which adds flavor complexity without adding tons of extra sugar. They are definitely decadent, but we are using smart swaps to keep the texture rich without making them overly heavy. They are perfect for a special weekend brunch!
Serving Suggestions for Your Red Velvet Pancakes
So, you’ve got your stack ready, gorgeous and red, topped with the cream and strawberries we talked about. That’s already amazing, but let’s take this brunch up a notch! Since these are already rich and slightly chocolatey, you want sides that complement that flavor without competing too much.
For savory contrast, skip the bacon and try a side of simple, salty prosciutto. It sounds fancy, but it’s just quick to fry up, and the saltiness is divine next to the sweet cocoa. If you’re feeling extra indulgent, a side of lemon ricotta pancakes—just a tiny serving!—adds a bright, citrusy punch that cuts through the richness perfectly. If you are looking for other sweet breakfast ideas, check out my recipe for walnut banana muffins.
If you need more toppings, think about texture. A sprinkle of chopped toasted pecans or walnuts adds a necessary crunch. And for a little extra decadence, a drizzle of dark chocolate sauce alongside your maple syrup is just heavenly. It turns a great breakfast into a true celebration! For more sweet inspiration, you might enjoy my cozy winter chocolate cookie cups.
Share Your Experience Making Red Velvet Pancakes
I am so excited for you to try these! When you stack up your beautiful, fluffy creation, I want to see it! Please let me know down in the comments how they turned out for you. Did you love the tang from the sour cream? You can also share your creations with me on Pinterest!
Take a picture and tag me on social media—your feedback truly helps me know I’m steering you right in the kitchen. Let me know if you tried any fun topping combinations, too. Happy cooking! You can also follow along for more updates on Facebook.
Print
Amazing 30 Minute Red Velvet Pancakes
- Total Time: 30 minutes
- Yield: 4 servings
- Diet: Vegetarian
Description
Fluffy red velvet pancakes offer a rich flavor with cocoa hints and tangy buttermilk, perfect for special weekend breakfasts. Top with cream and berries for a festive dish your family enjoys.
Ingredients
- 1 cup all-purpose flour
- 1 teaspoon baking soda
- 1/4 teaspoon baking powder
- 1/4 teaspoon salt
- 2 tablespoons granulated sugar
- 2 tablespoons unsweetened cocoa powder
- 1 large egg
- 3/4 cup buttermilk
- 1/4 cup sour cream
- 1 tablespoon red gel food coloring
- 1 teaspoon vanilla extract
- 3 tablespoons unsalted butter, melted
- Extra unsalted butter for greasing
- Whipped cream
- Maple syrup
- Fresh strawberries, sliced
Instructions
- Whisk dry ingredients together in a large bowl.
- Beat egg, buttermilk, sour cream, food coloring, and vanilla in another bowl until smooth.
- Stir wet mixture into dry ingredients until just combined.
- Gradually mix in melted butter to form a smooth batter; thin with 1-2 tablespoons extra buttermilk if needed.
- Heat a nonstick skillet over medium heat; grease lightly with butter.
- Scoop 1/4 cup batter per pancake onto the skillet.
- Cook until bubbles form and edges set, about 2 minutes.
- Flip and cook 1-2 more minutes until golden.
- Stack pancakes and keep them warm; repeat with remaining batter.
- Serve topped with whipped cream, maple syrup, and strawberry slices.
Notes
- Always cook eggs and dairy to 165°F internal temperature for safety.
- Prep Time: 10 minutes
- Cook Time: 20 minutes
- Category: Breakfast
- Method: Pan-Fried
- Cuisine: American