If you are looking for a holiday treat that disappears faster than you can make it, you are in the absolute right place! Seriously, stop whatever you are doing and pay attention to this recipe for Chocolate Saltine Toffee. I’m not even kidding when I say this is my secret weapon for every single party, potluck, or random Tuesday craving.
What makes this recipe so special? It’s incredibly easy! We are talking about using simple pantry staples—saltines, butter, brown sugar—and turning them into something that tastes like gourmet candy. My entire family calls this “Peanut Butter Holiday Crack” because once you start eating it, you just can’t stop. The best part about this Chocolate Saltine Toffee is that it requires almost no actual baking skill; it’s mostly just layering and waiting. Trust me, this simple method guarantees perfectly crisp, snappy candy every single time, which is why I feel so confident sharing it with you today.

Why You Will Love This Chocolate Saltine Toffee Recipe
Honestly, there are a million holiday candy recipes out there, but this one always wins because it’s just so straightforward. You don’t need any fancy candy thermometers or hours of stirring. It’s the perfect recipe to whip up when you realize you forgot a dessert for tomorrow’s gathering!
- It comes together so quickly—the active prep time is barely fifteen minutes!
- It’s incredibly inexpensive, relying on ingredients you probably already have in the pantry.
- It’s a total crowd-pleaser; I’ve never brought this to a party and had any leftovers.
Quick Prep and Simple Steps for Chocolate Saltine Toffee
If you’ve never made candy before, this is where you start. Seriously, if you can line up crackers on a pan, you can master this Chocolate Saltine Toffee. We are layering, boiling sugar for just three minutes, and then letting the oven and the fridge do the heavy lifting. It’s nearly foolproof, which is exactly what I need during the busy holiday season.
Flavor Profile of This Delicious Cracker Candy
Oh, the flavor! This cracker candy hits every single note perfectly. You get that satisfying, sharp saltiness from the crackers that cuts right through the sweet, buttery toffee base. Then, the creamy peanut butter melts into the warm toffee, and that beautiful layer of rich chocolate ties it all together. It’s salty, sweet, crunchy, and smooth—all in one bite. It’s heaven, truly.
Gathering Your Ingredients for Perfect Chocolate Saltine Toffee
Okay, while this Chocolate Saltine Toffee is super easy, we can’t cheat on the ingredients. Candy making requires a little more precision than regular baking, especially when it comes to sugar ratios, so grab your measuring cups and let’s get organized. Having everything ready before you start cooking the toffee is key because once that sugar mixture starts boiling, things move fast!
I always lay out every single item on the counter before I even turn the stove on. It saves so much stress later, trust me. We need basic things, but getting the proportions just right ensures that incredible snap when you break the candy later.
Essential Components for the Chocolate Saltine Toffee Base
This is the foundation of the whole magic trick. You absolutely need the right amount of saltine crackers—don’t skimp or over-measure here. For the toffee itself, make sure you use packed light brown sugar; that molasses flavor is crucial for the depth of flavor we are aiming for.
- 40 salted saltine crackers (it’s about one full sleeve!)
- 1 cup unsalted butter (because we control the salt later)
- 1 cup light brown sugar, packed tightly
Topping Ingredients for Rich Chocolate Saltine Toffee
This is where we layer on the indulgence! For the peanut butter, you *must* use creamy. Crunchy just won’t spread right over the hot toffee base, and we need that smooth surface. And for the chocolate, semi-sweet chips melt beautifully.
- 3/4 cup creamy peanut butter (don’t substitute this, please!)
- 2 cups semi-sweet chocolate chips
- Holiday sprinkles and chopped peanuts (optional, but so festive!)
Equipment Needed for Your Chocolate Saltine Toffee Project
You don’t need a stand mixer for this one, which is another reason I love it! Just some basic tools for cooking and setting. Make sure your foil is heavy-duty, too, because that hot toffee can be sneaky.
- A large 10×15-inch jelly roll pan
- A medium saucepan
- A sturdy spatula for spreading
Step-by-Step Instructions for Amazing Chocolate Saltine Toffee
Alright, let’s get down to the fun part! This is where we turn simple crackers into that incredible, crunchy, chocolatey treat. Remember, timing is everything in the toffee stages, but take a deep breath—I’ll walk you through exactly what to watch for. Follow these steps precisely, and you’ll have the best batch of Chocolate Saltine Toffee you’ve ever tasted.
Preparing the Pan and Cracker Layer for Chocolate Saltine Toffee
First things first: we need to get that pan ready. Preheat your oven to 400°F (200°C). Now, grab your 10×15-inch jelly roll pan. You need to line it completely with heavy-duty aluminum foil, making sure that foil comes up the sides significantly. This is a pro tip: if the foil doesn’t come up the sides, that boiling hot toffee will leak underneath and make cleaning an absolute nightmare! Spray the foil lightly with non-stick spray, just for good measure.
Next, take your saltine crackers and lay them out in a single, flat layer across the bottom of the pan. You might have to break a few pieces to fit them edge-to-edge, but try to cover the entire surface area. We want full coverage for that perfect base!
Cooking the Buttery Toffee Mixture
Time to make the toffee! In a medium saucepan over medium heat, toss in your butter and brown sugar. Stir them together until the butter melts and the sugar dissolves. Once it starts to boil, this is crucial: stop stirring! Let it boil undisturbed. You need to cook this mixture for exactly three minutes. Watch your timer! If you stir it, the sugar crystals might form and prevent that smooth, hard set we need later. When it’s done, it should look frothy and slightly thickened. Pour this hot mixture evenly over your cracker layer, using a spatula to gently guide it right to the edges.
Pop that pan into the 400°F oven for five minutes. You want to see it getting bubbly all over.
Baking and Adding the Peanut Butter Layer
As soon as those five minutes are up, pull the pan out! The toffee will be sizzling hot. Immediately drop spoonfuls of your creamy peanut butter all over the surface. Don’t try to spread it yet; just let it sit for about a minute while the heat softens it up. Once it’s softened, use your spatula to gently spread the peanut butter into a smooth, thin layer across the hot toffee. Work quickly but gently here!
Melting and Setting the Chocolate Topping
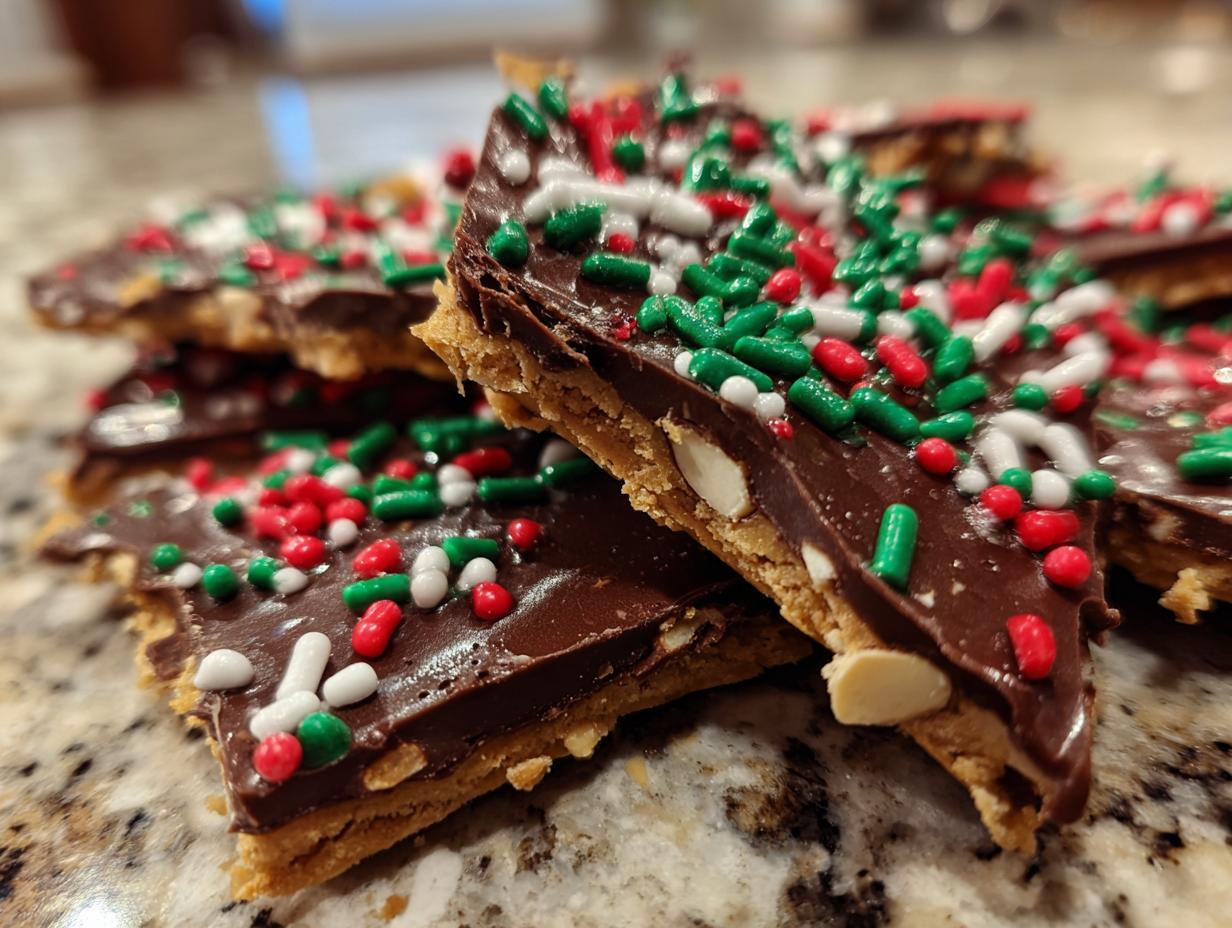
Now for the chocolate! Sprinkle your semi-sweet chocolate chips evenly over that warm peanut butter layer. Put the pan right back into the oven, but this time, just for one minute. We only want them soft enough to melt together. Take it out and gently spread that melted chocolate into a beautiful, even layer. This is where you can get festive! While the chocolate is still wet—and I mean right away—sprinkle on your holiday sprinkles and chopped peanuts if you’re using them. If you wait, nothing will stick!

Chilling and Cracking Your Finished Chocolate Saltine Toffee
This is the hardest part: waiting! You must get this pan into the refrigerator now. It needs to chill for a minimum of two hours until the toffee and chocolate are totally set and hard. Don’t try to rush this in the freezer unless you absolutely have to, because sometimes it affects the snap. Once it’s rock hard, lift the foil out of the pan. Then, just use your hands to break the whole sheet into jagged, gorgeous pieces. This is why we call it “crack”—it’s so satisfying to break apart!
Expert Tips for Perfect Chocolate Saltine Toffee Every Time
I’ve made this Chocolate Saltine Toffee so many times that I’ve learned a few tricks to make sure it comes out perfectly crisp and never sticky. These aren’t in the main recipe steps, but they are the little details that make the difference between good toffee and truly amazing, snappy candy. Pay close attention to the toffee cooking time; that’s where most people run into trouble.
Troubleshooting Common Chocolate Saltine Toffee Issues
If your candy ends up sticky after chilling, it almost always means one of two things. First, you didn’t let the toffee boil for the full three minutes without stirring. That boiling time is what cooks the sugar enough to set hard later. Second, if the chocolate layer didn’t set, you probably didn’t chill it long enough—two hours minimum is a must! Don’t try to pull it out early. Also, make sure you line the pan sides completely with foil; if hot toffee leaks underneath, it will stick to the pan, and you’ll lose half your candy trying to pry it out!
Ingredient Swaps and Variations for This Toffee
While the peanut butter is my favorite addition, you can certainly switch things up! If you aren’t a fan of peanut butter, you can skip it. Just spread the melted chocolate directly over the hot toffee base. You can also swap out the semi-sweet chips for dark chocolate chips for a richer flavor, or even use milk chocolate if you like things sweeter. For a texture twist, try using chopped pecans instead of peanuts, or skip the nuts and load up on flaky sea salt right after the chocolate layer melts. It’s still going to be delicious!
Storage and Handling of Leftover Chocolate Saltine Toffee
I know, I know, the idea of having “leftover” Chocolate Saltine Toffee seems impossible, but sometimes you manage to hide a piece or two! Since this candy is so rich, a small piece goes a long way. The most important thing for keeping this cracker candy perfect is keeping it cold. Heat is the enemy of a good snap!
You want to keep it stored properly so that when you finally sneak a piece later, it still has that satisfying crunch. Don’t worry about finding a special spot; the fridge works perfectly for this recipe. If you want to see more of my favorite holiday recipes, check out my holiday winter casseroles collection!
Storing Your Homemade Chocolate Saltine Toffee
Once you’ve cracked all those beautiful pieces, you need to protect them so they don’t get soggy or pick up any weird smells from the fridge. Place the candy in an airtight container. I usually put down a layer of parchment paper on the bottom first, just in case, and then stack the pieces with another sheet of parchment between layers. This stops them from sticking together, which is a lifesaver!
This candy holds up really well in the refrigerator for up to two weeks. If you need to stash some away for the long haul, you can freeze it, too. Just make sure it’s sealed up tight!
Reheating or Serving Suggestions for the Toffee
The best way to enjoy this Peanut Butter Holiday Crack is straight from the cold. It should be served chilled or at room temperature. You absolutely do not need to reheat this! In fact, if you try to warm it up, you’ll just end up with a gooey, melted mess, and we want that satisfying crunch, remember? Serve it cold for the best texture contrast between the chocolate and the snappy toffee base.
Here’s a quick cheat sheet for how long you can keep these delicious treasures tucked away:
| Storage Location | Maximum Time |
|---|---|
| Refrigerator | Up to 2 weeks |
| Freezer | Up to 3 months |
Frequently Asked Questions About Chocolate Saltine Toffee
I get so many questions about this recipe because everyone wants to make sure their batch of Chocolate Saltine Toffee turns out perfectly snappy! It’s such a popular treat, and honestly, most issues are easy to fix once you know the secret. Here are the things I hear most often when people are making this Peanut Butter Holiday Crack for the first time.
Can I make this Easy Toffee Recipe without Peanut Butter?
Yes, you absolutely can! If someone has a peanut allergy or just isn’t feeling the peanut butter vibe, you can skip it. When you do that, you are left with a classic Chocolate Saltine Toffee. Just make sure that after you pull the crackers out of the first five-minute bake, you immediately pour the melted chocolate chips right over the hot toffee base. You’ll still want to spread it quickly because the residual heat helps the chocolate set nicely.
Why Did My Chocolate Saltine Toffee Not Set Firmly?
This is almost always an issue with the toffee cooking stage. If your cracker candy is soft or sticky after chilling, it means the butter and brown sugar mixture wasn’t cooked long enough. Remember that crucial instruction: once it boils, you cook it undisturbed for exactly three minutes. If you pull it off the heat early, you don’t develop enough sugar structure, and it won’t set hard. Make sure you use a timer for those three minutes next time!
Another common reason is impatience during chilling. If you cut into it before those two hours are up, the toffee can feel soft. Give it the full chilling time in the fridge, and you’ll get that perfect, snappy break every time.
Nutritional Estimates for Chocolate Saltine Toffee
I know some of you are probably curious about the official numbers for this delicious Peanut Butter Holiday Crack. Since this is a homemade treat, the exact counts can shift depending on what brand of chocolate or peanut butter you grab at the store. But based on the standard ingredients, here’s a general idea of what one piece packs. It’s candy, so we know it’s rich, but wow, is it worth it!
| Nutrient | Amount Per Serving |
|---|---|
| Calories | 210 kcal |
| Fat | 13 g |
| Carbohydrates | 22 g |
| Protein | 3 g |
Disclaimer Regarding Chocolate Saltine Toffee Nutrition
Please remember these are just estimates for the Chocolate Saltine Toffee recipe. The actual nutritional values can change quite a bit depending on the fat content of your peanut butter, whether you used dark or milk chocolate chips, and if you added those optional chopped peanuts. Always treat these numbers as a general guideline!
Share Your Experience with This Chocolate Saltine Toffee
I truly hope you loved making this Peanut Butter Holiday Crack as much as I love eating it! It’s such a joy to share recipes that bring smiles to faces, and this Chocolate Saltine Toffee is definitely one of them. Now I need to know how it turned out for you!
Did you use sprinkles? Did it set perfectly on the first try? Drop a comment below and let me know your rating. I read every single review and love hearing how this easy toffee recipe worked in your kitchen! You can also follow along for more great recipes on my Pinterest page.
Print
Crack Chocolate Saltine Toffee In 1 Pan
- Total Time: 2 hours 25 minutes
- Yield: 24 servings
- Diet: Omnivore
Description
Make this addictive Peanut Butter Holiday Crack with salty crackers, buttery toffee, creamy peanut butter, and a chocolate topping. It is an easy chocolate saltine toffee perfect for parties.
Ingredients
- 40 saltine crackers (about 1 sleeve), salted
- 1 cup unsalted butter
- 1 cup light brown sugar, packed
- 3/4 cup creamy peanut butter
- 2 cups semi-sweet chocolate chips
- 1/3 cup holiday-colored sprinkles (red, white, and green nonpareils)
- 1/4 cup roasted peanuts, chopped (optional)
Instructions
- Preheat your oven to 400°F (200°C). Line a large 10×15-inch jelly roll pan with heavy-duty aluminum foil and spray lightly with non-stick spray.
- Arrange the saltine crackers in a single flat layer on the prepared pan, breaking them to fit edge-to-edge.
- In a medium saucepan over medium heat, combine the butter and brown sugar. Bring to a boil while stirring occasionally.
- Once boiling, cook the mixture undisturbed for exactly 3 minutes until it is frothy and thickened.
- Pour the hot toffee mixture evenly over the crackers. Use a spatula to spread it to the edges. Bake in the preheated oven for 5 minutes until bubbly.
- Remove the pan from the oven. Immediately drop spoonfuls of peanut butter over the hot toffee. Let it sit for 1 minute to soften, then spread into a smooth, thin layer.
- Sprinkle the chocolate chips evenly over the warm peanut butter layer. Return the pan to the oven for 1 minute to melt the chocolate.
- Gently spread the melted chocolate into an even layer using an offset spatula.
- Immediately top with holiday sprinkles and chopped peanuts while the chocolate is still wet.
- Refrigerate the pan for at least 2 hours until the chocolate and toffee are completely set and hard.
- Lift the foil out of the pan and peel it away from the candy. Crack the candy into jagged pieces using your hands or a knife.
Notes
- Line the pan with foil completely up the sides to prevent sticky toffee from leaking.
- Do not stir the brown sugar and butter mixture once it starts boiling to ensure the toffee sets properly.
- Chill the crackers thoroughly before breaking them for clean, snappy pieces.
- Store in an airtight container in the refrigerator for up to 2 weeks.
- Freeze for up to 3 months in a freezer-safe container with parchment paper between layers.
- Prep Time: 15 minutes
- Cook Time: 10 minutes
- Category: Candy/Dessert
- Method: Baking and Chilling
- Cuisine: American