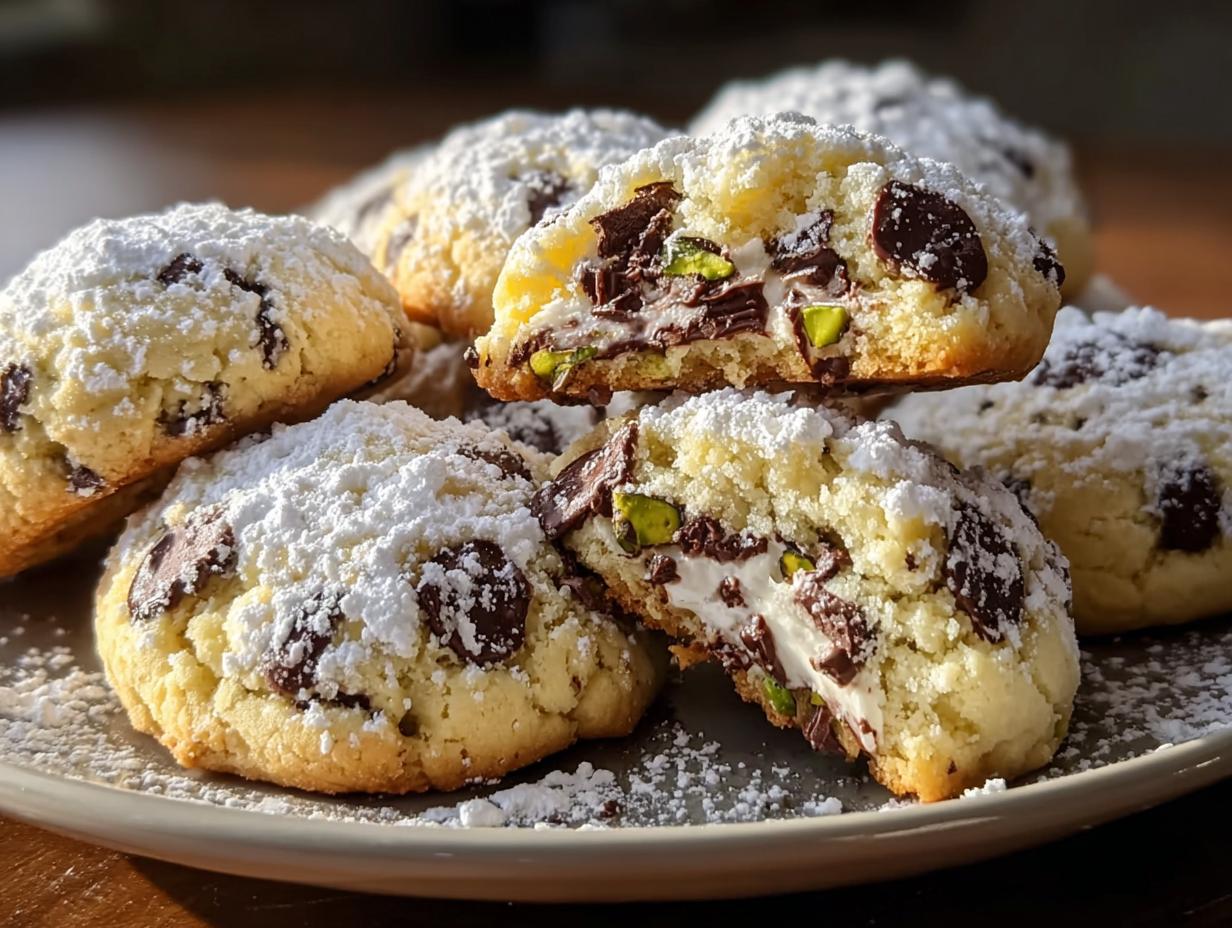
Cannoli Cookies! When I first started NoobRecipes, I promised myself we’d tackle those desserts that look super fancy but are actually totally doable at home. I remember trying to pipe actual cannoli shells years ago—total disaster, flour everywhere, and the shells cracked immediately. That’s why these Cannoli Cookies are my absolute favorite shortcut. We capture that creamy ricotta filling, the hint of citrus zest, and the crunch of chocolate and nuts, all wrapped up in a simple, easy-to-fold cookie dough. Seriously, if you can mix two bowls together, you can master this recipe. No deep-frying required, I promise!

Why You Will Love These Cannoli Cookies
I developed this recipe because I wanted that amazing, authentic cannoli flavor without needing a pastry bag or a deep fryer. These cookies are the perfect marriage of textures: a slightly crisp edge that gives way to a soft, almost cakey interior, all hugging that sweet, citrus-kissed ricotta filling. They’re surprisingly sturdy, which means they travel well to parties—a huge win compared to delicate, shell-based desserts! Trust me, the flavor payoff is huge for how little effort you put in.
- Amazing Texture Contrast: You get the soft dough, the creamy filling, and the satisfying little crunch from the chocolate chips and pistachios all in one bite.
- No Frying Necessary: We skip the messy, intimidating process of frying shells entirely. It’s all mixing and baking!
- Bright, Complex Flavor: That little bit of lemon zest cuts through the richness of the ricotta perfectly. It tastes expensive, but it’s totally beginner-proof.
Beginner Baking Friendly
This is exactly why we created NoobRecipes! These Cannoli Cookies rely on simple mixing steps. You mix the dry stuff in one bowl and the wet stuff in another. Then, you just combine them. That’s it for the dough base. There’s no complicated creaming method needed, and you don’t have to worry about over-mixing the flour too much, thanks to the ricotta cheese giving you a little forgiveness. Ooey gooey chocolate chip cookies are great, but these are easier!
We aren’t even using yeast or complicated folding techniques. You roll it out, cut a simple rectangle, plop the filling on, and fold. If your edges aren’t perfectly sealed? No sweat. A little filling might peek out, but that just means you get an extra bit of deliciousness when you bite in. This recipe proves you don’t need years of experience to nail a classic Italian-American flavor profile.
Essential Ingredients for Perfect Cannoli Cookies
Okay, let’s talk about what makes these cookies taste like they came straight out of a real Italian bakery, even though they are so simple for us beginners. The dough itself is soft and almost cake-like because of the ricotta, which is our secret weapon for moisture! But the star, truly, is the filling. You need good quality stuff here, especially that ricotta. Don’t just grab the first container you see off the shelf!
I spent way too much time testing different brands when I was first making this recipe for the blog. The texture of the dough and the final look of the cookie really depend on having the right consistency in your wet ingredients. That’s why I highlighted those two preparation notes below—they are non-negotiable if you want that authentic texture!
Ingredient List Table
| Ingredient | Amount |
|---|---|
| All-purpose flour | 1 cup (240 ml) |
| Granulated sugar | ½ cup (100 g) |
| Ricotta cheese | ½ cup (120 g) |
| Large egg | 1 |
| Vanilla extract | 1 tsp |
| Lemon zest | 1 tsp |
| Mini chocolate chips | ½ cup (75 g) |
| Chopped pistachios | ½ cup (75 g) |
| Powdered sugar | For dusting |
Ingredient Notes and Preparation Tips
Listen up, because these two tips are what separate the good Cannoli Cookies from the great ones. First, for the flour: I know it seems old-fashioned, but sift your flour twice. It really helps break up any clumps and incorporates air, which keeps the dough from getting too heavy. It makes a noticeable difference in the final crumb!
Second, and this is maybe the most crucial step for the filling: You absolutely must drain your ricotta cheese. If you just scoop it out of the container, it’s going to have too much water, and that water will make your dough sticky and your filling runny. I usually let mine sit in a fine-mesh sieve lined with a coffee filter or cheesecloth over a bowl for at least 30 minutes. It pulls out that extra moisture so your cookies bake up perfectly golden, not soggy.
Equipment Needed for Your Cannoli Cookies
You don’t need a whole arsenal of fancy gear for this recipe, which is great news for new bakers! We are keeping things simple here at NoobRecipes. You’ll mostly be using standard mixing bowls and measuring cups. Having the right tools makes the process smooth, especially when dealing with that soft dough.
- Large mixing bowls (at least two) for separating wet and dry ingredients.
- Whisk and spatula for mixing everything up nicely.
- Rolling pin—essential for getting that even ¼ inch thickness on the dough.
- A sharp knife or pizza cutter for cutting neat rectangles.
- Baking sheets lined with parchment paper—don’t skip the parchment!
Step-by-Step Instructions for Making Cannoli Cookies
Alright, time to get our hands dirty! This is where the magic happens, and I promise you, these steps are incredibly straightforward. We’re going to build the dough, let it chill out, and then get those delicious fillings tucked inside. Follow these steps exactly, and you’ll have golden, flavorful Cannoli Cookies coming out of the oven!
Preparing the Dough Base
- First things first, get your oven happy! Preheat that thing to 350°F (175°C). While it warms up, grab your baking sheets and line them completely with parchment paper. Trust me, this saves you scrubbing later.
- In a large bowl—this is your dry zone—whisk together that sifted flour and the sugar until they look perfectly uniform. Make sure there are no sneaky pockets of just sugar hiding anywhere.
- Now for the wet ingredients. In a separate bowl, mix your drained ricotta cheese, the egg, your vanilla extract, and that lovely lemon zest. Whisk this vigorously until it’s completely smooth. You don’t want any lumps of ricotta hanging around here.
- Time to combine! Gradually add the flour mixture into your wet ingredients. Use a spatula and stir gently until you have a soft, cohesive dough. Don’t overbeat it; once it comes together, stop mixing!
- Cover the dough—a piece of plastic wrap works great—and let it rest on the counter for 30 minutes. This resting time lets the flour hydrate properly, making the dough much easier to handle.
Shaping and Filling the Cannoli Cookies
- While the dough rests, quickly mix up your filling in a small bowl: the drained ricotta, the mini chocolate chips, and those chopped pistachios. Give it a good stir to distribute everything evenly.
- Once rested, dust your work surface lightly with flour. Roll out that dough until it’s about ¼ inch thick. Aim for consistency here; thin spots will burn faster than thick spots.
- Using a sharp knife or a pizza cutter, cut the dough into rectangles, roughly 2×3 inches. They don’t have to be perfect, but try to keep them close to the same size so they bake evenly.
- Take one dough rectangle. Place a spoonful—maybe about a teaspoon—of your filling right in the center. Don’t overfill, or they will explode when baking!
- This is the folding part! Bring two opposite corners of the dough up over the filling and pinch them together firmly in the middle to seal. It should look a bit like a little pouch or a closed purse. Make sure those seams are pressed tight so the filling stays inside your Cannoli Cookies.
Baking and Cooling Procedures
- Carefully place your sealed cookies onto the prepared baking sheets, leaving about an inch between each one.
- Bake them for 15 to 18 minutes. You are looking for a beautiful, light golden brown color around the edges. If they look pale, give them two more minutes.
- Once they are baked, let them cool right there on the baking sheet for just a few minutes. They are fragile when hot!
- After about five minutes, gently transfer them to a wire rack to cool completely. Once they are totally cool, dust them generously with powdered sugar for that classic bakery finish. Enjoy!
Tips for Achieving Expert Results with Cannoli Cookies
Even though these are beginner-friendly, there are a few little tricks I picked up over the years that will take your cookies from “good” to “I can’t believe you made these!” The main challenge with any filled cookie is managing moisture and making sure that gorgeous filling stays locked inside during the high heat of the oven. Don’t let that scare you off; a little attention to detail goes a long way here.
When I first tested this recipe, I had a few cookies where the filling just oozed out and burned on the pan—total bummer! That usually means one of two things: either the ricotta wasn’t dry enough, or you didn’t pinch those edges hard enough. These Cannoli Cookies are forgiving, but mastering the seal is your ticket to success. If you love sharing your baking wins, make sure to check out our Pinterest page for more inspiration!
Controlling Texture and Moisture
Remember that note about draining the ricotta? I can’t stress that enough. If your ricotta is watery, the dough will feel slightly tacky even after resting, and that moisture will steam out during baking, making your cookie soft instead of having that lovely slight crispness we want. If you notice your dough is still a bit sticky after the 30 minutes of rest, dust your rolling surface *very* lightly with more flour, but avoid adding too much, or you’ll dry out the dough itself.
For the seal, be decisive! When you fold the dough over the filling, use your fingertips to press down firmly along the entire seam. I like to go over the seam twice, making sure there are no gaps. If you see a tiny bit of filling trying to escape, just pinch it back in. A well-sealed Cannoli Cookie keeps its shape beautifully and ensures every bite has the perfect ratio of sweet dough to creamy filling. For more easy dessert ideas, check out our dessert and cakes section.
Frequently Asked Questions about Cannoli Cookies
I get so many questions about these cookies after people try them the first time! They are so versatile, which is part of why I love them so much. Here are some of the most common things folks ask me when they’re whipping up a batch of these Italian-American treats.
Q1. Can I substitute the ricotta cheese with something else?
Honestly, no, not really if you want them to be true Cannoli Cookies. Ricotta is essential because it adds that unique moisture and slight tang to the dough base that makes it different from a standard sugar cookie. Mascarpone is too fatty, and cottage cheese is too watery, even if drained. Stick with full-fat ricotta!
Q2. What happens if I don’t let the dough rest?
If you skip the 30-minute rest, the dough will be a nightmare to roll out. It will snap back on you immediately, and you’ll end up adding too much flour to the surface just to get it flat. That ruins the texture we worked so hard for! Just set a timer and walk away for half an hour. If you want to see how we use ricotta in other ways, check out our whipped ricotta dip.
Q3. Can I make these without nuts or chocolate chips?
Absolutely! These are your Cannoli Cookies, so customize them. If you hate pistachios, skip them! You can add dried orange peel pieces, use mini dark chocolate chips instead, or even leave the filling completely plain for a pure ricotta flavor. Just make sure the amount of filling stays roughly the same so you don’t mess up the dough-to-filling ratio.
Q4. Do these freeze well?
Yes, they do! They freeze beautifully, either baked or unbaked. If freezing unbaked, place them on a tray until solid, then transfer them to a freezer bag. For baked cookies, make sure they are completely cool before freezing. They last about three months this way, which is great for making ahead of holidays.
Storing and Keeping Your Cannoli Cookies Fresh
One of the biggest perks of making these cookies instead of traditional cannoli is how sturdy they are for storage! You don’t have to worry about soggy shells or filling weeping out overnight. These Cannoli Cookies actually taste even better the next day once the flavors have settled together. I usually make a double batch because they disappear so fast, but if you do have leftovers, here’s the best way to keep them tasting bakery-fresh.
The key is protection from air, especially since we dusted them with powdered sugar. If they sit out uncovered, that beautiful white topping will just disappear into the air or stick weirdly to the cookie surface. If you want to see more of our baking tips, follow us on Facebook!
Storage and Reheating Table
| Condition | Storage Method | Duration |
|---|---|---|
| Room Temperature | Airtight container, layered with parchment paper | Up to 4 days |
| Refrigerated (If you live somewhere humid) | Airtight container | Up to 1 week |
| Freezing (Unfilled Dough) | Vacuum seal or heavy-duty freezer bag | Up to 3 months |
| Reheating (Optional) | Briefly warm (10 seconds) in the microwave | N/A |
If you do decide to reheat a cookie that’s been in the fridge, just give it a quick 10-second zap in the microwave. That just softens the dough slightly and makes the chocolate chips gooey again—it’s heavenly!
Sharing Your Homemade Italian-American Dessert
That’s it—you’ve made beautiful, delicious Cannoli Cookies! Seriously, I’m so proud of you for tackling this classic dessert. Now that you’ve mastered this one, I want to know all about it. Did you use dark chocolate chips? Did your family even notice they weren’t real cannoli? Drop a comment below and let me know how they turned out, and don’t forget to share a picture if you post it online!
Print
Amazing 9 Cannoli Cookies Simple Now
- Total Time: 68 minutes
- Yield: About 18 cookies
- Diet: Vegetarian
Description
These Cannoli Cookies capture the creamy, crunchy flavor of traditional cannoli in an easy-to-make cookie format perfect for beginner bakers.
Ingredients
- 1 cup (240 ml) all-purpose flour
- ½ cup (100 g) granulated sugar
- ½ cup (120 g) ricotta cheese
- 1 large egg
- 1 tsp vanilla extract
- 1 tsp lemon zest
- ½ cup (75 g) mini chocolate chips
- ½ cup (75 g) chopped pistachios
- Powdered sugar for dusting
Instructions
- Preheat your oven to 350°F (175°C).
- In a large bowl, whisk together flour and sugar until well blended.
- In a separate bowl, mix ricotta, egg, vanilla, and lemon zest until smooth.
- Gradually stir the flour mixture into the wet ingredients until a soft dough forms.
- Cover the dough and let it rest for 30 minutes.
- Line baking sheets with parchment paper.
- Dust your work surface with flour and roll the dough to ¼ inch thick.
- Cut the dough into rectangles or squares, approximately 2×3 inches.
- Mix ricotta, chocolate chips, and pistachios in a small bowl for the filling.
- Place a spoonful of filling in the center of each dough piece and fold to seal.
- Bake for 15-18 minutes until golden brown.
- Cool on baking sheets for a few minutes before transferring to a wire rack.
Notes
- Sift flour twice for a lighter texture.
- Let ricotta drain for 30 minutes; a dry filling prevents soggy cookies.
- Prep Time: 20 minutes
- Cook Time: 18 minutes
- Category: Dessert
- Method: Baking
- Cuisine: Italian-American