Okay, listen up, because if you are anything like I was when I first started baking, you probably burned something. Seriously, I once tried to make fudge and nearly set off the smoke alarm. That’s why these Easy Chocolate Covered Marshmallows are my absolute go-to comfort recipe!
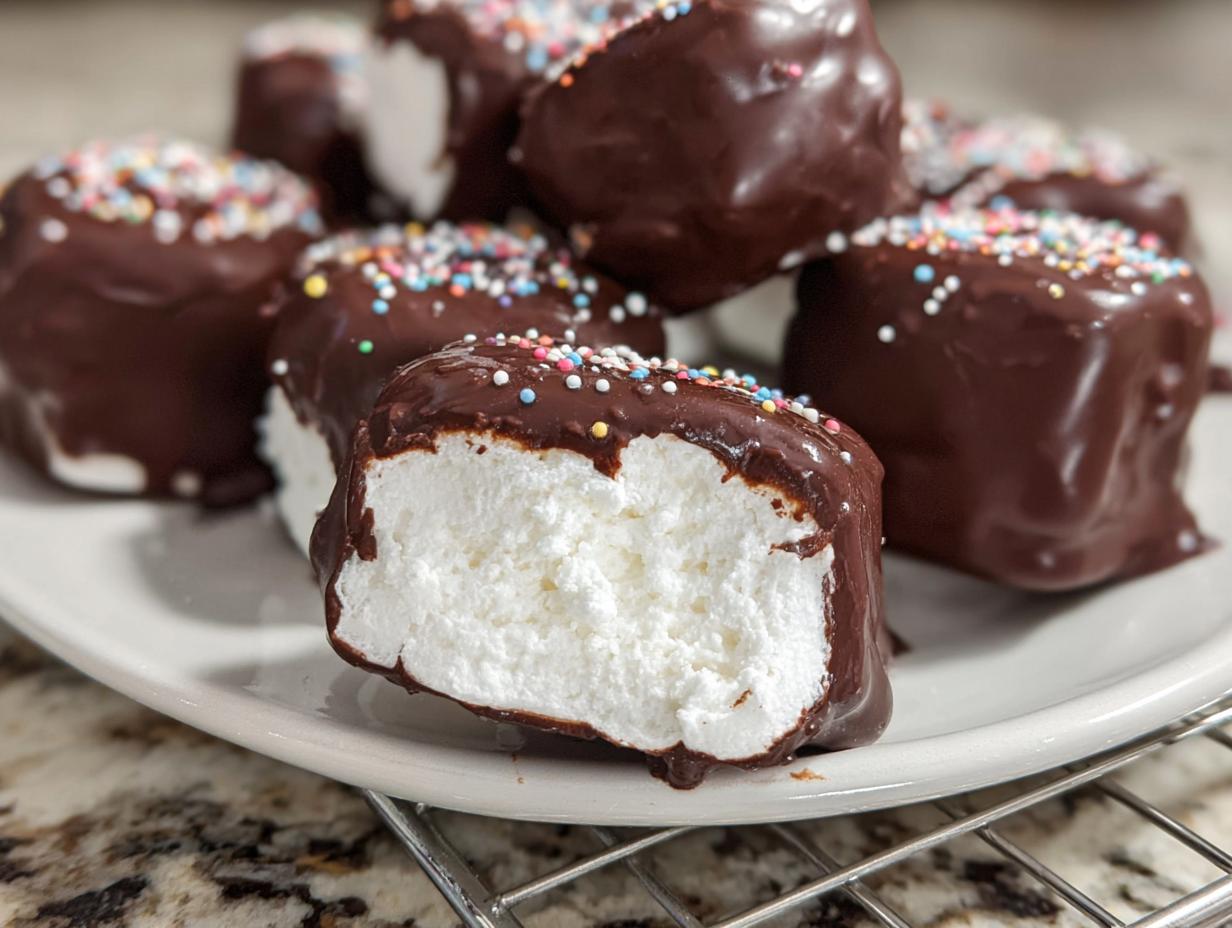
This is the ultimate no-bake savior. When you need a crowd-pleaser fast, or when your oven is already full of something else, this recipe is pure magic. It takes about twenty minutes total, and the result is this gorgeous, fluffy marshmallow enveloped in smooth, rich chocolate. It’s the easiest treat you’ll ever make, and trust me, it tastes way fancier than the effort involved!
Gathering Your Ingredients for Easy Chocolate Covered Marshmallows
You won’t believe how few things you need to pull off these incredible Easy Chocolate Covered Marshmallows. Seriously, it’s just three main ingredients, and the rest is just fun window dressing! When I’m short on time, I always make sure I have these staples on hand. You need one full 12-ounce bag of those big, fluffy, classic large marshmallows. Don’t try to substitute the size; the big ones give you that perfect bite contrast against the chocolate shell.
Next up is the chocolate. You’ll want 20 ounces of semi-sweet chocolate chips. I use semi-sweet because it balances the marshmallow’s sweetness perfectly, but if you’re a dark chocolate fanatic, go for it! The final must-have is 2 tablespoons of coconut oil. This little bit of oil is the secret weapon that makes the chocolate melt silky smooth and gives it that beautiful, glossy finish. Everything else—sprinkles or a white chocolate drizzle—is just extra flair for when you’re feeling fancy!

Equipment Needed for Perfect Easy Chocolate Covered Marshmallows
You don’t need a stand mixer or a double boiler for these Easy Chocolate Covered Marshmallows, which is why they are so fantastic! The most important thing you need is a sturdy, microwave-safe bowl for melting that chocolate. Make sure it’s big enough for dipping your marshmallows without making a huge mess.
You absolutely must have a baking sheet ready, and you need to line it with parchment paper. I learned the hard way that chocolate and bare metal do not mix well when setting! A few toothpicks are also essential for handling the marshmallows while dipping. That’s it! Simple tools for a simple, delicious treat.
Step-by-Step Guide to Making Easy Chocolate Covered Marshmallows
Alright, let’s get messy! Making these Easy Chocolate Covered Marshmallows is fast, but you have to work quickly once the chocolate is melted, so setting up your station first is key. Think of this as an assembly line where every piece has its job. Once you get the rhythm down, you’ll be cranking these out faster than you can say “no-bake!”
Preparing Your Dipping Station
First things first, grab that baking sheet—the one you lined with parchment paper earlier. You want that paper smooth and flat because that’s where your beautiful, coated marshmallows are going to rest and firm up. Set that sheet right next to your workspace so you can easily transfer the dipped treats.
Next, get your chocolate ready. You’ll add the 20 ounces of semi-sweet chocolate chips and the 2 tablespoons of coconut oil into your microwave-safe bowl. Don’t stir them yet! Just let them sit there looking tempting. This prep work ensures that when the chocolate is perfectly melted, you aren’t scrambling for toothpicks or looking for a place to put the finished product.
Mastering the Chocolate Melt for Easy Chocolate Covered Marshmallows
This is where you need to pay attention, because burnt chocolate smells like sadness, and we don’t want that! Pop that bowl of chips and oil into the microwave. Start with a full minute. After that first minute, take it out and stir it really well. You’ll notice some chips are still solid, but that’s okay.
Now, we go slow. Heat in 15-second intervals, stirring thoroughly after *every* single one. This gentle heating prevents scorching the bottom of the bowl while the top looks fine. Keep going until it’s all glossy and smooth. If you have one or two tiny lumps left, just remove the bowl from the microwave and keep stirring—the residual heat will usually take care of those last bits. This careful melting is crucial for achieving that professional look on your Easy Chocolate Covered Marshmallows.

Dipping and Decorating Your Marshmallows
Grab a toothpick and firmly stick it into one of your large marshmallows. Now, dip it right into that gorgeous, warm chocolate. You can go for a full dip or just coat half—whatever you love! Once it’s coated, lift it out and gently tap the marshmallow against the edge of the bowl. You need to shake off that excess chocolate; otherwise, you end up with huge, thick puddles underneath, and nobody wants that.
Place the dipped marshmallow right onto your prepared sheet. This is the fun part! While the chocolate is still wet—and I mean *while* it’s wet—you can go wild. If you’re using sprinkles, give them a quick shower right now. If you decided to drizzle white chocolate over the top for contrast, melt that tiny bit of white chocolate separately and use a fork to flick thin lines across the tops of your Easy Chocolate Covered Marshmallows.
Repeat this whole dipping and decorating process until you run out of marshmallows or chocolate. Then, just let them sit on the counter at room temperature. No need to rush them into the fridge! They just need about an hour for that smooth chocolate shell to fully set up and harden perfectly.
Tips for Success with Easy Chocolate Covered Marshmallows
Even though these Easy Chocolate Covered Marshmallows are simple, there are a couple of rookie mistakes that can throw a wrench in your smooth chocolate plans. The biggest one? Water! If even one tiny drop of water gets into your melting chocolate, it will seize up and turn into a grainy, unusable mess. Make sure your bowl and stirring utensils are completely bone dry before you start melting anything.
Another thing I always watch out for is temperature. If your chocolate gets too hot during those 15-second bursts, it can start to seize or taste scorched. Remember, you want it melted and glossy, not scorching hot. If the chocolate starts getting too thick while you’re dipping, don’t panic! Just pop the bowl back in the microwave for five seconds, stir it up, and it should loosen right back up.
Finally, about those sticky marshmallows—if you’re finding they are refusing to let go of the parchment paper, it usually means the chocolate hasn’t set yet. Give them a little more time at room temperature. If you used enough coconut oil like the recipe suggests, they should peel right off once the shell is firm. These little tricks make sure every one of your Easy Chocolate Covered Marshmallows looks like it came from a fancy candy shop! If you are looking for other quick dessert ideas, check out our 3 Ingredient Banana Bark.
Storage and Keeping Your Easy Chocolate Covered Marshmallows Fresh
Now that you’ve made these gorgeous Easy Chocolate Covered Marshmallows, you need to know how to keep them tasting fresh! The great news is that because they are mostly sugar and fat, they are surprisingly resilient. You don’t need to keep them chilling in the fridge, which I think is a huge bonus.
According to my notes—and my personal test batches that lasted way longer than they should have—you can store these beauties for up to three days. The key is making sure they stay protected from humidity and air. You want that chocolate shell to stay crisp! If you are interested in other no-bake treats, you might enjoy our recipe for Oreo Fluff Dessert Dip.
Here’s a quick rundown of what you need to remember for keeping your Easy Chocolate Covered Marshmallows perfect:
- Duration: Up to 3 days
- Location: Room temperature only
- Container: Must be airtight
Best Practices for Storing Easy Chocolate Covered Marshmallows
The rule here is simple: airtight container at room temperature. Don’t put them in the fridge! If you chill them, two things happen: first, the chocolate can sometimes develop a slightly cloudy look, and second, the marshmallows themselves can get a little tougher and lose that fluffy center we worked so hard to achieve. Just find a good container where they won’t get squished, seal it up tight, and keep it away from any direct heat or sunlight. Enjoy your Easy Chocolate Covered Marshmallows over the next few days! For more dessert inspiration, see our French Chocolate Flan.
Common Questions About This Simple Treat
I get so many questions whenever I post a picture of these treats online! People always want to know if they can skip certain steps, especially since this is a no-bake recipe. Here are some of the most frequent things folks ask about making these Easy Chocolate Covered Marshmallows.
Q1. Can I use milk chocolate instead of semi-sweet chips?
You absolutely can change the chocolate! Milk chocolate will make the final product much sweeter, as marshmallows are already quite sweet. If you use milk chocolate, you might want to skip the optional white chocolate drizzle to keep the flavor balanced. The coconut oil is still crucial for getting that smooth chocolate coating.
Q2. Why did my chocolate seize up when I tried to melt it?
That’s the most common issue! Chocolate seizes when it hits even a tiny bit of moisture. Make absolutely sure your microwave-safe bowl and your stirring utensil (toothpick or spoon) are totally dry. If you are using white chocolate for drizzling, be extra careful, as white chocolate is even more sensitive to water than semi-sweet chocolate.
Q3. Can I make these ahead of time for a party?
Yes, that’s the beauty of these Easy Chocolate Covered Marshmallows! Since they are a no-bake treat, they are perfect for prepping a day or two early. Just follow the storage instructions we talked about—keep them at room temperature in an airtight container. They stay fresh and delicious for up to three days.
Q4. Do I have to use coconut oil, or can I use butter instead?
Please stick to the coconut oil for the best results when making these Easy Chocolate Covered Marshmallows. Butter contains water, and adding water to melted chocolate is a recipe for disaster—it will cause it to seize up instantly. The coconut oil melts cleanly and gives the chocolate that beautiful, glossy finish that looks so professional. If you want to follow our latest updates, check out our Facebook page.
Understanding the Nutrition in Easy Chocolate Covered Marshmallows
Even though these Easy Chocolate Covered Marshmallows taste like pure indulgence, they are surprisingly simple when you break down the numbers. Since this is a no-bake recipe relying on just chocolate and marshmallows, the macros are pretty straightforward. I always check these details before I start dipping, just so I know what I’m dealing with!
Keep in mind that since this recipe makes about 24 pieces, the serving size we are looking at is just one marshmallow. It’s a light treat, but remember that delicious chocolate adds up quickly! Here is a quick overview of what you can expect per piece:
| Nutrient | Estimate Per Marshmallow |
|---|---|
| Calories | 110 |
| Fat | 5 g |
| Carbohydrates | 16 g |
| Protein | 1 g |
So, while they are definitely a sweet treat, they are portion-controlled and easy to manage! Enjoy your Easy Chocolate Covered Marshmallows guilt-free! You can also find more great recipes on our Pinterest profile.
Print
Amazing 110 Calorie Easy Chocolate Covered Marshmallows
- Total Time: 20 minutes
- Yield: 24 marshmallows
- Diet: Vegetarian
Description
These chocolate covered marshmallows are a simple no bake treat made with fluffy marshmallows dipped in smooth chocolate and topped as you like.
Ingredients
- 1 12 ounce bag large marshmallows
- 20 ounces semi sweet chocolate chips
- 2 tablespoons coconut oil
- Sprinkles (optional)
- White chocolate drizzle (optional)
Instructions
- Line a baking sheet with parchment paper and set aside.
- Add the chocolate chips and coconut oil to a microwave safe bowl.
- Microwave for 1 minute, then stir well. Continue heating in 15 second intervals, stirring each time, until the chocolate is fully melted and smooth.
- Insert a toothpick into a marshmallow and dip it into the melted chocolate, coating it halfway or fully as desired.
- Gently tap the marshmallow against the edge of the bowl to remove excess chocolate.
- Place the dipped marshmallow onto the prepared baking sheet.
- While the chocolate is still wet, add sprinkles or drizzle with melted white chocolate if using.
- Repeat with remaining marshmallows.
- Let the marshmallows rest at room temperature until the chocolate is fully set.
Notes
- Store in an airtight container at room temperature for up to 3 days.
- Prep Time: 15 minutes
- Cook Time: 5 minutes
- Category: Dessert
- Method: No Bake
- Cuisine: American