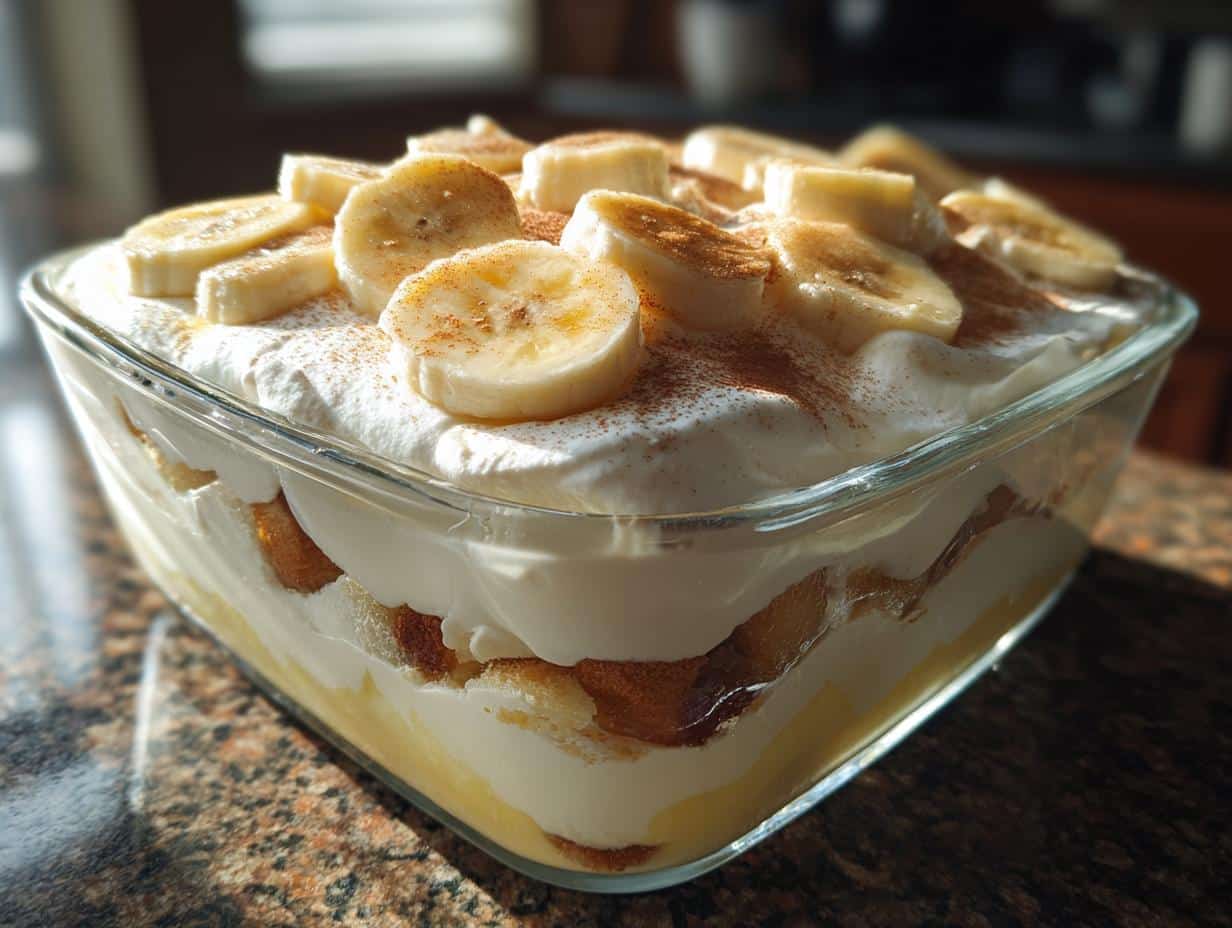
Get ready to whip up the most amazing banana pudding recipe you’ve ever tasted! Seriously, this stuff is pure magic in a dish. We’re all about making your kitchen adventures fun and totally stress-free here, so this no-bake wonder is perfect for everyone, even if you’re just starting out. Imagine layers of creamy, dreamy pudding, sweet bananas, and those classic Nilla wafers all coming together. It’s a make-ahead dream that’s so simple, you’ll be making it again and again!
Why This Banana Pudding Recipe is a Must-Try
Honestly, this banana pudding recipe is a total game-changer! If you’re looking for a dessert that’s guaranteed to impress without a ton of fuss, you’ve found it. We designed this with you in mind – someone who loves delicious, homemade treats but maybe doesn’t have hours to spend in the kitchen. It’s just pure joy in every spoonful!
- Quick and Easy Preparation: Seriously, no oven needed! This is a no-bake wonder, meaning less time cooking and more time enjoying. It’s so simple, you can whip it up in about 15 minutes of active time. Perfect for those weeknights or when you need a dessert in a pinch.
- Classic Comfort Flavors: This isn’t just any pudding; it’s a trip down memory lane! The combination of creamy vanilla pudding, sweet, ripe bananas, and those perfectly crisp Nilla wafers is a flavor explosion that everyone adores. It tastes like pure comfort.
- Perfect for Any Occasion: Whether it’s a family potluck, a birthday party, or just a Tuesday craving, this banana pudding fits right in. It’s elegant enough for guests but casual enough for a cozy night in. Plus, it’s a make-ahead marvel, so it’s ready when you are!

Gathering Your Banana Pudding Ingredients
Alright, let’s get down to business! To make this incredible banana pudding recipe, you’ll need a few simple, delicious things. Don’t worry, nothing too fancy here, just good stuff that comes together like magic. Having everything ready makes the whole process a breeze. Trust me, the quality of your ingredients really shines through in this no-bake wonder!
Creamy Pudding Base Essentials
The heart of our creamy pudding comes from just a few key players. You’ll grab one box of instant vanilla pudding mix – make sure it’s the instant kind, not the cook-and-serve, okay? Then, you’ll need 2 cups of regular milk. Any kind works, but whole milk gives it a little extra richness. And for that super smooth, sweet base, we’re adding one 14-ounce can of sweetened condensed milk. Just pour it all in!
The Richness of Heavy Cream
This is where we get that light, airy texture that makes our banana pudding so dreamy. We need 3 cups of heavy cream. Make sure it’s nice and cold when you whip it – that’s the secret to getting those lovely stiff peaks. It really makes the pudding feel so decadent without being too heavy.
The Iconic Nilla Wafers
You absolutely can’t make banana pudding without Nilla Wafers! Grab a 12-ounce box. These little vanilla cookies are the perfect crunchy, slightly sweet layer that soaks up just enough of that pudding goodness. If you happen to not find Nilla Wafers, graham crackers or even ladyfingers can work in a pinch, but Nilla Wafers are classic for a reason!
Fresh Banana Perfection
And of course, bananas! You’ll want about 5 large, ripe bananas. Not too green, not too mushy – just perfectly ripe with a few little brown spots are ideal. They’ll be nice and sweet! Just give them a good slice before you start layering everything up.

Step-by-Step Guide to Your Perfect Banana Pudding
Alright, let’s put this beautiful banana pudding together! It’s really straightforward, so don’t stress. We’re basically going to make a delicious pudding, whip some cream, and then layer it all up. It’s like building edible happiness!
Creating the Luscious Pudding Mixture
First things first, grab a big bowl. You’re going to whisk together 2 cups of milk, your instant vanilla pudding mix (remember, the instant kind!), and that can of sweetened condensed milk. Whisk it until it’s all smooth and lovely, no lumps allowed! Then, pop that bowl in the fridge for about 5 minutes. You just want it to start setting up a little bit, not get rock solid.
Whipping the Cream to Perfection
While your pudding base is chilling, let’s tackle the cream. Get another bowl and pour in your 3 cups of cold heavy cream. Now, grab your hand mixer and just go for it! Beat that cream until you see stiff peaks forming. You know, when you lift the beaters, the cream stands straight up? That usually takes about 3 to 5 minutes. Don’t overdo it, or you’ll end up with butter!
Gently Combining the Layers
Okay, time to bring our pudding and cream together. This is where you want to be a little gentle. Take your whipped cream and start folding it into the chilled pudding mixture. Use a spatula and just gently scoop from the bottom and fold it over the top. You want to keep all that lovely airiness from the whipped cream, so don’t stir it vigorously. Just fold until it’s mostly combined, and you’ll have this wonderfully light and creamy pudding.
Assembling Your Layered Pudding Masterpiece
Now for the fun part – building your banana pudding! Grab your serving dish. I love using a big glass bowl so you can see all those gorgeous layers, but a 9×13 inch baking dish works perfectly too. Start with a layer of Nilla wafers on the bottom – use about half your box. Then, spoon about half of your creamy pudding mixture over the wafers. Next, arrange half of your sliced bananas on top of the pudding. Repeat those layers: the rest of the wafers, the rest of the pudding, and finally, the rest of your banana slices.

Chilling for Flavor Fusion
This step is super important, so don’t skip it! You need to cover your banana pudding tightly with plastic wrap. This keeps it from getting any weird fridge smells. Now, let it chill in the refrigerator for at least 4 hours. This isn’t just about getting it cold; it’s crucial for all those flavors to really get to know each other and meld together. The wafers will soften just enough, and the pudding will set beautifully. It’s the secret to making this a truly amazing banana pudding experience!
Tips for the Best Banana Pudding
Want to make your banana pudding absolutely perfect every time? It’s all about a few little tricks that really elevate this classic dessert. These tips will help you nail that incredible texture and flavor, making your banana pudding recipe a guaranteed hit!
Wafer Texture Control
Okay, so the wafers are key, right? To get that perfect balance where they’re not too soggy but not too crunchy, I like to layer them in. For an extra bit of crunch right before serving, save some Nilla Wafers and crumble them right on top. It adds a fantastic texture contrast! Some people even like to lightly crush half the wafers and layer them, then use whole ones on top for visual appeal.
Banana Ripeness Matters
This is a big one for flavor! You want your bananas to be ripe, but not *too* ripe. Think perfectly yellow with maybe a few little brown freckles. Those are the sweetest and have the best flavor. If they’re too green, they won’t be sweet enough, and if they’re overly mushy and brown, they can make the pudding a bit too soft. Just right is perfect!
Achieving the Perfect Chill
Seriously, don’t rush the chilling time for this make-ahead banana pudding! Those 4 hours (or even longer!) are crucial. It’s not just about making it cold; it’s when the magic happens. The pudding sets up beautifully, and the wafers soften just enough to absorb some of that creamy goodness without turning to mush. It really lets all those wonderful flavors meld together into that classic, comforting taste we all love.
Banana Pudding Variations and Serving Ideas
This banana pudding recipe is fantastic as is, but it’s also super fun to play around with! If you’re feeling adventurous, try swapping out the Nilla Wafers for some crushed graham crackers or even delicate ladyfingers for a slightly different texture. You could also add a touch of cinnamon to the pudding mixture for a little warmth, or even swirl in some caramel sauce for a decadent twist!
Creative Ingredient Swaps
For a different cookie vibe, try using shortbread cookies or even some crushed pretzels for a sweet and salty surprise! And if you want to amp up the banana flavor even more, a teaspoon of banana extract in the pudding mix works wonders. Some folks even like to add a layer of toasted coconut or chopped pecans for extra texture and flavor.
Complementary Pairings
This banana pudding is so rich and satisfying on its own, but it’s also wonderful served alongside a tall glass of cold milk or even a light, fluffy whipped topping. It’s a perfect ending to a BBQ or a casual dinner. For a more elaborate dessert spread, consider pairing it with some fresh berries or a scoop of vanilla bean ice cream!

Frequently Asked Questions about Banana Pudding
Got questions about our favorite banana pudding? I’ve got answers! We want this recipe to be your go-to, so let’s clear up any little things you might be wondering about. It’s all about making this make-ahead banana pudding as easy and delicious as possible for you!
Can I Make Banana Pudding Ahead of Time?
Absolutely! This banana pudding recipe is practically *made* for making ahead. In fact, I highly recommend chilling it for at least 4 hours, or even overnight. This gives all those lovely flavors time to meld together, and the Nilla wafers soften up just perfectly. It’s the ultimate stress-free, make-ahead dessert!
How Long Does Banana Pudding Last in the Refrigerator?
Once it’s made and chilled, your banana pudding should stay good in the refrigerator for about 2 to 3 days. The bananas can start to get a little soft or brown after the first day, but it will still taste delicious! Just make sure it’s covered tightly to keep it fresh.
What’s the Best Way to Store Leftover Banana Pudding?
The best way to store any leftovers is to make sure the dish is covered really well with plastic wrap, pressing it down gently onto the surface of the pudding. This helps prevent it from drying out or picking up any other smells from the fridge. Keep it in the main part of your fridge, not the door, so it stays nice and cold.
Can I Use a Different Type of Pudding Mix for this Banana Pudding Recipe?
You sure can! While the instant vanilla pudding mix is what we call for in this classic banana pudding recipe, you can definitely experiment. Just make sure it’s an instant pudding mix, not the cook-and-serve kind, as the recipe relies on it setting without cooking. Butterscotch or even banana-flavored instant pudding would be delicious swaps!
Understanding the Nutritional Value of Banana Pudding
Just a friendly heads-up about the nutrition info for this yummy banana pudding! The numbers you see are estimates, okay? They can totally change depending on the specific brands of ingredients you use, like the type of milk or even how ripe your bananas are. We’re aiming for deliciousness, and these figures are just a general guide! For more information on understanding nutritional labels, you can check out resources from the U.S. Food & Drug Administration.
Print
Amazing Banana Pudding: 5 Pure Joy Spoonfuls
- Total Time: 4 hours 15 minutes
- Yield: 8 servings
- Diet: Vegetarian
Description
This easy banana pudding recipe is a delightful no-bake dessert perfect for any occasion. With layers of creamy pudding, sweet bananas, and crunchy wafers, it’s a crowd-pleaser that’s simple enough for beginners. We believe cooking should be fun and stress-free, and this recipe is designed for you to follow with confidence. Get ready to enjoy a classic treat made with simple ingredients and a whole lot of flavor. It’s a make-ahead dessert that impresses without the fuss.
Ingredients
- 2 cups milk
- 1 (4.6‑ounce) box instant vanilla pudding mix
- 1 (14‑ounce) can sweetened condensed milk
- 3 cups heavy cream
- 1 (12‑ounce) box Nilla Vanilla Wafers
- 5 large bananas, sliced
Instructions
- In a large bowl, whisk together the milk, instant vanilla pudding mix, and sweetened condensed milk until smooth. Refrigerate for about 5 minutes or until slightly set.
- In another bowl, beat the heavy cream with a hand mixer until stiff peaks form (3–5 minutes).
- Gently fold the whipped cream into the pudding mixture.
- Using a large glass or 9×13-inch baking dish, layer half of the Nilla wafers, followed by half of the pudding mixture, then half of the banana slices. Repeat the layers.
- Cover tightly with plastic wrap and refrigerate for at least 4 hours. Just before serving, crumble additional wafers on top for extra crunch, if desired.
Notes
- You can substitute graham crackers or ladyfingers for Nilla Wafers if preferred.
- For best results, refrigerate for at least 4 hours to allow the flavors to meld.
- Crumble extra wafers on top just before serving for added texture.
- Prep Time: 15 minutes
- Cook Time: 0 minutes
- Category: Dessert
- Method: No-Bake
- Cuisine: American