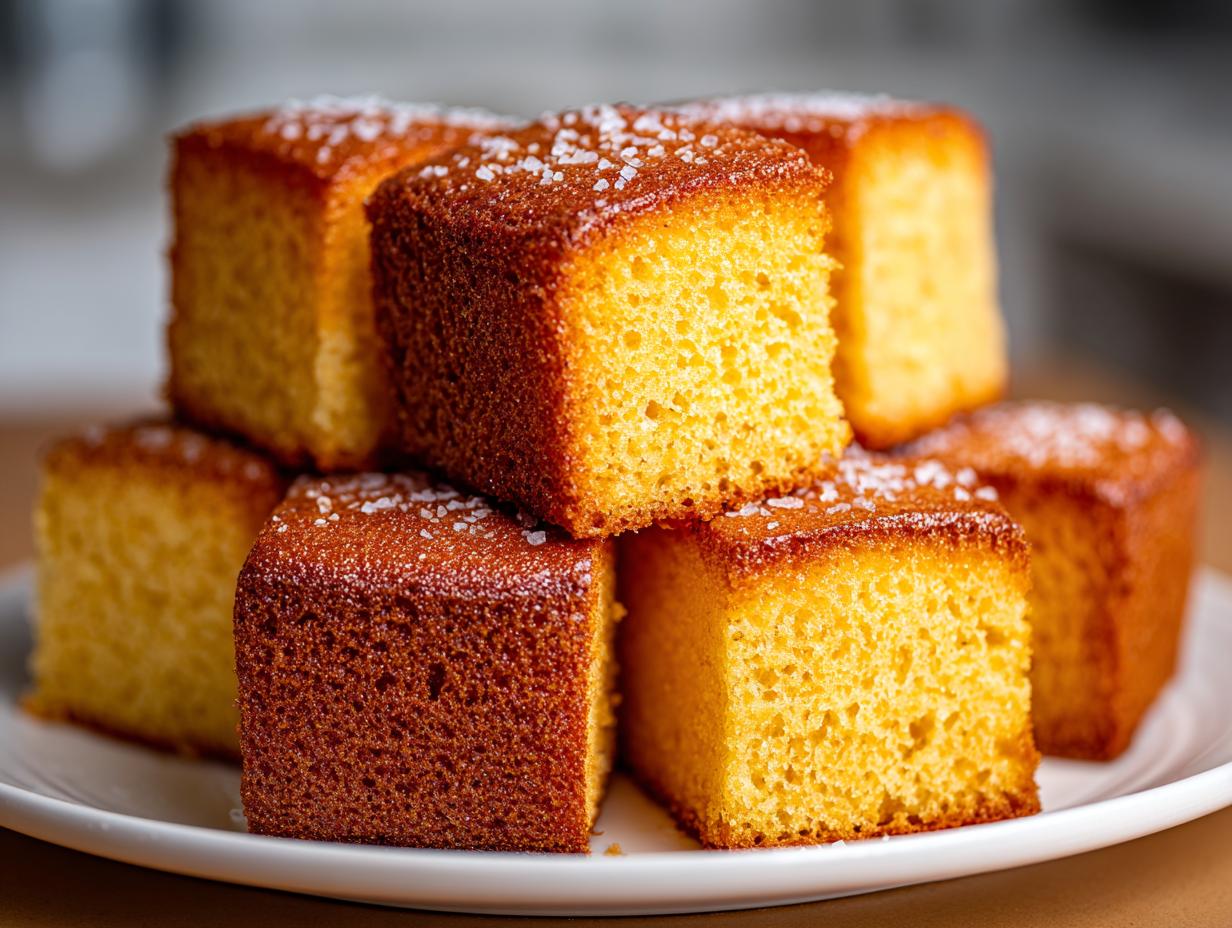
Okay, listen up, because I’m about to tell you about the easiest, most satisfying kitchen hack I learned when I was first trying to figure out how to cook without burning everything. We’re talking about homemade bread toast squares. Forget the toaster oven; those things just dry everything out! This stovetop method gives you buttery, golden crisp little nuggets that are perfect for dipping into soup, sprinkling on a big salad, or just eating straight over the sink when nobody’s looking.
I remember the first time I made these; I was terrified of burning the butter, but seriously, this recipe is nearly foolproof. The combination of butter for flavor and olive oil for a higher smoke point is my secret weapon. In less than ten minutes, you go from soft sandwich bread to the crunchiest little squares imaginable. Trust me, once you make these buttery bread toast squares this way, you’ll never go back to the dry, sad little cubes you used to buy in a bag.
They’re ready before your coffee is even done brewing! It’s just so simple, and the smell that fills the kitchen when that butter hits the pan? Heaven. Let’s get started so you can taste what I’m raving about.

Gathering What You Need for Your Bread Toast Squares
To make these incredible bread toast squares, you don’t need a giant pantry or fancy gadgets. Honestly, if you have bread and some fat, you’re halfway there! But for the best, most reliable results, stick to the specific amounts I list below. Using the right kind of bread—not too thin—is really important for that perfect crunch.
We only need a few simple things for the stovetop magic to happen. Make sure you have everything ready to go before you even turn on the heat because once the butter melts, things move fast! It’s all about quick assembly here.
Essential Ingredients for Golden and Buttery Bread Toast Squares
We are working with just four main ingredients, but their quality really matters here. You’ll want:
- Four slices of regular sandwich bread. I mean it—use bread that’s about half an inch thick. Thin, flimsy stuff will just burn instantly.
- Two tablespoons of unsalted butter. This is for the flavor, so use the real stuff!
- One tablespoon of olive oil. This helps the butter from burning too fast.
- Just a tiny pinch—about 1/8 teaspoon—of salt to bring out the buttery flavor.
Necessary Equipment for Making Bread Toast Squares
You don’t need much specialized gear for these crispy treats. Just grab:
- A large nonstick skillet. Make sure it’s big enough that you can spread the bread pieces out in one layer when we start cooking!
- A sharp knife and a cutting board for prepping the bread.
- A sturdy spatula for tossing and turning those little squares.
Step-by-Step Guide to Creating Delicious Bread Toast Squares
This is where the magic happens, and I promise you, it moves quickly! Because we are using the stovetop, you need to be right there paying attention. Don’t walk away to check your phone or start washing dishes—these bread toast squares go from perfect to slightly scorched in a blink if you aren’t watching.
Remember, the goal is golden brown and crispy all over, not just one side. We’re building layers of flavor and texture here, so follow these steps exactly, and you’ll have the best skillet toast ever. If you want to see more quick dinner ideas, check out our Cheesesteak Tortellini Recipe.
Preparing the Bread for Your Bread Toast Squares
First things first: we need to get our bread into squares! Take those four slices of bread—and I’m reminding you again, make sure they are sturdy, about half an inch thick—and stack them up neatly. It’s much faster to cut them all at once this way.
Using a sharp knife, cut the stacked bread into 1-inch squares. Don’t worry if they aren’t perfectly uniform; that little bit of variation just adds to the homemade charm of these bread toast squares. Once they are cut, set them aside on a plate right next to your stove. You want them ready to dump into the hot pan the second the fat is ready.
Heating the Fat for Perfect Bread Toast Squares
Now, grab that large nonstick skillet and put it over medium heat. This is important—not medium-high! If it’s too hot, the butter will burn before the bread even starts to toast. We want a nice, even heat working its way through the bread.
Add your two tablespoons of butter and your one tablespoon of olive oil right into the pan. Watch them closely! You’ll see the butter melt, and then it will start to foam up a little bit. Once that foam subsides and the mixture looks hot and shimmery—that’s when you know you’re ready for the next step. Swirl the pan gently to make sure the bottom is completely coated with the hot fat. This coating is what gives your bread toast squares that beautiful, even golden color.
The First Cook Phase for Your Bread Toast Squares
Carefully drop all your bread squares into the hot skillet. You need to spread them out so they are in a single layer. If they are piled up or overlapping, they won’t get crispy—they’ll just steam, and that’s not what we want for our bread toast squares!
Now, here’s the hardest part: Do nothing! Let them cook undisturbed for two full minutes. Resist the urge to poke them or move them around. You are waiting for that bottom layer to turn a deep, gorgeous golden brown. If you peek after two minutes and they aren’t golden, just give them 30 more seconds. Patience pays off for that initial crisp.
Seasoning and Finishing the Bread Toast Squares
Once the bottoms are perfectly browned, it’s time to season and finish the job. Sprinkle that tiny bit of salt evenly over the exposed, untoasted sides of the bread pieces. Then, take your spatula and toss them gently. You want to flip them over so the golden side is now facing up, and the raw sides hit the hot pan.
You’ll continue cooking these amazing bread toast squares for another two to three minutes. Keep tossing them frequently now—every 30 seconds or so. We are aiming for all sides to be crisp and golden-brown. When they smell nutty and look crunchy all over, pull them immediately out of the skillet and transfer them to a serving bowl. Serve them warm for the absolute best experience!

Tips for Achieving Consistent Bread Toast Squares Every Time
I’ve definitely had batches of these that ended up patchy or slightly burned, so I learned a few things the hard way! The biggest enemy of perfect bread toast squares is overcrowding the pan. If you cram too many pieces in there, the temperature of the fat drops instantly, and instead of crisping up, the bread soaks up the oil and gets soggy. If your skillet isn’t large enough, just work in two batches. It takes an extra minute, but it’s worth the consistency.
Another thing I noticed is that the heat needs to stay steady. If your heat is too high, you’re only coloring the outside, and the inside stays soft, which we don’t want. Medium heat is your friend here. Also, don’t be shy about tossing them during that final stage. Those gentle stirs ensure that every single face of your bread toast squares gets that beautiful buttery crunch we’re aiming for. If you follow these little rules, your toast squares will be perfectly golden every single time! Feel free to share your results on our Facebook page.
Storage and Reheating Instructions for Bread Toast Squares
Nobody wants soggy toast squares, right? The beauty of these bread toast squares is that they are so quick to make, but if you happen to have leftovers, you need to treat them right to keep that beautiful crisp texture. Storing them incorrectly is the fastest way to turn them soft!
You absolutely cannot store them in the fridge; the moisture in there is their mortal enemy. Keep them on the counter, but make sure they are sealed up tight. Here’s a quick summary of how I handle leftovers.
Storing Leftover Bread Toast Squares
To keep your bread toast squares as crunchy as possible, place them in a completely airtight container after they have cooled down completely to room temperature. I mean *completely* cool, or you’ll trap steam inside! Keep the container on your counter, away from any humidity, for up to two days. They really are best the day you make them, though.
Reheating Your Bread Toast Squares for Re-crisping
If they’ve lost a little snap, don’t worry! We can bring them right back to life. Avoid the microwave at all costs—it makes them chewy! The best way to re-crisp your bread toast squares is either in a dry skillet over medium heat for a minute or two, tossing constantly, or spread them on a baking sheet in a 350°F oven for about five minutes. Both methods work wonders!
| Method | Container/Setting | Duration |
|---|---|---|
| Storage (Short Term) | Airtight container, Room Temp | Up to 2 Days |
| Reheating (Crispness) | Dry Skillet or Oven (350°F) | 1-5 Minutes |
Frequently Asked Questions About Bread Toast Squares
I get so many questions about these little guys! They seem simple, but people always want to know the best way to get that perfect crunch. I’ve gathered the most common things folks ask when they are trying to nail their batch of homemade bread toast squares.
What is the Best Type of Bread for Bread Toast Squares
Honestly, the thickness is more important than the type of bread! You really want something sturdy, like a standard sandwich loaf that’s about half an inch thick. If you use thin sandwich bread, it gets totally brittle and breaks apart when you try to toss it. Sturdier bread holds up better to the fat and heat, giving you a satisfying, chewy-crisp texture in your bread toast squares.
Can I Make Bread Toast Squares Ahead of Time
You absolutely can, but you have to follow the storage rules I mentioned! If you store them incorrectly, they go soft fast. If you’re making a huge batch for a party, make them the morning of, let them cool completely, and keep them in a large, sealed container on the counter. They are definitely best eaten within a few hours, but they hold up okay for a day if you’re careful about humidity. For more quick snack ideas, see our Cottage Cheese Snack Bowls.
How to Adjust the Flavor Profile of Your Bread Toast Squares
The base recipe is pure buttery goodness, but if you want to jazz up your bread toast squares, try adding spices right when you add the salt! A tiny pinch of garlic powder or onion powder works really well if you’re serving these with soup. For a sweeter snack, you can skip the salt and toss them with a mix of cinnamon and a little sugar right after they come out of the pan. Just don’t add too much, or the sugar will burn! You can find more recipe inspiration on our Medium page.
Nutritional Information for Bread Toast Squares
I never usually count calories when I’m making these—they disappear too fast! But since you asked, I pulled the estimates for one standard serving size. Since this recipe is so simple, we are mostly looking at fats from the butter and oil, plus the carbs from the bread. They are surprisingly filling for such a quick snack!
Here’s a quick look at what you can expect from one serving of these delicious, buttery bread toast squares.
| Nutrient | Estimate per Serving |
|---|---|
| Calories | 210 |
| Total Fat | 11 g |
| Carbohydrates | 24 g |
| Protein | 5 g |
Share Your Homemade Bread Toast Squares Experience
Now it’s your turn! I’ve shared all my secrets for making the very best crunchy, buttery bread toast squares right on the stovetop. I really want to know how they turned out for you. Did they get perfectly golden on the first try? Go ahead and drop a rating below and tell me what you served them with—soup, salad, or just plain? Don’t forget to pin this recipe on Pinterest!
Print
Shocking 2-Minute Bread Toast Squares Triumph
- Total Time: 9 minutes
- Yield: 2 servings
- Diet: Vegetarian
Description
Make homemade bread toast squares that are golden crisp and buttery. This easy stovetop recipe works great for breakfasts, soups, or snacking.
Ingredients
- 4 slices sandwich bread (about 1/2 inch thick)
- 2 tablespoons unsalted butter
- 1 tablespoon olive oil
- 1/8 teaspoon salt
Instructions
- Stack the bread slices and cut into 1-inch squares.
- Heat a large nonstick skillet over medium heat.
- Add the butter and olive oil; swirl until melted and hot.
- Add the bread squares in a single layer.
- Cook for 2 minutes without stirring until the bottoms are golden.
- Sprinkle with salt and toss gently.
- Continue cooking for 2 to 3 minutes, stirring occasionally, until crisp on all sides.
- Remove from the skillet and serve warm.
Notes
- Use bread that is about 1/2 inch thick for the best results.
- Ensure the skillet is not overcrowded; cook in batches if necessary.
- Prep Time: 4 minutes
- Cook Time: 5 minutes
- Category: Breakfast
- Method: Stovetop
- Cuisine: American