Look, I know onions seem simple, right? You chop them, you cook them, done. But if you want those deeply golden, jammy, naturally sweet caramelized onions that taste like pure comfort, you have to forget everything you think you know about speed! I’ve spent years at the stove messing this up—burning them, boiling them—until I finally cracked the code. My secret? It’s all about the low and slow method. We’re not just softening these; we are coaxing the natural sugars out until they transform. Trust me, these stovetop techniques I’ve honed over the years are foolproof once you respect the clock.
This isn’t a quick side dish; it’s a meditation. And that’s okay! You can walk away, but you can’t rush the science.
Why Patience Makes the Best Caramelized Onions
So many people crank the heat up, hoping to speed things along, and end up with charred, bitter onion bits. That’s not caramelization, that’s just burning, and it tastes awful! What we are actually doing when we cook them slowly is breaking down the complex carbohydrates in the onions into simpler sugars. This takes time, usually 40 minutes or more if you want that deep, mahogany color.
When you keep the heat low—medium-low is your best friend here—you give those sugars time to brown evenly instead of scorching. The salt helps pull out the initial moisture, which creates steam, allowing the onions to soften beautifully before the actual browning process kicks in. It’s a gentle dance between moisture and heat. Don’t worry if you see brown bits sticking to the bottom of your pan; that’s called fond, and it’s where all the best flavor lives!

Gathering Your Ingredients for Caramelized Onions
You don’t need a pantry full of weird spices or fancy equipment for these onions. Nope! The beauty of truly great caramelized onions is that they rely almost entirely on three simple things: onions, fat, and time. When you use high-quality basics, the low-and-slow cooking process really lets those natural flavors shine through. I always make sure to grab my biggest skillet because we need space for these guys to spread out and breathe evenly.
Don’t skimp on the onions here; we start with a huge pile because they cook down dramatically. Seriously, three large onions will barely fill the pan at first, but by the end, you’ll have a beautiful, rich yield.
Essential Components for Caramelized Onions
Here is exactly what you need to have out on your counter before you even think about turning on the stove. Stick to these measurements, and you are golden:
- 3 large yellow onions, thinly sliced (peeling and slicing evenly is crucial!)
- 2 tablespoons olive oil or unsalted butter (I usually do a mix of both for flavor and stability)
- 1 teaspoon kosher salt (this helps draw out the moisture right away)
- 2 to 4 tablespoons water as needed (this is our emergency brake if things get too sticky!)
Essential Equipment for Slow Cooking
You don’t need any fancy gadgets for this process, which is what I love about it! We are relying on basic stovetop physics here. If you try to rush this in a tiny saucepan, I promise you’ll end up with scorched onion bits stuck to the bottom. We need surface area, people!
Choosing the Right Pan for Caramelized Onions
The single most important piece of equipment is your pan. You absolutely must use a wide, heavy skillet—cast iron is amazing, but a heavy stainless steel pan works perfectly too. Why heavy? Because heavy bottoms distribute heat much more evenly, which prevents hot spots that cause burning. Wide is important because you want the onions spread out in a single layer, not piled high like a mountain. Piling them up causes them to steam instead of caramelize. We want them gently sweating and browning, not stewing in their own juices!

Step-by-Step Instructions to Achieve Rich Caramelized Onions
Okay, deep breath. Now that we have our ingredients and the right pan, let’s actually make these glorious caramelized onions! The whole process takes about 45 minutes to an hour total, but don’t panic about the clock. Just focus on the color and the texture. I’m going to walk you through exactly what I do every time I make a batch for my French Onion Soup base.
Initial Preparation and Sauté
First things first: slicing. You want your onions cut evenly into thin half-moons, about 1/8-inch thick. I always cut them root to tip, peel them, and then slice. If your slices are uneven, the thin ones will burn before the thick ones even soften, and that’s a nightmare to deal with later. Once they are sliced, get your wide, heavy skillet on the stove over medium heat. Don’t rush this part—let the pan warm up for a minute or two, then add your oil or butter. Once the fat is shimmering, dump in all those onions and sprinkle them with the teaspoon of kosher salt.
Now, we sauté. Cook them for about 10 minutes, stirring every minute or two. During this initial burst, the onions will release a ton of water. They’ll wilt down significantly and look a little sad, but that’s exactly what we want. This softens them up before we start the real magic.
The Slow Cooking Phase for Caramelized Onions
This is where the patience pays off! After those first 10 minutes, reduce your heat way down to medium-low. Seriously, turn that knob! Spread the onions out as much as possible across the bottom of the pan so they aren’t stacked up. Now, you let them cook slowly. The rule here is to stir every 3 to 5 minutes. I often use a wooden spoon or a sturdy spatula and make sure I scrape up all those lovely browned bits sticking to the bottom of the pan—that’s pure flavor!
If they are sticking too much, or if the bottom is looking dark brown instead of light golden brown after about 15 minutes on low, you need to intervene before they burn. Don’t worry; this happens to me sometimes too, especially if my pan runs a little hot!
Managing Moisture and Assessing Doneness
If things are getting too sticky or browning too fast, grab 1 tablespoon of water—just plain tap water—and splash it right into the pan. Immediately stir it around. This deglazes the pan, lifting those stuck bits back into the onions, and cools the temperature down slightly. This step is your safety net!
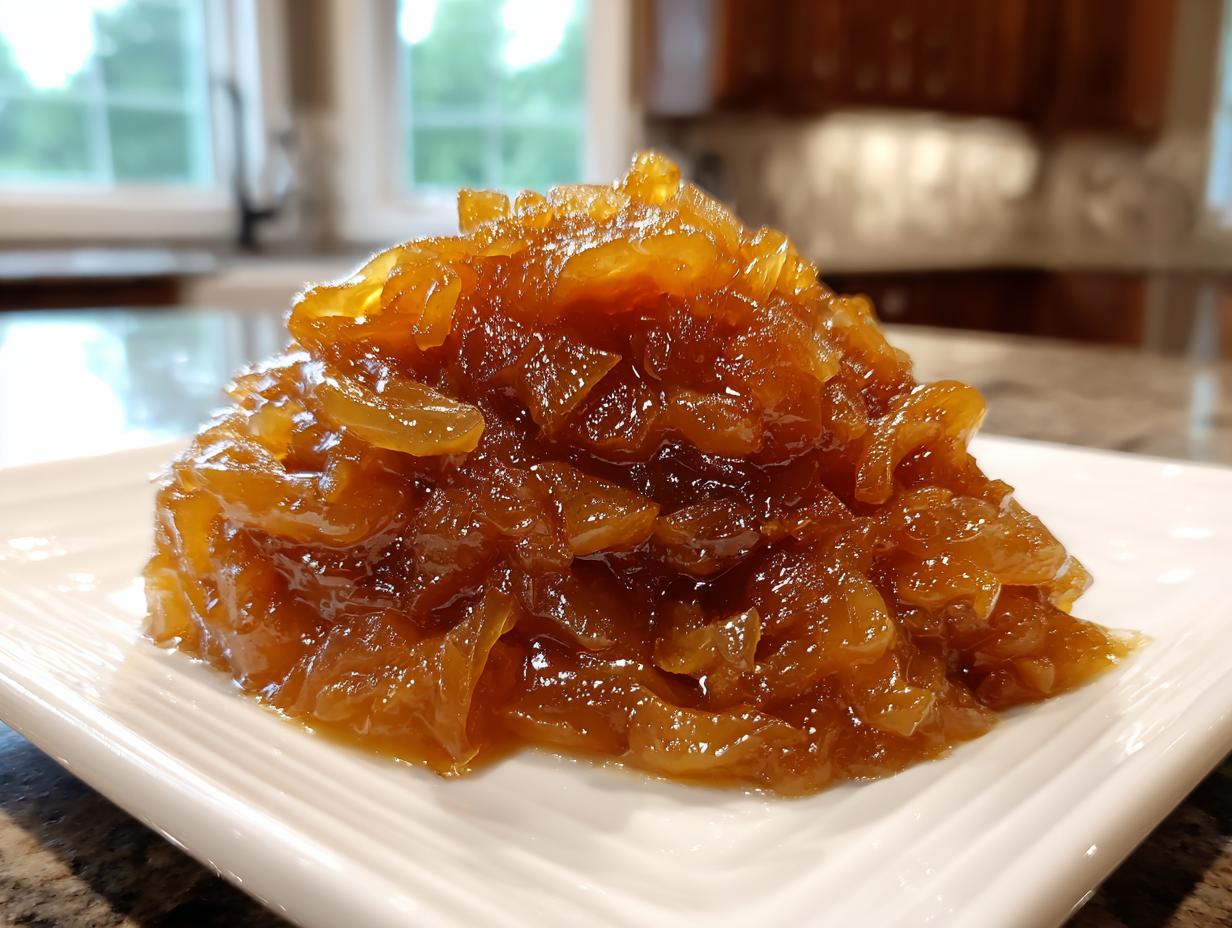
Keep stirring and cooking. For lightly caramelized onions—still sweet but with some texture left—you’re looking at about 25 to 30 minutes total cook time after the initial sauté. But if you want that deep, rich, jammy flavor that tastes like candy, plan on going for a full 40 to 50 minutes on that low heat. When they are done, they should be incredibly soft, almost melting, and a deep, rich golden-brown color. Taste them! Adjust the salt if you think they need it, and then get them off the heat immediately so they don’t overcook.
Tips for Achieving Superior Caramelized Onions Flavor
Getting that perfect, sweet flavor in your caramelized onions really comes down to respecting the process. I’ve learned that the difference between sweet and burnt comes down to just a few degrees and a few seconds of distraction. These aren’t just guidelines; they are the hard-won lessons from my own kitchen experiments. If you follow these secrets, you’ll nail the texture every single time.
Avoiding the Burn: Heat Control Secrets
I cannot stress this enough: High heat is the enemy of caramelization! If you see black spots forming anywhere on the bottom of your pan before the 25-minute mark, your heat is too high, plain and simple. You need constant, gentle heat to melt the sugars. If you have to walk away to answer the phone, turn the burner down to the lowest setting possible while you’re gone. Frequent stirring is your second line of defense. Those little scrapes of the spatula are necessary to redistribute the onions and prevent any single spot from scorching. If you stir too infrequently, you risk uneven flavor.
Ingredient Adjustments for Caramelized Onions
When it comes to the fat, you have a choice, but know the trade-offs. Olive oil is great, especially if you like a slightly fruitier undertone, but I often use a mix of oil and butter. Butter adds incredible richness and that classic savory depth that really complements the natural sweetness we are building. However, butter can burn faster than oil, so if you use all butter, you might need to use slightly lower heat overall or add your water deglazing step a little sooner.
Remember, this recipe is vegetarian, so we skip bacon grease, but if you were making a beef stock base later, that would be a different story! Stick to the oil/butter combo for the best results in this specific recipe. For more cooking inspiration, check out our page on Facebook.
Serving Suggestions for Your Caramelized Onions
Now that you have this incredible, jammy, sweet topping, what on earth do you do with it? Honestly, I could eat a bowl of these all by themselves with a spoon—they are that good! But they are best used to elevate simple dishes. Because they are so intensely flavorful, you don’t need much to make a big impact. Think of them as a flavor bomb you can drop onto anything that needs a little savory, sweet depth.
Pairing Simple Dishes with Caramelized Onions
The sweetness pairs beautifully with sharp, salty flavors. My absolute favorite way to use them is on top of thick slices of toasted sourdough bread. I’ll rub the toast with a little garlic, smear on some goat cheese, and pile these onions high on top. Wow! It’s an instant appetizer. You can find more appetizer ideas on our Pinterest page.
If you’re making something simple for dinner, like grilled chicken breasts or maybe some veggie burgers (since we are keeping things vegetarian here), these onions turn a plain protein into something special. Just spoon a generous layer over the top right before serving. They are also fantastic stirred into scrambled eggs or mixed into mashed potatoes for an unexpected treat. Don’t forget about soups; they are the backbone of any good French Onion Soup, but they are also delicious just melted into a simple vegetable broth!
Storing and Reheating Leftover Caramelized Onions
The best part about taking the time to make a big batch of caramelized onions? You get leftovers! And honestly, they are even better the next day once the flavors have had a chance to really marry together overnight. You don’t want to waste all that effort, so knowing how to store them properly is key to keeping that beautiful, jammy texture intact. They are so versatile, so make a double batch next time, I promise you won’t regret it!
They store really well, which is a huge bonus for busy weeknights. Just make sure they are completely cooled down before you put them away, otherwise, you risk condensation building up inside the container, which can make them soggy.
Making Ahead: Refrigeration and Freezing
For short-term storage, refrigeration is super easy. Just scoop your cooled onions into a clean, airtight container. I use glass containers because they don’t retain odors, but any good sealable container works fine. They stay delicious in the fridge for up to five days. When you want to use them, just scoop out what you need and gently reheat them on the stovetop over low heat, maybe with a tiny splash of water or broth, until they are warmed through and soft again.
If you made enough to last longer than a week, freezing is the way to go! You can portion them out into small freezer bags or ice cube trays—the cubes are perfect for adding a burst of flavor to sauces later on. They freeze beautifully for up to three months. When you go to thaw them, the stovetop is still the best method. Here’s a quick reference chart so you don’t forget:
| Storage Method | Container Type | Duration |
|---|---|---|
| Refrigerate | Airtight Container | Up to 5 days |
| Freeze | Freezer-Safe Portions | Up to 3 months |
Frequently Asked Questions About Caramelized Onions
I get so many questions when people try this recipe for the first time, and that’s totally normal! It feels counterintuitive to cook something for so long when you’re used to quick weeknight meals. Don’t sweat it; I’ve got the answers right here to make sure your first batch of caramelized onions is a total success. If you have other questions, drop them in the comments below! You can also read more of our content on Medium.
How long does it take to make truly sweet caramelized onions?
If you are aiming for that deep, rich, candy-like sweetness—the kind that makes everything better—you really need to dedicate about 45 to 50 minutes of cooking time on low heat after the initial softening phase. Lighter browning can happen faster, around 30 minutes total, but the deep, jammy texture requires that full commitment. Remember, you can’t rush caramelization!
Can I use sweet onions instead of yellow onions for this recipe?
Yes, absolutely! Yellow onions are my go-to because they hold their structure well and develop a fantastic savory depth. However, sweet onions, like Vidalia, have a higher natural sugar content, so they might brown and soften slightly faster than yellow onions. If you use sweet onions, keep an extra close eye on the heat, especially in the later stages, to prevent scorching.
What is the role of salt in making caramelized onions?
The salt is super important in the beginning phase! It doesn’t just add flavor; it helps draw the natural moisture out of the onion cells through osmosis. This moisture has to leave before the sugars can truly start to brown and caramelize. By adding the salt early on, we kickstart the softening process and prevent the onions from just steaming themselves into mush before they get a chance to develop that beautiful golden color.
Share Your Experience Making Caramelized Onions
Well, that’s everything I know about turning humble onions into golden treasure! I truly hope you give this low-and-slow method a try. It takes patience, but the payoff is huge! Did you manage to get that deep, jammy sweetness in your caramelized onions? I’d love to hear how they turned out for you or if you have any other tricks you swear by. Drop a comment below and let me know your favorite way to use them!
Print
Amazing 45-min Caramelized Onions Taste
- Total Time: 45 to 60 minutes
- Yield: About 1.5 cups
- Diet: Vegetarian
Description
A simple method for making deeply golden, soft, and naturally sweet caramelized onions using low heat and patience.
Ingredients
- 3 large yellow onions
- 2 tablespoons olive oil or butter
- 1 teaspoon kosher salt
- 2 to 4 tablespoons water as needed
Instructions
- Slice the onions evenly: Cut onions in half root to tip, peel, then slice into thin half-moons about 1/8-inch thick.
- Heat the pan: Place a wide, heavy skillet over medium heat and add the oil or butter. Let it melt and warm fully.
- Add onions and salt: Add the onions and sprinkle with salt. Stir to coat evenly.
- Cook until softened: Cook for 10 minutes, stirring every 1 to 2 minutes, until onions wilt and release moisture.
- Lower the heat: Reduce heat to medium-low. Spread onions into an even layer and let them cook slowly.
- Stir and scrape: Stir every 3 to 5 minutes, scraping the pan bottom to lift browned bits.
- Add water if needed: If onions stick or brown too fast, add 1 tablespoon water and stir to deglaze.
- Continue cooking: Cook for 25 to 40 more minutes until onions are deep golden brown, very soft, and jammy.
- Finish and serve: Taste and adjust salt if needed. Use immediately or cool for storage.
Notes
- Lightly caramelized onions take 25–30 minutes.
- Deep golden and sweet onions take 40–50 minutes.
- Avoid high heat; it causes burning, not sweetness.
- Stir frequently to prevent uneven browning.
- Caramelization cannot be rushed.
- Refrigerate leftovers up to 5 days in an airtight container.
- Freeze portions up to 3 months.
- Prep Time: 10 minutes
- Cook Time: 35 to 50 minutes
- Category: Side Dish
- Method: Stovetop
- Cuisine: Western