If you need a show-stopping appetizer that screams “I planned this for days” but actually takes less than 40 minutes, stop what you are doing and make this Chicken Garlic Pull Apart Bread right now. Seriously, this is my secret weapon for any impromptu gathering. It’s gooey, it’s garlicky, and that sourdough gets just crispy enough on the edges while staying soft inside.
I remember my sister called me one Tuesday—she needed an appetizer for a neighborhood party starting in an hour! I panicked for exactly thirty seconds, then I grabbed a loaf of bread and everything else we had. This recipe saved me. It’s so forgiving; you can barely mess up the cutting, and the cheese just melts everything together beautifully. If you’re looking for the easiest, cheesiest, most crowd-pleasing appetizer, this Chicken Garlic Pull Apart Bread is it. You are going to love how simple it is!

Gather Your Ingredients for Chicken Garlic Pull Apart Bread
Okay, before we dive into the magic of cutting, gathering your supplies is key. This recipe is simple, but quality ingredients make a huge difference, especially with something as straightforward as this Chicken Garlic Pull Apart Bread. You want that butter rich and that cheese melty, right? Don’t skimp on the garlic, either—it’s the star of the show!
Here is exactly what you need to pull this cheesy masterpiece together:
| Item | Quantity |
|---|---|
| Unsalted Butter (softened) | ½ cup |
| Garlic Cloves (minced) | 4 large |
| Fresh Parsley (chopped) | 2 tablespoons |
| Salt & Pepper | ½ tsp salt, ¼ tsp pepper |
| Sourdough or Vienna Loaf | 1 round loaf (about 1 lb) |
| Cooked Chicken Breast (diced) | 2 cups |
| Mozzarella Cheese (shredded) | 2 cups |
| Parmesan Cheese (shredded) | ½ cup |
Essential Components for Cheesy Chicken Garlic Pull Apart Bread
The most important thing here is your chicken. You absolutely must have 2 cups of cooked chicken breast, diced small. I almost always use a rotisserie chicken because who has time to boil chicken when you’re making Chicken Garlic Pull Apart Bread last minute? Make sure your butter is softened—not melted—because we are creaming it with the garlic, not sizzling it. That soft texture is what lets the butter seep into every single crack we make!
Equipment Needed for Assembly and Baking
You don’t need fancy gadgets for this one, thankfully! Grab a small bowl for mixing up that amazing garlic butter. You’ll need a sharp serrated knife for cutting the bread—be careful with this step! A sturdy cutting board is essential so you don’t slice up your counter. Finally, make sure you have a large baking sheet ready, lined with foil or parchment paper to catch all those glorious, cheesy drips.
Step-by-Step Guide to Making Perfect Chicken Garlic Pull Apart Bread
Alright, now for the fun part! This is where the transformation happens, and trust me, it’s easier than it looks. The whole process moves fast, so make sure your oven is hot and ready to go. We want this Chicken Garlic Pull Apart Bread hitting that heat quickly!
Preparing the Flavor Base
First things first: that heavenly garlic butter. In a small bowl, you’re going to mix together your softened butter—and I mean *softened*, like room temperature soft, not microwaved mushy soft. Add in your four large minced garlic cloves. Don’t be shy with the garlic; it’s what makes this bread sing! Then toss in the two tablespoons of finely chopped fresh parsley, half a teaspoon of salt, and just a little pinch of black pepper. Mash it all together with a fork until it’s a beautiful, uniform green-flecked paste. Taste it! Yep, it’s perfect. Set that aside.
Mastering the Bread Cutting Technique
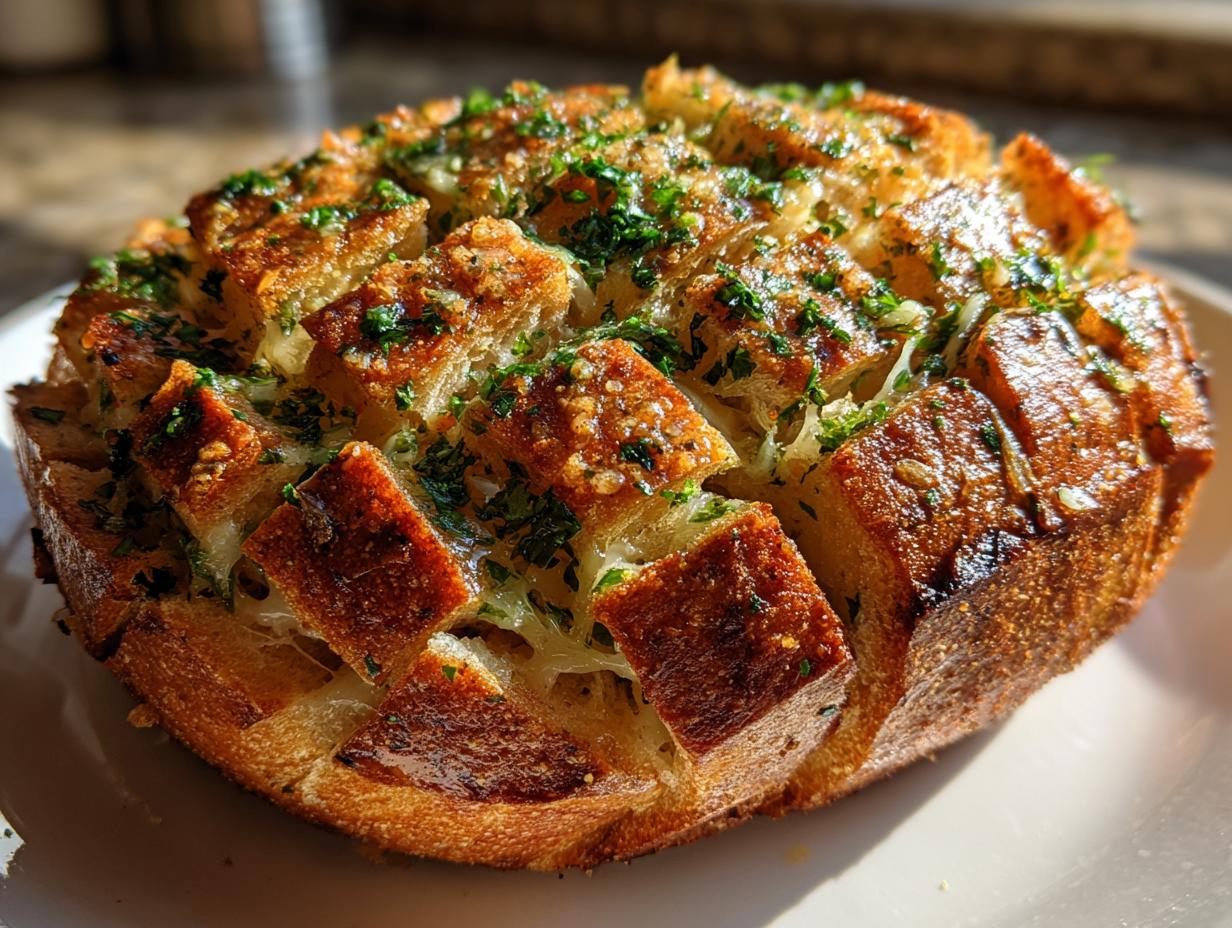
This is the step that looks intimidating, but I promise it’s not. Take your round sourdough loaf and put it on your cutting board. Grab your sharpest serrated knife. You want to cut diagonal slices about one inch apart, going all the way down, but stop about half an inch from the bottom crust. Don’t cut all the way through! That bottom crust is holding our whole cheesy structure together.
Now for the crosshatch. Rotate the loaf 90 degrees and cut another set of diagonal slices, crossing over the first set. When you’re done, the loaf should look like it’s been diced into little cubes, but they are all still attached at the base. Gently wiggle the cuts apart with your fingers—this opens up the little pockets we need for stuffing. If a few cubes feel a little loose, just push them back into place gently.
Stuffing and Layering the Fillings
Time to load it up! Start by taking that garlic butter and using a butter knife or your fingers to spread it generously into every single crevice you just made. Make sure you get that butter right down into the cracks. Next, grab your two cups of diced cooked chicken and start stuffing pieces into those openings. Distribute it as evenly as you can.
Once the chicken is nestled in, it’s time for the cheese avalanche. Take your two cups of mozzarella and your half-cup of Parmesan and push them into every gap you can find. You want cheese sticking out everywhere! Don’t worry if it looks like too much; it all melts down into the bread. This heavy stuffing is what makes this Chicken Garlic Pull Apart Bread so satisfying.

Baking Instructions for Optimal Melt and Crisp
Wrap the entire stuffed loaf tightly in aluminum foil. This is crucial because it steams the inside first, melting all that cheese and letting the butter soak deep into the dough without burning the top. Place the foil-wrapped loaf on your prepared baking sheet and pop it into the preheated 350°F oven for 15 minutes.
After 15 minutes, carefully unwrap the foil—watch out for hot steam! Then, put it back in the oven, unwrapped, for another 10 to 15 minutes. You’re looking for the cheese to be bubbly, golden brown on top, and those exposed edges of the bread to look crispy. Once it looks perfect, pull it out. Don’t slice it! Just let it rest right there on the pan for about 3 minutes before you serve it. That short rest lets the structure firm up just enough so you can pull off perfect sections.
Tips for Success with Your Chicken Garlic Pull Apart Bread
Honestly, this recipe is built for success, but a few little tricks can elevate your Chicken Garlic Pull Apart Bread from great to legendary. My number one time-saver, which I mentioned earlier, is using rotisserie chicken. It’s already seasoned, tender, and saves you a solid 20 minutes of prep time. Don’t feel guilty about it—Grandma would have done it if she could! Share it on social media if you love it!
When it comes to herbs, if you don’t have fresh parsley on hand, you can absolutely use dried Italian seasoning or even a little fresh rosemary mixed into the garlic butter. It changes the flavor profile slightly, but it’s still delicious. Also, if you like a little heat, tossing in half a teaspoon of red pepper flakes into the butter mixture before you stuff the bread gives this Chicken Garlic Pull Apart Bread a fantastic little kick that everyone always asks about.
Another pro tip: when you’re stuffing the cheese, really pack it in there. If you think you’ve added enough mozzarella, add a little bit more. That gooey, stringy cheese is the whole point of this appetizer!
Ingredient Notes and Simple Substitutions
Since this recipe is so simple, the ingredients really do all the heavy lifting. If you’re missing something specific, don’t sweat it! This bread is wonderfully forgiving, which is why I love making it when I’m low on supplies. If you are looking for other great bread recipes, check out this list of 18 Best Bread Recipes.
For the cheese, if you’re fresh out of mozzarella or just want a different flavor, Cheddar or Monterey Jack work beautifully. I even used a bag of Italian blend cheese once when I was in a pinch, and it melted down just as nicely, adding a bit more tang.
The bread choice is slightly more important, but still flexible. Sourdough gives you that great tangy flavor and structure, but if you only have a French baguette or a nice, crusty ciabatta loaf, those work great too. Just make sure whatever loaf you choose is sturdy enough to handle all that stuffing without immediately falling apart.
And for those who like spice? Don’t forget those red pepper flakes in the butter! It’s a game-changer for balancing out all that richness. A little sprinkle of chopped green onions or chives mixed in with the chicken also adds a lovely freshness that cuts through the heavy cheese.
Serving Suggestions for Chicken Garlic Pull Apart Bread
This Chicken Garlic Pull Apart Bread is so rich and satisfying that it really doesn’t need much company, but if you are serving it as part of a bigger spread, keeping the sides simple is the way to go. You don’t want to compete with all that garlic and cheese!
For a game day situation, I always serve it alongside something cool and crisp to cut through the richness. A simple bowl of celery and carrot sticks with a light ranch dip is perfect. If you are making this for a party, serving it straight out of the foil wrapper on a rustic wooden board looks amazing and keeps it warm longer. You can find more great appetizer ideas here.
When it comes to drinks, this bread pairs up beautifully with a crisp, light beer—think a pale ale or a light lager. If you prefer wine, skip the heavy reds. A nice, dry Sauvignon Blanc or even a slightly chilled Pinot Grigio works wonders to balance out the savory notes of the garlic and chicken. Honestly, though, sometimes a big glass of ice-cold soda is all you need when you’re pulling apart this cheesy goodness!
Storing and Reheating Leftover Chicken Garlic Pull Apart Bread
It’s rare that we have any Chicken Garlic Pull Apart Bread left over, but when we do, storing it properly is key so you can enjoy that cheesy goodness later! The best way to keep it fresh is to make sure it’s completely cooled down first. Then, wrap the entire loaf tightly back up in aluminum foil. This prevents it from drying out in the fridge. It should keep nicely for up to two days this way.
Reheating is super simple and brings back that fresh-from-the-oven flavor. You just need to unwrap it, place it back on a baking sheet, and pop it into a 325°F oven. Give it about 10 to 12 minutes, just until everything is hot and gooey again. Don’t try to microwave it; you’ll lose that crispy exterior!
| Storage Detail | Guidance |
|---|---|
| Storage Duration | Up to 2 days |
| Refrigeration Method | Wrap tightly in aluminum foil |
| Reheat Temperature | 325°F (wrapped) |
| Reheat Time (Oven) | 10 to 12 minutes |
Frequently Asked Questions About This Recipe
I always get so many questions when people first try this recipe, which just proves how much everyone loves it! Here are the things folks ask me most often when they’re planning their first batch.
Q1. Can I make the garlic butter mixture ahead of time?
Yes, you absolutely can! I usually make the butter base the night before. Just store it in a small airtight container in the fridge. You’ll need to let it sit out on the counter for about 30 minutes before you start cutting the bread so it softens up enough to spread easily into all those crevices.
Q2. What if I don’t have sourdough bread? What other types work?
Don’t worry if your grocery store is out of sourdough! A crusty Vienna loaf is the next best thing, as the recipe notes. I’ve also had great luck using a sturdy French baguette, though you might need to adjust the amount of filling slightly, or use a slightly shorter baking time since baguettes are usually narrower.
Q3. Can I use shredded turkey or ham instead of chicken?
Oh, that’s a great idea for using up leftovers! Yes, you can definitely swap the chicken out. Shredded rotisserie turkey works perfectly. If you use ham, make sure it’s diced small, and you might want to cut back slightly on the added salt in the garlic butter, as ham is often saltier than plain chicken.
Q4. My loaf seemed huge! How long does the prep really take?
The prep time is mostly cutting and stuffing, which takes me about 15 minutes if I’m moving fast. The key is pre-cooked your meat! If you have to boil and shred chicken first, the prep time jumps up significantly. If you use rotisserie chicken, you can easily stick to that 15-minute prep window.
Q5. Why do I have to wrap the bread in foil for the first half of baking?
That foil wrap is crucial for texture! If you just throw the bread in unwrapped, the outside gets crispy and hard before the cheese inside even starts to melt properly. The foil traps the heat and steam, melting the cheese and letting the butter soak deep into the dough. Then, we unwrap it to get that beautiful golden-brown crust on top.
Share Your Chicken Garlic Pull Apart Bread Creations
I just love hearing from you all when you try one of my favorite recipes! Making this Chicken Garlic Pull Apart Bread is such a fun, communal cooking experience, and I want to see how yours turned out!
Did you use a different kind of cheese blend? Did you manage to get the crosshatch cuts perfect on the first try? Maybe you served it with a side dip I hadn’t even thought of! Whatever happened in your kitchen, I want the details. Feel free to connect with us on Facebook!
Please take a picture and share it on social media, tagging me so I can see your cheesy, garlicky masterpiece. And if you have a minute, leave a rating and a quick review right here on the page. Your feedback helps other home cooks feel confident trying this amazing Chicken Garlic Pull Apart Bread for their own parties or weeknight dinners. Happy pulling!
Print
Amazing 30 Min Chicken Garlic Pull Apart Bread
- Total Time: 40 minutes
- Yield: 6 servings
- Diet: Omnivore
Description
Pull-apart bread loaded with chicken, garlic butter, and melty mozzarella cheese. Perfect for parties, game day, or weeknight dinners in 35 minutes!
Ingredients
- ½ cup unsalted butter, softened
- 4 large garlic cloves, minced
- 2 tablespoons fresh parsley, finely chopped
- ½ teaspoon salt
- ¼ teaspoon black pepper
- 1 round sourdough or Vienna loaf (about 1 pound)
- 2 cups cooked chicken breast, diced into small pieces
- 2 cups shredded mozzarella cheese
- ½ cup shredded Parmesan cheese
Instructions
- Preheat your oven to 350°F and line a large baking sheet with parchment paper or aluminum foil.
- Prepare the garlic butter by combining softened butter, minced garlic, chopped parsley, salt, and black pepper in a small bowl, mixing until well blended.
- Place the bread loaf on a cutting board and use a sharp serrated knife to cut diagonal slices about 1 inch apart, cutting down to within ½ inch of the bottom without slicing all the way through.
- Rotate the loaf 90 degrees and make another series of diagonal cuts in the opposite direction to create a crosshatch pattern throughout the entire loaf.
- Use your fingers or a butter knife to gently separate the cuts and spread the garlic butter mixture generously into each crevice, making sure to coat all exposed surfaces.
- Stuff diced cooked chicken pieces into the cuts of the bread, distributing evenly throughout the loaf.
- Push shredded mozzarella and Parmesan cheese into all the cuts, filling every opening generously so the cheese melts between each section.
- Wrap the entire loaf tightly in aluminum foil and place it on the prepared baking sheet.
- Bake wrapped for 15 minutes until the cheese begins to melt, then unwrap the foil and bake for an additional 10 to 15 minutes until the cheese is fully melted, bubbly, and the bread edges are golden and crispy.
- Remove from the oven and let rest for 3 minutes before serving warm, allowing guests to pull apart individual sections.
Notes
- Use rotisserie chicken for a quick shortcut.
- Swap mozzarella for cheddar, Monterey Jack, or an Italian cheese blend.
- Replace the round loaf with a French baguette or ciabatta bread if sourdough is unavailable.
- Add ½ teaspoon red pepper flakes to the garlic butter for a spicy kick.
- Mix in ½ cup chopped green onions or chives with the chicken for extra freshness.
- Add 1 teaspoon dried Italian seasoning or fresh rosemary to the garlic butter for a herbier version.
- Store leftovers wrapped tightly in foil in the refrigerator for up to 2 days.
- Reheat leftovers in a 325°F oven wrapped in foil for 10 to 12 minutes.
- Prep Time: 15 minutes
- Cook Time: 25 minutes
- Category: Appetizer
- Method: Baking
- Cuisine: American