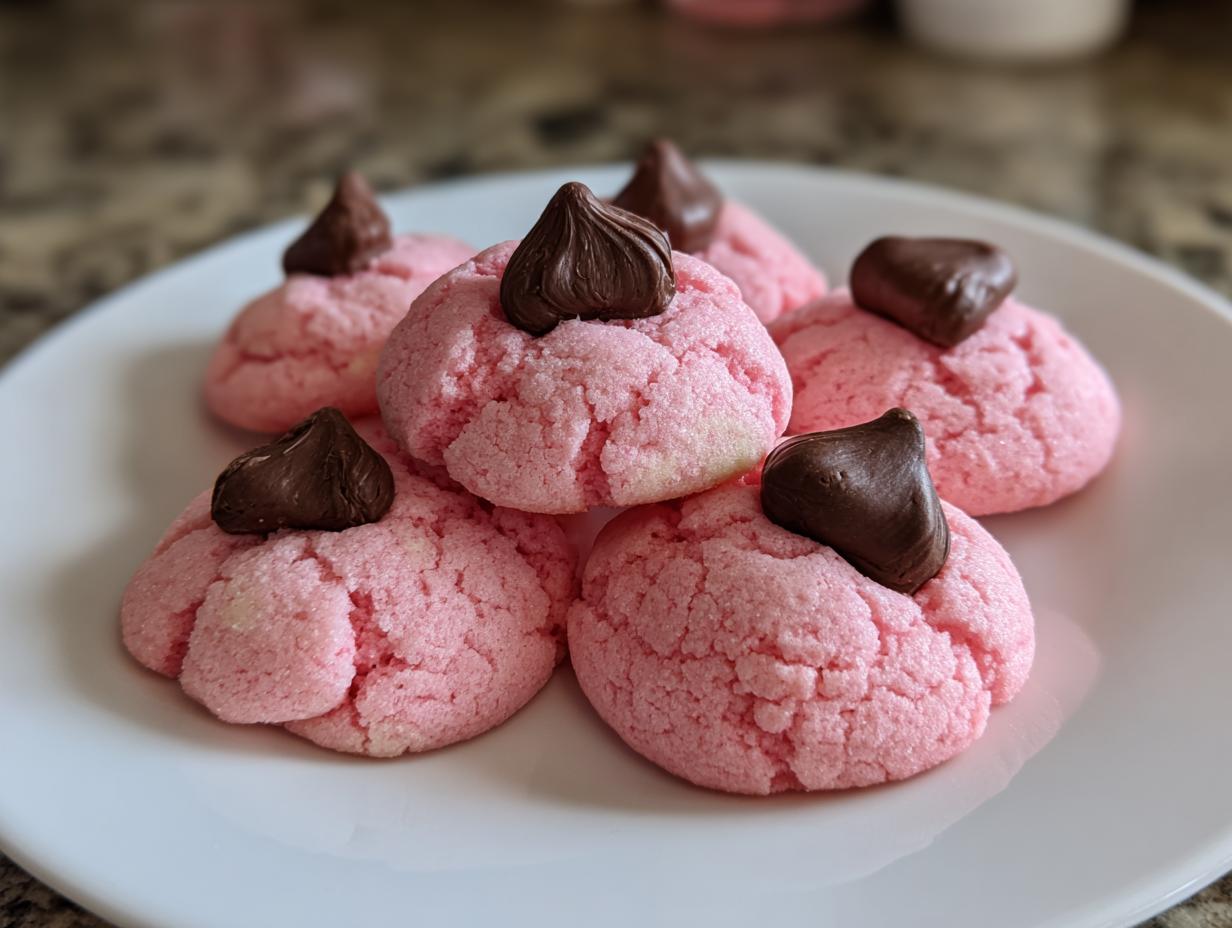
Oh my goodness, I have found the absolute easiest holiday cookie, and they are so cute you won’t believe they take practically no time! If you’re looking for a recipe that guarantees smiles and requires zero fancy piping skills, then these soft pink Kiss Cookies are about to become your new obsession. Seriously, these are perfect for anyone—even if you’ve never baked before!
What makes them so special? Well, the dough is a simple drop cookie base that bakes up beautifully with those lovely crisp edges and a center that stays wonderfully gooey. I always make sure my recipe is rock solid so you get that perfect texture every single time. We are talking about that reliable goodness that folks look for when they trust a recipe, and this one is a winner. They are delightfully pink, topped with that gorgeous melted chocolate—it’s just pure magic!
We use real butter and good vanilla here, which is my personal way of ensuring flavor authority in every batch. Get ready to bake these!

Gathering Everything for Perfect Kiss Cookies
Before we dive into mixing that gorgeous pink dough, let’s make sure the counter is ready! Having everything measured out and prepped makes the whole process so much smoother. Trust me, you do not want to be scrambling for the baking powder when your butter is perfectly creamed.
I always lay out my ingredients first, especially the butter. It needs to be softened, not melted, which is a huge difference maker for the final texture of these drop cookies. Also, make sure those chocolate kisses are unwrapped and waiting patiently nearby—you have to work fast once they come out of the oven!
Essential Ingredients for Your Kiss Cookies
- Three and a half cups of all-purpose flour.
- Two teaspoons of baking powder for just the right lift.
- One teaspoon of salt to balance out all that sugar.
- One and one-third cups of unsalted butter, softened just right.
- One and a half cups of granulated sugar—the white kind works best here!
- Two large eggs, brought to room temperature if you can remember.
- One teaspoon of pure vanilla extract (don’t skimp on this!).
- About half a teaspoon of bright red gel food coloring to get that perfect pink hue.
- Thirty-six chocolate kiss candies, completely unwrapped and ready for their crowning moment.
Recommended Equipment for Your Kiss Cookies
You don’t need a million gadgets for these, but a couple of things really help speed things up. I recommend having two sturdy baking sheets ready to go—we bake one sheet at a time, so having the second one ready to swap in is key.
You’ll definitely need either a stand mixer or a good hand mixer for creaming the butter and sugar properly. Grab a couple of medium mixing bowls, your whisk for the dry stuff, and a small scoop or two tablespoons to make sure all your cookie balls are the same size. Parchment paper is non-negotiable for easy clean-up!

Step-by-Step Guide to Making Amazing Kiss Cookies
Alright, let’s get this show on the road! This recipe is so straightforward, but the order of operations truly matters, especially when it comes to getting that perfect soft center. We need to work relatively quickly once the dough is mixed, so keep your unwrapped kisses right next to your oven!
Preparing the Dough Base for Your Kiss Cookies
First things first, let’s get the dry team mixed up. In a medium bowl, just whisk together your flour, baking powder, and salt. Whisking really helps distribute that leavening agent evenly, so don’t skip it! Set that bowl aside for now.
Now for the good stuff. Grab your biggest mixing bowl for your mixer. We need to cream that softened butter and the granulated sugar together until it looks light and fluffy—it should take about two minutes on medium speed. This step is crucial because we are whipping air into the fat, which gives our pink cookies that beautiful, tender structure. If it looks dense or grainy, keep mixing!
Coloring and Combining the Kiss Cookies Dough
Once the butter and sugar are perfect, it’s time for the fun part! Add in your two large eggs one at a time, making sure each one is fully incorporated before adding the next. Then, drizzle in that vanilla extract and your red gel food coloring. Watch it transform! You want a rich, vibrant pink dough—that’s the sign you’re doing it right.
Now, slow your mixer way down. We are going to add those dry ingredients we set aside earlier, but we do it gradually. Add about a third of the flour mix, mix just until it barely disappears, then stop. If you overmix at this stage, you’ll develop too much gluten, and your soft cookies will turn tough. We just want it combined, so be gentle!
Shaping and Baking Your Kiss Cookies
We bake these one sheet at a time, and I really mean it—don’t crowd the oven! Using a small scoop or about one tablespoon of dough, roll it gently between your palms into a nice little ball. Place these balls about two inches apart on your parchment-lined baking sheets. They spread just a little bit, so give them room to breathe.
Pop one sheet into your preheated 350°F oven. They bake fast, usually 10 to 12 minutes. You want the edges to look set and just barely golden, but the center should still look soft. Pull them out the second they look done. This timing is your secret weapon for that gooey center!
Adding the Signature Chocolate Touch to Your Kiss Cookies
This part requires speed, so have those unwrapped chocolate kisses right next to your oven mitts! As soon as the sheet comes out, immediately take one chocolate kiss and gently but firmly press it right into the center of each hot cookie. The residual heat melts the bottom just enough for it to stick perfectly.
Leave them on the hot baking sheet for about five minutes. This lets the chocolate set up a tiny bit so it doesn’t slide off when you move them. After five minutes, carefully use a spatula to move the cookies over to a wire rack to cool completely. They’ll finish setting up as they cool down!
Tips for Consistent and Beautiful Kiss Cookies
Even though this recipe is super easy, there are a few little tricks that turn good Kiss Cookies into truly show-stopping ones. It all comes down to temperature and touch. If you follow these pointers, you won’t have any spreading disasters or dough that crumbles on you!
Ingredient Temperature Matters for Kiss Cookies
The absolute key to that soft, non-greasy texture is the butter. It has to be softened, not melted—I can’t stress this enough! When butter is softened, it’s pliable enough to cream properly with the sugar. This creaming step whips in all the necessary air. If your butter is too cold, you’ll end up with lumps, and if it’s melted, the cookie will spread out into a sad, flat puddle in the oven. Leave it on the counter for about an hour before you start mixing.
Achieving the Right Texture in Your Kiss Cookies
If your dough seems too dry and crumbly when you try to roll the balls, don’t panic! It usually means your butter wasn’t quite soft enough, or maybe your flour measurement was a hair too heavy. Just try kneading the dough gently with your hands for 30 seconds; your body heat will help bring it together. If it still won’t stick, add just a *tiny* splash of milk—like half a teaspoon—and mix it in quickly. Conversely, if your cookies are spreading too much, your oven probably isn’t hot enough, or you might have over-creamed the butter initially. Make sure you bake only one sheet at a time for even heat!
Storing and Serving Your Delicious Kiss Cookies
You’ll want to hold onto these goodies for as long as possible, but the truth is, they are always best eaten the day they are made! The chocolate kiss is perfectly set once cooled, but they are just heavenly when the cookie itself is still slightly chewy. Don’t worry though, they keep well enough for sharing!
Storing Leftover Kiss Cookies Safely
The main thing here is keeping air away from the cookie base so it doesn’t dry out. Once they are completely cool—and I mean totally cool, otherwise the chocolate will smear—stack them in an airtight container. I usually put a small square of wax paper between layers just to make sure the chocolate tops don’t stick to each other.
They stay wonderfully soft at room temperature for about three to four days. I wouldn’t recommend the fridge, as the cold can sometimes make the cookie part a little harder than we want. Enjoy them quickly! If you want to see more fun holiday baking ideas, check out our Pinterest page for inspiration.
Frequently Asked Questions About Kiss Cookies
I get so many questions about these pink beauties, which just proves how popular they are! Most folks want to know about making them ahead or what to do if they run out of the signature topping. Here are the things I hear most often about making these easy cookies.
Can I Chill the Dough for These Kiss Cookies?
This is a common question, especially if you’re trying to get ahead of holiday baking. While you certainly *can* chill the dough for these drop cookies, you need to adjust your expectations. If you chill the dough balls for an hour or two, the cookies will spread less, which is great if you struggle with flat cookies. However, you must let the dough sit on the counter for at least 20 minutes before scooping, or the dough will be too stiff to roll nicely. If you chill it overnight, you might need to add a tiny splash of milk just to get it workable again.
What If I Do Not Have Chocolate Kisses for My Kiss Cookies?
Oh, the dreaded shortage! If you can’t find the classic chocolate kisses, don’t worry; you can still make a delicious chocolate topped cookie. The key is that you need a small, meltable chocolate candy. My favorite substitution is using a small Hershey’s Hug, which gives you a nice white and milk chocolate swirl on top. You could also use a small, good-quality chocolate drop or even a rolo candy if you don’t mind a slight caramel flavor mingling with the pink dough. Just press it in immediately after they come out of the oven, just like you would the original! You can also follow us on Facebook for quick recipe updates.
Estimating the Nutrition in Your Kiss Cookies
Now, I’m not a nutritionist, so please take these numbers with a grain of salt—or maybe a grain of sugar! These Kiss Cookies are definitely an indulgence, not an everyday snack, but knowing the basics helps when you’re planning out treats. Since we use a good amount of butter and sugar to get that perfect soft texture, the fat and carbohydrate counts are what you’d expect from a classic butter cookie.
This calculation is based on the full recipe yielding 36 cookies, so the calories are concentrated nicely into each little pink treat. They aren’t low-fat, but they are certainly low-fuss! If you are interested in other low-fuss recipes, check out our Medium blog.
| Nutrient | Amount Per Cookie |
|---|---|
| Serving Size | 1 cookie |
| Calories | 160 |
| Fat | 8g |
| Carbohydrates | 20g |
| Protein | 2g |
Share Your Experience Baking Kiss Cookies
I truly hope you loved making these soft pink treats as much as I love sharing them! Did they turn out perfectly chewy? Did your family devour them in minutes? Please hop down below and give this recipe a rating—it really helps other bakers know they can trust this method. I can’t wait to hear all about your beautiful chocolate-topped results!
Print
Amazing 36 Kiss Cookies Baker’s Joy
- Total Time: 45 minutes
- Yield: 36 cookies
- Diet: Omnivore
Description
Bake soft pink kiss cookies topped with chocolate for delightful treats. Simple drop dough bakes evenly with crisp edges and gooey centers. Perfect for family baking sessions.
Ingredients
- 3 1/2 cups all-purpose flour
- 2 teaspoons baking powder
- 1 teaspoon salt
- 1 1/3 cups unsalted butter, softened
- 1 1/2 cups granulated sugar
- 2 large eggs
- 1 teaspoon vanilla extract
- 1/2 teaspoon red gel food coloring
- 36 chocolate kiss candies, unwrapped
Instructions
- Preheat oven to 350°F. Line two baking sheets with parchment paper.
- Whisk flour, baking powder, and salt in a medium bowl. Set aside.
- Beat butter and sugar in a large bowl with electric mixer on medium until light and fluffy, about 2 minutes.
- Add eggs, vanilla, and food coloring. Beat until fully combined.
- Gradually mix in dry ingredients until dough forms.
- Scoop 1-tablespoon portions of dough. Roll each into a ball.
- Place balls 2 inches apart on prepared sheets.
- Bake one sheet at a time for 10 to 12 minutes until edges are set and lightly golden.
- Remove from oven. Immediately press one chocolate kiss into center of each cookie.
- Cool on sheet 5 minutes. Transfer to wire rack to cool completely.
Notes
- Pink dough adds charm.
- Chocolate kisses melt in for indulgence.
- Recipe yields consistent results every time.
- Prep Time: 20 minutes
- Cook Time: 25 minutes
- Category: Dessert
- Method: Baking
- Cuisine: American