Are you tired of flipping tiny patties on the stovetop, making a huge mess, and ending up with burgers that are dry before you even get the cheese melted? Trust me, I’ve been there! When I first started trying to feed a crowd, I thought making homemade sliders was this huge, complicated affair involving tiny spatulas and endless scrubbing. Nope! That’s why I am so thrilled to share this recipe.
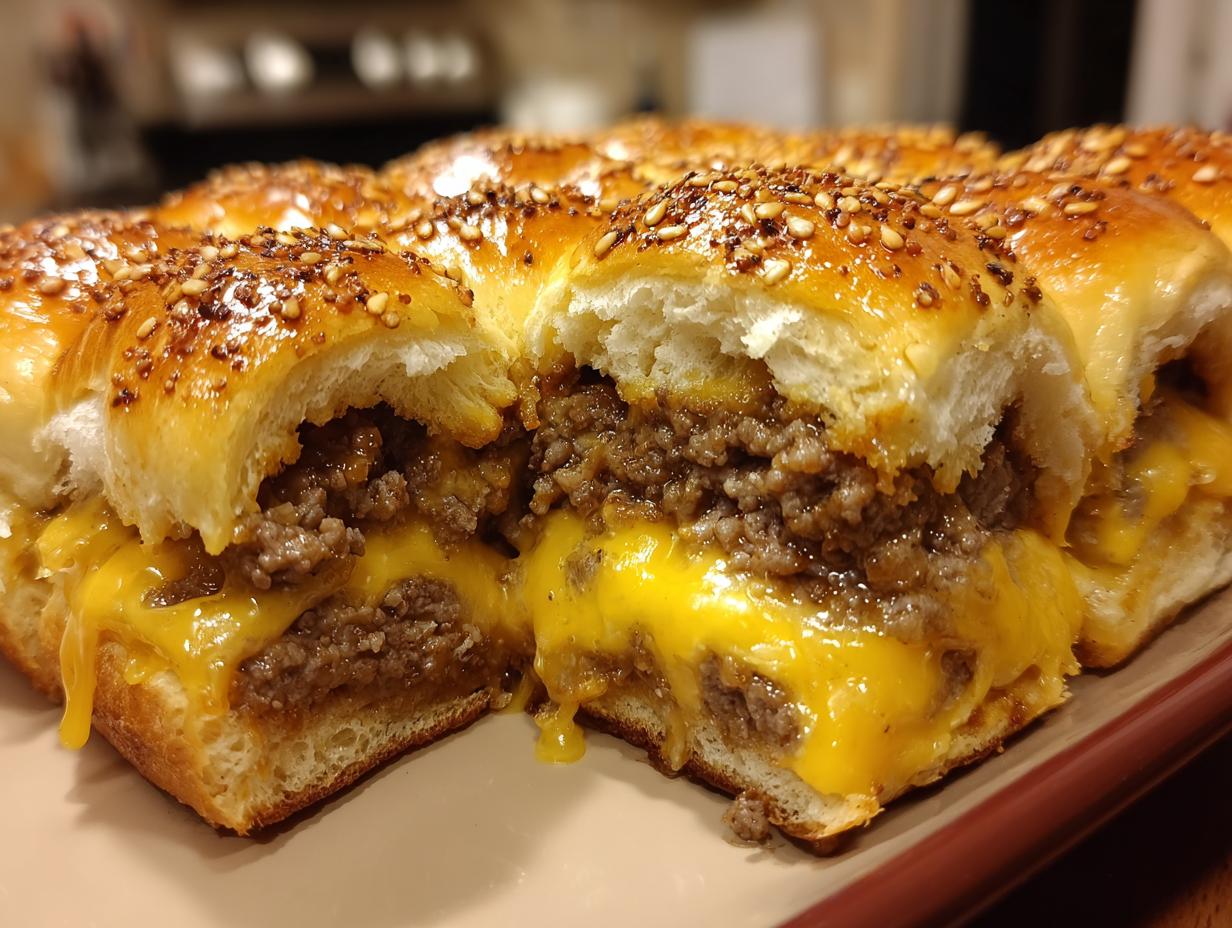
This method for baked cheeseburger sliders changed everything for me. We’re talking about getting juicy, cheesy, perfectly seasoned mini burgers onto a single sheet pan and baking them all at once. It’s practically foolproof, which is fantastic news for anyone who feels intimidated by cooking ground beef.
I remember trying to make these for my nephew’s birthday party, panicking about getting 12 patties cooked evenly. When I tried this baked method, I had time to actually make a proper dipping sauce instead of just grabbing ketchup! You get all the incredible flavor of a classic backyard burger, but with zero fuss. Seriously, this is the easiest crowd-friendly meal you’ll ever pull out of your oven.

Why This Cheeseburger Sliders Recipe Works for Everyone
I know what it’s like when you need dinner on the table fast. You don’t want a recipe that requires ten different bowls or specialized equipment. This particular method for cheeseburger sliders is brilliant because it prioritizes simplicity while still delivering amazing, high-quality results. It’s built on sound cooking principles, meaning you can trust it even if you’re new to making burgers.
We’re not guessing here; we’re following a proven system that guarantees even cooking and perfect cheese melt every single time. It’s the kind of recipe I confidently pass along because I know it works, even when you’re short on time and energy. It’s just good, honest cooking! You can see more of our easy dinner ideas here.
Quick Prep Time for Busy Weeknights
Honestly, the prep time flies by! You only need about 15 minutes to get everything ready to bake. That’s less time than it takes to order takeout, if you ask me. You’re just mixing the meat and spices, pressing it out, and layering the cheese. That’s it!
Since it’s all happening on one rimmed baking sheet, cleanup is a dream, too. You just peel off the parchment paper when you’re done. This ease of use is what makes these baked sliders a staple for me when I’m staring down a busy weeknight and need something satisfying fast.
Gathering Ingredients for Perfect Cheeseburger Sliders
You don’t need a massive grocery run for these incredible cheeseburger sliders. The magic here comes from using good quality basics and treating them right. Since we are baking the beef, the fat content matters a lot for juiciness, so pay attention to that ground beef when you shop!
I always lay out all my ingredients before I start mixing anything. It saves me from realizing halfway through that I’m out of garlic powder! Keep things simple, and you’ll find this recipe comes together in a flash. If you want to see other great recipes using sheet pans, check out our sheet pan chicken parmesan.
Essential Components for Your Cheeseburger Sliders
Here is exactly what you need to pull off these fantastic baked sliders. Make sure your measurements are spot on!
| Ingredient | Amount |
|---|---|
| Ground Beef (80 percent lean) | 2 pounds |
| Slider Buns | 12, sliced horizontally |
| American Cheese | 12 slices |
| Unsalted Butter (melted) | 4 tablespoons |
| Kosher Salt | 2 teaspoons |
| Black Pepper | 1 teaspoon |
| Garlic Powder | 1 teaspoon |
| Onion Powder | 1 teaspoon |
| Sesame Seeds | 1 tablespoon |
Ingredient Notes and Simple Substitutions
For the best melt possible on these baked sliders, you absolutely must use American cheese. It’s engineered to melt into that perfect, gooey blanket over the beef. If you use cheddar, it might get oily or separate instead of draping nicely.
Also, stick with 80/20 ground beef. That 20% fat is crucial! When you bake the meat, some fat renders away, but what’s left keeps the patties incredibly juicy. Anything leaner, like 90/10, tends to dry out too quickly in the oven, which defeats the whole purpose of this moist slider recipe.
Step-by-Step Instructions for Baked Cheeseburger Sliders
Okay, this is where the magic happens! Don’t be intimidated by the steps; they are broken down so simply that you can’t mess this up. We are using the oven to do all the heavy lifting for these amazing cheeseburger sliders. Remember, we are doing everything on one sheet pan, which is the key to keeping things clean and easy!
Preparing the Beef Patty Base
First things first, get your oven preheated to 375°F and line a rimmed baking sheet with parchment paper. That paper is your best friend for easy cleanup, trust me. Now, in a big bowl, gently mix your ground beef with the salt, pepper, and garlic powder. I mean gently! You don’t want to overwork the meat, or you’ll end up with tough burgers. Just mix until you see the spices distributed.
Next, press that seasoned beef evenly into a rectangle. You want it to match the size of your 12 slider buns perfectly—about three-quarters of an inch thick. Pop that whole sheet of raw beef onto the prepared pan and slide it into the hot oven. Bake this for about 18 to 20 minutes. You must check the temperature here for food safety; it needs to hit 160°F internally before we move on.
Baking and Melting the Cheese
Once that beef is cooked through, carefully take the pan out. Be ready—there will be some fat pooled on the pan. Tilt the pan slightly and use a paper towel or carefully pour off that excess grease. Don’t skip this draining step! Now, lay your 12 slices of American cheese evenly over the hot beef slab. It only needs a couple of minutes back in the oven—seriously, just enough time for the cheese to get completely gooey and draped over the meat.
Finishing and Glazing Your Cheeseburger Sliders
This is my favorite part because it brings in that classic diner flavor! Once the cheese is melted, place the bottom halves of the buns right on top of the cheese layer. Then, gently invert the whole slab so the buns are now underneath the meat and cheese. Put the top buns on. Melt that four tablespoons of butter and brush it generously over the very top of the buns. Sprinkle that onion powder and the sesame seeds right over the butter.
Back into the oven they go for just 8 to 10 minutes until those tops are golden brown and slightly crisp. When they come out, resist the urge to cut immediately! Let these beautiful cheeseburger sliders rest on the pan for about 5 minutes. This lets the juices settle. Then, slice them into twelve individual servings and serve them warm!

Tips for Making the Best Cheeseburger Sliders Every Time
Even though this recipe is super easy, there are a couple of little secrets that take these cheeseburger sliders from good to absolutely unforgettable. The biggest rule, which I mentioned before, is to treat that ground beef gently. If you mash it like you’re making meatloaf, the texture will be tough, not tender.
When you press the beef rectangle onto the pan, try to keep the thickness uniform across the whole slab. If one side is thin and another is thick, one side will be overdone before the other is even ready. Also, don’t skip the resting time after the final bake! Those five minutes let the juices redistribute, ensuring every single slider is moist and flavorful when you finally slice into them.
Serving Suggestions for Your Cheeseburger Sliders
These baked cheeseburger sliders are packed with flavor, so they pair best with sides that are quick and classic. You don’t want anything too heavy competing with that melty cheese!
For a truly American meal, think simple. My favorite is a big bowl of crispy, salty French fries—you can bake those right alongside the sliders if you have extra room! If you need something green, a quick, crunchy coleslaw adds the perfect acidic counterpoint to the rich beef and cheese. Or, if the kids are picky, just serve them with some pickle chips on the side. Easy peasy!
Storing and Reheating Leftover Cheeseburger Sliders
If, by some miracle, you have any of these delicious cheeseburger sliders left over, you need to handle them right away for food safety. Make sure you refrigerate any leftovers within two hours of taking them out of the oven. Don’t let them sit on the counter! If you want to save this recipe for later, you can find us on Pinterest.
When you reheat them, the microwave is fast, but it can steam the nice crust off that top bun. I prefer wrapping individual sliders loosely in foil and popping them into a 350°F oven for about 10 minutes. This warms them through gently and keeps the bun from getting soggy.
| Storage Detail | Guideline |
|---|---|
| Refrigeration Window | Within 2 hours |
| Best Reheat Method | Foil-wrapped in oven |
Frequently Asked Questions About Mini Burgers
I get so many questions about these baked cheeseburger sliders, and honestly, I love hearing from you! It just shows how popular this simple meal is. Here are the things I hear most often when people try this recipe for the first time. Don’t hesitate to ask if you have more!
Sometimes people ask if they can use other types of beef, or if they can skip the butter glaze. Keep in mind that these little mini burgers rely on the fat content and the way the cheese melts to stay tender, so sticking close to the recipe really pays off!
Can I use different cheese on these cheeseburger sliders?
You certainly can try! But let me tell you what happens. If you want that perfect, gooey drape right over the meat, American cheese is the champion because it melts so smoothly. If you want more flavor, try using Provolone or even Pepper Jack for a little kick. Just be aware that harder cheeses might not melt quite as evenly over the whole slab of beef. If you use something like sharp cheddar, you might need an extra minute or two in the oven, and you might see a little more oil separate out.
What internal temperature should the beef reach?
Food safety is super important, even when making fun party food! When you pull the beef out for the first cheese melt, you must make sure the internal temperature reaches 160°F. That’s the safe temperature for ground beef, and since we are cooking it all at once on a sheet pan, checking the middle is the only way to be certain. Trust me, checking it with a meat thermometer ensures fantastic, safe results for all your baked sliders!
Share Your Amazing Cheeseburger Sliders Experience
Now that you have the secrets to making the juiciest, easiest baked cheeseburger sliders known to humankind, I really want to hear from you! Didn’t that come together faster than expected? I love seeing how this recipe fits into your busy lives, whether you served them at a huge game day party or just made them for a quiet Tuesday dinner. You can also follow our journey on Medium.
Did you stick with the classic American cheese, or did you experiment with something spicy? Let me know! Drop a comment below and tell me what you thought of the simplicity of the baking method. A quick rating lets other cooks know that this recipe is a keeper!
Seriously, sharing your experience helps our little cooking community grow. Happy cooking, and enjoy those perfect, cheesy bites! If you want to connect with us directly, feel free to visit our Facebook page.
Print
Amazing 12-minute cheeseburger sliders
- Total Time: 45 minutes
- Yield: 12 sliders
- Diet: Omnivore
Description
Easy mini cheeseburger sliders baked on one pan. Juicy beef, melty cheese, and soft buns make this a perfect crowd friendly meal.
Ingredients
- 2 pounds ground beef 80 percent lean
- 2 teaspoons kosher salt
- 1 teaspoon black pepper
- 1 teaspoon garlic powder
- 12 slider buns sliced horizontally
- 12 slices American cheese
- 4 tablespoons unsalted butter melted
- 1 tablespoon sesame seeds
- 1 teaspoon onion powder
Instructions
- Heat the oven to 375°F and line a rimmed baking sheet with parchment paper.
- Gently mix ground beef with salt, black pepper, and garlic powder in a large bowl.
- Press the beef evenly into a rectangle about three quarters inch thick to match the size of the slider buns.
- Place the beef on the prepared baking sheet and bake for 18 to 20 minutes until cooked through and the internal temperature reaches 160°F.
- Remove the beef from the oven and carefully drain excess fat.
- Lay cheese slices evenly over the hot beef and return to the oven for 2 minutes until melted.
- Place the bottom halves of the buns on top of the cheese, then invert the whole slab so the buns are underneath.
- Set the top buns in place. Brush melted butter over the tops and sprinkle with sesame seeds and onion powder.
- Bake for 8 to 10 minutes until the buns are golden and lightly crisp.
- Let rest 5 minutes, slice into individual sliders, and serve warm.
Notes
- Refrigerate leftovers within 2 hours for food safety.
- Prep Time: 15 minutes
- Cook Time: 30 minutes
- Category: Main Dish
- Method: Baking
- Cuisine: American