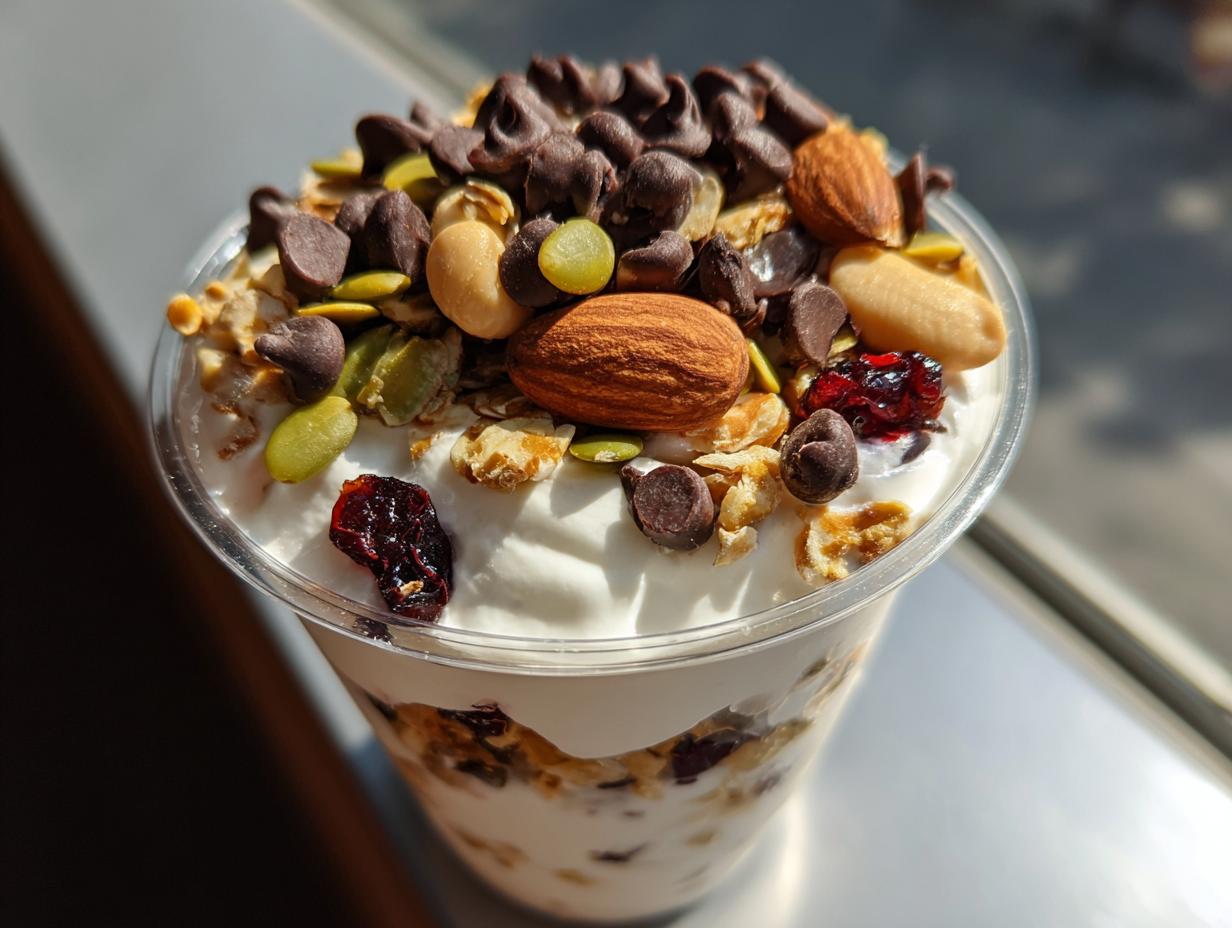
You know those mornings, right? You hit snooze three times, realize you have zero time, and suddenly you’re grabbing whatever dusty protein bar is hiding in your pantry. Ugh. I used to live like that! My breakfast game was a disaster until I finally cracked the code on something genuinely fast, satisfying, and packed with fuel. Trust me, I’ve perfected the art of fast food prep, and these Yogurt Trail Mix Cups are my absolute go-to.
We are talking about layering creamy Greek yogurt with crunchy nuts, seeds, and dark chocolate. You assemble them in about five minutes flat, and they are ready to grab all week long. These aren’t just quick; they are seriously high-protein snacks that keep me full until lunch without any fuss. If you need real food that travels well, you’ve found your new best friend.

Why You Will Love These Yogurt Trail Mix Cups
Honestly, these cups solve so many problems in my busy week. They take almost no effort, but they feel like such a treat when I pull one out of the fridge. I love that I can make a batch on Sunday and have breakfast sorted for half the week. They are perfect for desks, lunch bags, or just a quick afternoon fix when that 3 PM slump hits hard.
- They are genuinely ready in five minutes—seriously, I time myself!
- The crunch-to-creaminess ratio is just heavenly.
- They are perfectly portioned for a satisfying snack or breakfast.
Quick Assembly for Busy Mornings
If you can spoon things into a container, you can make these. There’s no baking, no complicated stirring, and absolutely no cleanup beyond a single bowl and a spoon. They are so beginner-friendly, even my teenager can assemble them without supervision, which is a huge win in my book!
High Protein Content
Because we’re using that thick, glorious Greek yogurt, you get a serious protein punch right up front. That’s the magic that keeps you cruising past lunchtime. White yogurt just doesn’t cut it here; the density of Greek yogurt supports the mix-ins perfectly and keeps the energy steady, not spiking and crashing.
Gathering Your Ingredients for Yogurt Trail Mix Cups
Okay, let’s talk about what you need to make these amazing Yogurt Trail Mix Cups. The beauty of this recipe is that it relies on simple, quality ingredients you probably already have kicking around. We aren’t doing any fancy baking here, so the quality of what you put in really shines through. Remember, we are building layers of texture and flavor, so don’t skimp on the good stuff!
I always lay everything out on the counter first. It makes the assembly process so much faster, and you get to admire all the colorful bits you’re about to combine. It’s part of the fun! Follow along on Pinterest for more visual inspiration.
Essential Components List
Here is exactly what you’ll need for six perfectly layered cups. I always use measuring spoons for the yogurt base because consistency is key there, but for the mix-ins, I’m a bit more relaxed!
- 3 cups plain Greek yogurt
- 3 tablespoons honey
- 1 teaspoon vanilla extract
- ½ cup roasted almonds, roughly chopped
- ¼ cup roasted cashews, roughly chopped
- ¼ cup roasted peanuts, roughly chopped
- ¼ cup pumpkin seeds
- ¼ cup dried cranberries
- ¼ cup raisins
- ⅓ cup dark chocolate chips
- 2 tablespoons mini dark chocolate chips
- ¼ cup granola (optional garnish)
- Fresh berries (optional garnish)
- Drizzle of honey (optional garnish)
Ingredient Clarity and Preparation Notes
A little prep goes a long way here. For the nuts, make sure they are roughly chopped. You want texture, not dust! If you’re using raw nuts, please take five minutes to toast them—it makes a world of difference in the flavor of your final Yogurt Trail Mix Cups. Trust me on the toasting! If you enjoy baking or quick snacks, you might also like my recipe for banana bread bites.
The cranberries and raisins are straightforward, but make sure you’re using standard dried fruit, not the sticky, overly sweetened kind if you can help it. As for the optional stuff—granola, berries, extra honey—those are for the very top layer right before you cover them. They are purely for looks and that final textural pop right before you take a bite!
Equipment for Making Yogurt Trail Mix Cups
You truly don’t need much fancy gear for these Yogurt Trail Mix Cups! Keep it simple; that’s the whole point. I usually just grab what’s clean from the drying rack. You’ll need a medium mixing bowl for the yogurt base and another smaller bowl just to hold all those wonderful trail mix components.
The most important pieces are your six individual containers. I prefer using clear ones so I can admire the layers! You’ll also need a spoon for stirring and a spatula or small knife to spread the yogurt evenly.
Step-by-Step Instructions for Yogurt Trail Mix Cups
Alright, this is where the magic happens, and I promise it moves fast. Since we aren’t turning on the oven, this is pure assembly work. Just follow these steps in order, and you’ll have six perfect Yogurt Trail Mix Cups ready in the time it takes to empty the dishwasher!
Preparing the Yogurt Base
Grab your medium bowl. We start with the creamy stuff! Dump in all three cups of your plain Greek yogurt. Then, measure in that honey—I use three tablespoons, but if you like it sweeter, sneak in a tiny bit more! Add the teaspoon of vanilla extract. Now, take your spoon or whisk and stir everything together until it looks completely uniform and smooth. You don’t want any ribbons of plain yogurt showing; it needs to be one gorgeous, slightly sweet, creamy mixture.
Creating the Trail Mix Blend
While that yogurt base is chilling for two seconds, turn your attention to the crunch! In your second, smaller bowl, toss in all your chopped nuts—almonds, cashews, peanuts—along with the pumpkin seeds, dried cranberries, and raisins. Mix it up well with a fork so everything is evenly distributed. If you haven’t toasted those nuts yet, now is the time to do it quickly in a dry skillet over medium heat for about three to five minutes until they smell amazing. Let them cool for just a minute before mixing them in so they don’t melt the chocolate later!
Layering Your Yogurt Trail Mix Cups
Time to build! Take your six containers. For the first layer, spoon about two tablespoons of that prepared yogurt mixture right into the bottom of each cup. Don’t worry about making it perfect; just try to cover the bottom evenly. Next, take a generous scoop of your trail mix blend—about two tablespoons—and gently sprinkle that right over the yogurt in each cup. Now, we add the second yogurt layer. Use just a little more yogurt this time, maybe three tablespoons per cup, spreading it gently over the trail mix so it’s mostly covered.

Final Touches and Chilling
This is the fun part! Take your dark chocolate chips—both the regular size and the mini ones—and sprinkle them liberally over the very top yogurt layer. This is the visual reward for your hard work! If you’re using the optional toppings, now is when you add a little sprinkle of granola, a few fresh berries, or a light drizzle of honey right on top of the chocolate. Once they look perfect, cover those containers tightly with their lids or plastic wrap. They go straight into the refrigerator immediately to set up.
Tips for Perfect Yogurt Trail Mix Cups
Getting these Yogurt Trail Mix Cups right means making sure that beautiful crunch lasts. I’ve learned a few tricks over the weeks I’ve been making these for my own lunches. The biggest enemy here is moisture migration—we want creamy yogurt and crunchy nuts, not a soggy mess!
If you are planning ahead for the whole week, you have to be a little strategic. If you just dump everything together on Sunday, by Thursday, those cranberries and seeds start to get soft. Don’t let that happen to your perfect snack! For more quick meal prep ideas, check out my overnight oats guide.
Maintaining Crunch for Meal Prep
If you need these to last longer than two days, you absolutely must keep the yogurt and the trail mix separate until just before you eat them. I store the vanilla yogurt base in one large airtight container and my mixed trail mix in another. When it’s lunchtime, I just scoop a portion of each into a small bowl and mix it up right there. It takes five extra seconds, but the payoff is worth it—you get that fresh-from-the-kitchen snap every single time!
Flavor Boosts Through Simple Technique
I mentioned it briefly, but I need to stress this again: toasting your nuts and seeds is non-negotiable for the best flavor in these Yogurt Trail Mix Cups. You don’t need oil or butter! Just toss your almonds, cashews, and peanuts into a dry skillet over medium heat. Keep them moving constantly; they’ll start smelling amazing in about three minutes. This simple step brings out their natural oils, making them taste richer and deeper. It’s an instant flavor upgrade that makes these cups taste gourmet, not like something you threw together at 6 AM.
Storing and Serving Your Yogurt Trail Mix Cups
Once you’ve assembled these gorgeous Yogurt Trail Mix Cups, the next big question is: how long can I keep them? I’ve tested this extensively for my meal prep routine, and I have clear guidelines for you. The key is understanding what happens to the crunch factor over time. They are best eaten cold, straight from the fridge, no reheating needed whatsoever!
Storage Guidelines
If you’ve layered everything—yogurt, mix, chocolate—and sealed them up tight, they are good to go for about three days in the refrigerator. That’s perfect for most people’s immediate needs. However, if you’re planning ahead for almost a week, remember my tip from before: keep the yogurt and the trail mix separate! If you want to see more of my meal prep tips, feel free to check out my Medium page.
When separated, the yogurt base stays fresh and perfect for up to five days, and your dry mix stays crisp for even longer in an airtight container. You just combine them right before you eat. I keep all my storage info in a quick reference chart below so you don’t have to hunt for it later!
| Assembly State | Storage Time (Refrigerated) |
|---|---|
| Assembled Cups | Up to 3 days |
| Yogurt & Mix Separate | Up to 5 days |
Enjoying Cold or Frozen
These are definitely designed to be eaten cold. The texture of the Greek yogurt is just superior when chilled. If you’re looking for a different kind of treat, though, I discovered a fun hack! You can actually freeze the fully assembled Yogurt Trail Mix Cups. For another frozen treat idea, check out my recipe for frozen yogurt granola cups.
Just pop them in the freezer for about two to three hours. They turn into this dense, creamy frozen dessert that’s amazing on a hot afternoon. It’s like a healthy yogurt bar! Just make sure they aren’t frozen solid if you want to eat them right away.
Common Questions About Yogurt Trail Mix Cups
I get so many messages asking about tweaks and substitutions for these Yogurt Trail Mix Cups, which is great! It shows you’re excited to make them your own. Here are the top things people always ask me when they are prepping their first batch.
Can I Substitute the Yogurt Type?
You absolutely can try, but you need to know you’ll change the texture significantly. Regular, thinner yogurt will make these cups much soupier because it doesn’t have the structure Greek yogurt has. If you must use it, you need to strain it first, or you’ll end up with a lot of liquid whey pooling at the bottom. For the best high-protein result, stick to the thickest Greek yogurt you can find!
How Long Do Yogurt Trail Mix Cups Last?
This depends on how you layer them! If you assemble the whole thing—yogurt, mix, chocolate—and seal it up, it’s best eaten within three days. If you want them to last longer, separate the yogurt base and the trail mix blend into different containers. That way, you can keep them for up to five days, assembling them right before you eat them to keep that crunch perfect.
Are There Nut-Free Options for Yogurt Trail Mix Cups?
That’s an important consideration! If you need nut-free Yogurt Trail Mix Cups, swapping out the almonds, cashews, and peanuts is easy. Just substitute those with more pumpkin seeds, sunflower seeds, or roasted soy nuts if you can tolerate soy. You can also bulk up the mix with extra dried fruit or some crunchy puffed rice cereal for texture. Just make sure to check the labels on your granola, too!
Sharing Your Yogurt Trail Mix Cups Experience
I’ve shared all my secrets for making the best, fastest Yogurt Trail Mix Cups, but now I want to hear from you! Did you try the toasting trick? Are you team separate storage or team assemble-it-all? Let me know how these fit into your busy week. Drop a comment below and tell me what your favorite combination of mix-ins turned out to be! You can also share your creations on Facebook!
Print
5 Minute Yogurt Trail Mix Cups Magic
- Total Time: 5 minutes
- Yield: 6 cups
- Diet: Vegetarian
Description
Easy high-protein yogurt trail mix cups layered with Greek yogurt, nuts, and dark chocolate. Assemble in 5 minutes for a satisfying, protein-packed snack or breakfast.
Ingredients
- 3 cups plain Greek yogurt
- 3 tablespoons honey
- 1 teaspoon vanilla extract
- ½ cup roasted almonds, roughly chopped
- ¼ cup roasted cashews, roughly chopped
- ¼ cup roasted peanuts, roughly chopped
- ¼ cup pumpkin seeds
- ¼ cup dried cranberries
- ¼ cup raisins
- ⅓ cup dark chocolate chips
- 2 tablespoons mini dark chocolate chips
- ¼ cup granola (optional garnish)
- Fresh berries (optional garnish)
- Drizzle of honey (optional garnish)
Instructions
- Combine Greek yogurt, honey, and vanilla extract in a medium bowl. Stir until smooth.
- Mix chopped almonds, cashews, peanuts, pumpkin seeds, dried cranberries, and raisins in a separate bowl for the trail mix.
- Set out 6 portable containers or cups.
- Spoon about 2 tablespoons of the yogurt mixture into the bottom of each cup.
- Add approximately 2 tablespoons of the trail mix on top of the yogurt layer in each cup.
- Add another layer of yogurt, using about 3 tablespoons per cup, spreading it evenly.
- Sprinkle dark chocolate chips (regular and mini) generously over the top yogurt layer.
- Add optional toppings like granola, fresh berries, or a honey drizzle.
- Cover cups tightly and refrigerate immediately, or enjoy right away.
Notes
- Keep the trail mix and yogurt separate when making ahead more than 2 days to maintain crunch.
- Toast nuts in a dry skillet for 3 to 5 minutes before assembly to improve flavor.
- Layer ingredients in clear containers to see the layers.
- Store assembled cups covered in the refrigerator for up to 3 days.
- For longer storage, keep yogurt and mix separate for up to 5 days, assembling just before eating.
- Enjoy cold; no reheating is needed. Freeze assembled cups for 2 to 3 hours for a frozen dessert.
- Prep Time: 5 minutes
- Cook Time: 0 minutes
- Category: Breakfast/Snack
- Method: Assembly
- Cuisine: American