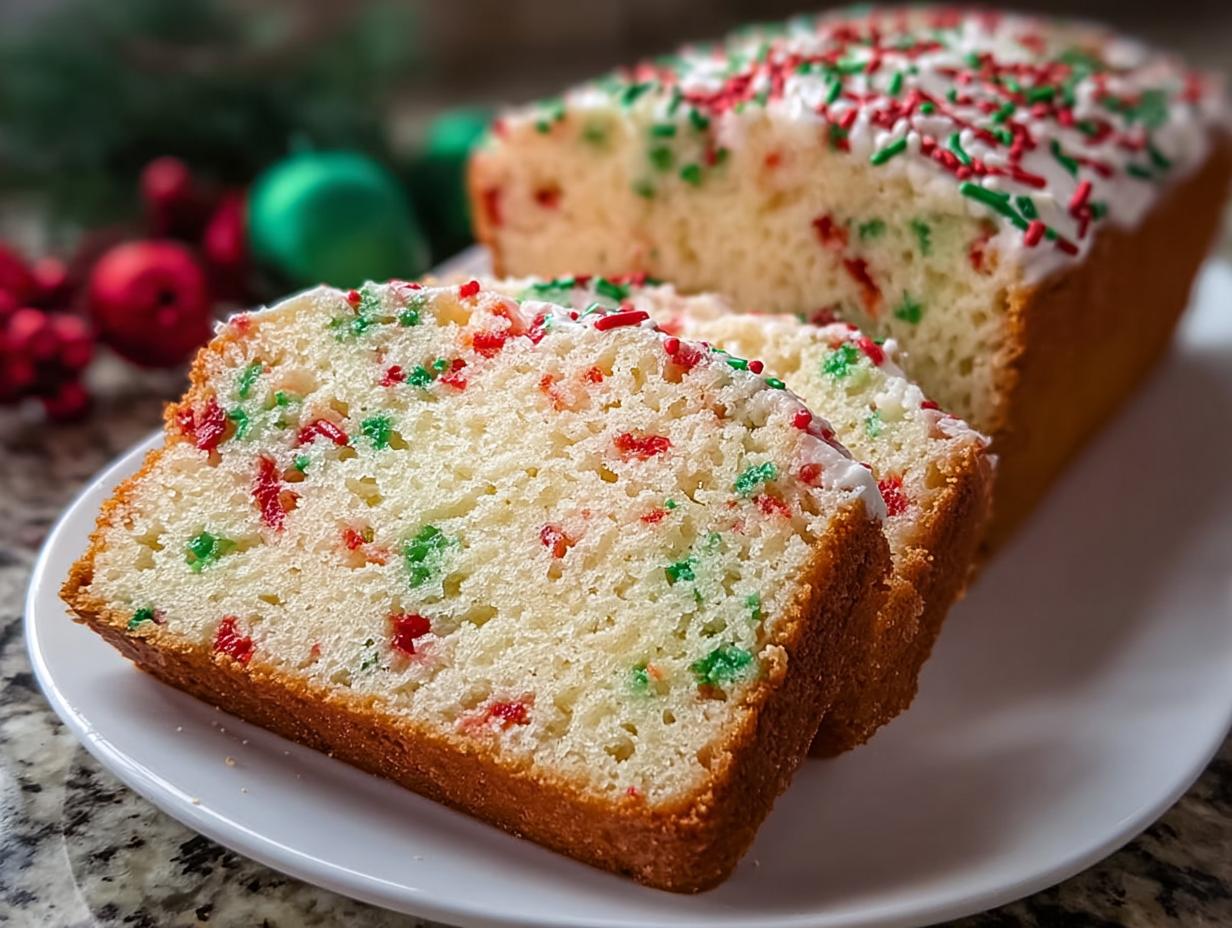
Sprinkle Buttermilk Bread is the absolute perfect thing to bake when you need a burst of happy color in your kitchen but don’t have hours to spend. When I first started NoobRecipes, I wanted to prove that baking didn’t have to be scary or complicated, and this recipe is the poster child for that mission! Seriously, it comes together faster than ordering takeout, and the result is this incredibly moist, tender loaf thanks to the buttermilk magic.
I remember trying to make colorful breads years ago, and they always ended up dense or the colors bled into a depressing gray mess. Yuck! But this formula? It’s rock solid. You just mix, fold, and bake. It’s festive enough for a birthday party, but easy enough for a Tuesday afternoon when you just need a sweet treat. Trust me, if you can stir ingredients together, you can nail this easy quick bread on your very first try. It’s pure, simple joy in a loaf!

Why You Will Love This Sprinkle Buttermilk Bread
This recipe isn’t just pretty; it’s genuinely reliable, which is what we look for here at NoobRecipes. It never fails to make everyone smile when it comes out of the oven.
Quick Prep for Busy Days
We’re talking 15 minutes of active time, tops. You whisk the dry stuff, stir the wet stuff, combine, fold in the fun, and you’re done. It moves fast!
Tender Crumb Texture
That buttermilk is doing heavy lifting here. It reacts perfectly with the baking soda to give you a soft, tender bite every single time. No dry edges here, I promise you that!
Gather Your Sprinkle Buttermilk Bread Ingredients
Okay, let’s look at what you need for this festive bake. Honestly, half the ingredients are probably already in your pantry, which is why I love this recipe so much for beginners. The absolute most important thing you need to know before you start measuring anything for your Sprinkle Buttermilk Bread is the kind of sprinkles you buy. You MUST go for the long, thin ones—the jimmies style.
If you use those tiny round balls, the nonpareils, they bleed their color into the wet batter instantly, and your pretty loaf will turn out looking slightly muddy. We want bright colors popping, right? So grab your jimmies, and let’s get everything else measured out!
Dry Components
- 1 ¼ cups all-purpose flour (210g)
- 1 teaspoon baking powder
- ½ teaspoon baking soda
- ½ teaspoon salt
Wet Components and Flavorings
- ½ cup (1 stick) unsalted butter, melted and slightly cooled
- 1 cup granulated sugar (200g)
- 2 large eggs
- 1 cup buttermilk (240ml)
- 2 teaspoons vanilla extract
The Colorful Addition
- ½ cup red and green sprinkles (jimmies style only!)
- 1 tablespoon coarse sugar (Optional Topping)
- Additional sprinkles for garnish (Optional Topping)
Essential Equipment for Your Sprinkle Buttermilk Bread
You do not need any fancy stand mixers for this easy quick bread! Just grab the standard stuff you use for everyday cooking. Having the right tools makes the whole process smoother, especially when you are just starting out.
- A 9×5-inch loaf pan (greased and lined, please!)
- Two mixing bowls—one medium, one large
- A whisk for the dry goods
- A rubber spatula for folding
- A toothpick for testing doneness
Step-by-Step Instructions for Perfect Sprinkle Buttermilk Bread
This is where the magic happens, and remember the golden rule for quick breads: mix just until combined! Overmixing is the number one way to wreck a beautiful batter. We are aiming for tender, not tough, in this Sprinkle Buttermilk Bread.
Preparing the Oven and Pan
First things first, let’s get that oven warmed up. Preheat your oven to 350°F (175°C). Don’t rely on it being ready when you think it is! While it heats, take your 9×5-inch loaf pan. You need to either grease it really well or line it with parchment paper. I like to do both—a little grease, then a parchment sling so I can lift the whole loaf out later. It’s my peace-of-mind insurance policy!
Combining Dry and Wet Mixtures
In your medium bowl—this is important—whisk together your flour, baking powder, baking soda, and salt. Whisking them ensures the leavening agents are perfectly distributed, so you don’t get weird salty pockets later. Set that dry mix aside. Now, move to your big bowl. Whisk your melted butter and sugar together until they look smooth. Add your eggs one at a time, mixing well after each one goes in. Finally, stir in the buttermilk and vanilla extract. It might look a little curdled; that’s totally normal!
The Gentle Fold: Integrating Sprinkles
Now we bring the two parts together. Gradually stir the dry ingredients into the wet mixture. Stop mixing the *second* you see the last streak of flour disappear. Seriously, put the spatula down! Now, gently fold in those colorful sprinkles. You’re not mixing; you’re just coaxing them into the batter. If you stir too hard here, the color will bleed, and you’ll lose that festive look. Pour the batter into your prepared loaf pan and smooth the top gently. If you want that extra crunch, sprinkle a little coarse sugar right on top now.
Baking and Initial Cooling
Slide that pan into the preheated oven. It needs to bake for about 45 to 55 minutes. How do you know it’s ready? Use the toothpick test! Stick a wooden skewer right into the very center. If it comes out clean, or with just a few moist crumbs clinging to it—not wet batter—it’s done! Let it cool in the pan for about 10 to 15 minutes. This short rest is crucial; it lets the loaf firm up just enough so it doesn’t fall apart when you turn it out onto the wire rack to finish cooling completely.
Tips for Success Making Sprinkle Buttermilk Bread
Even though this is a super simple recipe, there are a few little secrets that guarantee success every time you make this sweet loaf. We want that perfect crumb, and these tips will help you achieve it with your Sprinkle Buttermilk Bread.
Avoiding Color Bleeding
I mentioned this before, but it bears repeating: stick to jimmies! Those little round nonpareils seem cute, but they are made with dye that dissolves instantly in liquid. Jimmies hold their color much better during the mixing process, keeping your batter bright and beautiful.
Mastering the Mix
When you add the dry ingredients, you are developing gluten, and too much gluten equals a tough, chewy bread, which is the opposite of what we want in a tender buttermilk quick bread. Mix only until the flour disappears. If you see a tiny bit of dry flour hiding, don’t panic; it will hydrate as it bakes.
Alternative Baking Methods
If you don’t want a full loaf, you can absolutely turn this batter into muffins! Use the same 350°F temperature, but the baking time shortens significantly—check them around 18 to 22 minutes. They make fantastic little grab-and-go treats!
Serving Suggestions for Your Sweet Loaf
Because this Sprinkle Buttermilk Bread is already so flavorful and moist, it really doesn’t need much help. It’s perfect warm or at room temperature. If you are feeling fancy, a thin smear of softened butter is divine—the saltiness cuts through the sweetness just right.
It’s also amazing served alongside a big bowl of fresh berries in the summer, or maybe toasted slightly and topped with a little cream cheese for breakfast. It’s truly versatile!
Storing and Keeping Your Sprinkle Buttermilk Bread Fresh
This sweet loaf keeps surprisingly well because of the buttermilk, but you want to make sure you store it correctly so it doesn’t dry out. We want to keep that tender texture we worked so hard for!
Storage Guidelines
For short-term storage, just wrapping it up tightly at room temperature is best. If you need to keep it for longer, the fridge is your friend, but make sure you wrap it really well—plastic wrap followed by foil works wonders to keep the air out.
| Storage Duration | Storage Location | Reheating Method |
|---|---|---|
| Up to 3 Days | Room Temperature (Airtight) | Microwave for 15 seconds |
| Up to 1 Week | Refrigerator (Wrapped Tightly) | Microwave for 20 seconds or toast lightly |
| Up to 3 Months | Freezer (Heavy Duty Wrap) | Thaw overnight, then warm slightly |
Frequently Asked Questions About This Recipe
I get so many great questions about this recipe! It’s one of my most popular on NoobRecipes because it’s just so foolproof.
Can I substitute the buttermilk?
You sure can if you’re in a pinch! The buttermilk is key for tender results, but you can make a good substitute by taking 1 cup of regular milk and stirring in one tablespoon of white vinegar or lemon juice. Let it sit for five minutes until it looks slightly curdled. That works great as a swap in this easy quick bread.
How do I get the brightest sprinkle color?
Again, this comes down to the sprinkle type! You absolutely must use the long, firm jimmies. If you use soft or tiny round sprinkles, the dye will leech out and stain your batter immediately. Stick to the good stuff for your festive bread!
Is this recipe suitable for high-altitude baking?
That’s a great question for those of us living up high! Generally, for quick breads like this, you might need to add just a tiny bit more liquid—maybe an extra tablespoon of buttermilk—and slightly reduce the leavening agents (like a pinch less baking powder). But honestly, since the recipe is so simple, start with my original measurements and see how it goes first!
Share Your Festive Bread Creation
I truly hope you love making and eating this Sprinkle Buttermilk Bread as much as I do. If you bake it up, please come back and leave a rating or drop a comment below. I love seeing your colorful creations!
Why You Will Love This Sprinkle Buttermilk Bread
This recipe isn’t just pretty; it’s genuinely reliable, which is what we look for here at NoobRecipes. It never fails to make everyone smile when it comes out of the oven.
Quick Prep for Busy Days
- We’re talking 15 minutes of active time, tops. You whisk the dry stuff, stir the wet stuff, combine, fold in the fun, and you’re done. It moves fast!
Tender Crumb Texture
- That buttermilk is doing heavy lifting here. It reacts perfectly with the baking soda to give you a soft, tender bite every single time. No dry edges here, I promise you that!
Gather Your Sprinkle Buttermilk Bread Ingredients
Okay, let’s look at what you need for this festive bake. Honestly, half the ingredients are probably already in your pantry, which is why I love this recipe so much for beginners. The absolute most important thing you need to know before you start measuring anything for your Sprinkle Buttermilk Bread is the kind of sprinkles you buy. You MUST go for the long, thin ones—the jimmies style.
If you use those tiny round balls, the nonpareils, they bleed their color into the wet batter instantly, and your pretty loaf will turn out looking slightly muddy. We want bright colors popping, right? So grab your jimmies, and let’s get everything else measured out!
Dry Components
- 1 ¼ cups all-purpose flour (210g)
- 1 teaspoon baking powder
- ½ teaspoon baking soda
- ½ teaspoon salt
Wet Components and Flavorings
- ½ cup (1 stick) unsalted butter, melted and slightly cooled
- 1 cup granulated sugar (200g)
- 2 large eggs
- 1 cup buttermilk (240ml)
- 2 teaspoons vanilla extract
The Colorful Addition
- ½ cup red and green sprinkles (jimmies style only!)
- 1 tablespoon coarse sugar (Optional Topping)
- Additional sprinkles for garnish (Optional Topping)
Essential Equipment for Your Sprinkle Buttermilk Bread
You do not need any fancy stand mixers for this easy quick bread! Just grab the standard stuff you use for everyday cooking. Having the right tools makes the whole process smoother, especially when you are just starting out. This is all about keeping it simple, so you can focus on folding those sprinkles in perfectly.
- A 9×5-inch loaf pan (greased and lined, please!)
- Two mixing bowls—one medium, one large
- A whisk for the dry goods
- A rubber spatula for folding
- A toothpick for testing doneness
Step-by-Step Instructions for Perfect Sprinkle Buttermilk Bread
This is where the magic happens, and remember the golden rule for quick breads: mix just until combined! Overmixing is the number one way to wreck a beautiful batter. We are aiming for tender, not tough, in this Sprinkle Buttermilk Bread. Follow these steps exactly, and you’ll have a gorgeous loaf!
Preparing the Oven and Pan
First things first, let’s get that oven warmed up. Preheat your oven to 350°F (175°C). Don’t rely on it being ready when you think it is! While it heats, take your 9×5-inch loaf pan. You need to either grease it really well or line it with parchment paper. I like to do both—a little grease, then a parchment sling so I can lift the whole loaf out later. It’s my peace-of-mind insurance policy against sticking!
Combining Dry and Wet Mixtures
In your medium bowl—this is important—whisk together your flour, baking powder, baking soda, and salt. Whisking them ensures the leavening agents are perfectly distributed, so you don’t get weird salty pockets later or spots that sink. Set that dry mix aside. Now, move to your big bowl. Whisk your melted butter and sugar together until they look smooth. Add your eggs one at a time, mixing well after each one goes in. Don’t rush this part; you want those eggs incorporated well. Finally, stir in the buttermilk and vanilla extract. It might look a little curdled because of the acid in the buttermilk; that’s totally normal, so don’t worry about it!
The Gentle Fold: Integrating Sprinkles
Now we bring the two parts together. Gradually stir the dry ingredients into the wet mixture. You’re adding them in maybe two or three additions, stirring just until the streaks of flour disappear. Stop mixing the *second* you see the last streak of flour gone. Seriously, put the spatula down! Now, gently fold in those colorful sprinkles. You’re not stirring or beating; you’re just coaxing them into the batter. This folding action is key to keeping the crumb soft. If you stir too hard here, the color will bleed, and you’ll lose that festive look. Pour the batter into your prepared loaf pan and smooth the top gently. If you want that extra crunch, sprinkle a little coarse sugar right on top now.
Baking and Initial Cooling
Slide that pan into the preheated oven. It needs to bake for about 45 to 55 minutes. How do you know it’s ready? Use the toothpick test! Stick a wooden skewer right into the very center. If it comes out clean, or with just a few moist crumbs clinging to it—not wet batter, not raw dough—it’s done! Let it cool in the pan for about 10 to 15 minutes. This short rest is crucial; it lets the loaf firm up just enough so it doesn’t collapse or tear when you turn it out onto the wire rack to finish cooling completely. Patience for those 15 minutes pays off!
Tips for Success Making Sprinkle Buttermilk Bread
Even though this is a super simple recipe, there are a few little secrets that guarantee success every time you make this sweet loaf. We want that perfect crumb, and these tips will help you achieve it with your Sprinkle Buttermilk Bread. Don’t skip these little details; they make a huge difference!
Avoiding Color Bleeding
I mentioned this before, but it bears repeating: stick to jimmies! Those little round nonpareils seem cute, but they are made with dye that dissolves instantly in liquid. Jimmies hold their color much better during the mixing process, keeping your batter bright and beautiful. Trust me, nobody wants a gray loaf!
Mastering the Mix
When you add the dry ingredients, you are developing gluten, and too much gluten equals a tough, chewy bread, which is the opposite of what we want in a tender buttermilk quick bread. Mix only until the flour disappears. If you see a tiny bit of dry flour hiding, don’t panic; it will hydrate as it bakes. Stop stirring when you think you should stop, and then mix five more seconds—that’s usually enough!
Alternative Baking Methods
If you don’t want a full loaf, you can absolutely turn this batter into muffins! Use the same 350°F temperature, but the baking time shortens significantly—check them around 18 to 22 minutes. They make fantastic little grab-and-go treats for lunch boxes!
Serving Suggestions for Your Sweet Loaf
Because this Sprinkle Buttermilk Bread is already so flavorful and moist, it really doesn’t need much help. It’s perfect warm or at room temperature. If you are feeling fancy, a thin smear of softened butter is divine—the saltiness cuts through the sweetness just right. This easy quick bread shines brightest when you keep the toppings simple.
It’s also amazing served alongside a big bowl of fresh berries in the summer, or maybe toasted slightly and topped with a little cream cheese for breakfast. It’s truly versatile!
Storing and Keeping Your Sprinkle Buttermilk Bread Fresh
This sweet loaf keeps surprisingly well because of the buttermilk, but you want to make sure you store it correctly so it doesn’t dry out. We want to keep that tender texture we worked so hard for! Since this is a quick bread and not a cake loaded with cream cheese frosting, it’s pretty resilient.
Storage Guidelines
For short-term storage, just wrapping it up tightly at room temperature is best. If you need to keep it for longer than three days, the fridge is your friend, but make sure you wrap it really well—plastic wrap followed by foil works wonders to keep the air out and prevent that slightly stale refrigerator taste.
| Storage Duration | Storage Location | Reheating Method |
|---|---|---|
| Up to 3 Days | Room Temperature (Airtight) | Microwave for 15 seconds |
| Up to 1 Week | Refrigerator (Wrapped Tightly) | Microwave for 20 seconds or toast lightly |
| Up to 3 Months | Freezer (Heavy Duty Wrap) | Thaw overnight, then warm slightly |
Frequently Asked Questions About This Recipe
I get so many great questions about this recipe! It’s one of my most popular on NoobRecipes because it’s just so foolproof. People always ask about swaps and how to keep the colors bright when making this festive bread.
Can I substitute the buttermilk?
You sure can if you’re in a pinch! The buttermilk is key for tender results, but you can make a good substitute by taking 1 cup of regular milk and stirring in one tablespoon of white vinegar or lemon juice. Let it sit for five minutes until it looks slightly curdled. That works great as a swap in this easy quick bread.
How do I get the brightest sprinkle color?
Again, this comes down to the sprinkle type! You absolutely must use the long, firm jimmies. If you use soft or tiny round sprinkles, the dye will leech out and stain your batter immediately. Stick to the good stuff for your festive bread!
Is this recipe suitable for high-altitude baking?
That’s a great question for those of us living up high! Generally, for quick breads like this, you might need to add just a tiny bit more liquid—maybe an extra tablespoon of buttermilk—and slightly reduce the leavening agents (like a pinch less baking powder). But honestly, since the recipe is so simple, start with my original measurements and see how it goes first!
Share Your Festive Bread Creation
I truly hope you love making and eating this Sprinkle Buttermilk Bread as much as I do. It’s such a simple way to bring some fun into the kitchen. If you bake it up, please come back and leave a rating or drop a comment below. I love seeing your colorful creations and hearing how your first attempt at this easy quick bread turned out for you!
If you enjoyed this recipe, please consider sharing it with your friends on social media! You can find us on Pinterest or follow along for more easy baking ideas on Facebook.
Print
Amazing 1-Bowl Sprinkle Buttermilk Bread
- Total Time: 65 minutes
- Yield: 1 loaf
- Diet: Vegetarian
Description
Make this Sprinkle Buttermilk Bread for a fun, colorful loaf. This simple recipe mixes up fast, making it perfect for beginner bakers who want a festive treat. The buttermilk keeps the crumb moist and tender.
Ingredients
- 1 ¼ cups all-purpose flour (210g)
- 1 teaspoon baking powder
- ½ teaspoon baking soda
- ½ teaspoon salt
- ½ cup (1 stick) unsalted butter, melted and slightly cooled
- 1 cup granulated sugar (200g)
- 2 large eggs
- 1 cup buttermilk (240ml)
- 2 teaspoons vanilla extract
- ½ cup red and green sprinkles (jimmies style)
- 1 tablespoon coarse sugar (Optional Topping)
- Additional sprinkles for garnish (Optional Topping)
Instructions
- Preheat your oven to 350°F (175°C). Line or grease a 9×5-inch loaf pan.
- Whisk flour, baking powder, baking soda, and salt in a medium bowl. Set this dry mix aside.
- In a large bowl, whisk the melted butter and sugar until smooth. Add the eggs one at a time, mixing well after each addition. Stir in the vanilla and buttermilk.
- Gradually stir the dry ingredients into the wet mixture until they are just combined. Stop mixing right away.
- Gently fold in the sprinkles, taking care not to overmix the batter.
- Pour the batter into your prepared loaf pan and smooth the top surface. Sprinkle with coarse sugar or extra sprinkles if you want more topping.
- Bake for 45 to 55 minutes, or until a toothpick inserted into the center comes out clean.
- Cool the bread in the pan for 10 to 15 minutes before turning it out onto a wire rack to cool completely.
Notes
- Use jimmies style sprinkles; avoid nonpareils to prevent color bleeding into the batter.
- Do not overmix the batter; this keeps your bread tender and soft.
- For gifting, wrap the cooled loaf in wax paper and tie it with twine.
- You can bake this recipe as muffins; use the same oven temperature and bake for 18 to 22 minutes.
- Prep Time: 15 minutes
- Cook Time: 50 minutes
- Category: Quick Bread
- Method: Baking
- Cuisine: American