Oh, you guys, I have a secret weapon for those nights when you’re tired but you still need something amazing on the table fast. We all have that container of leftover chili sitting in the fridge, right? It’s delicious, but eating it the same way twice? No thanks! That’s where my absolute favorite weeknight hack comes in. In about 15 minutes flat, we turn that basic batch into a towering, cheesy masterpiece.
I’ve spent years perfecting the art of the quick meal because, honestly, who has time for complicated recipes when you’re starving? My experience tells me that the best meals often come from what you already have. That’s why this Simple Chili Nachos Using Leftover Chili Recipe is a staple in my house. It’s fast, it uses up what needs using up, and it tastes like you spent way more time on it than you actually did. Trust me, this sheet pan wonder is about to save your weeknights! 
Repurposing Dinner into Simple Chili Nachos Using Leftover Chili Recipe
I swear, I used to look at leftover chili like it was a chore. I’d stand in front of the fridge, sighing, dreading the thought of eating the same bowl of goodness for the third night in a row. Then, one Tuesday, I decided I was done with boring leftovers!
That’s when I realized that leftovers aren’t a burden; they are already a head start! You’ve already cooked the main component! This realization led to creating this super fast Simple Chili Nachos Using Leftover Chili Recipe. It proves that even the newest cooks can achieve massive flavor in minutes. You just layer, bake for ten minutes, and boom—dinner is served. It’s the ultimate transformation! It’s the ultimate transformation!
Gathering Your Ingredients for Simple Chili Nachos Using Leftover Chili Recipe
Okay, now that you’re excited about this transformation, let’s talk about what you need. The beauty of this Simple Chili Nachos Using Leftover Chili Recipe is that most of the heavy lifting is already done since we are using pre-made chili! We just need the supporting cast to make these nachos sing.
I’ve pulled all the exact measurements and specific notes into the lists below so you don’t have to scribble things down while you’re raiding the fridge. Just make sure your leftover chili is nice and thick—that’s key for chip integrity!
Detailed Ingredient List for Simple Chili Nachos Using Leftover Chili Recipe
Take a peek at the table below for the exact amounts. Seriously, pay attention to the chili consistency note—if your chili is watery from simmering too long, the chips will weep! You want that thick, hearty chili that clings to the spoon. Also, make sure your avocado is perfectly ripe, not mushy, since we are adding it fresh at the end.
Essential Equipment for Sheet Pan Nachos
You don’t need much fancy gear for this, which is another win! You absolutely must have a large baking sheet—the bigger the better so you can spread those chips out. Parchment paper is my non-negotiable friend here; it makes cleanup instant. And grab a small saucepan because we need to gently warm that chili up before it hits the cheese.
Step-by-Step Instructions for Simple Chili Nachos Using Leftover Chili Recipe
Alright, let’s get this show on the road! Since this whole recipe takes about 15 minutes total, we need to move quickly. The goal here is to preheat everything while we prep the layers. Remember, we are building two full layers of nachos, which is my secret weapon against sad, bare chips on the bottom!
Preparation and Layering the Simple Chili Nachos Using Leftover Chili Recipe
First things first, get your oven cranked up to 350°F. While that’s heating, line a big baking sheet with parchment paper. Don’t skip the paper unless you love scrubbing baked-on cheese—and trust me, you don’t want to do that!
Now, arrange about half of your tortilla chips in a nice, even layer across the pan. Don’t pile them too high, or the middle ones won’t cook right. While those chips are chilling, grab that leftover chili and put it in a saucepan over medium heat. You just need it simmering gently, which takes about five minutes. We don’t want it boiling furiously, just warm enough to melt that cheese fast.
Once the chili is warm, take half of it and spoon it right over that first layer of chips. Spread it around with the back of the spoon! Then, sprinkle half of your shredded cheese right on top of the chili layer. We repeat the whole thing: remaining chips go down, then the rest of the chili, and finish it off with the last of that glorious cheese.
Baking and Melting the Cheese
Into the oven they go! You’re looking for about 8 to 10 minutes. You’ll know they’re ready when the cheese is completely melted, gooey, and just starting to bubble around the edges. Keep an eye on them, though, because if your oven runs hot, they can brown too fast! We want melted cheese, not burnt chips.
Adding Fresh Toppings for Maximum Flavor
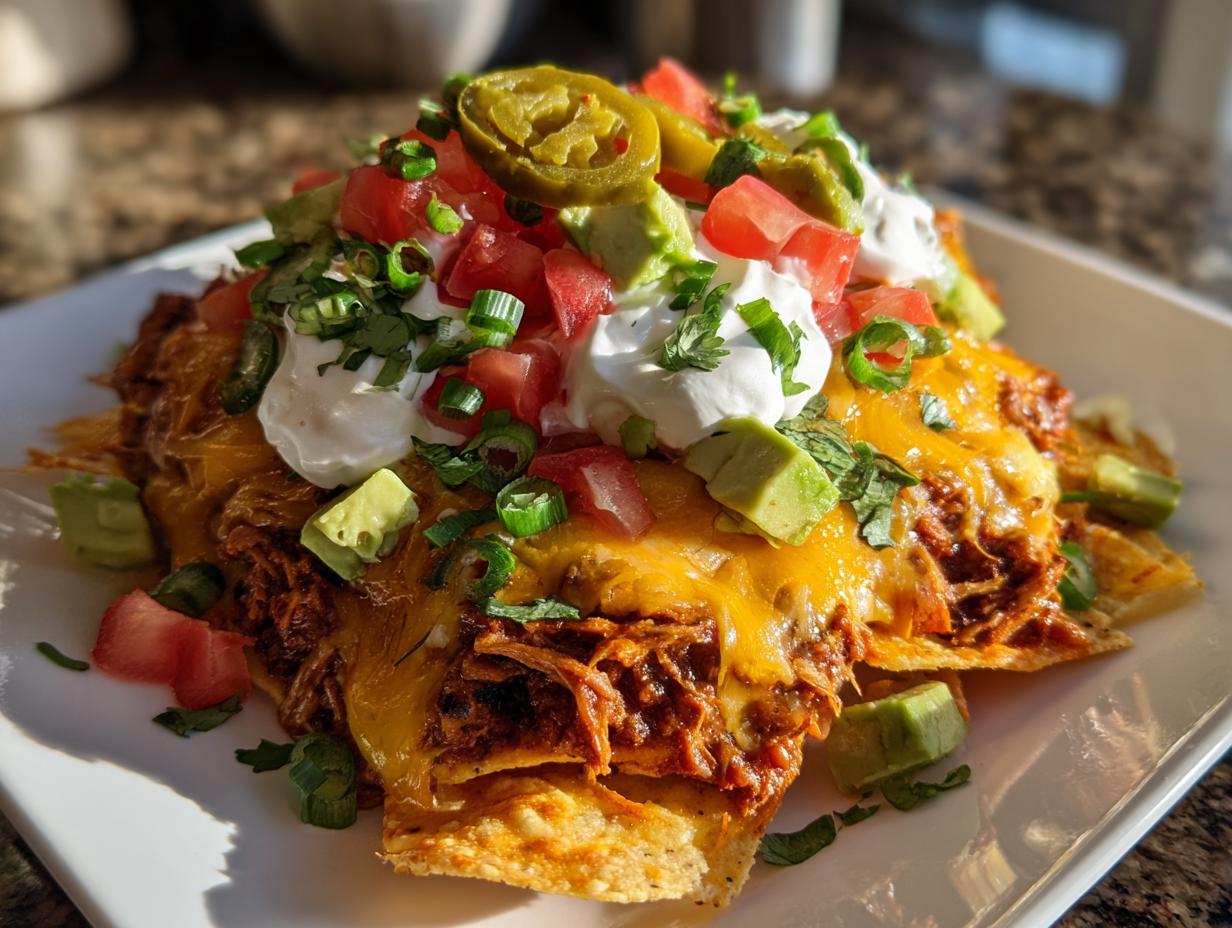
This is the fun part, and timing is everything! Pull that hot sheet pan out of the oven immediately—we want those fresh toppings to stay cool and crisp against the hot base. Dice up your tomato and avocado, slice those green onions, and grab your cilantro.
Sprinkle those fresh veggies right over the melted cheese. Next up is the sour cream. I hate trying to dollop that stuff on, so here’s a trick: snip the corner off a Ziploc bag, fill it with sour cream, and you can pipe little dots or even thin lines right across the top. It looks fancy! If you like a little kick, scatter those pickled jalapeños on top, grab those lime wedges, and serve them while they are screaming hot! 
Pro Tips for Perfect Simple Chili Nachos Using Leftover Chili Recipe
Using leftovers is smart cooking, but we have to be smart about texture, too! If you want truly perfect Simple Chili Nachos Using Leftover Chili Recipe, you need to pay attention to how thick that chili is. Soggy chips are the enemy of good nachos, and we are not having that in this kitchen!
Managing Chili Consistency and Layering
My biggest piece of advice for using leftover chili is this: the colder it is, the better it works for nachos! When you refrigerate chili overnight, it naturally thickens up because the starches and fats firm up. This means when you reheat it, it’s dense enough to sit right on top of the chips without immediately soaking down to the bottom layer.
That’s why we always layer twice—half the chips, half the chili, half the cheese, then repeat. This ensures maximum chip coverage and prevents that dreaded pile of bare, sad chips at the bottom of the pan. You want every single chip to have a chance at that cheesy, meaty goodness! You want every single chip to have a chance at that cheesy, meaty goodness!
Speeding Up Melting Time
If you’re running even shorter on time than 10 minutes, you can totally cheat the baking process. Instead of baking at 350°F for 8 to 10 minutes, you can switch to the broiler. Set your oven rack to the middle position, turn the broiler on high, and watch like a hawk!
It only takes about 2 or 3 minutes under the broiler for that cheese to get bubbly and golden brown. Seriously, don’t walk away! Broilers are intense, but they are fantastic for getting that perfect melt super fast before you pile on the cool, fresh toppings.
Frequently Asked Questions About Leftover Chili Nachos
I get so many questions about how to make sure these sheet pan nachos turn out perfectly every time, especially since we are using leftovers. It’s all about technique, even when you’re moving fast! Here are the top things people ask me when they try this recipe for the first time.
How to Prevent Soggy Chips in Simple Chili Nachos Using Leftover Chili Recipe
This is the number one concern, and I totally get it! The secret to avoiding a mushy mess in your Simple Chili Nachos Using Leftover Chili Recipe is twofold. First, use thick chili. If your leftover chili is runny, let it simmer uncovered for a few extra minutes before you start layering to cook off some liquid.
Second, and this is crucial, you must layer! Don’t just dump all the chips down and cover them. By splitting the chips, chili, and cheese into two distinct layers, you create air pockets and ensure that the heat from the oven can get to the bottom chips before they get saturated. Also, make sure that chili is hot when it goes on; that short blast in the oven is for melting cheese, not essentially cooking the chips.
Can I Make These Ahead of Time?
You can totally prep ahead, which is fantastic for entertaining! You can layer the chips, chili, and cheese onto your baking sheet up to an hour before you plan to serve them. Just cover the sheet pan tightly with plastic wrap and keep it in the refrigerator. When your guests arrive, just pop it straight into the preheated 350°F oven.
However, you absolutely must wait to add the fresh stuff! The sour cream, avocado, tomato, and cilantro should only go on after the nachos come out of the oven. Those fresh toppings need to stay cool and crisp to provide that necessary texture contrast. Those fresh toppings need to stay cool and crisp to provide that necessary texture contrast.
What Cheese Works Best for Nachos?
I usually stick with a good quality Mexican blend because it melts beautifully and has a nice, balanced flavor. But if you want to kick up the heat factor, absolutely swap that out for Pepper Jack! Pepper Jack melts just as well, but those little flecks of pepper add a nice background warmth that pairs perfectly with spicy chili.
You want a cheese that shreds easily and melts smoothly. Avoid pre-grated cheeses if you can, because they often have anti-caking agents that make them clump instead of creating that beautiful, cohesive blanket of melted goodness we are looking for!
Storing and Reheating Your Leftover Chili Nachos
So, you made too many? That’s never a bad problem to have! If you happen to have some of these incredible sheet pan nachos left—which only happens if you resist eating them all in one sitting—you need to store them correctly. Storing them the wrong way means you’ll end up with sad, soggy chips the next day, and we can’t allow that to happen!
Best Practices for Storing Components
The absolute best way to store leftovers is to keep everything separate. Keep your remaining chili in an airtight container in the fridge; it lasts great for up to five days. Store your chopped fresh toppings—the avocado, tomato, onions—in their own little containers, too. The chips should be kept in a sealed bag or container away from any moisture.
Do not store the assembled, baked nachos together unless you are planning to eat them within a few hours. Once they cool down, the chips really start to absorb moisture from the melted cheese and chili, and they lose their crunch fast.
Reheating Assembled Leftover Chili Nachos
If you are determined to reheat the whole thing assembled, I won’t stop you, but you need to manage your expectations! Pop those leftovers onto a clean baking sheet and stick them back into a 350°F oven. Give them about 5 to 7 minutes, just until the cheese loosens up again.
I have to warn you: the chips will be significantly softer after this second heating. They won’t have that glorious fresh-out-of-the-oven snap. If you want them crispy, just reheat the chili separately and then layer it over a fresh batch of chips—that’s always the best route! that’s always the best route!
Sharing Your Simple Chili Nachos Using Leftover Chili Recipe Experience
Well, that’s it! You’ve successfully turned a plain container of leftovers into the best snack or quick dinner ever. I truly hope you love this Simple Chili Nachos Using Leftover Chili Recipe as much as my family does!
Tell me—what’s your absolute favorite topping variation? Do you load yours up with extra jalapeños or maybe try my cilantro-lime sour cream trick? Drop a rating below and be sure to sign up for my newsletter so you never miss another genius way to use up leftovers! Drop a rating below and be sure to sign up for my newsletter so you never miss another genius way to use up leftovers!
Print
5 Minute Simple Chili Nachos Recipe Wow
- Total Time: 15 minutes
- Yield: 4 servings
- Diet: Omnivore
Description
Transform leftover chili into easy sheet pan nachos with melted cheese and fresh toppings. Perfect way to repurpose a basic chili batch in 15 minutes.
Ingredients
- 10 ounces tortilla chips
- 3 cups leftover chili, any variety
- 2 cups shredded cheddar cheese or Mexican blend cheese
- 1/2 cup sour cream
- 1 ripe avocado, diced
- 1 medium tomato, diced
- 2 green onions, sliced
- 1/4 cup fresh cilantro, chopped
- 1/4 cup sliced pickled jalapeños, optional
- Lime wedges for serving
Instructions
- Preheat oven to 350°F and line a large baking sheet with parchment paper.
- Arrange half of the tortilla chips in an even layer on the prepared baking sheet.
- Heat leftover chili in a saucepan over medium heat until warmed through and simmering, about 5 minutes.
- Spoon half of the warmed chili over the first layer of chips, distributing evenly.
- Sprinkle half of the shredded cheese over the chili layer.
- Add remaining tortilla chips as a second layer, then top with remaining chili and remaining cheese.
- Bake for 8-10 minutes until cheese is melted and bubbly and nachos are heated through.
- Remove from oven and immediately top with diced tomato, diced avocado, sliced green onions, and fresh cilantro.
- Add dollops of sour cream over the nachos or drizzle using a cut corner of a ziplock bag.
- Garnish with pickled jalapeños if desired and serve immediately with lime wedges.
Notes
- Use thick chili for nachos to prevent soggy chips; leftover chili thickens well when refrigerated.
- Layer the nachos in two layers so every chip receives toppings.
- Warm the chili before adding to the nachos; oven time is for melting cheese.
- Prep all fresh toppings while the nachos bake for immediate serving.
- Serve nachos immediately after baking for best texture.
- Store leftover chili separately in the refrigerator for up to 5 days.
- Reheating assembled nachos in a 350°F oven for 5-7 minutes is possible, but expect softer chips.
- You can swap cheddar for pepper jack cheese for more spice.
- Add refried beans or black beans between layers for extra protein.
- Make a cilantro lime sour cream by mixing sour cream with lime juice and cilantro.
- Use the broiler on high for 2-3 minutes instead of baking for faster melting.
- Prep Time: 5 minutes
- Cook Time: 10 minutes
- Category: Snack/Appetizer
- Method: Baking
- Cuisine: American