I have to tell you, when I first started baking, anything that required chilling dough or multiple bowls felt like a huge commitment. That’s why these sheet pan cookie bars became my absolute weeknight savior! Seriously, if you think you don’t have time to bake something amazing, think again.
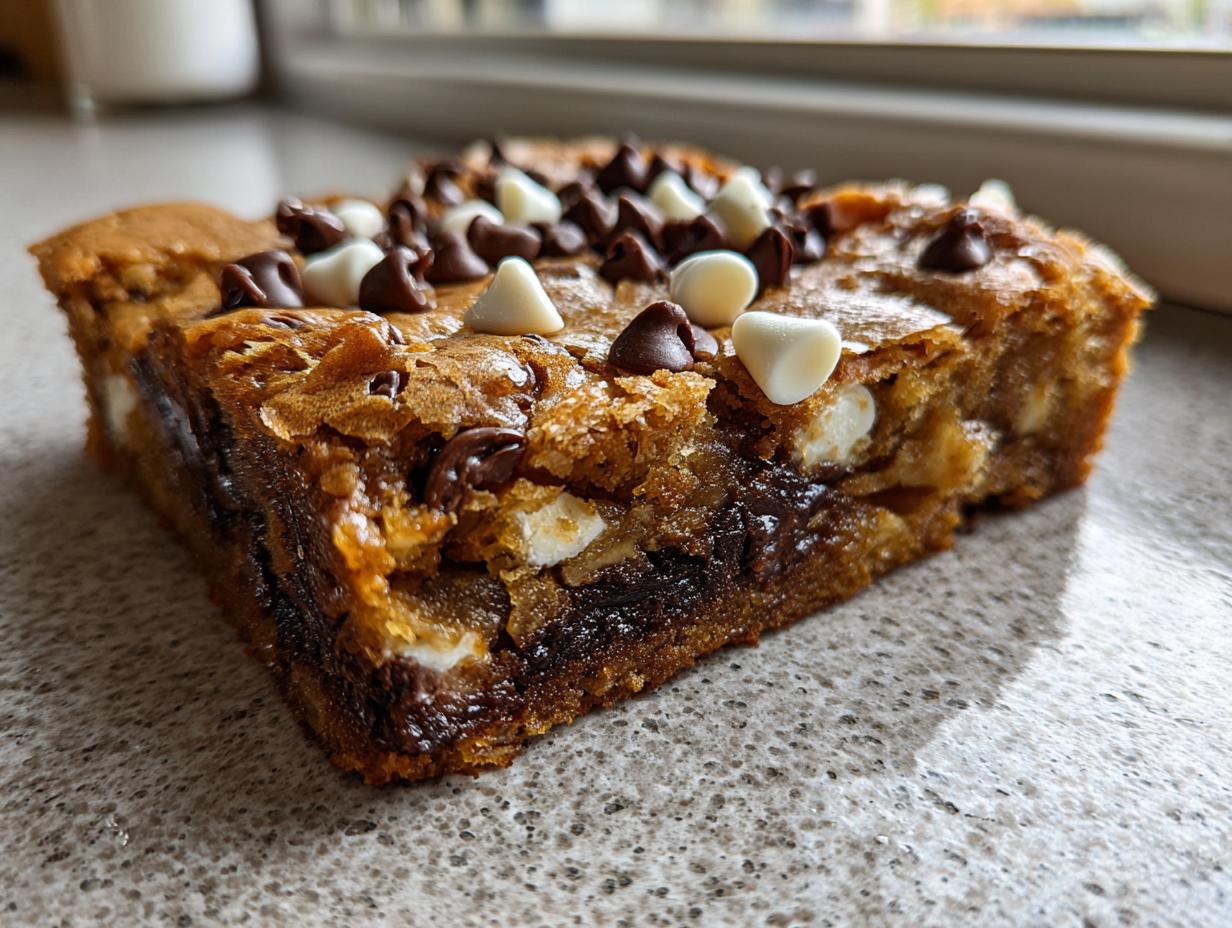
These aren’t just quick; they are honestly the chewiest, thickest chocolate chip bars you will ever pull out of your oven. We’re talking about a rich, buttery dough that you mix in one bowl, press right into the pan, and bake up in under 15 minutes. I used to burn cookies constantly, but because you bake this batter right on the pan, it cooks so evenly. Trust me, mastering these sheet pan cookie bars was the moment I realized baking didn’t have to be fussy or complicated. Get your oven preheated, because we are making magic happen fast!

Why You Will Love These Sheet Pan Cookie Bars
I promise you, these are going to change your dessert game entirely. Forget rolling dozens of little balls! These bars are built for speed and maximum comfort food factor. They come together so fast, you can decide on dessert while the coffee is brewing.
Here’s why I keep making batch after batch:
- Prep time is unbelievably fast, usually under 10 minutes.
- Everything mixes up right in one large bowl. No mess!
- The final product is super thick—a true bar, not a flat cookie.
- They are perfect for holidays, potlucks, or just feeding a hungry family quickly.
Quick Prep and Simple Cleanup
The prep time is just about 10 minutes, tops. Once the dough is done, it goes right onto the sheet pan. That’s the beauty of it! You mix it, press it, bake it, and eat it—all using that one single pan. Cleanup is basically just washing the one bowl you mixed everything in. Honestly, I sometimes just wipe the bowl out and call it a day!
Chewy Texture Guarantee for Your Sheet Pan Cookie Bars
The texture is everything here. We are aiming for pure chewiness, that wonderful pull when you bite into a warm square. The secret? Do not, under any circumstances, overbake these. You want the edges to look golden, sure, but the middle should look just barely set when you pull them out. They firm up perfectly while cooling in the pan, giving you that signature soft center. Trust me on the timing!
Essential Ingredients for Perfect Sheet Pan Cookie Bars
Okay, now let’s talk about what makes these sheet pan cookie bars taste so outrageously good. Because we’re moving fast, we need ingredients that perform perfectly right out of the gate. I’ve learned that room temperature eggs make a huge difference in how smoothly everything blends together, so don’t skip that step!
The combination of melted butter and two kinds of sugar is what locks in that amazing chewiness we talked about. And of course, we need chocolate—lots of it! I like using a mix because the semisweet and white chips melt differently, giving you pockets of flavor. Don’t worry if you don’t have everything exactly as listed; I’ll give you some simple swaps in the next section.
Ingredient List Table
| Quantity | Ingredient |
|---|---|
| 1 cup | unsalted butter, melted and slightly cooled |
| 1 cup | packed light brown sugar |
| ½ cup | granulated sugar |
| 2 large | eggs, room temperature |
| 2 teaspoons | vanilla extract |
| 2 ¼ cups | all-purpose flour |
| 1 teaspoon | baking soda |
| ½ teaspoon | fine salt |
| 1 ½ cups | semisweet chocolate chips |
| ½ cup | white chocolate chips |
| ¼ cup | mini chocolate chips for topping |
Ingredient Notes and Simple Substitutions
Just a couple of quick notes here to ensure your dough is perfect. Remember I mentioned room-temperature eggs? They emulsify much better with the melted butter and sugar, creating a smoother base. If you forgot to pull them out, just put the eggs in a bowl of warm (not hot!) water for five minutes.
When it comes to the chips, feel free to customize! If you only have semisweet, go ahead and use 2 cups of just that. Or maybe you love butterscotch? Swap those white chips out for butterscotch chips—they melt beautifully. If you want a little crunch, toss in about half a cup of chopped walnuts or pecans right along with the chocolate chips. They bake up perfectly in this thick dough.
Equipment Needed for Your Sheet Pan Cookie Bars
You don’t need a giant stand mixer for this recipe, which is part of why it’s so great! Having the right tools just makes the process smoother, though. You’ll need a sturdy, large mixing bowl since we are keeping this to one bowl. A good rubber spatula is essential for scraping down the sides and folding everything in at the end.
You’ll also need a whisk for the initial sugar mixture and measuring cups and spoons, naturally. Since we aren’t using a separate cooling rack, the pan itself is doing double duty here!
Preparing Your Baking Surface
The pan size is actually pretty important for getting that perfect thickness. You absolutely need a standard 13×18-inch rimmed sheet pan. If your pan is smaller, the dough will be too thick and won’t bake through properly. I always line mine with parchment paper, but here’s the trick: leave a little overhang on two opposite sides—like little handles.
This parchment sling is my best friend! Once the bars are cool enough to handle, you can just lift the whole slab right out of the pan. It makes getting them out completely mess-free, and trust me, you want that intact slab when you go to cut them into squares later!

Step-by-Step Instructions for Sheet Pan Cookie Bars
Alright, my favorite part! This is where the magic happens with these fast and fabulous sheet pan cookie bars. Because we’re skipping the chilling time, organization is key, but honestly, this whole process moves so quickly you’ll be amazed. Make sure your oven is at 350°F before you even start whisking. If you’re using parchment paper, set up those little handles now so you’re ready to go later!
Mixing the Wet Ingredients for Sheet Pan Cookie Bars
Grab your biggest bowl. We start with the melted butter—make sure it’s cooled down just a bit so it doesn’t cook your eggs! Whisk that melted butter together with both the brown sugar and the white sugar. You want to whisk until it looks smooth and maybe just a tiny bit lighter in color. It should feel thick when you stir it.
Next up are the eggs. Add them one at a time, making sure the first one is fully incorporated before adding the second. This keeps the batter from breaking. Follow that up with the vanilla extract. Keep whisking until the whole mixture looks glossy and happy. That shine tells you the base is ready to hold all the goodness!
Combining Dry Ingredients and Forming the Dough
Now for the dry stuff. Take your flour, baking soda, and salt, and just sprinkle them right over the top of your wet mixture. Do not dump them all in at once and try to beat them with the whisk! Grab your spatula. Fold everything together gently. You only want to mix until you see no more white streaks of flour. Seriously, stop mixing as soon as the dry bits disappear. Overmixing at this stage is what makes bars tough, and we want chewy!
Once that’s just combined, fold in your main batch of chocolate chips—the semisweet and white ones. If you reserved any extra chips for the top, set those aside for the next step.
Pressing and Topping the Dough
Time to transfer! Scoop all that thick dough right into your prepared 13×18 pan. Use your spatula, or even lightly damp hands (that stops sticking!), to press the dough out evenly. You need to get it right to the corners so every bar is the same thickness and bakes the same amount of time. Don’t press too hard, just firm enough to cover the bottom.
Now, take those reserved chocolate chips—and toss those little mini chips right on top. Gently press them into the surface so they don’t fly off during baking. They’ll melt beautifully and make the top look irresistible!
Baking Time and Doneness Check
Slide that pan into your 350°F oven. Set a timer for 14 minutes. These usually take between 14 and 16 minutes total. You are looking for the edges to start turning a light golden brown. The center should look set, maybe a little puffy, but it shouldn’t look wet or jiggly.
When the timer goes off, test it! Stick a toothpick right near the center. You want to see moist crumbs clinging to the wood, but definitely no wet, raw batter dripping off. If the edges are getting too dark before the middle is done, just tent the pan loosely with aluminum foil for the last couple of minutes. That protects the edges while the middle finishes setting up.
Cooling Guidelines for Ideal Sheet Pan Cookie Bars
This is the hardest part, but you absolutely cannot skip it! Pull the pan out of the oven and let those beautiful bars cool right there in the pan for a minimum of 10 minutes. If you try to cut them immediately, they will just crumble everywhere because they haven’t had time to firm up. That 10 minutes lets the structure set, which is key for that perfect, chewy texture.
After 10 minutes, you can either use the parchment sling to lift the whole slab onto a cutting board, or if you prefer, just cut them right there in the pan. If you cut them in the pan, let them cool down a bit more before slicing for the cleanest squares possible!
Frequently Asked Questions About Sheet Pan Cookie Bars
I get so many questions about these bars because everyone wants that perfect chewy center! It’s easy to get stuck on the timing, but honestly, relying on your eyes is better than relying strictly on the clock. Here are the things I hear asked most often when people are making their first batch of these amazing bars.
How Long to Bake Sheet Pan Cookie Bars for Maximum Chewiness?
You want to bake them just until the edges look golden brown, which usually hits right around 14 to 16 minutes at 350°F. The biggest mistake people make is baking them until the center looks completely dry—don’t do that! You want the toothpick to come out with moist crumbs attached. If you bake them until the toothpick is totally clean, you’ll end up with a dry, cakey bar instead of the soft, chewy ones we are aiming for.
Can I Make These Sheet Pan Cookie Bars Ahead of Time?
Yes, absolutely! They are great for making ahead, especially since they hold up so well. I store leftover sheet pan cookie bars in an airtight container right on the counter, and they are still soft and delicious for about four days. If you know you won’t eat them all right away, you can definitely bake them, let them cool completely, cut them up, and freeze them for later snacking!
What is the Best Pan Size for These Sheet Pan Cookie Bars?
The 13×18-inch rimmed sheet pan is non-negotiable if you want the right thickness! If you use a smaller pan, the dough will be too deep, and the middle won’t cook through before the edges burn. If you use a pan that’s too big, the dough will spread too thin, and you won’t get that satisfyingly thick bite. Stick to the 13×18 for the ultimate chocolate chip cookie bar experience.
Storing and Refreshing Your Sheet Pan Cookie Bars
The great thing about these bars is they are wonderfully sturdy, which means they travel well and keep well, too. You don’t have to worry about eating them all in one day, which is a win for my willpower! They taste just as good on day three as they do fresh out of the oven, provided you store them right.
Storage and Freezing Instructions
Once the bars are completely cool—and I mean totally cool, no residual warmth—transfer them to an airtight container. You can stack them, but I like to put a small piece of wax paper between layers just to make sure the chocolate doesn’t smudge across the tops. They will stay wonderfully fresh at room temperature for up to four days. If you need them to last longer, freezing is the way to go!
For the freezer, cut the bars first. Lay the squares in a single layer on a small baking sheet and freeze them until solid. Then, transfer those frozen bars into a heavy-duty freezer bag. They keep beautifully for about two months!
How to Reheat Sheet Pan Cookie Bars Simply
If you froze them, or if they’ve been sitting on the counter for a day or two and you want that fresh-out-of-the-oven melt, reheating is super easy. For a quick fix, zap one bar in the microwave for just 8 to 10 seconds. That’s enough time to get the chocolate gooey again without making the cookie part hard.
If you’re warming up a few squares, the oven is better! Pop them onto a small baking sheet and warm them in a 300°F oven for about 3 or 4 minutes. They come out perfectly soft and warm all the way through. I love doing this right before serving them with a scoop of ice cream!
Share Your Sheet Pan Cookie Bars Success
I truly hope these quick, chewy bars have made your week a little sweeter! They are such a simple recipe, but they always get rave reviews from everyone who tries them. I’m always tinkering in the kitchen, so I’d love to hear how yours turned out. If you want to see more quick recipes like this, check out my Facebook page!
Did you use pecans or butterscotch chips? Tell me everything! Please leave a rating below and share your thoughts in the comments so I know what you thought of this sheet pan cookie bar recipe! You can also find more great ideas over on Pinterest.
Print
Amazing 1-Bowl Sheet Pan Cookie Bars Joy
- Total Time: 25 minutes
- Yield: 24 to 30 cookie bars
- Diet: N/A
Description
Make soft, chewy 15-minute sheet pan cookie bars packed with melty chocolate, perfect for busy nights and winter gatherings. The dough mixes in one bowl, presses straight into a pan, and bakes up thick and chewy.
Ingredients
- 1 cup unsalted butter, melted and slightly cooled
- 1 cup packed light brown sugar
- ½ cup granulated sugar
- 2 large eggs, at room temperature
- 2 teaspoons vanilla extract
- 2 ¼ cups all-purpose flour
- 1 teaspoon baking soda
- ½ teaspoon fine salt
- 1 ½ cups semisweet chocolate chips
- ½ cup white chocolate chips
- ¼ cup mini chocolate chips for topping
Instructions
- Preheat the oven to 350°F and lightly grease a 13×18-inch rimmed sheet pan or line it with parchment, leaving a little overhang for easy lifting.
- In a large bowl, whisk together the melted butter, brown sugar, and granulated sugar until smooth and slightly thickened.
- Whisk in the eggs one at a time until fully combined, then stir in the vanilla until the mixture looks glossy.
- Sprinkle the flour, baking soda, and salt over the wet mixture and stir with a spatula just until no streaks of dry flour remain and a soft, thick dough forms.
- Fold in the semisweet and white chocolate chips until evenly distributed, reserving a small handful if you want extra chips sprinkled on top.
- Transfer the dough to the prepared sheet pan and use a spatula or lightly damp hands to press it into an even layer all the way to the edges; scatter reserved chocolate chips and mini chocolate chips over the top and gently press them in.
- Bake for 14 to 16 minutes, until the edges are lightly golden and the center looks just set and slightly puffed; a toothpick inserted near the center should come out with moist crumbs but not wet batter.
- Let the bars cool in the pan for at least 10 minutes so they firm up, then lift the slab out by the parchment or cut directly in the pan into squares or rectangles.
Notes
- Use all semisweet or all milk chocolate chips if you prefer one type of chocolate.
- Swap white chocolate chips for butterscotch or peanut butter chips for a different flavor.
- Add ½ cup chopped nuts such as walnuts or pecans for extra crunch.
- Stir in ½ cup festive sprinkles for a fun, seasonal look.
- Replace ¼ cup of the flour with cocoa powder for double chocolate cookie bars.
- Add ½ teaspoon ground cinnamon to the dough for a cozy winter spiced version.
- Do not overbake; pull the bars as soon as the center is just set to keep them soft and chewy.
- Use room-temperature eggs so the batter mixes smoothly and bakes evenly.
- Press the dough into an even thickness so all bars bake at the same rate.
- If the edges brown too quickly, tent loosely with foil during the last few minutes.
- For clean slices, let bars cool longer and wipe the knife between cuts.
- Store cooled bars in an airtight container at room temperature for up to 4 days.
- For longer storage, freeze cut bars in a single layer, then transfer to a freezer-safe bag for up to 2 months.
- To refresh, warm a bar in the microwave for 8 to 10 seconds or in a 300°F oven for 3 to 4 minutes until slightly warm and the chocolate is just melty again.
- Prep Time: 10 minutes
- Cook Time: 15 minutes
- Category: Dessert
- Method: Baking
- Cuisine: American