Forget soggy, steamed vegetables! If you think broccoli is boring, I promise you haven’t met my recipe for roasted broccoli yet. This isn’t just a side dish; it’s the reason people actually eat their greens. The absolute magic here is achieving those deeply browned, almost burnt, crispy edges while keeping the center perfectly tender. I used to dread cooking broccoli because it always ended up mushy—a total waste of time!
I learned this trick years ago when I accidentally cranked my oven way too high, and instead of ruining dinner, I created the best vegetable side dish our family had ever tasted. It’s ridiculously simple, which is why I trust it for busy weeknights, but it looks and tastes gourmet. The combination of salty Parmesan and bright lemon juice right at the end just seals the deal.
Seriously, this method uses high heat and zero fuss. You don’t need fancy gadgets or hours of prep time. Just follow the steps for drying the florets really well, and I guarantee you’ll get that restaurant-quality char every single time. It’s become my go-to for impressing guests without breaking a sweat! 
Essential Ingredients for Perfect Roasted Broccoli
Okay, the ingredient list for this phenomenal roasted broccoli is short, which I love because it means quality really shines through. You don’t need a million things, but the few items we use have to be good. Trust me, these measurements are spot-on for getting that perfect crispiness and flavor balance.
Gathering Your Roasted Broccoli Ingredients
First up, you need about 24 ounces of fresh broccoli. The key here is fresh—make sure the heads look bright green, not yellowing at all. We’re using four cloves of garlic, and I mean *real* garlic, not the pre-minced jar stuff; we need that pungent kick! Then, we keep it simple with good olive oil, kosher salt, and black pepper. The cheese is crucial: a quarter cup of grated Parmesan. Don’t use the powdery shaker stuff if you can help it; freshly grated melts much better and tastes nutty.
Equipment Needed for Roasting Vegetables
You need a sturdy, rimmed baking sheet. This is non-negotiable for getting air circulation around the florets. Please, line it with parchment paper. It saves you scrubbing later, and it helps prevent sticking when the cheese melts. You’ll also need a sharp knife for cutting down any giant florets and a good box grater if you decide to grate your own Parmesan, which I highly recommend! If you are looking for other great side dishes, check out our garlic parmesan focaccia bread.
Step-by-Step Instructions for Roasted Broccoli
This is where the magic happens, and honestly, it’s the easiest part! We are going for high heat here because that’s the secret to getting those beautiful, crispy edges on our roasted broccoli. Don’t be shy with the temperature; the oven needs to be roaring hot to achieve the perfect texture. Pay close attention to the drying step—I cannot stress this enough!
Preparing the Broccoli and Oven Setup
First things first, crank that oven up to 425 degrees F. That high heat is essential! While it’s heating up, grab your largest rimmed baking sheet and line it with parchment paper. This makes cleanup a breeze, trust me. Now, take your broccoli florets—rinse them off under cool water, but here is the crucial part: you must dry them thoroughly!
Use paper towels or a clean kitchen towel and pat every single floret dry. If the broccoli is wet, it steams instead of roasts, and we end up with mush. Oops! If you have any florets that are huge, chop them down just a bit so everything is roughly the same bite-size. Uniformity helps them cook evenly.
Seasoning and Arranging for Optimal Roasted Broccoli
Once dry, put all those beautiful florets right onto the lined baking sheet. Drizzle the 3 tablespoons of olive oil evenly over everything. Now, mince up about four cloves of garlic—make them small so they don’t burn too quickly—and scatter them over the top. Add your salt and pepper too. Grab your hands and toss everything right there on the pan until every piece of roasted broccoli looks shiny and coated. Don’t dump it all in a bowl first; tossing it on the pan saves dishes! 
The final arrangement step is vital for crispy results: spread the florets out into a single, even layer. They should not be touching or piled on top of each other. If you have too much broccoli for one pan, use two pans! Air needs to circulate around every piece for that char we love.
The Roasting Process and Finishing Touches
Slide that pan into the 425-degree oven. Set your timer for 12 minutes, but check them around 12 minutes in. You’re looking for stems that are tender when poked, but the edges should be dark brown, maybe even a little black—that’s the flavor! This usually takes between 12 and 15 minutes total.
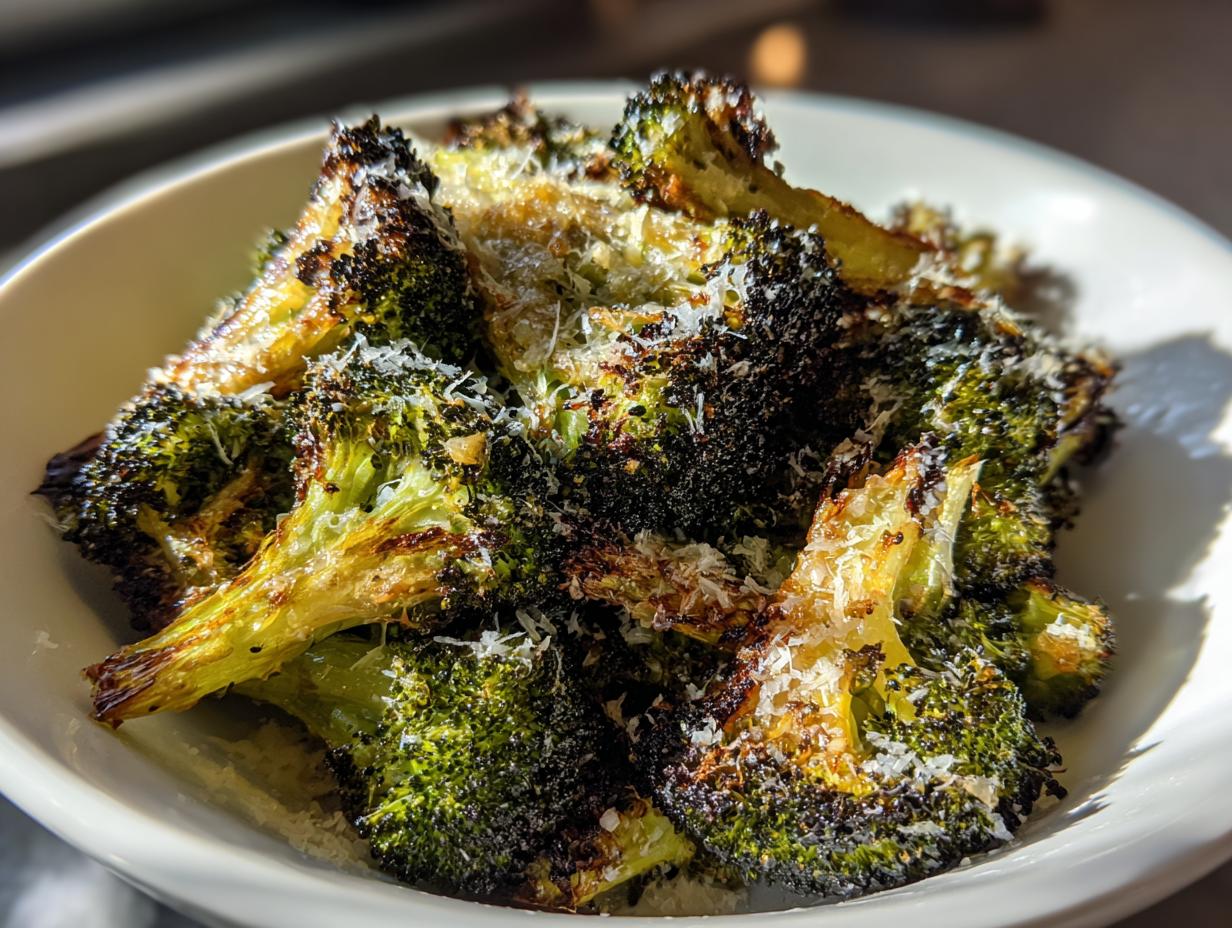
When they come out looking perfectly charred, immediately sprinkle that quarter cup of Parmesan cheese all over the hot vegetables. The residual heat melts it instantly. Then, take one medium lemon, cut it in half, and squeeze about two tablespoons of fresh juice right over the cheesy broccoli. Give it one quick, gentle toss right there on the hot pan to distribute that bright lemon flavor. Transfer it right away to a serving bowl. If you have any leftovers, get them into an airtight container within two hours! If you want to see how we use similar high-heat techniques for chicken, check out our crispy parmesan crusted chicken recipe.
Tips for Achieving Superior Roasted Broccoli Texture
If you want truly amazing roasted broccoli—the kind where the tips are almost crunchy—you have to respect the science of roasting. This isn’t just guesswork; it’s about heat transfer! My biggest lesson came from realizing that moisture is the number one enemy of crispiness. That’s why I insist you dry those florets like you mean it before they ever see the oven.
Secondly, give your broccoli space! If you pile the florets up or overcrowd the baking sheet, the steam gets trapped. Instead of roasting and charring, they end up steaming in their own moisture, turning soft and sad. Spreading them out in that single layer ensures every surface gets direct contact with the hot air. This allows the edges to caramelize beautifully, giving you that depth of flavor you just can’t get any other way. Skip these two steps, and you miss out on the best part of this roasted broccoli! For more vegetable tips, follow us on Pinterest.
Ingredient Notes and Simple Substitutions
I know sometimes you just don’t have what the recipe calls for, and that’s okay! This recipe is pretty flexible, but a couple of things shouldn’t change if you can help it. For example, I really push for fresh garlic because that jarred stuff tastes cooked before it even hits the pan, which ruins the sharp flavor we want here.
If you’re out of fresh lemon, a teaspoon of white wine vinegar can give you that necessary acidic brightness at the end, though the lemon is definitely superior. For the oil, extra virgin olive oil is best for the flavor it imparts, but if you’re worried about burning the garlic at high heat, you can swap half of it out for avocado oil, which has a higher smoke point.
As for the cheese, if you absolutely can’t find Parmesan, Pecorino Romano works wonderfully—it’s saltier, so maybe cut back the added kosher salt just a tiny bit. Please, though, avoid using pre-shredded cheese in the bag. It has anti-caking agents that stop it from melting into that beautiful, gooey layer we’re aiming for! If you are interested in other ways to prepare broccoli, see our crustless broccoli and cheese quiche.
Frequently Asked Questions About Roasted Broccoli
I get so many questions about this recipe, especially from people trying to get that perfect crunch. Here are the things I hear most often when people try making my crispy roasted broccoli!
Q1. How can I guarantee my roasted broccoli will be crispy and not soggy?
The absolute number one rule is drying the florets thoroughly after rinsing them! Seriously, pat them until they feel dry to the touch. Second, make sure you are using a hot oven—425 degrees F—and that you spread the broccoli out in a single layer on the baking sheet. No overcrowding allowed!
Q2. Can I roast other vegetables along with the broccoli?
You absolutely can, but you have to watch the timing! Harder vegetables like carrots or potatoes need a head start because they take longer to soften. If you’re roasting softer veggies like mushrooms or zucchini, add them halfway through the broccoli’s cooking time so they don’t turn to mush while the broccoli is getting charred.
Q3. My garlic burned before the broccoli was done. What did I do wrong?
That’s a classic rookie mistake! Minced garlic burns fast at 425 degrees. Next time, either mince the garlic much larger, or try tossing it with the oil and salt, but only add the minced garlic in the last five minutes of roasting. I prefer to add it at the very beginning, but I make sure my mince is coarse, not finely chopped.
Q4. Can I use frozen broccoli for this recipe?
Oh, honey, no. Frozen broccoli is already partially waterlogged, and it will turn to soup in the oven. This recipe relies entirely on the moisture coming off fresh florets. Stick to fresh for this garlic parmesan roasted broccoli! You can read more about our cooking philosophy on Medium.
Q5. How long will the leftovers of this roasted broccoli last in the fridge?
If you store them correctly in an airtight container, they are perfectly fine for about three days. They won’t be quite as crispy when you reheat them, but they still taste amazing! I usually just eat the leftovers cold the next day.
Storing and Reheating Your Roasted Broccoli
If you’re lucky enough to have any of this delicious roasted broccoli leftover—which rarely happens in my house!—storage is super easy. You must get them cooled down and into an airtight container within two hours of taking them out of the oven. They should stay fresh in the fridge for about three days. Don’t leave them sitting on the counter!
Reheating is the tricky part because you lose some of that fresh-off-the-pan crispness. Microwaving them is fast, but they will definitely soften up. For the best results, try to reheat them in a hot oven or an air fryer for just a few minutes to bring some of that heat back. Here’s a quick guide:
| Method | Time | Result |
|---|---|---|
| Airtight Container (Fridge) | Up to 3 days | Best flavor retention |
| Oven/Toaster Oven | 5 minutes at 375°F | Recrisps edges nicely |
| Microwave | 30-60 seconds | Fastest, but softest texture |
Sharing Your Experience with This Roasted Broccoli Recipe
Now that you’ve tried my secret method for achieving the crispiest roasted broccoli ever, I absolutely need to hear about it! Did you get those perfect charred tips? Did your family actually ask for seconds?
Baking and cooking is all about sharing what works, and your feedback helps other home cooks who might be nervous about high-heat roasting. If you made this garlic parmesan roasted broccoli, please leave a rating below—five stars if it blew your socks off! And if you have a substitution that worked brilliantly for you, drop it in the comments too. I love learning new tricks from all of you! You can also share your results on our Facebook page.
Print
Roasted broccoli: 1 trick for amazing char
- Total Time: 25 minutes
- Yield: 4 servings
- Diet: Vegetarian
Description
Crispy Garlic Parmesan Roasted Broccoli. Oven-charred broccoli florets finished with nutty parmesan cheese and fresh lemon. This side dish uses high heat to create crispy edges.
Ingredients
- 24 ounces fresh broccoli florets
- 3 tablespoons extra virgin olive oil
- 4 cloves garlic
- 0.5 teaspoon kosher salt
- 0.25 teaspoon black pepper
- 0.25 cup grated parmesan cheese
- 1 medium lemon
Instructions
- Preheat your oven to 425 degrees F and line a large rimmed baking sheet with parchment paper.
- Rinse the broccoli florets under cool water and dry them very thoroughly with paper towels.
- Cut any large florets into smaller, uniform bite-sized pieces.
- Spread the broccoli on the prepared baking sheet and drizzle evenly with the extra virgin olive oil.
- Mince the garlic cloves and scatter them over the vegetables along with the kosher salt and black pepper.
- Toss the broccoli directly on the pan until every piece is well coated in the oil and seasonings.
- Arrange the florets in a single layer with space between them.
- Bake for 12 to 15 minutes until the stems are tender and the edges are browned and charred.
- Remove the pan from the oven and immediately sprinkle the hot broccoli with the grated parmesan cheese.
- Cut the lemon in half and squeeze about two tablespoons of fresh juice over the dish.
- Toss lightly to distribute the cheese and lemon juice before transferring to a serving bowl.
- Refrigerate any leftovers in an airtight container within two hours of cooking.
Notes
- Drying the broccoli thoroughly helps ensure it roasts crisp.
- Arrange florets in a single layer for proper air circulation during baking.
- Refrigerate leftovers in an airtight container.
- Prep Time: 10 minutes
- Cook Time: 15 minutes
- Category: Side Dish
- Method: Roasting
- Cuisine: American