Okay, listen up, because these are my absolute favorite treats to make when spring rolls around! Forget those waxy, overly sweet store-bought candies. We are making real, honest-to-goodness homemade Peanut Butter Eggs, and they are going to change your life. For years, I struggled with holiday candy making—my chocolate always seized up, or the filling totally fell apart. It was a disaster! But once I cracked the code on these beauties, I never looked back.
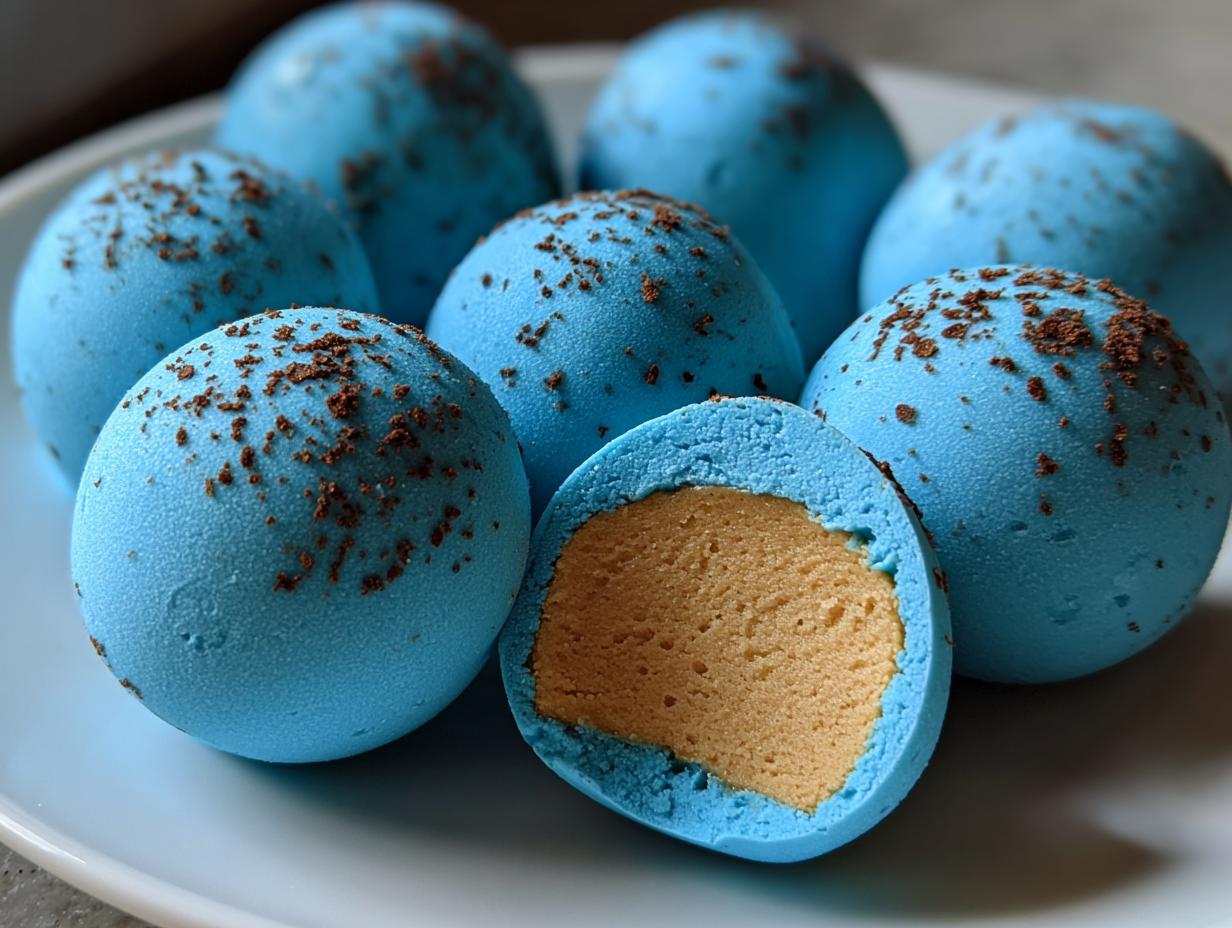
The magic here is twofold: you get this incredibly smooth, slightly maple-sweetened peanut butter center, and then we dip them in crisp white chocolate that we color that perfect, delicate robin egg blue. They look like they came from a fancy chocolatier, but honestly, they are so much easier than you think. Trust me, once you master these Peanut Butter Eggs, you’ll be making them way past Easter!

Why You Will Love These Peanut Butter Eggs
These homemade confections are a total winner for spring celebrations or just a Tuesday afternoon treat. Seriously, why wouldn’t you love them? They hit every mark for a perfect seasonal sweet.
- The flavor is just dreamy—that natural peanut butter cuts through the sweetness beautifully.
- They look absolutely stunning; that robin egg blue is show-stopping on any platter.
- They are surprisingly simple to make, even if you usually shy away from candy making.
- The texture contrast between the soft filling and the firm shell is addictive.
Quick Prep and No Oven Required
The best part? We aren’t turning the oven on, which is a huge plus when the weather starts warming up. You’ll spend maybe 45 minutes actively mixing and shaping, but most of that time is just chilling the centers so they don’t melt when you dip them.
Since these are no-bake, the active work time is really short. You mix, you roll, you freeze for a bit, and then you dip. That’s it! It’s the perfect recipe for an afternoon project that yields incredible results fast.
Essential Ingredients for Perfect Peanut Butter Eggs
Getting the right stuff is half the battle, especially when dealing with chocolate coatings. For these Peanut Butter Eggs to turn out perfectly—both creamy inside and crack-free outside—you can’t just grab whatever is closest in your pantry. I’ve listed everything out here, and I really want you to stick to the specifics, especially when it comes to the coloring and the peanut butter.
You’ll need the following for the filling and the coating:
- 1 1/4 cups creamy natural peanut butter
- 1/3 cup almond flour
- 1/4 cup powdered sugar
- 1/4 cup maple syrup
- 1/4 teaspoon fine sea salt
- 10 ounces white chocolate melting wafers
- 2 teaspoons coconut oil
- Oil based blue food coloring
- 1 teaspoon unsweetened cocoa powder
- 1/2 teaspoon warm water
Ingredient Breakdown and Clarity
Let’s talk about the ingredients that really make or break this recipe, because substitutions here can lead to sad, melty messes. First, you absolutely must use creamy natural peanut butter. The kind that separates? Perfect. It has less stabilizers, which keeps the filling smooth and malleable when you roll it.
When you get to the chocolate, you must use oil based blue food coloring. Water-based coloring will make your melted white chocolate seize up into a gritty paste, and nobody wants that! A few drops of oil-based dye incorporate beautifully. Also, don’t skip the maple syrup; it adds a beautiful, subtle earthy sweetness that plain sugar just can’t give you.
Finally, the almond flour acts as a binder, helping the filling hold its oval shape once it comes out of the freezer. It’s a small amount, but it does crucial work!
Necessary Equipment for Making Peanut Butter Eggs
Before you even mix your first ingredient, get your tools ready. Since we are working with melting chocolate and things that need to freeze solid, having everything laid out beforehand saves so much stress. Trust me on this one; trying to find a fork while your chocolate is getting too hot is never fun!
You’ll need these basics on hand:
- A large baking sheet lined with parchment paper—this is non-negotiable for easy cleanup and removal.
- A medium bowl for mixing that peanut butter filling.
- A microwave-safe bowl, preferably glass, for melting the white chocolate wafers.
- A fork or small whisk for stirring the chocolate, and maybe a rubber spatula.
- A small cup or ramekin to mix up that cocoa speckling liquid.
- Crucially, a clean pastry brush for the speckle flicking step!
Step-by-Step: How to Form and Coat Your Peanut Butter Eggs
Alright, this is where the fun really begins! Making these homemade Peanut Butter Eggs involves a few distinct phases: making the filling, freezing it solid, and then dipping it in that gorgeous blue shell. If you follow the timing here, you won’t have any issues with your filling melting the second it hits the warm chocolate. Patience is your best friend in this section.
First things first, line up that baking sheet with parchment paper. You need a clean, cool space for the eggs to firm up. Don’t skip this—it makes moving them later so much easier!
Preparing the Creamy Peanut Butter Filling
Grab your medium bowl and toss in the peanut butter, almond flour, powdered sugar, maple syrup, and salt. Mix it up! You are looking for a thick dough that just comes together. It might seem a little stiff at first, but keep mixing until it’s cohesive. Once it’s mixed, stop! Don’t overwork it.
Now, this is important: wash your hands really well before you start shaping. We are handling the food directly here. Scoop out about two tablespoons of the dough at a time. Roll it into a nice little ball between your clean palms, and then gently squeeze and flatten the sides until you get that classic, slightly plump oval egg shape. They don’t need to be perfect, that’s part of the charm!
Place all your finished ovals onto that parchment-lined tray. Now, we need them rock solid. Pop that tray into the freezer and set a timer for 30 minutes. This chilling time is vital; if they aren’t frozen, they will disintegrate when they get dipped.
Mastering the White Chocolate Coating for Peanut Butter Eggs
While those centers are freezing, let’s tackle the shell. In your microwave-safe bowl, combine the white chocolate wafers and the coconut oil. The oil helps thin the chocolate just slightly so it coats beautifully without being too thick.
Microwave this in short bursts—30 seconds at a time is perfect. After each 30 seconds, take it out and stir vigorously, even if it doesn’t look melted yet. You want to keep stirring until it’s completely smooth. White chocolate scorches easily, so short bursts and constant stirring are the secret to success with your white chocolate coating.
Once it’s silky smooth, it’s time for color! Add just a few drops of your oil-based blue food coloring. Stir slowly until you get that soft, lovely robin egg blue hue. If it looks too dark, add a tiny bit more white chocolate if you have any leftover, or just keep stirring until it lightens up.
Pull those firm Peanut Butter Eggs out of the freezer. Dip one egg at a time completely into the blue chocolate. Use a fork to lift it out, and then gently tap the fork against the side of the bowl. This tapping action lets the excess chocolate drip off, which is key to a thin, crisp shell.

The Final Decorative Touch
This step gives them that realistic, speckled look! In a tiny cup, mix that teaspoon of cocoa powder with the half teaspoon of warm water until it’s a thin, dark liquid—it should be runny, almost like dirty water. Don’t make it thick!
Take a clean pastry brush, dip just the very tips of the bristles into your cocoa mixture, and then hold the brush over the tray of dipped eggs. Flick your thumb against the bristles, aiming toward the eggs. This will spray tiny, natural-looking speckles all over the wet blue chocolate. It looks messy while you’re doing it, but it dries beautifully. Once speckled, let them sit at room temperature for about 10 minutes to set up before you move them!
Tips for Success Making Your Homemade Peanut Butter Eggs
Making these Peanut Butter Eggs is straightforward, but a few little tricks will really elevate them from good to spectacular. Don’t get discouraged if your first batch of speckled eggs looks a little odd; practice makes perfect with that flicking technique!
Here are my absolute must-know tips:
- Keep It Natural: Stick to the natural peanut butter. If you use the regular kind with added oils and sugars, your filling will be too soft and you’ll end up with melted puddles instead of firm ovals on your baking sheet.
- Oil-Based Coloring is Non-Negotiable: I cannot stress this enough. If you use liquid food coloring, that little bit of water content will cause your beautiful white chocolate to seize instantly. You need that oil-based dye for a smooth coating.
- Don’t Over-Dip: When you take the egg out of the chocolate, tap, tap, tap that fork! If you leave the egg sitting in the chocolate for too long or don’t drain the excess, you end up with thick, heavy shells that hide the creamy center.
- Speckle Timing: Make sure you flick the cocoa mixture onto the chocolate *while it is still wet*. If the chocolate has started to firm up, the speckles will just sit on top instead of embedding slightly into the coating.
Storing and Reheating Your Peanut Butter Eggs
These treats are best stored in the fridge because of that creamy peanut butter filling, but honestly, they taste best if you let them warm up just a little bit before eating. Letting them sit on the counter for about 15 minutes before serving takes the chill off the chocolate shell, making it melt perfectly in your mouth.
They keep really well, which is great because you usually make too many! Just make sure they are in an airtight container so they don’t pick up any weird smells from the fridge.
Storage and Shelf Life Table
| Storage Method | Duration | Reheating Advice |
|---|---|---|
| Airtight Container in Refrigerator | Up to 1 week | Serve Chilled (let sit at room temp for 15 mins) |
Frequently Asked Questions About Peanut Butter Eggs
I get so many questions every spring about these little gems! Most people worry about the chocolate or the filling consistency, which is totally understandable when you’re trying to get that perfect Peanut Butter Eggs look. Here are the top things folks ask.
Q1. Why did my white chocolate coating seize up when I added the blue coloring?
Oh, that’s the classic white chocolate coating issue! It almost always means you accidentally introduced water. You must use oil-based food coloring, not the liquid kind that comes in little dropper bottles. The water in liquid dye makes the cocoa butter in the chocolate contract immediately, turning it grainy.
Q2. Can I use regular Jif or Skippy peanut butter instead of natural?
You can, but I strongly advise against it if you want a firm filling. Standard peanut butters have added stabilizers and oils that make the filling much softer. When you try to dip those softer centers, they often break or melt into the coating, ruining the perfect oval shape of your robin egg candy.
Q3. How do I get those nice, dense speckles on the shell?
The speckles come from flicking a very thin cocoa/water mixture onto the *wet* chocolate. If your chocolate has started to set even a little bit, the speckles will just sit on top looking dusty. If your chocolate cools too fast, just pop the bowl back in the microwave for 10 seconds to loosen it up again before you start speckling!
Q4. Can I make these Peanut Butter Eggs ahead of time?
Yes! They are actually better made a day ahead so the flavors can meld. Just keep them covered in the fridge. They hold up wonderfully for about a week stored that way.
Share Your Beautiful Peanut Butter Eggs Creations
Well, that’s all there is to it! You’ve successfully made the most delicious homemade Peanut Butter Eggs. I truly hope you love pulling these out for your spring table.
I am dying to know how they turned out for you! Did the robin egg blue come out just right? Let me know in the comments below what you liked best about this recipe.
If you tried making them, please tell me how they looked! Happy Spring baking!
If you want to see more of my kitchen adventures, you can always follow along on Pinterest!
Print
Amazing 1 Peanut Butter Eggs Magic
- Total Time: 50 minutes
- Yield: 14 servings
- Diet: Vegetarian
Description
Make these festive robin egg blue treats with a creamy peanut butter filling and a crisp white chocolate shell for a delightful spring dessert. These homemade confections feature a smooth center made from natural peanut butter and maple syrup. The vibrantly colored chocolate coating and decorative cocoa speckles make them a charming addition to any seasonal gathering.
Ingredients
- 1 1/4 cups creamy natural peanut butter
- 1/3 cup almond flour
- 1/4 cup powdered sugar
- 1/4 cup maple syrup
- 1/4 teaspoon fine sea salt
- 10 ounces white chocolate melting wafers
- 2 teaspoons coconut oil
- Oil based blue food coloring
- 1 teaspoon unsweetened cocoa powder
- 1/2 teaspoon warm water
Instructions
- Line a large baking sheet with a piece of parchment paper.
- Mix the creamy peanut butter, almond flour, powdered sugar, maple syrup, and fine sea salt in a medium bowl until a cohesive dough forms.
- Wash hands thoroughly before rolling the peanut butter mixture into shapes.
- Scoop 2 tablespoons of the dough and roll it into a ball, then gently flatten and squeeze it into an oval egg shape.
- Place the shaped eggs onto the prepared baking sheet and freeze them for 30 minutes to firm up the filling.
- Stir the unsweetened cocoa powder and warm water together in a small cup to create a thin dark liquid for speckling.
- Combine the white chocolate wafers and coconut oil in a microwave-safe bowl.
- Microwave the chocolate in 30 second intervals, stirring vigorously between each heat cycle, until completely smooth and melted.
- Stir a few drops of oil based blue food coloring into the melted chocolate until you achieve a robin egg blue hue.
- Remove the eggs from the freezer and dip each one into the blue chocolate, tapping the fork against the bowl to remove excess coating before returning it to the baking sheet.
- Dip a clean pastry brush into the cocoa mixture and flick the bristles over the wet chocolate to create decorative speckles.
- Refrigerate the finished eggs for 10 minutes to fully set the coating before serving.
Notes
- Use natural peanut butter for the best filling consistency.
- Make sure the peanut butter mixture is firm enough to hold its shape before dipping.
- Use oil based food coloring for best results with white chocolate.
- Prep Time: 45 minutes
- Cook Time: 5 minutes
- Category: Dessert
- Method: No Bake/Chilling
- Cuisine: American