I used to stress myself sick trying to come up with fancy party drinks that required three different blenders and a chemistry degree to assemble. Honestly, I’d end up serving lukewarm sparkling water because I gave up halfway through! But then I discovered the absolute magic of the Green Sherbet Float, and let me tell you, it completely changed my hosting game. This isn’t just a drink; it’s a fizzy, creamy dessert that looks stunning but takes practically no effort.
This vibrant concoction is the perfect balance between a beverage and a dessert, making it ideal for everything from casual movie nights to big holiday gatherings where you need something eye-catching fast. The combination of lime sherbet, tropical punch, and that sharp lemon-lime fizz is just heaven. Seriously, if you want applause with minimal cleanup, you need this Green Sherbet Float in your life. It’s my secret weapon!

Gathering Your Components for the Green Sherbet Float
Okay, the beauty of the Green Sherbet Float is that you don’t need to cook anything at all! Zero ovens, zero fuss. But you do need to be organized, especially with the liquids. If your punch and soda are warm, you’ll end up with a lukewarm, flat mess instead of that beautiful, fizzy eruption we want.
Trust me on this one: everything liquid needs to be straight out of the fridge. I learned the hard way that lukewarm lemon-lime soda just doesn’t have the same aggressive fizz required to lift that sherbet properly. This whole process takes maybe five minutes once you have everything lined up. Let’s get those components ready!
Precise Ingredient List for the Green Sherbet Float
For the best result in your Green Sherbet Float, you need specific measurements. I always lay these out on a tray before I even think about scooping the ice cream. Notice how we have a mix of sweet, tart, and fizzy elements? That’s the key to the flavor profile.
Here’s exactly what you need for one spectacular float:
| Item | Amount |
|---|---|
| Lime Sherbet | 3 large scoops |
| Green Berry Fruit Punch (Chilled) | 1/2 cup |
| Pineapple Juice (Chilled) | 1/4 cup |
| Lemon-Lime Soda (Chilled) | 3/4 cup |
| Red Sanding Sugar | 2 tablespoons |
Equipment Needed for Making Your Float
You don’t need much fancy gear for this, thankfully! Grab one sturdy, tall glass—a highball or a parfait glass works best to show off those layers. You’ll also need a very small, shallow plate for dipping the rim in the sanding sugar. And of course, don’t forget that fun, striped straw for serving!
Tips for Success with Your Green Sherbet Float
If you want that perfect, towering Green Sherbet Float that looks amazing in photos, you have to respect the fizz! The absolute biggest mistake people make is adding the soda first. If you do that, the sherbet just melts into sad, flat milk, and you lose all that wonderful lift and foam. We want that bubbly mountain!
Another crucial tip is to keep everything cold. I mean, bone-chilling cold. The colder your fruit punch and soda are, the longer the sherbet holds its shape before the fizz takes over. Remember to always add the lemon-lime soda last, right before you hand it over to your eager guests. This maximizes that exciting, immediate eruption!
Ingredient Notes and Simple Substitutions
While my heart belongs to the classic lime version, this recipe is so adaptable. If you can’t find green berry punch, don’t panic! A great swap is using regular green lemonade mixed with just a drop or two of green food coloring. It gives you that beautiful hue without changing the flavor profile too much.
For the fizz, if you want a little kick, swap the lemon-lime soda for ginger ale—it adds a lovely spicy note against the sweet sherbet. And if you’re feeling extra zesty, mix two tablespoons of fresh lime juice right into the fruit punch and pineapple juice mix before pouring. It just brightens up the whole Green Sherbet Float experience. You can even use lemon or rainbow sherbet if you want a different color scheme!
Step-by-Step Instructions: Assembling the Green Sherbet Float
Alright, this is where the fun starts! You’ve got your chilled liquids and your beautiful sherbet ready to go. Remember, speed is your friend here, but precision is key when pouring so you don’t lose all that gorgeous carbonation. We are building this Green Sherbet Float in a very specific order to ensure maximum visual impact and perfect texture.
Don’t rush the layering—it’s what separates a good float from a *great* float. Have your garnish ready to go right next to your workstation because once that soda hits the sherbet, you need to move fast to get it into your guest’s hands before it melts too much.
Preparing the Glass Rim
First things first, we need that pop of color on the glass. Get your red sanding sugar ready on that shallow plate. You can dip the rim lightly in water, like the recipe says, but honestly, if you want that sugar to really stick, use a tiny bit of corn syrup instead of water. It’s stickier! Just gently swirl the very edge of your tall glass into the sugar until you get a nice, even band of red. Set that decorated glass aside.

Layering the Sherbet and Liquids
Now, grab your prepared glass. Carefully place three generous scoops of that bright lime sherbet right into the bottom. Don’t smash them down; we want them fluffy! Next, we introduce the flavor base. Slowly pour that chilled green berry fruit punch over the sherbet—watch how it starts to bubble slightly around the edges. Then, drizzle in your quarter cup of cold pineapple juice.
This next step is the most important for a truly spectacular Green Sherbet Float. Take your three-quarters cup of chilled lemon-lime soda. You must pour this slowly, aiming it right down the inside edge of the glass, avoiding the direct center of the sherbet mound. This gentle pour controls the foam. It’s going to fizz up beautifully! Let the whole thing sit for about 30 seconds—it needs this moment to settle and let the flavors marry.
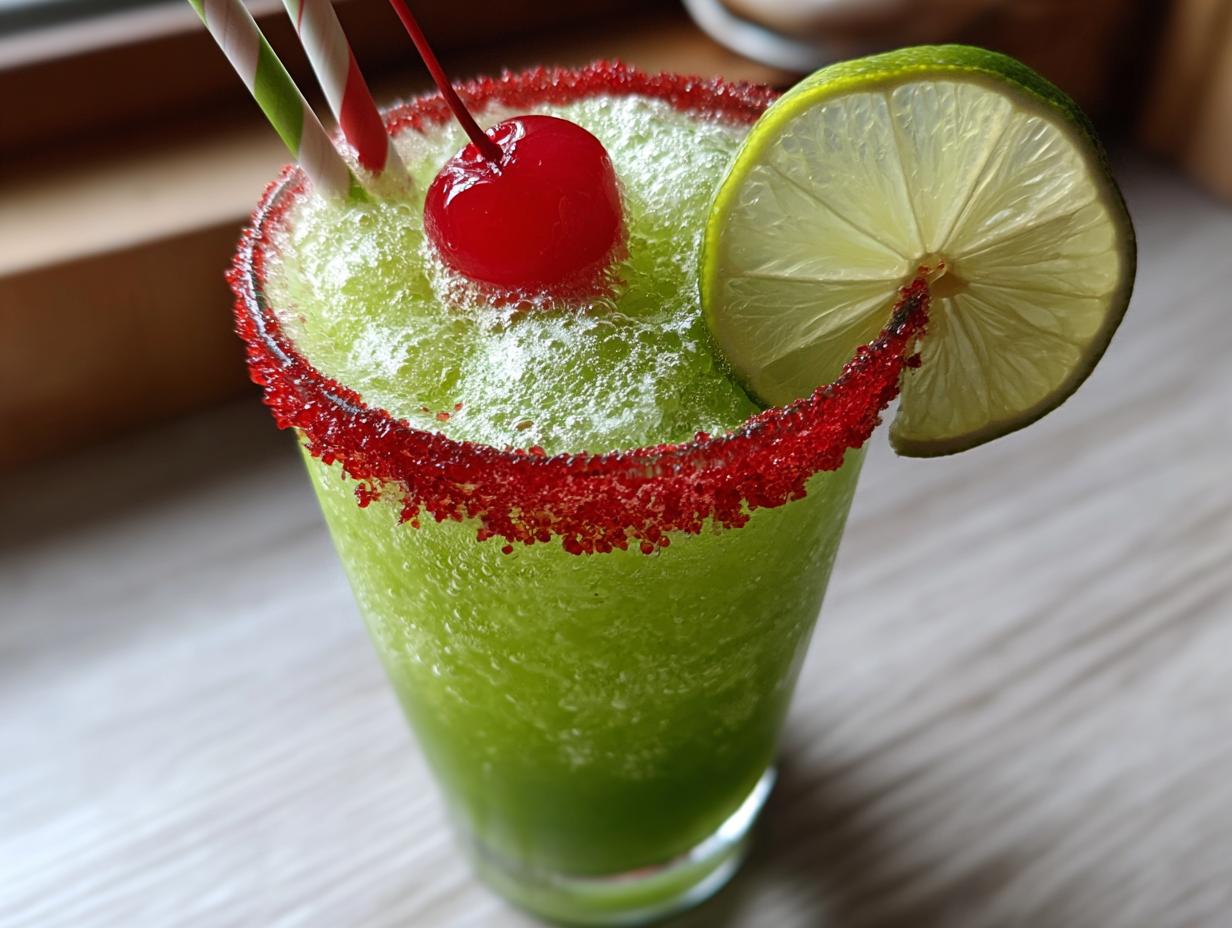
Finally, time for the decoration! Crown that fizzy mountain with your maraschino cherry, slip that fresh lime slice onto the rim, and slide in your striped straw. Serve this masterpiece immediately and enjoy the show!
Serving Suggestions for Your Green Sherbet Float
Since this Green Sherbet Float is already a creamy, sweet powerhouse, you really don’t need heavy sides. I like to keep things light and no-cook to match the ease of the drink itself. Think snacks that won’t compete with that vibrant lime flavor.
Try serving this alongside a bowl of plain, salted pretzel sticks—the saltiness is amazing against the sweet sherbet. Or, if you want a fruit element, some chilled, sliced starfruit or kiwi works beautifully. Keep it simple; this float is the star of the show! If you’re looking for other easy snack ideas, check out my quick snack recipes.
Storing Leftovers of the Green Sherbet Float
Look, the assembled Green Sherbet Float is a one-and-done deal. You absolutely have to drink it right away, or you end up with sweet, green soup. That fizz goes flat the second you look away!
However, you might have extra liquids left over! That’s fine. You can totally save the fruit punch mix for another day. Just make sure you seal those bottles tightly and keep them tucked away in the fridge. Here’s a quick guide for any components you haven’t used:
| Component | Storage Advice |
|---|---|
| Unused Liquids (Punch/Juice Mix) | Refrigerate up to 3 days. |
| Unused Soda | Transfer to a sealed container and refrigerate. |
| Assembled Float | Consume immediately! |
Frequently Asked Questions About the Green Sherbet Float
I get so many messages asking about tweaking this recipe, which is great! It shows you’re all getting excited to make your own Green Sherbet Float. Here are the top things people wonder about before they start mixing.
Q1. Can I make this ahead of time for a party?
You absolutely cannot assemble the whole thing ahead of time, or you’ll have flat, melted disappointment sitting on your counter! The best way to prep is to mix your fruit punch and pineapple juice together and keep that mixture refrigerated. Then, when guests arrive, you just scoop the cold sherbet and pour the chilled soda right over the top. That’s how you keep the fizz alive!
Q2. My float isn’t fizzy enough! What did I do wrong?
This is almost always because your soda wasn’t cold enough, or you poured it too fast. For the ultimate fizzy Lime Fizz Punch experience, make sure that lemon-lime soda is ice cold. Also, pour it slowly, down the side of the glass, not right onto the center of the sherbet mound. That controls the eruption and keeps the bubbles working longer.
Q3. I don’t like lime. What other sherbet flavors work?
Oh, you have options! If you want to keep that vibrant green color, you can try swapping the lime sherbet for a rainbow sherbet—you’ll get a cool swirl effect as it melts. Lemon sherbet works well too, though it will turn your drink a lighter yellow color. The key is keeping the liquids green for that beautiful look! If you enjoy easy, colorful recipes, you might like my guide on sprinkle pancakes.
Q4. How can I make this float sweeter or tangier?
If you want it tangier, try adding a splash of fresh lime juice right into your fruit punch mixture before you layer it, as I mentioned in the notes. If you want it sweeter, skip the pineapple juice and use a bit more of the sugary green berry punch instead, but be careful not to drown out that citrus! For more sweet and tangy ideas, check out my citrus burst rolls.
Share Your Green Sherbet Float Experience
I put my heart into sharing this recipe because I know how much it saved my sanity during busy party seasons. Now it’s your turn! Did you try the corn syrup trick for the rim? Did you swap the soda for ginger ale? I absolutely love hearing how you made this Green Sherbet Float your own. You can follow my latest recipe adventures on Facebook.
Please leave a rating below and tell me what you thought! Your feedback helps other folks decide to try this quick, fizzy treat. Happy mixing! You can also save this recipe for later on Pinterest.
Print
3 Amazing Green Sherbet Float Secrets
- Total Time: 5 minutes
- Yield: 1 large float
- Diet: N/A
Description
This vibrant green sherbet float combines lime sherbet with lemon-lime soda and tropical fruit punch for a fizzy, creamy treat perfect for winter parties and gatherings. It tastes like a cross between a drink and a dessert.
Ingredients
- 3 large scoops lime sherbet
- 1/2 cup green berry fruit punch, chilled
- 1/4 cup pineapple juice, chilled
- 3/4 cup lemon-lime soda, chilled
- 2 tablespoons red sanding sugar
- 1 maraschino cherry
- Fresh lime slice
- Striped straw
Instructions
- Prepare the glass rim by dipping it lightly in water, then immediately dip the rim into a shallow plate of red sanding sugar, rotating to coat evenly.
- Place three generous scoops of lime sherbet into the prepared tall glass.
- Pour the chilled green berry fruit punch slowly over the sherbet.
- Add the pineapple juice over the sherbet.
- Slowly pour the lemon-lime soda down the side of the glass, filling to about one inch from the rim.
- Allow the float to sit for 30 seconds.
- Garnish with a maraschino cherry, lime slice on the rim, and insert a striped straw for serving. Serve immediately.
Notes
- Replace lime sherbet with lemon sherbet or rainbow sherbet for different color variations.
- Use ginger ale instead of lemon-lime soda for a spicier fizz.
- Substitute orange juice for pineapple juice for a tangier taste.
- Add 2 tablespoons lime juice to the base for extra citrus brightness.
- Swap green fruit punch for prepared green lemonade mixed with green food coloring.
- Make a red version using raspberry sherbet and regular fruit punch.
- Chill all liquid ingredients thoroughly before assembly.
- Add the lemon-lime soda just before serving to preserve carbonation.
- Use corn syrup instead of water to rim the glass for a stickier surface.
- Pour the soda slowly down the inside edge of the glass to control foam buildup.
- Combine the green fruit punch and pineapple juice and refrigerate for up to 3 days if prepping ahead.
- Prep Time: 5 minutes
- Cook Time: 0 minutes
- Category: Beverage
- Method: No-cook
- Cuisine: American