Halloween Oreo Balls are seriously one of the easiest and most fun treats you can whip up for spooky season, and trust me, I know! Back when I first started NoobRecipes, I was always looking for ways to make holiday baking less intimidating, especially for folks like me who are just figuring things out in the kitchen. I remember trying to make these elaborate Halloween cookies one year and ending up with a sticky, floury mess! That’s why I fell in love with these Halloween Oreo Balls. They’re no-bake, super forgiving, and they look SO festive with just a little bit of sprinkle magic. You get all the Halloween fun without any of the baking stress!

Why You’ll Love These Halloween Oreo Balls
Honestly, these little guys are a total game-changer for Halloween. They’re so simple to make, which is exactly what my NoobRecipes philosophy is all about! You get all the festive flair without any of the stress. Seriously, if you’re new to baking or just short on time, you’re going to adore these. They’re a crowd-pleaser for sure!
- Quick and Easy No-Bake Preparation: Forget the oven! These take barely any time to mix and roll. It’s the perfect recipe when you want a homemade treat without the fuss. You can literally whip these up while the kids are getting their costumes ready.
- Perfectly Spooky and Fun Decorations: The best part? You can totally customize these! Just a sprinkle of Halloween-themed candy bits or some colorful sugar and BAM – instant spooky vibes. They look so cute all lined up, ready for trick-or-treaters or your Halloween party guests.
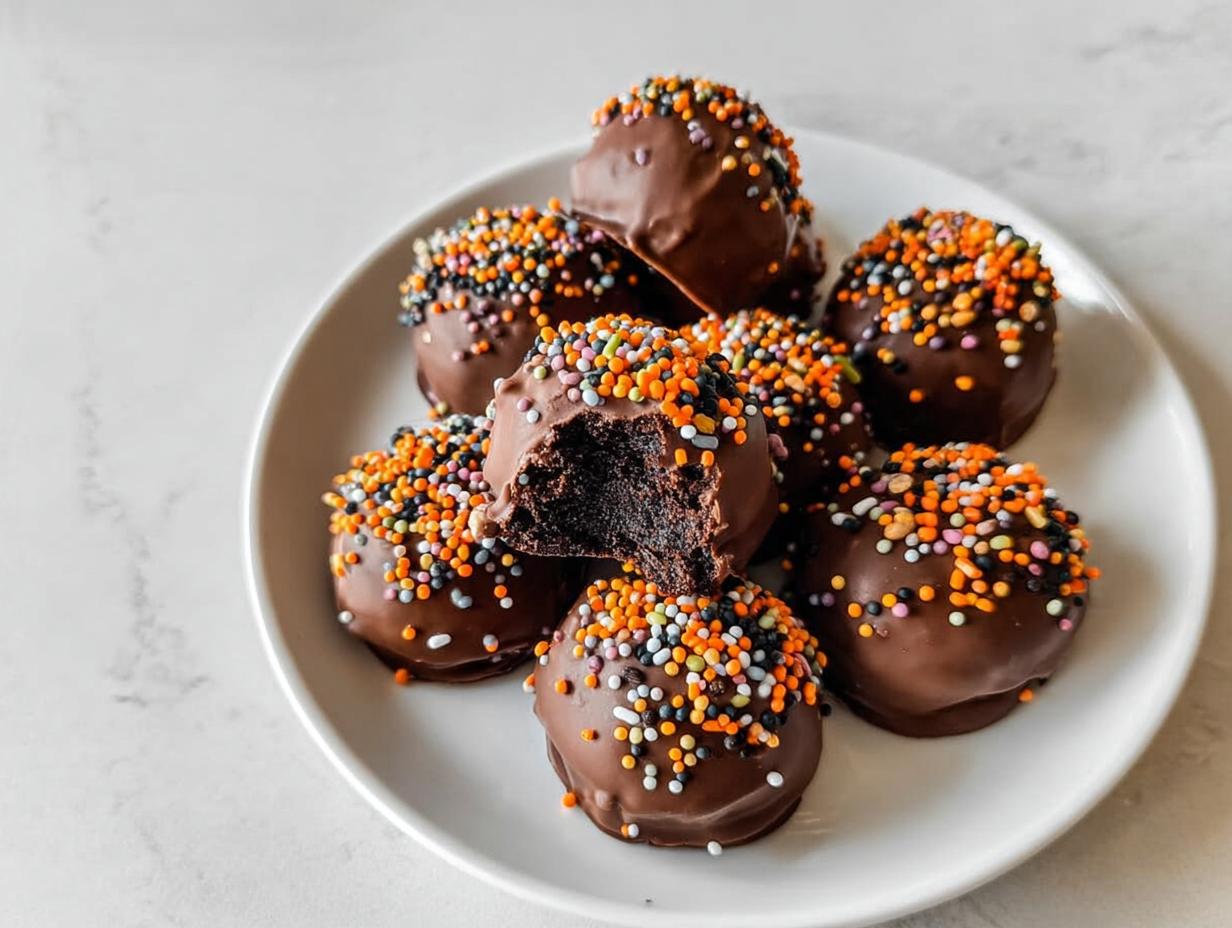
- Deliciously Creamy and Chocolatey Flavor: Inside that crisp chocolate shell is a dreamy, creamy center made from crushed Oreos and cream cheese. It’s that perfect sweet, rich flavor that just melts in your mouth. Plus, who doesn’t love chocolate-covered anything?
Halloween Oreo Balls Ingredients
Okay, so the magic behind these Halloween Oreo Balls? It’s all about keeping things super simple with just a few key players. You really don’t need much to create these little bites of spooky deliciousness. Make sure you grab good quality melting chocolate – it makes all the difference for that smooth, clean coating. And for the Oreos, regular ones are perfect, but feel free to get creative with seasonal Halloween Oreos if you can find them!
- 36 regular Oreo cookies, finely crushed
- 8 ounces cream cheese, softened
- 2 cups dark melting chocolate (or white/milk chocolate, whatever you prefer!)
- Assorted Halloween-themed sprinkles
How to Prepare Halloween Oreo Balls
Alright, let’s get these spooky little treats made! Don’t worry, this is the fun part and super straightforward. We’re talking minimal fuss, maximum deliciousness. Grab your apron, maybe put on some fun Halloween tunes, and let’s dive in!
Step 1: Prepare Your Base Mixture
First things first, we need to get our Oreo base ready. Take all 36 of your regular Oreo cookies and crush them up nice and fine. A food processor is your best friend here – just pulse until they’re like sand. If you don’t have one, no biggie! Just pop them into a zip-top bag and go to town with a rolling pin or even the bottom of a heavy pan. Once they’re crumbs, dump them into a medium bowl. Now, add in your 8 ounces of softened cream cheese. You want it soft enough to mash easily, but not melted. Mix it all together until it forms a thick, dough-like consistency. It should hold together when you squeeze it. If it seems a little too crumbly, add another tablespoon of cream cheese; if it’s too sticky, a few more Oreo crumbs can help. Just keep mixing until it’s uniform.
Step 2: Shape and Chill Your Halloween Oreo Balls
Now for the rolling! Grab a baking sheet and line it with wax or parchment paper. This is super important so they don’t stick. Take about a tablespoon of the Oreo mixture and roll it between your palms to form a ball, about 1 inch in size. Try to make them all about the same size so they freeze and melt evenly. You should get around 40 to 42 balls from this batch. Once they’re all rolled, carefully place them onto your prepared baking sheet. Pop this whole sheet into the freezer for about 10 to 15 minutes. This chilling step is key – it makes them firm enough to hold their shape when you dip them in the chocolate. Don’t skip it!
Step 3: Melt Chocolate and Coat the Balls
While those little guys are chilling, it’s time to melt your chocolate. You can do this in the microwave or a double boiler. If you’re microwaving, use a microwave-safe bowl and heat the chocolate in 30-second intervals, stirring really well after each one. Be patient, and don’t let it get too hot or it’ll seize up! Once it’s smooth and melted, you’re ready. Take your chilled Oreo balls out of the freezer. Using a fork or a toothpick, carefully dip each ball into the melted chocolate, making sure it’s completely covered. Let any excess chocolate drip back into the bowl for a cleaner coat. Place the chocolate-covered ball back onto the wax paper-lined baking sheet.

Step 4: Decorate and Set Your Treats
This is where the Halloween magic really happens! As soon as you place a chocolate-covered ball back on the wax paper, immediately sprinkle the top with your chosen Halloween sprinkles. Work quickly, because the chocolate starts to set pretty fast, especially on the cold balls. Once all your balls are dipped and decorated, let them sit at room temperature until the chocolate is completely firm and set. This usually takes about 30 minutes to an hour, depending on your kitchen’s temperature. Once they’re solid, you can carefully transfer them to an airtight container. Pop them in the fridge to keep them nice and firm until you’re ready to gobble them up!
Tips for Perfect Halloween Oreo Balls
These Halloween Oreo Balls are super forgiving, but a few little tricks can make them absolutely perfect every single time. I learned these by making a few batches myself (tough job, right?), and they really do make a difference, especially if you’re just getting started. Don’t stress if they aren’t perfect the first go, they’ll still taste amazing!
Achieving the Right Dough Consistency
The key to getting that perfect dough consistency is all about the cream cheese. Make sure it’s truly softened – sitting out for about an hour at room temperature should do the trick. You want it soft enough to mash easily with a fork but not so warm that it’s liquid. When you mix it with the finely crushed Oreos, you’re looking for a texture that holds together when you squeeze it, almost like play-doh. If it’s too crumbly and won’t stick, add another teaspoon or two of cream cheese. If it’s too sticky and messy, just add a tablespoon or two more of finely crushed Oreos. It should be easy to roll into balls without sticking too much to your hands.
Smooth Chocolate Coating Every Time
Melting chocolate can be a bit tricky, but here’s how to get it smooth and perfect. If you’re using a microwave, use a microwave-safe bowl and heat it in short bursts – like 20-30 seconds – stirring really well in between. This prevents it from getting too hot and seizing up. You want it smooth and glossy. When you dip your chilled Oreo balls, a fork works great for holding them, but a toothpick can be easier for getting into smaller crevices. Don’t forget to let the excess chocolate drip back into the bowl before placing them on the wax paper. This gives you a nice, even coating without too much thickness. For more tips on chocolate tempering, check out this guide to tempering chocolate.
Creative Decoration Ideas
This is where you can really have some Halloween fun! Besides classic Halloween sprinkles, think about using edible googly eyes pressed into the wet chocolate, or even drizzling contrasting colored chocolate (like white chocolate over dark, or vice versa) over the dipped balls for a spooky swirl. You can also tint white melting chocolate with a tiny bit of oil-based food coloring for some really vibrant Halloween colors. If you’re feeling super fancy, use a piping bag with a very fine tip and draw little spiderwebs or ghosts on them once the base chocolate has set. The possibilities are endless, and the kids absolutely love helping with this part!
Halloween Oreo Balls Frequently Asked Questions (FAQ)
Got questions about these spooky little treats? I’ve got you covered! These Halloween Oreo Balls are pretty straightforward, but it’s always good to have a few common queries answered. Here are some things folks often ask:
Can I use different types of Oreos for Halloween Oreo Balls?
Absolutely! While the classic Oreo is fantastic, feel free to get creative. Limited edition Halloween Oreos are perfect for adding an extra festive touch. Golden Oreos, red velvet Oreos, or even mint Oreos can also work, though they might change the color and flavor slightly. Just make sure to crush them up really well, just like the regular ones, for the best texture!
How long do these Halloween Oreo Balls last?
These chocolate-covered Oreo balls are best enjoyed fresh, but they do keep pretty well! Stored properly in the refrigerator, they should stay delicious for about 1 to 2 weeks. The chocolate coating helps to keep them from drying out, and the cream cheese stays safe in the chilly environment.
Can I make Halloween Oreo Balls ahead of time?
Yes, you totally can! These are actually a fantastic make-ahead treat. You can prepare them a few days in advance, up to about a week before you plan to serve them. Just make sure they are fully set and then store them in an airtight container in the refrigerator. They might even taste better after a day or two as the flavors meld together!
What’s the best way to store leftover Halloween Oreo Balls?
The best way to store any leftovers is in an airtight container. I like to place a piece of wax paper or parchment paper between layers if I’m stacking them to prevent them from sticking together. Keep the container in the refrigerator. This helps maintain their shape and keeps that chocolate coating nice and firm. They’re perfect for grabbing as a quick snack!
Halloween Oreo Balls Nutritional Information
Just a heads-up, the nutritional info below is an estimate for one Halloween Oreo Ball. Since we’re using different types of chocolate and sprinkles, and everyone’s portion size might vary slightly, your exact numbers could be a little different. But this gives you a good idea of what you’re working with!
| Serving Size | 1 ball |
| Calories | 150 |
| Total Fat | 8g |
| Saturated Fat | 5g |
| Unsaturated Fat | 3g |
| Trans Fat | 0g |
| Cholesterol | 10mg |
| Sodium | 50mg |
| Total Carbohydrates | 18g |
| Dietary Fiber | 1g |
| Total Sugars | 15g |
| Protein | 2g |
Storing and Reheating Halloween Oreo Balls
These festive little treats are best enjoyed fresh, but they store like a dream, which is perfect for making ahead! Since they’re no-bake and coated in chocolate, keeping them cool is the name of the game. You don’t really need to reheat them, as they’re meant to be enjoyed chilled or at room temp, but here’s the lowdown on keeping them perfect:
| Storage Method | Airtight container in the refrigerator |
| Shelf Life | 1-2 weeks |
| Reheating | Not necessary; enjoy chilled or at room temperature |
Just pop them into your fridge in a sealed container, and they’ll be ready for snacking whenever a craving strikes. If they’ve been in the fridge for a while, letting them sit out for about 10-15 minutes before serving can take the chill off and make them extra creamy!
Share Your Halloween Oreo Balls Creations!
I would absolutely LOVE to see your spooky Halloween Oreo Balls! Did you try any fun sprinkle combos? Did the kids help out? Drop a comment below and tell me all about it, or even better, share a pic on social media and tag me! Your creations inspire me (and everyone else!) to get in the kitchen and have some fun. Don’t forget to leave a rating if you loved them! For more fun no-bake treats, check out these no-bake energy balls.
Print
Halloween Oreo Balls: 100 Easy Spooky Treats
- Total Time: 30 minutes (plus setting time)
- Yield: 40-42 balls
- Diet: Vegetarian
Description
These Halloween Oreo Balls are a simple, no-bake treat perfect for beginners. They’re fun to make and decorate for the spooky season.
Ingredients
- 36 regular Oreo cookies
- 8 oz softened cream cheese
- 2 cups melting chocolate (dark, white, or milk)
- Sprinkles
Instructions
- Line a baking sheet with wax paper.
- Crush the Oreo cookies into fine crumbs using a food processor or a rolling pin in a zip-top bag.
- Add the softened cream cheese to the crushed Oreos and pulse until combined and the mixture forms a dough.
- Roll the mixture into 40-42 balls, about 1 inch in size. Place them on the prepared baking sheet.
- Freeze the Oreo balls for 10-15 minutes.
- While the balls are freezing, melt the chocolate.
- Remove the Oreo balls from the freezer. Dip each ball into the melted chocolate, ensuring it’s fully coated.
- Place the chocolate-coated balls back onto the wax paper. Immediately sprinkle the tops with your chosen sprinkles.
- Allow the balls to set completely.
- Store the finished Oreo balls in an airtight container in the refrigerator.
Notes
- Ensure the cream cheese is softened for easy mixing. Only a few pulses are needed.
- If you don’t have a food processor, mix the Oreo crumbs and cream cheese by hand in a bowl.
- Prep Time: 20 minutes
- Cook Time: 5 minutes (for melting chocolate)
- Category: Desserts
- Method: No-Bake
- Cuisine: American