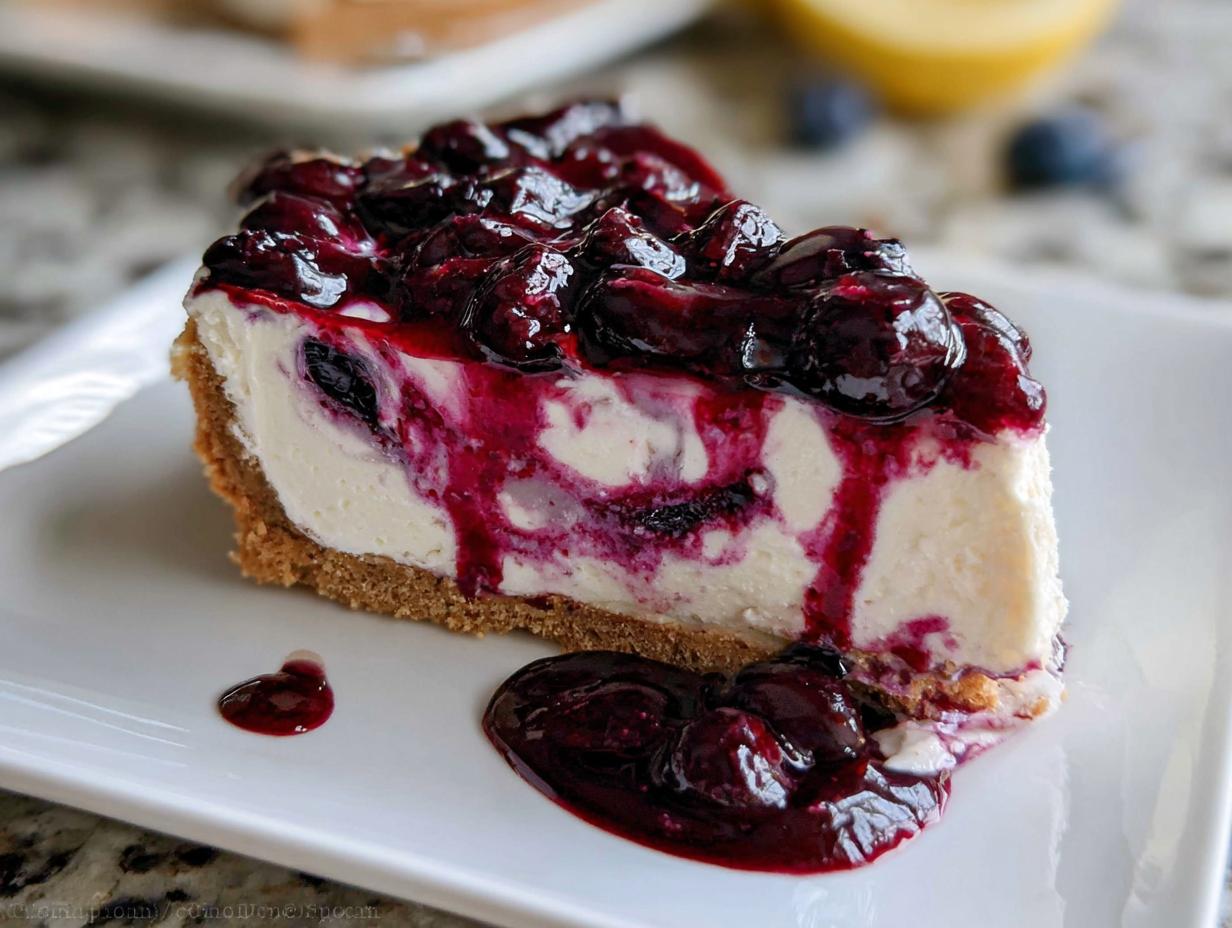
Oh my gosh, you HAVE to make this dessert! Seriously, forget turning on your oven when it’s blazing hot outside. This No Bake Blueberry Cheesecake With Creamy Filling is my absolute go-to when I need something stunning but can’t handle the stress of baking. When I first started cooking seriously, anything involving gelatin or baking times stressed me out completely!
But this? This is pure magic with zero fuss. I’ve made this recipe so many times now—for potlucks, last-minute birthdays, even just because it’s Tuesday—that I practically know the measurements by heart. The secret is that incredibly dreamy, light texture you get just from whipping the cream, and that gorgeous, tart blueberry swirl cutting through the richness.
If you’ve ever felt intimidated by cheesecake, this is your victory lap. It’s easy, it’s foolproof, and it tastes like a dream. Trust me, you’re going to want to keep this one in your back pocket!

Why You Will Love This No Bake Blueberry Cheesecake With Creamy Filling
This dessert is a lifesaver when summer hits, and honestly, it’s perfect any time of year. It looks fancy, but it’s so simple to put together. You get all the rich flavor without any of the oven drama.
- The prep work is unbelievably fast—less than 30 minutes start to finish!
- It’s the ultimate make-ahead dessert; just let it chill.
- The texture is light and airy, not heavy like baked versions.
- That swirl of homemade blueberry sauce makes this No Bake Blueberry Cheesecake With Creamy Filling unforgettable!
Essential Equipment for Your No Bake Blueberry Cheesecake With Creamy Filling
You don’t need a ton of fancy gadgets for this, which is part of why I love it so much. Just make sure you have the basics ready to go before you start mixing.
You absolutely need a 9-inch springform pan. That’s non-negotiable because you can’t flip this delicate beauty out of a regular cake pan! A good electric mixer, whether it’s a handheld or stand mixer, makes whipping the cream so much easier. And for that sauce, just grab a small saucepan. That’s it!
Gathering Ingredients for No Bake Blueberry Cheesecake With Creamy Filling
Okay, let’s talk about what you need. Since this is a no-bake recipe, the quality of your components really shines through. Don’t skimp on the cream cheese—it has to be fully softened, or you’ll end up with lumps, and nobody wants a lumpy No Bake Blueberry Cheesecake With Creamy Filling! I always lay out my dairy ingredients about an hour before I start mixing.
We’re breaking this down into three main parts: the base, the gorgeous topping, and the filling that makes this dessert famous.
Crust Components
For the bottom layer, it’s super straightforward. You need about one and three-quarter cups of graham cracker crumbs. Make sure they are fine, almost like sand. We mix that with just a tablespoon of sugar for a tiny bit of sweetness and then bind it all together with 8 tablespoons of melted unsalted butter. That simple mix is what holds everything up!
Fresh Blueberry Sauce Ingredients
This sauce is where you get that lovely tart contrast. We’re using 4 cups of blueberries—fresh or frozen works, no fuss there! The trick to getting it thick and syrupy without cooking forever is the cornstarch. We dissolve 1 tablespoon of cornstarch in a little water first, along with some sugar and fresh lemon juice. Whisking that slurry in is what makes the sauce coat the berries perfectly.
The Creamy Cheesecake Filling
This is the star of the show for our No Bake Blueberry Cheesecake With Creamy Filling. You need a full 16 ounces of full-fat cream cheese, and I mean *softened*—leave it out! We sweeten it with sugar, add a little tang from sour cream and lemon juice, and then the true secret to lightness: 1 cup of very cold heavy whipping cream whipped to stiff peaks. That whipped cream is what keeps the filling from being dense.
Step-by-Step Guide to Making No Bake Blueberry Cheesecake With Creamy Filling
Alright, let’s get down to business. This process is so satisfying because you see results so quickly! Just follow these steps closely, and you’ll have the most beautiful, stable No Bake Blueberry Cheesecake With Creamy Filling ready in no time.
Preparing the Graham Cracker Crust
First things first, get that 9-inch springform pan ready. I always line the bottom with parchment paper—it’s like an insurance policy against sticking, even though the butter helps a ton. Now, mix up those crumbs, sugar, and melted butter in a bowl. You want it to look like damp sand; when you squeeze a handful, it should hold its shape. Don’t be shy when pressing this into the pan!
Use the bottom of a flat measuring cup or just your fingers to really pack it down firmly along the bottom and slightly up the sides. This is your foundation, so it needs to be solid! Once it’s tight, pop that pan right into the refrigerator to chill for a solid 30 minutes while you tackle the sauce. That chilling time helps it set up before the filling goes on.
Creating the Blueberry Swirl Sauce
Time for our vibrant topping! Grab a saucepan and whisk together your water, lemon juice, sugar, and that cornstarch until it’s completely smooth—no lumps allowed! Turn the heat to medium. Once it starts to warm up, whisk constantly until it looks clear and smooth before you add those beautiful blueberries.
Once the berries are in, stir gently, maybe 5 or 6 minutes. You’ll see the sauce thicken up and start clinging to the berries, becoming syrupy. That’s exactly what we want! Take it off the heat immediately so the berries don’t break down too much. This is critical: you must let this blueberry sauce cool completely before you use it. If it’s warm, it will melt your lovely creamy filling!
Assembling the Creamy Filling
This is where the texture comes together for our No Bake Blueberry Cheesecake With Creamy Filling. In a large bowl, use your mixer to beat the softened cream cheese and sugar for a good three minutes. You need it light and fluffy, completely smooth—scrape down the sides often! Then, beat in the sour cream and lemon juice until everything is perfectly incorporated.
Now, the magic step! In a separate, clean bowl, whip that cold heavy cream until you have stiff, glorious peaks. You should be able to lift the whisk out, and the cream stands straight up. Gently, gently fold that whipped cream into the cream cheese base. Use a spatula and cut down the middle, sweeping up the sides. Don’t overmix, or you’ll deflate all that air you just whipped in!
Layering and Setting the No Bake Cheesecake
Time to layer! Take your chilled crust out. Spread exactly half of that beautiful, airy filling evenly over the crust. Next, take about a quarter of your cooled blueberry sauce and drop spoonfuls randomly over the filling. Take a knife or a skewer and lightly swirl it—just a couple of figure-eights are enough; we don’t want to mix it completely!
Top that with the remaining filling and smooth the top surface. Then, spoon another quarter of the sauce on top and swirl that lightly too. Cover the whole thing with plastic wrap—make sure it doesn’t touch the surface—and put it in the fridge. Seriously, you have to let it chill for a minimum of 6 hours, but overnight is even better. This ensures your No Bake Blueberry Cheesecake With Creamy Filling sets up cleanly so you get those perfect slices.

Tips for Perfect No Bake Blueberry Cheesecake With Creamy Filling Success
Even though this is a no-bake recipe, there are a few sneaky spots where things can go wrong if you rush them. I learned these the hard way over years of trying to get that perfect slice! Following these little tricks ensures your No Bake Blueberry Cheesecake With Creamy Filling is stable and tastes exactly like it should.
Ingredient Temperature Matters
This is probably the most important tip for the filling. Your cream cheese absolutely must be softened to room temperature. If it’s cold, you’ll beat it forever and still end up with little lumps, and that ruins the whole smooth experience. However, the heavy whipping cream? That needs to be ice cold. If it’s not cold, it won’t whip up to stiff peaks, and if you don’t get stiff peaks, your filling will be runny sludge instead of firm, creamy goodness.
Also, remember the blueberry sauce! I mentioned it before, but I’m saying it again because it’s that important: Cool that sauce completely. A warm sauce hitting a cold filling is a recipe for a melted mess.
Achieving the Perfect Swirl
When you swirl the sauce into the filling, less is definitely more. People tend to over-swirl because they want tons of blue everywhere, but when you do that, you just muddy the color and start incorporating too much liquid back into the filling.
My technique is to drop spoonfuls of the sauce onto the layer, then take a butter knife or a thin wooden skewer and gently drag it through the sauce just once or twice across the surface. You want distinct ribbons of blue against the white. If you’re using a large pan, you might want to swirl in a figure-eight pattern, but keep the movement shallow. This keeps the structure of your No Bake Blueberry Cheesecake With Creamy Filling intact while giving you that beautiful marbled look.
Storing and Serving Your Cheesecake
Once you’ve managed to get this gorgeous dessert into the fridge for its long nap, you need to know how to keep it perfect and how to present it like the showstopper it is! Since this is a no-bake recipe, storage is a little different than a traditional baked cake.
Storage and Shelf Life
Because we aren’t using eggs or baking agents that stabilize the structure, keeping this cheesecake cold is key. Once it has set up after those 6 hours (or overnight!), keep it covered tightly in the springform pan, or carefully transfer it to an airtight container. It stays wonderfully fresh in the refrigerator for up to four days.
If you need to store it longer—say, you made it for a party next week—you can freeze it! Just make sure you wrap it very securely first, maybe in a layer of plastic wrap followed by foil. It freezes beautifully for about a month. When you want to eat it, make sure you let it thaw slowly in the refrigerator overnight. Don’t try to rush the thaw on the counter, or the texture can get a little watery.
Serving Suggestions
When it’s time to serve, run a thin, sharp knife around the edge of the pan before releasing the springform ring. I like to use a hot, clean knife for slicing; just dip the knife in hot water and wipe it dry between each cut. This gives you those professional, clean slices that show off the swirl perfectly.
We always serve ours with the remaining blueberry sauce drizzled right on top. But if you want to get fancy, try adding a dollop of fresh, unsweetened whipped cream on the side. A few fresh mint leaves, tucked next to the slice, look incredibly vibrant against the deep blue and white. It really elevates the presentation!
Addressing Common Questions About No Bake Blueberry Cheesecake With Creamy Filling
I get so many questions when people try this recipe for the first time, which tells me how popular this No Bake Blueberry Cheesecake With Creamy Filling is! It’s great that everyone wants to make it, but sometimes those little recipe details trip people up. Here are the things I hear most often when folks are making it.
Q1. Can I use store-bought blueberry jam instead of making the sauce?
You certainly can try! If you use jam, you can skip cooking steps 5 and 6 entirely, which saves you about 15 minutes. However, jam is usually much sweeter and thicker than my homemade sauce. If you use jam, I’d suggest stirring in a teaspoon of lemon juice to brighten the flavor and maybe thinning it slightly with a tablespoon of water so it swirls nicely into the filling. You still need that sauce to be cool, though!
Q2. What happens if my cheesecake doesn’t set up properly?
Oh, that’s the worst! Usually, it means one of two things happened: either your heavy cream wasn’t cold enough and didn’t whip to stiff peaks, or you didn’t chill it long enough. If it’s just a little soft, put it back in the fridge for another 2 to 4 hours. If it’s really soupy, you might need to gently fold in a tablespoon of instant vanilla pudding mix next time to help stabilize it, but honestly, the best fix is always chilling time for this No Bake Blueberry Cheesecake With Creamy Filling.
Q3. Can I swap the blueberries for strawberries or raspberries?
Absolutely! This recipe is super adaptable. Berries like strawberries or raspberries are a little softer than blueberries, so they release more liquid when cooked. When you make the sauce, you might need to add an extra half-teaspoon of cornstarch to the slurry to make sure it thickens up just as well. The lemon juice is key with any berry to keep that bright, tangy flavor!
Q4. My graham cracker crust seems crumbly when I slice it. What did I do wrong?
That means you didn’t pack it down firmly enough! When you press the crust into the pan, you need to use the flat bottom of a glass or measuring cup and really press hard until the crumbs lock together. If you just use your fingers, it often stays too loose. Remember, that crust has to hold up the entire creamy filling!
Nutritional Estimates for This Dessert
I always feel a little guilty looking at the numbers after eating this delicious thing, but hey, it’s a dessert, right? I had to look up the general estimates for a slice of this since we aren’t whipping up lab tests in my kitchen! These numbers are based on the ingredients listed above, but remember, this is just an estimate—your portion sizes and exact ingredients will change things slightly.
Don’t stress too much about the details; just enjoy the fact that it’s easier to make than a traditional cheesecake!
| Component | Estimate |
|---|---|
| Serving Size | 1 serving |
| Calories | 350 |
| Fat | 25 g |
| Carbohydrates | 29 g |
| Protein | 4 g |
Please note: These nutritional values are rough estimates based on standard ingredient databases. Since this is a homemade recipe, actual values may vary slightly depending on the specific brands and amounts used.
Share Your Delicious Creation
I really hope you get a chance to whip up this No Bake Blueberry Cheesecake soon! It’s one of those recipes that just makes you feel like a baking superstar without breaking a sweat. I get so much joy knowing you’re enjoying a slice of creamy, tangy perfection.
When you make it, I would absolutely love to hear what you think! Did the swirl turn out just how you pictured it? Did you manage to wait the full six hours before digging in (I never do!)? Please leave a comment down below telling me how it went. If you snap a picture of your finished cheesecake, tag me on social media! Seeing your beautiful creations is the best part of sharing these recipes with you all. You can also find more of our culinary adventures on Facebook.
Don’t forget to rate this recipe with stars right below this section if you loved it. Happy chilling, everyone!