You know those days when you just need a treat, but the idea of turning on the oven feels like too much work? Me too! That’s why I’m completely obsessed with these simple, no-fuss Chocolate Taco Treats. Seriously, they are my go-to dessert when I need something fast, fun, and utterly delicious.
I first whipped these up years ago when a huge batch of friends unexpectedly dropped by, and I had zero time. They looked so impressive, but the secret is that they are barely more than three ingredients and no actual baking is involved! This recipe proves you don’t need fancy skills or hours in the kitchen to make something that tastes like you spent all afternoon on it.
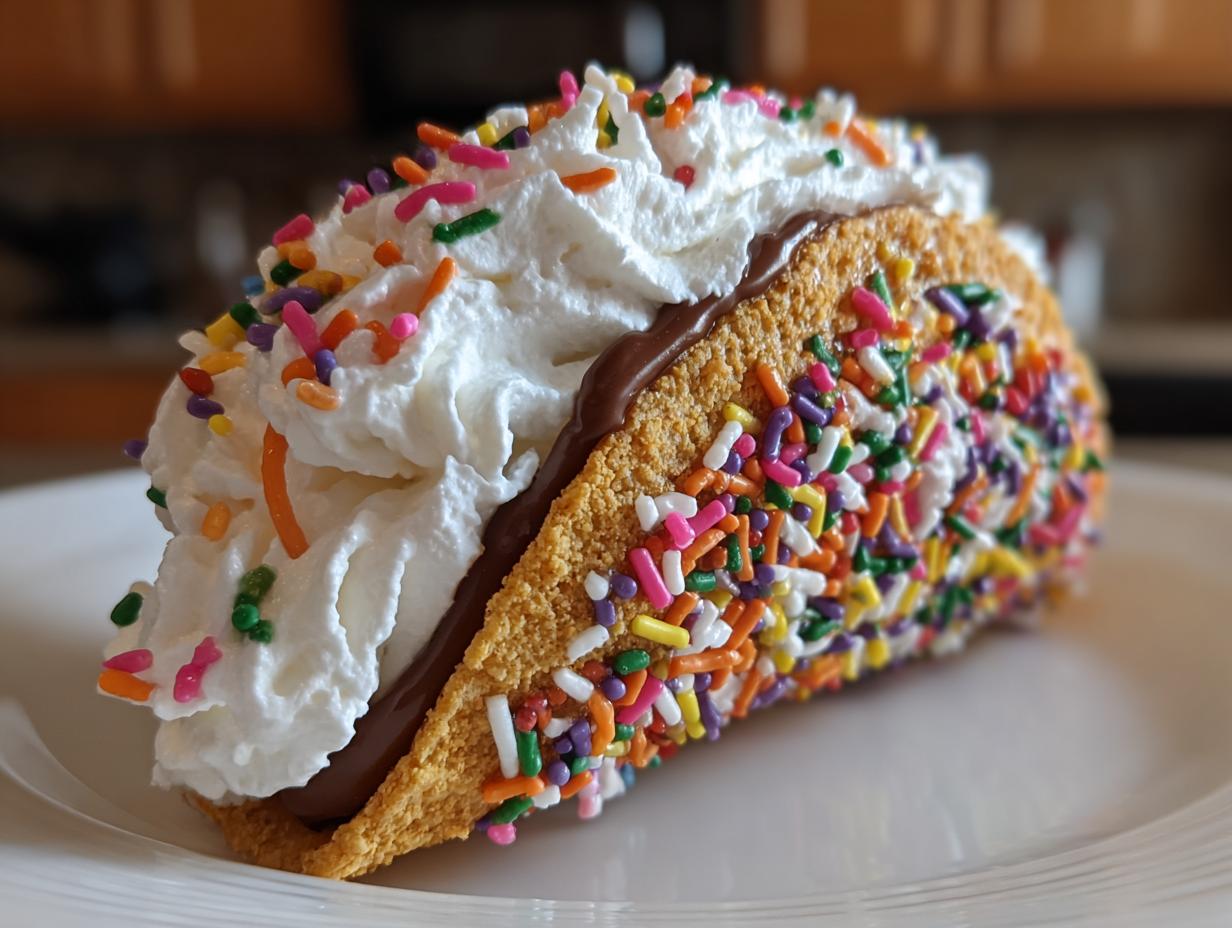
If you are new to cooking or just tired of complicated recipes, trust me on this one. We are talking about crisp taco shells dipped in rich, melted chocolate, chilled until firm, and then filled with fluffy cream. It’s pure magic, and I promise you’ll want to make these Chocolate Taco Treats every week!

Gathering Your Chocolate Taco Treats Ingredients
Okay, so the best part about this recipe is how short the list is! You probably have most of this stuff hanging out in your pantry already. Don’t stress about finding exotic items; we are keeping this super simple. This is the foundation for the easiest, quickest dessert you’ll ever assemble. When you get everything together, you’ll see just how few steps are involved in making these amazing Chocolate Taco Treats.
Make sure you have your measuring cups ready. Precision matters here, especially with the chocolate coating, because we want that shell to set up perfectly and not get soggy later on. I always lay everything out on the counter before I start melting anything—it just makes the process so much smoother!
Precise Ingredient Measurements for Chocolate Taco Treats
Here are the exact amounts I use to get that perfect balance of crunch, chocolate, and creaminess. Remember, these are the core items for our fantastic Chocolate Taco Treats, so don’t eyeball the chocolate!
- Six hard taco shells – the standard crunchy kind works best.
- One full cup of semi-sweet chocolate chips – I stick to semi-sweet, but milk or dark are fine too!
- Just one tablespoon of coconut oil. This helps the chocolate melt smooth and shiny.
- About a half cup of whipped cream. That should give you a nice, generous dollop in each shell.
- And finally, about a quarter cup of sprinkles. Any color, any kind – the more fun, the better!
Equipment Needed for Your Chocolate Taco Treats
You won’t need much for this, which is fantastic! Forget the stand mixer; we aren’t doing any serious baking today. Just grab a microwave-safe bowl for melting the chocolate. You’ll also need a spoon or spatula for stirring and some parchment paper to lay those shells on while they chill. A small knife or offset spatula is handy for neatly filling them later, but honestly, a regular spoon works in a pinch!
Step-by-Step Instructions for Perfect Chocolate Taco Treats
Now for the fun part! Since this is a no-bake recipe, speed and timing are our main goals. We want that chocolate to melt quickly and set up crisp before the shells get soft. Don’t worry about setting a timer for hours; we’re moving fast here. Once you see the ingredients laid out, you’ll realize how quickly these Chocolate Taco Treats come together. It’s less about cooking and more about assembly!

Melting the Chocolate Coating for Chocolate Taco Treats
This is where we use our microwave, but we have to be gentle! Put your semi-sweet chocolate chips and that tablespoon of coconut oil right into your microwave-safe bowl. I always start mine on 50% power for 30 seconds. Why 50%? Because chocolate hates direct, high heat; it seizes up and goes grainy if you rush it. After 30 seconds, pull it out and stir it really well, even if it looks like nothing has happened yet.
Keep zapping it in 15-second bursts, stirring vigorously between each one. You’re looking for a completely smooth, glossy liquid. If you see any tiny lumps, keep stirring until the residual heat melts them away. If you burn this chocolate, you’ll have to start over, so slow and steady wins the race here. If you want to see other fun chocolate recipes, check out these hot chocolate cookies recipe. Once it’s perfectly smooth, set the bowl aside so it doesn’t get too hot while you prep the shells.
Dipping and Setting the Taco Shells
Take your six hard taco shells and lay them out on a big sheet of parchment paper. You need to decide how much chocolate you want. I like to dip the shell deep enough so that the chocolate comes about halfway up the inside curve. Hold the shell by the top edges and carefully dip the bottom half right into that melted chocolate.
Gently swirl it around to make sure the entire inside bottom surface is coated. Let any major drips fall back into the bowl—we don’t want huge puddles on the parchment paper, just a nice, solid base. Place the shell carefully back down on the paper. You need to get these into the refrigerator immediately, and they need a solid 15 minutes in there. Don’t cheat this step! The cold helps the coconut oil firm up the chocolate so it snaps when you bite into it later.
Filling and Finishing Your Chocolate Taco Treats
Once those shells are firm to the touch—give one a gentle poke to check—they are ready for the filling! Take your whipped cream and spoon a nice, big dollop right into the chocolate-lined bottom of each shell. Don’t overfill them, or the cream will push out the sides when you try to eat them. You want enough cream that it’s satisfying, but not so much that it’s messy.
This is the moment for the sprinkles! Grab your colored sprinkles and shower them right over the fresh whipped cream. The cream acts like glue, so they should stick right away. These treats are best enjoyed right after you fill them, while the shell is crisp and the cream is cold. If you wait too long, the moisture from the cream can start to soften that beautiful chocolate layer! If you want to share your creations, feel free to tag us on Facebook.

Tips for Success with Chocolate Taco Treats
Even though this recipe is super simple, there are a couple of things that can trip you up if you aren’t careful. I learned these lessons the hard way, so you don’t have to! The biggest potential disaster is seizing chocolate, but we can avoid that easily.
If your chocolate starts looking grainy or stiff while you’re stirring it in the microwave, don’t panic! It usually means a tiny drop of water got in there, or it got too hot. The fix? Add another tiny splash—maybe half a teaspoon—of your coconut oil and stir like crazy. That extra fat often loosens it right back up and makes it smooth again. For more easy dessert ideas, check out these cozy winter chocolate cookie cups.
Another thing to watch out for is the shells breaking when you dip them. If you have shells that feel a little fragile, try dipping them gently and supporting the bottom curve with a spoon while you pull it out of the chocolate. You want the shell to stay completely intact so it can hold the filling.
Lastly, make sure you chill those shells long enough. If you try to fill them before the chocolate is totally hard, the cream will smear the chocolate when you try to spoon it in, and it just makes a huge mess. Fifteen minutes in the fridge is usually perfect, but if your kitchen is warm, give it twenty minutes just to be safe!
Creative Variations for Chocolate Taco Treats
Part of the fun with these treats is how easily you can switch things up! If you aren’t a huge fan of plain whipped cream, you have so many other options. You could easily substitute that half-cup of cream with a nice smooth pastry cream, or even a dollop of softened vanilla ice cream if you plan on serving them right away. If you are looking for other quick dessert inspiration, take a look at these marshmallow cocoa cookies.
For the chocolate coating, don’t feel locked into semi-sweet! If you prefer something richer, use dark chocolate chips. If you’re making these for younger kids, milk chocolate works great too. You can even mix in a tiny bit of cinnamon or a drop of peppermint extract into the melted chocolate for a seasonal twist on your Chocolate Taco Treats. Just remember, any substitution for the filling means you should serve them immediately!
Storing and Keeping Your Chocolate Taco Treats Fresh
Since these are filled with fresh whipped cream, you definitely need to refrigerate any leftovers right away. Don’t leave them sitting out on the counter! Pop them into an airtight container—I usually put a piece of paper towel on the bottom to absorb any extra condensation. They keep really well for about two days in the fridge. For more great recipe ideas, follow us on Pinterest.
When you pull out your Chocolate Taco Treats the next day, give them about five minutes on the counter before eating. This lets the chocolate soften just a tiny bit so it doesn’t shatter when you bite it, but the cream stays nice and cold. Enjoy!
Common Questions About Chocolate Taco Treats
I always get so many questions about these because people can’t believe how fast they come together! Here are a few things folks ask me all the time when they are planning their first batch.
Q1. Can I make these ahead of time?
You can definitely do the chocolate coating ahead of time! Just melt, dip, and chill the taco shells until the chocolate is completely hard. Store those empty chocolate shells in the fridge in an airtight container for up to three days. You should only fill them with the whipped cream right before you plan to serve them, though, or the cream will make the shells soft.
Q2. What kind of shells work best?
Standard crunchy taco shells are what I always use. The key is that they must be the hard, crisp kind, not the soft tortillas! Make sure they are fresh and not stale, or they might break when you dip them into the warm chocolate.
Q3. My chocolate seized up! What did I do wrong?
More than likely, a tiny bit of steam or water got into your chocolate while melting. Don’t throw it out! Just add a teaspoon of warm vegetable oil or a bit more coconut oil and stir really hard over low heat. That extra fat usually saves the batch so you can still coat your shells.
Q4. Can I use a different filling instead of whipped cream?
Absolutely! Since this is a no-bake recipe, you want a filling that doesn’t require cooking. Ice cream is great if you serve them immediately. You could also use canned pie filling or even a thick Greek yogurt mixed with a little vanilla. Just remember, any filling that holds more water than stabilized whipped cream will soften the shell faster.
Sharing Your Delicious Chocolate Taco Treats
I really hope you loved making these crunchy, chocolatey desserts as much as I love eating them! They are such a fun, fast win for any busy weeknight or surprise gathering. Once you’ve tried these Chocolate Taco Treats, please come back and let me know how they turned out for you. Snap a picture and tag me! I absolutely love seeing your creations and hearing what fillings you decided to try out! You can also read more about our recipes on Medium.
Print
Amazing 6-Step Chocolate Taco Treats
- Total Time: 10 minutes
- Yield: 6 treats
- Diet: Vegetarian
Description
Make these simple chocolate taco treats for a fun dessert.
Ingredients
- 6 hard taco shells
- 1 cup semi-sweet chocolate chips
- 1 tablespoon coconut oil
- 1/2 cup whipped cream
- 1/4 cup sprinkles
Instructions
- Melt chocolate chips and coconut oil in a microwave-safe bowl. Stir until smooth.
- Dip the inside of each taco shell into the melted chocolate, coating the bottom half.
- Place the coated shells on parchment paper.
- Refrigerate for 15 minutes, or until the chocolate sets.
- Fill each chocolate-coated shell with whipped cream.
- Top with sprinkles.
- Serve immediately.
Notes
- You can substitute dark or milk chocolate chips.
- Use your favorite filling instead of whipped cream, like ice cream or pastry cream.
- Store leftovers in the refrigerator.
- Prep Time: 10 minutes
- Cook Time: 0 minutes
- Category: Dessert
- Method: No-Bake
- Cuisine: American