Forget those sad, waxy tubs from the grocery store! If you’ve ever felt intimidated by making Homemade Vanilla Pudding from Scratch, I am here to tell you that you can stop worrying right now. This recipe is my absolute favorite way to bring true comfort food back to the table, and honestly, it’s shockingly easy. Seriously, if you can whisk, you can master this!
When I first tried making pudding from scratch years ago, I ended up with lumpy, sweet goo. I almost gave up! But then I figured out the secret—it’s all about temperature control and not being afraid of the whisk. This recipe is my refined version, the one that finally worked perfectly every single time, earning me major bragging rights at family dinners. We’re talking rich, velvety smooth texture that coats a spoon just right. Trust me, once you taste this real vanilla flavor, you’ll never go back to the box mix again. It’s just that good!

Why Choose Homemade Vanilla Pudding from Scratch
The biggest reason to choose Homemade Vanilla Pudding from Scratch is, without a doubt, the taste. It’s night and day compared to anything boxed up. You get this incredible, true vanilla aroma that fills up your whole kitchen. Plus, it’s incredibly fast! I often whip this up when I need a quick dessert after dinner, and the whole thing is ready in about 25 minutes total. When my little nephew first tried it, he looked at me with wide eyes and asked if it was ice cream. That simple reaction tells you everything you need to know about how good this Vanilla Pudding Recipe is, even for a beginner!
Quick Prep and Cook Times
Don’t let the “from scratch” scare you off. You are looking at only 10 minutes of actual prep time—that’s just gathering stuff and whisking a few things together. Then, it cooks on the stovetop in about 15 minutes. Twenty-five minutes total! That speed makes this perfect for weeknight treats when you need something comforting right away.
Superior Flavor Over Store-Bought Options
Store-bought options rely on artificial flavors, but here, we use real vanilla bean seeds. That tiny step elevates this into something unbelievably luxurious. You get those beautiful little black specks throughout the pudding, which is the sign of a truly great Vanilla Pudding Recipe. It’s that depth of flavor that makes people ask, “Did you buy this at a fancy bakery?”

Equipment Needed for Your Homemade Vanilla Pudding from Scratch
You don’t need any fancy gadgets for this, which is part of why it’s so approachable. Just grab these basics from your drawers:
- A whisk (your best friend for this recipe!)
- A medium saucepan
- A small bowl for mixing the slurry
- A separate bowl for tempering the eggs
- Serving dishes or ramekins
Gathering Ingredients for Homemade Vanilla Pudding from Scratch
The ingredient list is short, which is fantastic, but you have to be precise about what you use. We need that cornstarch to do its job correctly, and we need real fat for the richness. Don’t try to skimp here; it’s worth it!
| Quantity | Ingredient | Notes |
|---|---|---|
| 3 cups | Whole Milk (divided) | Make sure it’s whole milk for the best texture. |
| 3 tablespoons | Cornstarch | This is your main thickener. |
| Pinch | Salt | Just a tiny pinch to balance the sweetness. |
| 3/4 cup | Granulated Sugar | Standard white sugar works great here. |
| 3 large | Egg Yolks | Make sure they are separated well! |
| 1 tablespoon | Unsalted Butter | Adds that final velvety mouthfeel. |
| 1 | Vanilla Bean | Must be split open and the seeds scraped out. |
Ingredient Notes and Substitutions
The cornstarch is non-negotiable; it’s what gives us that smooth, lump-free texture without needing flour. If you try to substitute it with flour, your cooking time and final texture will change completely. Also, please, please use that real vanilla bean. If you absolutely can’t find a bean, use 1 teaspoon of high-quality pure vanilla extract, but you must add it right at the very end when the heat is off. That’s the secret to getting the best Scratch Pudding flavor profile.
Step-by-Step Instructions for Homemade Vanilla Pudding from Scratch
This is where patience pays off! Follow these steps exactly, especially the whisking parts, and you’ll have the silkiest pudding imaginable. Remember, constant motion is key when dealing with eggs and heat.
Preparing the Base Slurry
First things first, grab a small, separate bowl. Take about 1/4 cup of your whole milk—just a small splash—and whisk that together with your 3 tablespoons of cornstarch until it looks completely smooth. You shouldn’t feel any gritty bits when you rub it between your fingers. Set this cornstarch slurry aside for now.
Tempering the Egg Yolks
In a separate bowl, you have your 3 large egg yolks ready to go. Now, take your saucepan with the remaining milk, sugar, and salt, and heat it until it’s steaming hot, nearly boiling, but don’t let it actually roll! This next part is critical: slowly, slowly, take about half a cup of that hot milk and pour it into the egg yolks while whisking the yolks aggressively the entire time. This process is called tempering. If you just dump the hot milk in, you’ll end up with sweet scrambled eggs, and nobody wants that!
Cooking the Homemade Vanilla Pudding from Scratch to Perfection
Once your yolks are warmed up safely, pour that entire yolk mixture back into the saucepan with the rest of the hot milk. Now, whisk in your reserved cornstarch slurry. Put the pan back over medium heat. Now, you have to commit—whisk constantly! Keep that whisk moving over the bottom and sides of the pan. After about 7 to 10 minutes, you’ll see the pudding start to thicken up dramatically and begin to gently bubble. Don’t stop whisking until you see that first gentle bubble pop on the surface. That means the cornstarch is fully activated!
Finishing Touches and Setting the Pudding
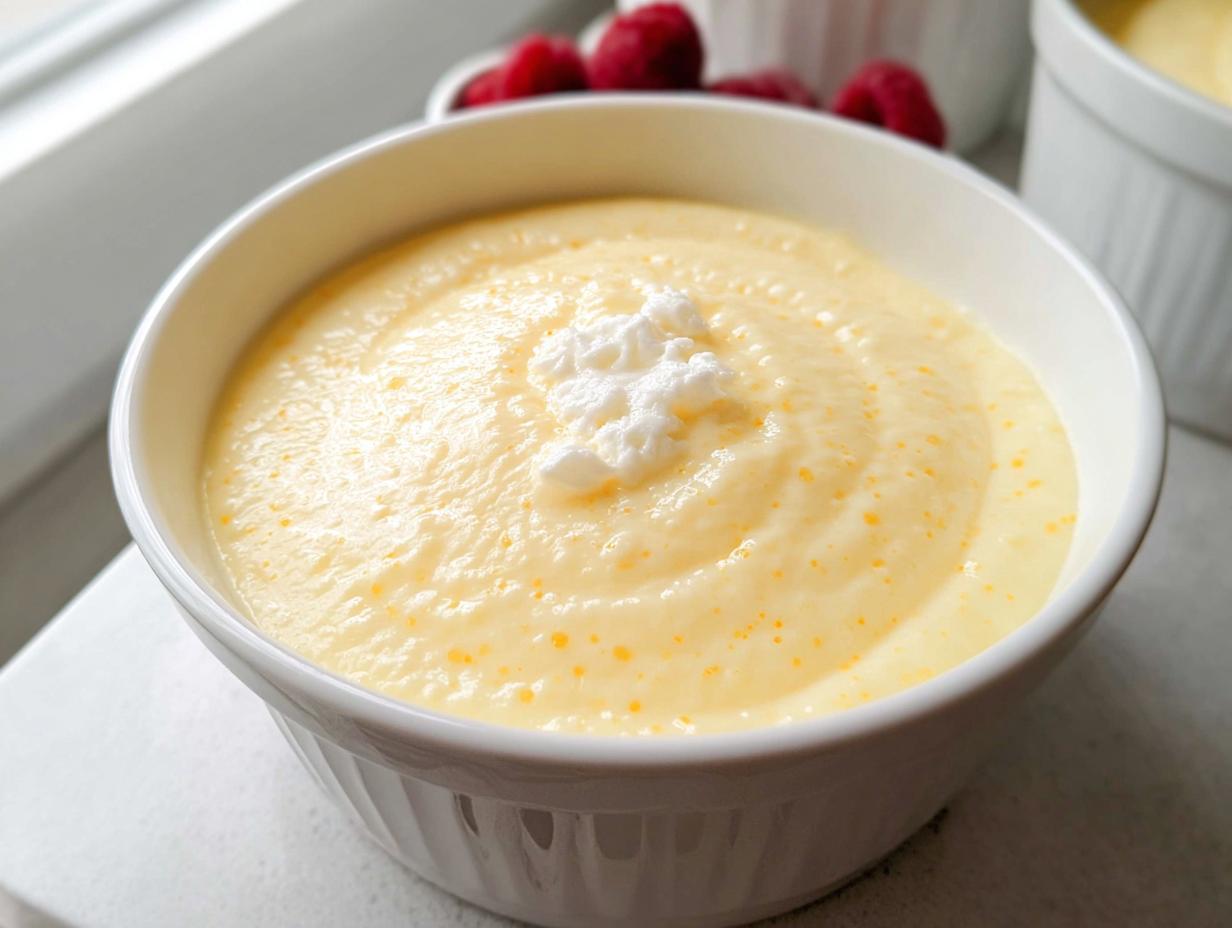
Take the pan immediately off the heat. Now is the time for magic: whisk in that tablespoon of unsalted butter until it melts completely and makes the pudding shiny. Then, scrape in all those beautiful seeds from your vanilla bean and whisk them through. Pour the wonderful Homemade Vanilla Pudding from Scratch right away into your serving dishes. To stop that dreaded skin from forming, take a piece of plastic wrap and press it directly onto the surface of the pudding in every single dish. Chill until set, or enjoy it warm!
Tips for Success with Your Homemade Vanilla Pudding from Scratch
Listen, I know the fear of lumps is real when making Homemade Vanilla Pudding from Scratch. But I’ve got your back with a few tricks I learned the hard way! First, don’t rush the tempering process. Seriously, that slow pour of hot milk into the eggs is the difference between creamy gold and a breakfast scramble. If you feel like you’re whisking too much, you’re probably doing it just right! If you are looking for other simple dessert ideas, check out this shocking 3 ingredient banana bark recipe.
Second, once that pudding starts to thicken on the stove, you cannot walk away. Keep that whisk moving constantly, scraping the bottom corners where the milk likes to stick and burn. That’s where lumps start hiding! Finally, when you add the butter and vanilla, make sure the heat is fully off. That final burst of richness should happen off the burner. Follow those three steps, and you’ll have the smoothest pudding of your life!
Serving Suggestions for Your Creamy Dessert
This pudding is fantastic all on its own, slightly warm, perhaps with a tiny pat of butter melting on top. But for a real showstopper, serve it chilled in small glasses. Top it with fresh whipped cream and maybe a dusting of cinnamon or a few toasted pecans for crunch. It makes a stunningly simple base for a layered Creamy Dessert trifle, too! For another great dessert base, consider trying out cinnamon swirl banana bread with vanilla icing.
Storing and Reheating Your Homemade Vanilla Pudding from Scratch
Good news! This pudding holds up really well, but you have to treat it right so it doesn’t get that weird film on top. It stays perfect in the fridge for up to three days. The trick is making sure the plastic wrap is touching the surface—I call it giving the pudding a little hug! That stops air from getting in and making it dry out. If you want more dessert ideas, you might enjoy this vanilla frozen custard creamy homemade dessert.
If you want to serve it warm again, don’t boil it! Just take out what you need and microwave it in short 15-second bursts, whisking well between each one until it’s smooth again. It might look a little looser at first, but it thickens right back up.
| Storage Method | Time Limit | Reheating Note |
|---|---|---|
| Airtight container with plastic wrap touching the surface | Up to 3 days | Serve cold, or microwave briefly if you prefer it warm. |
Frequently Asked Questions About Homemade Vanilla Pudding from Scratch
Q1. My pudding is lumpy! Can I save it?
Don’t panic! If the lumps are small, sometimes a quick buzz with an immersion blender works wonders right off the heat. If it’s really bad, you can strain the whole batch through a fine-mesh sieve into a clean bowl. It usually catches those stubborn bits.
Q2. Can I use vanilla extract instead of a bean?
Yes, absolutely! If you skip the bean, just use about 1 teaspoon of good quality pure vanilla extract. Make sure you only stir it in *after* you take the pudding off the heat. Boiling the extract ruins that delicate flavor.
Q3. Why do I have to temper the eggs?
Tempering is just slowly introducing the eggs to heat so they don’t shock and scramble. We whisk a little bit of the hot liquid into the cold eggs first, raising their temperature gently before adding them back to the main hot pot. It’s the secret to a smooth texture.
Q4. How long does it take to set in the fridge?
It usually takes about 2 to 3 hours in the refrigerator before it’s firm enough to hold its shape nicely. If you want it firmer, leave it overnight. This recipe yields a wonderfully soft, scoopable texture, unlike some stiffer store-bought versions.
Share Your Homemade Vanilla Pudding from Scratch Experience
Now that you’ve mastered this easy recipe, I want to hear about it! Did you use fresh berries on top? Did you manage to get that perfect velvety texture on your first try? Drop a comment below, rate this recipe, and please share photos of your beautiful Homemade Vanilla Pudding from Scratch! You can also connect with us on Facebook or see more recipe inspiration on Pinterest.
Why Choose Homemade Vanilla Pudding from Scratch
The biggest reason to choose Homemade Vanilla Pudding from Scratch is, without a doubt, the taste. It’s night and day compared to anything boxed up. You get this incredible, true vanilla aroma that fills up your whole kitchen. Plus, it’s incredibly fast! I often whip this up when I need a quick dessert after dinner, and the whole thing is ready in about 25 minutes total. When my little nephew first tried it, he looked at me with wide eyes and asked if it was ice cream. That simple reaction tells you everything you need to know about how good this Vanilla Pudding Recipe is, even for a beginner!
Quick Prep and Cook Times
Don’t let the “from scratch” scare you off. You are looking at only 10 minutes of actual prep time—that’s just gathering stuff and whisking a few things together. Then, it cooks on the stovetop in about 15 minutes. Twenty-five minutes total! That speed makes this perfect for weeknight treats when you need something comforting right away.
Superior Flavor Over Store-Bought Options
Store-bought options rely on artificial flavors, but here, we use real vanilla bean seeds. That tiny step elevates this into something unbelievably luxurious. You get those beautiful little black specks throughout the pudding, which is the sign of a truly great Vanilla Pudding Recipe. It’s that depth of flavor that makes people ask, “Did you buy this at a fancy bakery?”
Equipment Needed for Your Homemade Vanilla Pudding from Scratch
You don’t need any fancy gadgets for this, which is part of why it’s so approachable. Just grab these basics from your drawers:
- A whisk (your best friend for this recipe!)
- A medium saucepan
- A small bowl for mixing the slurry
- A separate bowl for tempering the eggs
- Serving dishes or ramekins
Gathering Ingredients for Homemade Vanilla Pudding from Scratch
The ingredient list is short, which is fantastic, but you have to be precise about what you use. We need that cornstarch to do its job correctly, and we need real fat for the richness. Don’t try to skimp here; it’s worth it!
| Quantity | Ingredient | Notes |
|---|---|---|
| 3 cups | Whole Milk (divided) | Make sure it’s whole milk for the best texture. |
| 3 tablespoons | Cornstarch | This is your main thickener. |
| Pinch | Salt | Just a tiny pinch to balance the sweetness. |
| 3/4 cup | Granulated Sugar | Standard white sugar works great here. |
| 3 large | Egg Yolks | Make sure they are separated well! |
| 1 tablespoon | Unsalted Butter | Adds that final velvety mouthfeel. |
| 1 | Vanilla Bean | Must be split open and the seeds scraped out. |
Ingredient Notes and Substitutions
The cornstarch is non-negotiable; it’s what gives us that smooth, lump-free texture without needing flour. If you try to substitute it with flour, your cooking time and final texture will change completely. Also, please, please use that real vanilla bean. If you absolutely can’t find a bean, use 1 teaspoon of high-quality pure vanilla extract, but you must add it right at the very end when the heat is off. That’s the secret to getting the best Scratch Pudding flavor profile.
Step-by-Step Instructions for Homemade Vanilla Pudding from Scratch
This is where patience pays off! Follow these steps exactly, especially the whisking parts, and you’ll have the silkiest pudding imaginable. Remember, constant motion is key when dealing with eggs and heat.
Preparing the Base Slurry
First things first, grab a small, separate bowl. Take about 1/4 cup of your whole milk—just a small splash—and whisk that together with your 3 tablespoons of cornstarch until it looks completely smooth. You shouldn’t feel any gritty bits when you rub it between your fingers. Set this cornstarch slurry aside for now.
Tempering the Egg Yolks
In a separate bowl, you have your 3 large egg yolks ready to go. Now, take your saucepan with the remaining milk, sugar, and salt, and heat it until it’s steaming hot, nearly boiling, but don’t let it actually roll! This next part is critical: slowly, slowly, take about half a cup of that hot milk and pour it into the egg yolks while whisking the yolks aggressively the entire time. This process is called tempering. If you just dump the hot milk in, you’ll end up with sweet scrambled eggs, and nobody wants that!
Cooking the Homemade Vanilla Pudding from Scratch to Perfection
Once your yolks are warmed up safely, pour that entire yolk mixture back into the saucepan with the rest of the hot milk. Now, whisk in your reserved cornstarch slurry. Put the pan back over medium heat. Now, you have to commit—whisk constantly! Keep that whisk moving over the bottom and sides of the pan. After about 7 to 10 minutes, you’ll see the pudding start to thicken up dramatically and begin to gently bubble. Don’t stop whisking until you see that first gentle bubble pop on the surface. That means the cornstarch is fully activated!
Finishing Touches and Setting the Pudding
Take the pan immediately off the heat. Now is the time for magic: whisk in that tablespoon of unsalted butter until it melts completely and makes the pudding shiny. Then, scrape in all those beautiful seeds from your vanilla bean and whisk them through. Pour the wonderful Homemade Vanilla Pudding from Scratch right away into your serving dishes. To stop that dreaded skin from forming, take a piece of plastic wrap and press it directly onto the surface of the pudding in every single dish. Chill until set, or enjoy it warm!
Tips for Success with Your Homemade Vanilla Pudding from Scratch
Listen, I know the fear of lumps is real when making Homemade Vanilla Pudding from Scratch. But I’ve got your back with a few tricks I learned the hard way! First, don’t rush the tempering process. Seriously, that slow pour of hot milk into the eggs is the difference between creamy gold and a breakfast scramble. If you feel like you’re whisking too much, you’re probably doing it just right! If you are looking for other simple dessert ideas, check out this shocking 3 ingredient banana bark recipe.
Second, once that pudding starts to thicken on the stove, you cannot walk away. Keep that whisk moving constantly, scraping the bottom corners where the milk likes to stick and burn. That’s where lumps start hiding! Finally, when you add the butter and vanilla, make sure the heat is fully off. That final burst of richness should happen off the burner. Follow those three steps, and you’ll have the smoothest pudding of your life!
Serving Suggestions for Your Creamy Dessert
This pudding is fantastic all on its own, slightly warm, perhaps with a tiny pat of butter melting on top. But for a real showstopper, serve it chilled in small glasses. Top it with fresh whipped cream and maybe a dusting of cinnamon or a few toasted pecans for crunch. It makes a stunningly simple base for a layered Creamy Dessert trifle, too! For another great dessert base, consider trying out cinnamon swirl banana bread with vanilla icing.
Storing and Reheating Your Homemade Vanilla Pudding from Scratch
Good news! This pudding holds up really well, but you have to treat it right so it doesn’t get that weird film on top. It stays perfect in the fridge for up to three days. The trick is making sure the plastic wrap is touching the surface—I call it giving the pudding a little hug! That stops air from getting in and making it dry out. If you want more dessert ideas, you might enjoy this vanilla frozen custard creamy homemade dessert.
If you want to serve it warm again, don’t boil it! Just take out what you need and microwave it in short 15-second bursts, whisking well between each one until it’s smooth again. It might look a little looser at first, but it thickens right back up.
| Storage Method | Time Limit | Reheating Note |
|---|---|---|
| Airtight container with plastic wrap touching the surface | Up to 3 days | Serve cold, or microwave briefly if you prefer it warm. |
Frequently Asked Questions About Homemade Vanilla Pudding from Scratch
Q1. My pudding is lumpy! Can I save it?
Don’t panic! If the lumps are small, sometimes a quick buzz with an immersion blender works wonders right off the heat. If it’s really bad, you can strain the whole batch through a fine-mesh sieve into a clean bowl. It usually catches those stubborn bits.
Q2. Can I use vanilla extract instead of a bean?
Yes, absolutely! If you skip the bean, just use about 1 teaspoon of good quality pure vanilla extract. Make sure you only stir it in *after* you take the pudding off the heat. Boiling the extract ruins that delicate flavor.
Q3. Why do I have to temper the eggs?
Tempering is just slowly introducing the eggs to heat so they don’t shock and scramble. We whisk a little bit of the hot liquid into the cold eggs first, raising their temperature gently before adding them back to the main hot pot. It’s the secret to a smooth texture.
Q4. How long does it take to set in the fridge?
It usually takes about 2 to 3 hours in the refrigerator before it’s firm enough to hold its shape nicely. If you want it firmer, leave it overnight. This recipe yields a wonderfully soft, scoopable texture, unlike some stiffer store-bought versions.
Share Your Homemade Vanilla Pudding from Scratch Experience
Now that you’ve mastered this easy recipe, I want to hear about it! Did you use fresh berries on top? Did you manage to get that perfect velvety texture on your first try? Drop a comment below, rate this recipe, and please share photos of your beautiful Homemade Vanilla Pudding from Scratch! You can also connect with us on Facebook or see more recipe inspiration on Pinterest.
Print
Shocking 1 Homemade Vanilla Pudding from Scratch trick
- Total Time: 25 minutes
- Yield: 6 servings
- Diet: Vegetarian
Description
Rich, creamy homemade vanilla pudding made from scratch with simple ingredients for a classic comforting dessert.
Ingredients
- 3 cups whole milk divided
- 3 tablespoons cornstarch
- Pinch of salt
- 3/4 cup granulated sugar
- 3 large egg yolks
- 1 tablespoon unsalted butter
- 1 vanilla bean split and seeds scraped
Instructions
- Whisk 1/4 cup of the milk and the cornstarch in a small bowl until smooth. Set aside.
- Whisk the remaining milk, sugar, and salt in a medium saucepan. Heat over medium heat until steaming but not boiling.
- Whisk the egg yolks in a separate bowl. Slowly pour about 1/2 cup of the hot milk mixture into the yolks while whisking constantly.
- Pour the warmed egg mixture back into the saucepan, then whisk in the cornstarch mixture.
- Cook over medium heat, whisking constantly, until the pudding thickens and begins to gently bubble, about 7 to 10 minutes.
- Remove from heat and whisk in the butter and vanilla bean seeds until smooth.
- Pour the pudding into serving dishes. Press plastic wrap directly onto the surface to prevent a skin from forming.
- Serve warm or refrigerate until chilled and set.
Notes
- Store covered in the refrigerator for up to 3 days.
- Prep Time: 10 minutes
- Cook Time: 15 minutes
- Category: Dessert
- Method: Stovetop
- Cuisine: American