When I first tried making bread at home, I was terrified of yeast. Seriously, I thought I was going to end up with a dense, sad hockey puck instead of a gorgeous, pillowy flatbread. But folks, these Greek pita recipes? They are the absolute game-changer for anyone who thinks baking is too hard. Forget the oven; we are doing this right on the stovetop!
This recipe changed everything for me. It’s so forgiving, and watching the dough puff up in the hot pan feels like magic happening right in your own kitchen. I used to buy those sad, plastic-wrapped pitas that always tear when you try to stuff them. Not anymore! This homemade Greek pita bread is soft, it stretches beautifully, and it tastes like you spent all day on it, even though it’s surprisingly fast.
I promise you, if you can whisk flour, you can master these. We’re using simple ingredients to get that authentic, slightly chewy texture that makes gyros and dips ten times better. Trust me on this one; this method guarantees you’ll get that perfect puff every single time you make this Greek pita.

Essential Ingredients for Fluffy Greek Pita
The beauty of this recipe is that it relies on pantry staples, nothing fancy needed! When you’re aiming for that authentic, soft texture in your Greek pita, every single ingredient plays a role. We aren’t using any crazy additives; just good, honest baking components that work together beautifully.
It’s important to measure correctly here. Too much flour and your pita will be tough; too little liquid and the yeast won’t wake up. But don’t stress! I’ve broken down exactly what you need below so you can gather your supplies confidently.
Dry Ingredients Breakdown
You’ll start with all-purpose flour—about a cup and a half—which is perfect for that traditional texture. Next up is the yeast; make sure it’s active dry yeast, and you need to wake it up properly with warm liquids later on. Don’t forget the salt! I insist on kosher salt because it dissolves nicely and gives a clean flavor. It’s just one teaspoon, but it makes a huge difference in flavor balance.
Wet Components for Greek Pita Dough
This is where the magic starts for a tender Greek pita. Your milk and water absolutely must be warm—think bathwater warm, not hot! If the liquid is too hot, you’ll kill your yeast, and that means no puff. We’re talking about 105 to 115 degrees Fahrenheit, give or take. The olive oil is key; it adds richness and keeps the dough pliable. Don’t skip brushing the pan with it either; that little bit of fat helps them brown perfectly.

Equipment Needed for Your Greek Pita Recipe
You don’t need a fancy stand mixer for this! Honestly, I make mine by hand most days. You’ll want a large mixing bowl to bring everything together, obviously. Then, you need something to roll the dough out with—a rolling pin is best, but even a clean wine bottle works in a pinch, trust me!
The most important tool for cooking your Greek pita is a heavy skillet. I swear by my cast iron skillet; it holds heat so well. You need that intense, even heat to get the bread to balloon up properly when it hits the surface.
Step-by-Step Instructions to Prepare Greek Pita
Okay, deep breath! This is where we turn flour and water into something amazing. I know step-by-step instructions can look intimidating, but I promise, this process is straightforward—just follow the flow. We’re going to mix, rest, shape, and then cook these beauties quickly on the stovetop.
Mixing and Kneading the Dough
First things first, get all your dry stuff—flour, yeast, and salt—whisked together in that big bowl. You want them evenly distributed before anything wet touches them. Now, pour in that warm milk and water mixture. Stir it up until it looks shaggy and just barely comes together. Don’t worry if it looks messy!
Next, drizzle in your olive oil. Now comes the fun part: kneading! Turn that dough out onto a lightly floured surface. You need to work it for about three to four minutes. I use the heel of my hand to push and fold. You’re looking for a dough that feels smooth, not sticky, and definitely elastic. If it’s still too sticky after a few minutes, add just a tiny sprinkle of flour, but be careful not to overdo it.
The Crucial Rising Period
Once you have that smooth ball, grab a clean bowl and just rub a little olive oil around the inside—this stops it from sticking. Tuck your dough ball in there and cover the bowl tightly with plastic wrap. Yeast needs a cozy spot to do its job, so find a warm area in your kitchen. I usually stick mine in the oven, but make sure the oven is OFF, just warm from a recent bake. Let it hang out for a full hour. You’ll know it’s ready because it will have doubled in size. Seriously, look for that visual cue!
Shaping and Cooking Your Greek Pita Bread
Punch that beautiful risen dough down gently—it makes that satisfying *whoosh* sound! Turn it onto your work surface and divide it into exactly eight equal pieces. Roll each one into a tight little ball. Now, flatten those balls and roll them out until they are about a quarter-inch thick and around seven inches wide. If they spring back, just let them rest for five minutes and try again.
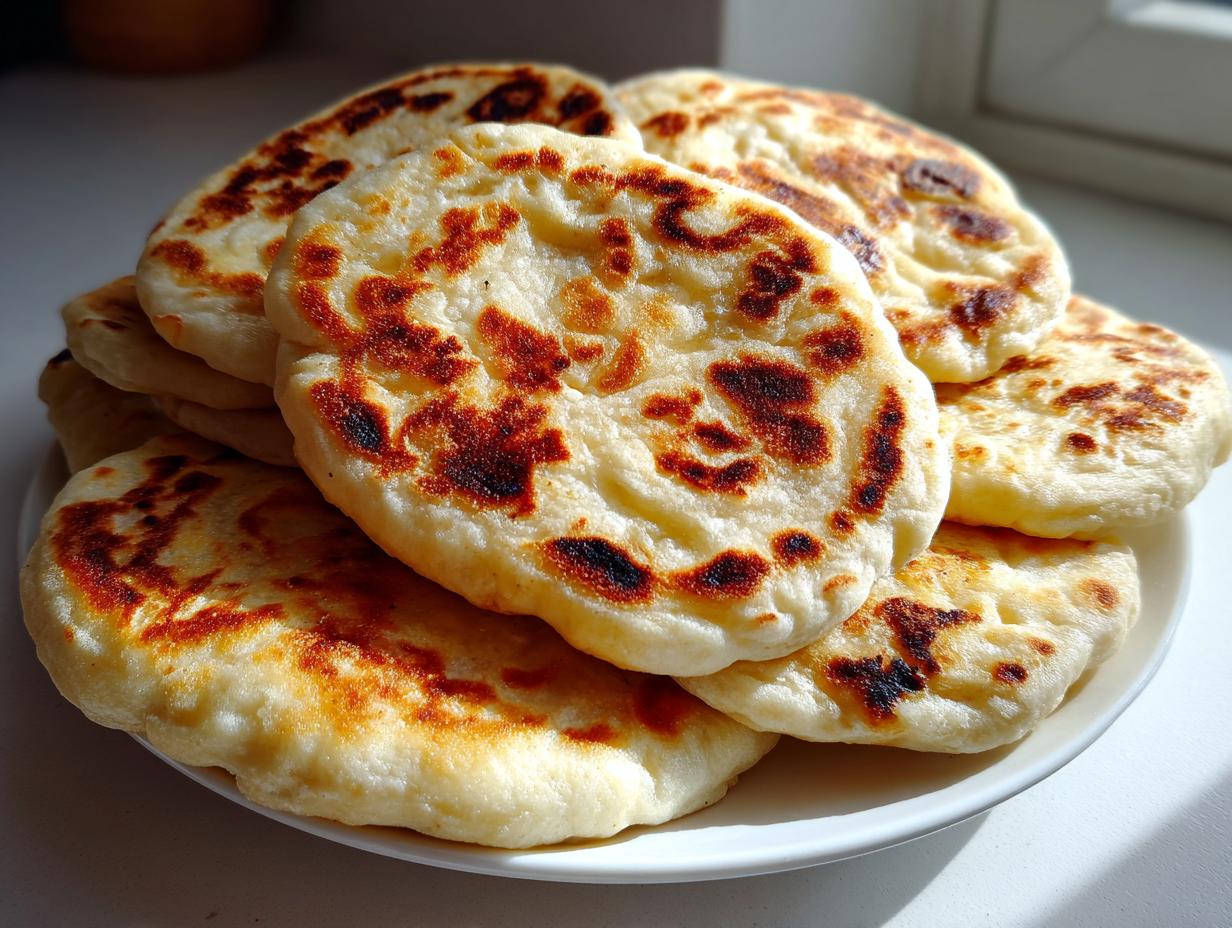
Heat up your cast iron skillet over medium-high heat. This is crucial for puffing! Brush the pan lightly with oil. Place one round of dough in the hot pan. Cook it for just about one minute per side. You need to watch it—it should puff up like a balloon! If it doesn’t puff much, your pan wasn’t hot enough. Keep cooking until you see those lovely golden-brown spots appear. Brush your finished Greek pita with a little more oil or melted herb butter right away, and keep them wrapped in a clean towel to stay soft until serving.
Why This is the Best Greek Pita Recipe for Beginners
I’m telling you, if you’ve been intimidated by homemade bread, this Greek pita recipe is where you start your journey. It’s trustworthy because it uses simple, real ingredients, and the stovetop method is incredibly reliable—way more predictable than trying to manage oven temperatures for bread!
I’ve made this dozens of times, tweaking and testing until I found the exact right balance of liquid and flour so you don’t end up with tough bread. This isn’t some fancy, complicated recipe; it’s straightforward and fast enough for a weeknight. Why struggle when you can get this result? If you enjoy easy baking, you might also love our recipe for chocolate chip sweet sourdough recipe.
Here’s why I know you’ll succeed with this simple Greek pita:
- No Oven Required: Cooking on the skillet is fast, and you get instant feedback on the heat level.
- Forgiving Dough: The olive oil keeps the dough workable even if you over-knead slightly.
- Guaranteed Puff: The high heat cooking method virtually guarantees that beautiful ballooning effect.
- Fast Results: From start to finish, you’re eating warm, fresh Greek pita in under an hour and a half!
Ingredient Notes and Simple Substitutions
Sometimes we run out of things, right? Don’t panic if your pantry isn’t perfectly stocked. For the flour in this Greek pita recipe, all-purpose is king because it gives the best stretch, but if you only have bread flour, you can swap it in—just know the dough might feel a little firmer. If you must substitute, use bread flour cup-for-cup, but you might need an extra splash of warm water.
If you are out of milk, water works fine! Just use the full 2/3 cup of warm water instead of splitting it between milk and water. You’ll lose a tiny bit of richness, but the yeast won’t care one bit. And seriously, always use olive oil here; margarine or vegetable oil just don’t give the same flavor profile to our beautiful Greek pita.
Tips for Achieving Maximum Puff in Your Greek Pita
Getting that incredible balloon puff in your Greek pita is totally dependent on heat management. If your skillet isn’t hot enough, the dough just sits there and dries out instead of steaming itself open. You need medium-high heat, and you need to let that pan preheat for a good five minutes before the first pita even touches it. Don’t rush this! If you want more easy cooking tips, check out our oven roasted potatoes guide.
Another thing I learned the hard way: don’t overload the pan! Cook only one pita at a time. If you crowd the skillet, the temperature drops instantly, and you end up with flatbread instead of a puffy pocket. Also, make sure you roll your dough evenly thin. If one spot is twice as thick as another, that thick spot will resist puffing up. These little tricks are what take your Greek pita from good to absolutely restaurant-quality!
Storing and Reheating Your Homemade Greek Pita
The best way to keep these fresh is to treat them like real bread. As soon as they come off the skillet, wrap them up tightly in a clean kitchen towel and then place them in an airtight container or a heavy-duty zip-top bag. They stay wonderfully soft at room temperature for about two days. Don’t try the fridge; it always makes bread hard! For more great recipes, follow us on Pinterest.
Reheating is super fast, which is part of why I love this recipe so much. You want to bring back that softness quickly without drying them out again. A quick flash in a hot, dry skillet is my favorite method for reviving that fresh-baked texture.
Storage and Reheating Table
| Method | Duration/Temperature | Time |
|---|---|---|
| Room Temperature Storage | Airtight container | Up to 2 days |
| Skillet Reheat | Dry skillet, medium heat | 30 seconds per side |
| Oven Reheat | 350°F (175°C) | 5 minutes |
Common Questions About Making Greek Pita
I get so many messages after people try this recipe, and that’s wonderful! It means you’re ditching the store-bought stuff. Here are a few of the most common things folks ask when they are trying to perfect their Greek pita for the first time, especially around the puffing stage. You can also find us on Medium for more cooking insights.
Q: My dough didn’t double in size during the rise. Did I mess up the yeast?
Oh, don’t worry about it! Nine times out of ten, that means your milk or water was too cold when you mixed it in. Yeast is sensitive! If it didn’t double, just give it another 30 minutes in a warmer spot. If it still doesn’t grow much, the dough will still work, but your Greek pita might be flatter.
Q: Why are my pitas tough instead of soft?
This usually happens for two reasons. Either you added too much flour during kneading, or you cooked them for too long. When you cook them, they only need about a minute per side. If you leave them on the heat too long, they dry out and get chewy, which is the opposite of what we want in a perfect Greek pita! If you are looking for a dip to serve with these, try our whipped ricotta hot honey dip.
Q: Can I make these ahead of time?
Yes! You can roll them out and keep them stacked between sheets of parchment paper in the fridge for up to 24 hours. Just let them sit on the counter for about 20 minutes before reheating on that hot skillet. They are definitely best fresh, but making them ahead is totally doable! For more community interaction, join us on Facebook.

Master 8 Greek pita stovetop secrets
- Total Time: 1 hour 25 minutes
- Yield: 8 pitas
- Diet: Vegetarian
Description
Soft and fluffy homemade Greek pita bread, perfect for wraps, gyros, or dips. A quick Mediterranean flatbread cooked on the stovetop.
Ingredients
- 1 ½ cups all-purpose flour, plus extra for dusting
- 1 tablespoon active dry yeast
- 1 teaspoon kosher salt
- ⅓ cup warm milk
- ⅓ cup warm water
- 2 tablespoons olive oil, plus more for brushing and cooking
Instructions
- Whisk flour, yeast, and salt in a large bowl.
- Stir in warm milk and warm water until the dough forms.
- Add olive oil. Knead in the bowl for 3 to 4 minutes until the dough is smooth and elastic.
- Lightly oil a clean bowl. Place the dough inside, cover with plastic wrap, and let rise in a warm place for 1 hour until doubled in size.
- Turn the dough onto a lightly floured surface. Divide into 8 equal pieces.
- Roll each piece into a ball, then flatten and roll out to ¼-inch thick circles, about 7 inches wide.
- Heat a cast iron skillet over medium-high heat. Brush lightly with olive oil.
- Cook each pita for 1 minute per side until puffed and golden brown spots form.
- Brush warm pitas with olive oil or melted herb butter if desired. Serve warm.
Notes
- The total time calculation includes the 1 hour rising time.
- Use warm liquids to properly activate the yeast.
- Cook the pitas quickly over high heat to achieve puffing.
- Prep Time: 15 minutes
- Cook Time: 10 minutes
- Category: Bread
- Method: Stovetop
- Cuisine: Greek/Mediterranean