Oh my gosh, you guys, if you think perfect summer pies are only for seasoned bakers, I have news for you! This Fresh Strawberry Pie With Glossy Strawberry Filling is the dessert that changed everything for me. I remember my first attempt at a summer pie—it was a runny, sad mess that looked like strawberry soup on a plate. I almost gave up on making anything with fruit!
But this recipe? It’s foolproof. Seriously. It’s the easiest, brightest, most gorgeously sliceable dessert you will ever make. The magic is entirely in that homemade glaze that sets up beautifully. When I nailed this recipe, I finally felt like I could conquer any summer baking challenge. It uses simple ingredients and a tested method that guarantees that perfect, jewel-toned shine every single time.
Forget fussy pastry work; we focus on the filling here. We’re talking about a pie that tastes like pure sunshine and holds its shape when you slice it. Trust me, this is the one you need for your next barbecue or just because it’s Tuesday! 
Essential Components for Your Fresh Strawberry Pie With Glossy Strawberry Filling
Okay, now that you’re excited about making this showstopper, let’s talk about what you need. Because this recipe has zero baking time for the filling, the quality of your starting materials really matters. We want that stunning, jewel-toned look, right? That means paying attention to the strawberries and making sure our glaze base is perfect.
The secret to a truly perfect Fresh Strawberry Pie With Glossy Strawberry Filling isn’t fancy equipment; it’s about having the right stuff ready to go before you start cooking that glaze. Everything comes together so fast once you’re at the stove! If you want to see more of my favorite quick recipes, check out my sauce secrets!
Gathering Ingredients for the Glossy Strawberry Filling
You don’t need a pantry full of weird items for this! We are keeping it simple, but precision is key, especially with the cornstarch and sugar. Too much starch, and it gets gummy; too little, and it stays soupy. I always lay everything out on the counter first, just like I’m setting up for a science experiment, because timing is everything!
For the absolute best result in your Glossy Strawberry Filling, follow these preparation notes exactly:
Ingredient Table and Clarity
You’ll need to make sure your crust is ready to go before you measure anything else. Here is what you need:
- 1 prepared 9 inch pie crust baked and cooled (It must be completely cool, or your glaze will melt right through it!)
- 5 cups fresh strawberries hulled and halved
- 3/4 cup granulated sugar
- 1/4 cup cornstarch
- 1/2 cup water
- 1 tablespoon lemon juice
Equipment Needed for This Easy Strawberry Pie
You really don’t need much specialized gear for this easy summer dessert! Mostly, we need things to mix the glaze and assemble the pie.
Make sure you have these items handy:
- A medium saucepan for cooking the glaze.
- A whisk—a balloon whisk works best to keep things smooth!
- A large bowl for holding the berries.
- A spoon or offset spatula for gently pouring the warm glaze over the fruit.

Step-by-Step Guide to Making the Fresh Strawberry Pie With Glossy Strawberry Filling
This is where the magic happens, and honestly, it moves fast! The total active cooking time is maybe ten minutes, so make sure your crust is cooled and your berries are washed and prepped before you even turn on the burner. We want to move straight from cooking the glaze to pouring it before it sets up in the pot!
Preparing the Base and Berries
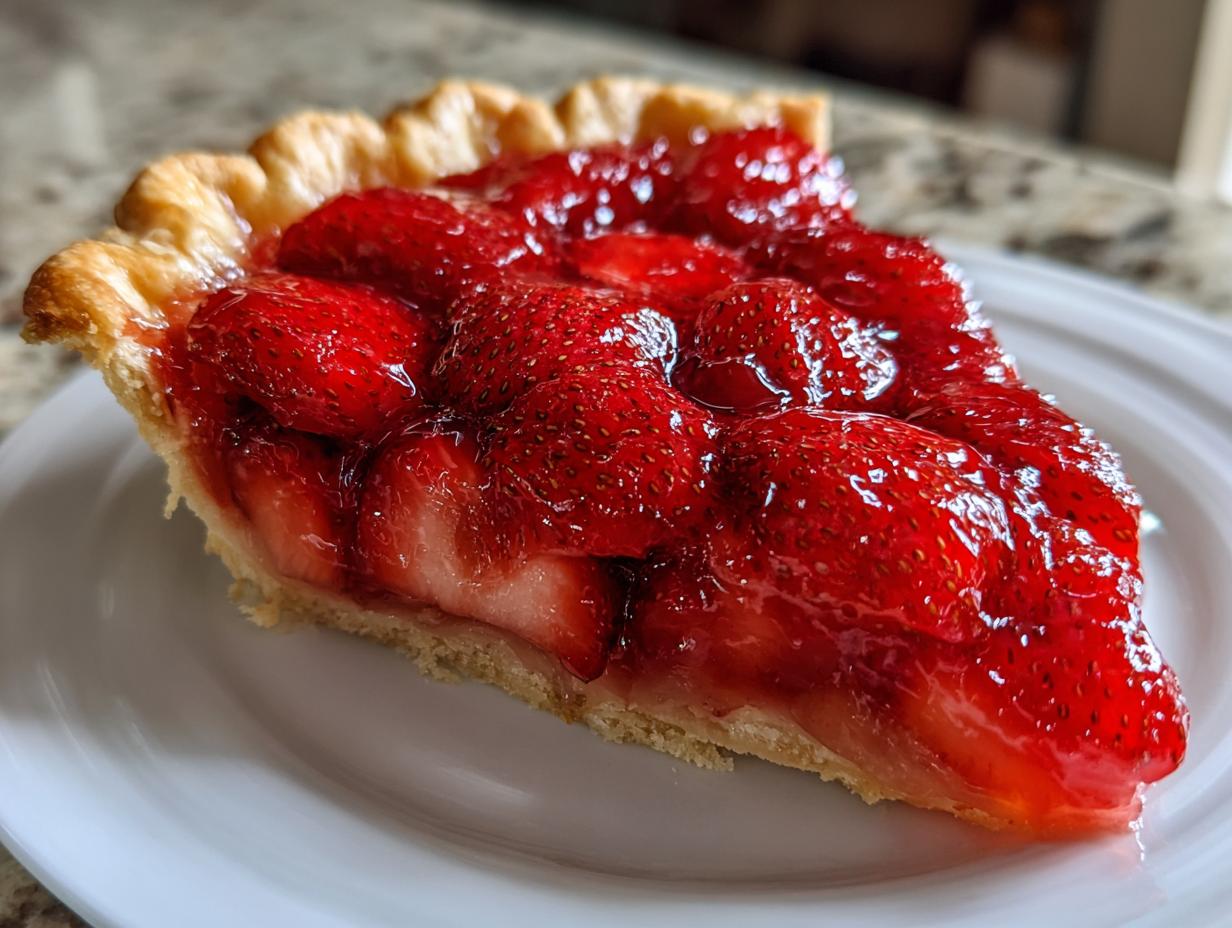
First things first, take that beautiful, fully cooled pie crust—and I mean *cool*—and arrange your strawberries. You want about five cups of berries, and since you’ve already hulled and halved them, just place them in there. Try to get them spread out evenly across the bottom of the crust, filling in any little gaps you see. Don’t mash them down; just nestle them in gently. They need a nice, cozy bed for that gorgeous glaze we’re about to make.
Creating the Glossy Strawberry Filling Glaze
Now, grab that medium saucepan. This is critical for the Glossy Strawberry Filling: take your sugar and cornstarch and whisk them together really well *before* adding any liquid. If you skip this, you’ll end up with little white lumps, and nobody wants a lumpy glaze! Once those dry ingredients look totally uniform, pour in the water and the lemon juice. The lemon juice is so important; it brightens up that sweet strawberry flavor.
Put the saucepan over medium heat. Now, you have to stick with it! Whisk constantly. I mean it—don’t walk away to check your phone! As it heats up, the mixture will go from cloudy to clear. Keep whisking until it hits a gentle boil and thickens up nicely. When it coats the back of your spoon and looks translucent—like shiny stained glass—it’s done. That’s the sign of a perfectly cooked starch that won’t break down later.
Assembling and Chilling Your Fresh Strawberry Pie With Glossy Strawberry Filling
Once it’s thick and glossy, immediately pull that saucepan off the heat. You need to let that glaze cool for just about five minutes. It needs to be warm, not scorching hot, because pouring boiling glaze onto fresh berries can make them weep and get mushy. After that brief cool-down, gently pour that shimmering glaze right over your arranged strawberries. Use your spoon to gently guide it so it flows into all the nooks and crannies of the fruit.
This is the hardest part: waiting! You must refrigerate the entire Fresh Strawberry Pie With Glossy Strawberry Filling uncovered for a minimum of three hours. Chilling is non-negotiable because that’s what sets the glaze firm enough to get those beautiful, clean slices we all want. Don’t rush this step, or you’ll end up with that soupy mess I told you about! If you love sharing your baking triumphs, follow us on Facebook!
Tips for Perfect Slices and Serving Your Fresh Strawberry Pie With Glossy Strawberry Filling
You’ve done the hard part—the chilling is over! Now, let’s talk about presentation because nobody wants a slice that looks like it was wrestled out of the plate. That glossy top layer is delicate, so we need a good strategy for cutting. The absolute best way to ensure a clean cut, every single time, is to use a really sharp knife. Don’t try to use a dull butter knife; it will drag and tear the fruit and the glaze.
Here’s the pro move my mom taught me: after you make your first slice, wipe that sharp knife completely clean with a damp paper towel before you cut the next piece. This stops any sticky glaze residue from messing up your next beautiful wedge of Fresh Strawberry Pie With Glossy Strawberry Filling. Serve it cold straight from the fridge for the best structural integrity. This pie is all about that refreshing chill! For more great recipe ideas, check out our trail mix ideas.
Storage and Reheating for This Homemade Glaze Pie
Since this pie is loaded with fresh fruit and a water-based glaze, we definitely need to keep it chilled. Don’t even think about leaving this on the counter for too long, especially on a warm day. The glaze can get soft, and nobody wants warm strawberries in their pie!
It keeps wonderfully in the refrigerator, but you must cover it loosely—I usually just use foil draped over the top without pressing it down on the fruit. Never try to reheat this pie; the heat will totally melt that beautiful, shiny glaze structure we worked so hard to set. Here’s how long it stays perfect:
| Storage Method | Duration |
|---|---|
| Refrigerator (Loosely Covered) | Up to 3 days |
| Freezer | Not Recommended |
Common Questions About Your Fresh Strawberry Pie With Glossy Strawberry Filling
I get so many questions about this pie because it seems almost too easy to be this good! People worry about the glaze or the fruit breaking down, but I promise, if you follow the steps, you’ll be golden. Here are the things I hear most often when people are making their first Fresh Strawberry Pie With Glossy Strawberry Filling.
Can I Use Pre-Made Pie Crust in This Fresh Strawberry Pie With Glossy Strawberry Filling?
Absolutely, yes! This is one of the reasons this pie is such a lifesaver during the summer when you don’t want to fuss with pastry. However, you cannot use a raw crust. The recipe specifically calls for a crust that is already baked and completely cooled. If you put your fresh berries and warm glaze into a soft, unbaked shell, you’ll end up with a soggy bottom, and nobody wants that disappointment!
How Long Does the Glossy Strawberry Filling Take to Set?
This is the patience test! The filling needs time to solidify its structure, and that happens in the cold. You need at least three hours of undisturbed chilling time in the refrigerator. If you try to cut it after only an hour or two, your beautiful, Glossy Strawberry Filling will just run right out when you slice it. Three hours is the minimum; if your kitchen is really warm, I’d push it to four just to be safe!
Can I Substitute the Cornstarch in the Glaze?
You could technically use arrowroot powder as a substitute for cornstarch, but I strongly advise against it if you want that specific, clear, high-shine look. Cornstarch thickens beautifully and gives us that classic, almost translucent quality we are aiming for in this pie. Other thickeners can sometimes leave the glaze looking cloudy or slightly dull, which defeats the whole purpose of having a stunning, Glossy Strawberry Filling! For more recipe inspiration, check out our Pinterest page.
Quick Facts About This Easy Summer Dessert
I know sometimes we just need the quick overview, right? This pie comes together surprisingly fast once those berries are washed. The actual hands-on time is minimal, which is why it’s my go-to when guests show up unexpectedly. It’s truly an American classic that tastes like pure summer, and you get a ton of servings out of one pie!
Remember that this recipe is vegetarian-friendly, and since the filling isn’t baked, we save a lot of oven time!
Estimated Nutritional Profile
Here are the estimated numbers based on an 8-serving yield. Since we don’t know exactly how much sugar is in your specific strawberries, consider these figures a good starting point for budgeting your slice!
| Metric | Value (Per Slice Estimate) |
|---|---|
| Prep Time | 20 minutes |
| Cook Time | 10 minutes |
| Total Time (Active) | 30 minutes plus chilling |
| Calories | 260 |
| Fat | 8 g |
| Carbohydrates | 44 g |
Share Your Experience Making This Fresh Strawberry Pie With Glossy Strawberry Filling
I just know you are going to fall in love with how simple and glorious this pie is! Seriously, once you nail that technique for the Fresh Strawberry Pie With Glossy Strawberry Filling, you’ll be making it all summer long. Tell me how it went in the comments below! Did your glaze look shiny? Did you get those perfect, clean slices? Rate your experience and let’s chat about your favorite ways to serve this easy dessert! You can also read more about my baking journey on Medium.
Print
Amazing 3-Hour Fresh Strawberry Pie Glossy Set
- Total Time: 30 minutes plus chilling
- Yield: 8 servings
- Diet: Vegetarian
Description
This strawberry pie features fresh berries and a smooth homemade glaze. It is a bright, sliceable dessert that is easy to make and pleases a crowd.
Ingredients
- 1 prepared 9 inch pie crust baked and cooled
- 5 cups fresh strawberries hulled and halved
- 3/4 cup granulated sugar
- 1/4 cup cornstarch
- 1/2 cup water
- 1 tablespoon lemon juice
Instructions
- Arrange the fresh strawberries evenly in the cooled pie crust and set aside.
- In a medium saucepan, whisk together the sugar and cornstarch until well combined.
- Add the water and lemon juice and cook over medium heat, whisking constantly.
- Bring the mixture to a gentle boil and cook for 2 to 3 minutes until thick, glossy, and translucent.
- Remove the glaze from the heat and let it cool for 5 minutes so it is warm but not hot.
- Pour the glaze evenly over the strawberries, using a spoon to gently coat and fill gaps.
- Refrigerate the pie uncovered for at least 3 hours until fully chilled and set.
- Slice and serve cold.
Notes
- For clean slices, use a sharp knife wiped clean between cuts.
- Prep Time: 20 minutes
- Cook Time: 10 minutes
- Category: Dessert
- Method: No Bake Filling
- Cuisine: American