Oh my stars, if you think making an incredible, sticky, sweet-and-savory dinner has to take all afternoon, you are in for the biggest treat! This recipe for **honey garlic chicken** is my absolute go-to when I need something show-stopping on the table in under 30 minutes. Seriously, thirty minutes! That’s faster than ordering takeout, and you get that amazing, juicy, baked texture.
When I first started cooking for myself years ago, anything involving a glaze terrified me. I thought sauces meant hours of simmering and complicated techniques. I was so wrong! This baked **honey garlic chicken** changed everything for me. It uses simple pantry staples—honey, soy sauce, and garlic—and you just bake it! No messy stovetop frying required until the very end, and even that part is quick.
The secret sauce, literally, is that we bake the chicken first, then use the leftover marinade to create that glossy, thick coating. It’s foolproof, trust me. If you’re looking for an easy, weeknight win that tastes like you spent way more time on it than you did, this is it. Welcome to your new favorite dinner!

Essential Ingredients for your honey garlic chicken
I always tell people that the magic of this **honey garlic chicken** recipe isn’t just the baking; it’s the quality of the few simple things you’re tossing together. You don’t need a pantry full of obscure spices here. We’re relying on a few powerhouse flavors to do all the heavy lifting. Make sure you have these items ready to go, especially that garlic—don’t skimp!
Even with only a handful of components, every item has a job to do. The honey brings the sweetness, the soy sauce brings the savory depth, and the lemon juice cuts through all that richness so the chicken doesn’t taste heavy. This balance is what makes it truly addictive.
Chicken Preparation Details
The most important thing when dealing with chicken breasts for a fast bake like this is the size. If you just throw whole, thick breasts in, the outside will burn before the middle is safe. That’s why I insist on cutting them into thin cutlets. You want pieces that are roughly the same thickness, maybe about half an inch thick.
If yours are thick, just slice them horizontally—it’s called butterflying, but you’re just making thinner pieces! This guarantees they cook quickly and evenly in that 450-degree oven. We want that perfect, juicy interior when we pull them out.
Creating the Signature honey garlic Glaze
The backbone of this whole dish is the sauce base before it even hits the pan. You need a good amount of honey—the real stuff, please!—along with low-sodium soy sauce. I use low-sodium because we are adding salt later when we thicken the sauce, and I don’t want our **honey garlic chicken** to taste like the ocean.
Then comes the fresh lemon juice. Don’t grab that bottle from the back of the fridge if you can help it! Freshly squeezed juice brightens everything up. And please, grate your garlic fresh. Those little pre-minced jars just don’t have the same punch that freshly grated cloves bring to the marinade. It’s a non-negotiable for me!

Equipment Needed for Baking honey garlic chicken
You don’t need a huge arsenal of fancy gadgets for this recipe, which is another reason why this **honey garlic chicken** is a weeknight dream! We are keeping things super straightforward here so you can get dinner on the table fast.
First up, you absolutely need a good baking sheet. A large one is best so you can arrange the chicken in a single layer—crowding the pan makes the chicken steam instead of bake, and we want golden edges!
You’ll also need a couple of mixing bowls for the marinade and the cornstarch slurry later on. And finally, grab a small saucepan for thickening up that leftover sauce. That’s it! No special thermometer or complicated whisking contraptions required. Simple tools for a simply amazing result.
Step-by-Step Instructions for honey garlic chicken
Okay, deep breath! This is where the magic happens, but I promise it’s incredibly easy to follow. We are going to do this in three simple phases: prep/marinate, bake, and sauce finish. Keep your eye on the oven timer, and you’ll have the best **honey garlic chicken** on your plate before you know it.
Marinating and Oven Setup
First things first, get that oven cranked up! Preheat your oven to 450 degrees Fahrenheit. This high heat is what gives us those beautiful caramelized edges on the chicken quickly. While it’s heating, line a large baking sheet with parchment paper. This is a lifesaver, trust me—cleanup is practically nonexistent afterward!
Now, whisk together all your wet ingredients in a medium bowl: the honey, soy sauce, that bright lemon juice, and all that gorgeous minced garlic. Once that’s combined, toss in your thinly cut chicken cutlets and make sure every piece gets happily coated in the marinade. We aren’t letting this sit overnight; just let it hang out on the counter while the oven finishes heating up—about 10 minutes is perfect. It just gives the chicken a little flavor boost while you wait.
Baking and Flipping Technique
Once the oven is screaming hot, take your marinated chicken pieces and arrange them on the lined baking sheet. Make sure they are in a single layer! If they are overlapping, they’ll steam, and we want that beautiful baked texture, not soggy chicken. Pop that tray right into the hot oven.
Set your timer for 15 minutes. When that timer buzzes, you need to flip every single piece over. Flipping is key for even browning! Put them back in for another 5 to 7 minutes. You’re looking for the chicken to be golden brown on the outside and cooked all the way through. Remember, chicken safety first—it needs to hit 165 degrees internally, but visually, you’ll see it’s firm and done.
Preparing the Thickened Sauce
While the chicken is finishing its last few minutes in the oven, we tackle the actual glaze. Pour any leftover marinade that you *didn’t* put the raw chicken into a small saucepan. Bring this to a rolling boil for about a minute. This step is important because we want to make sure any raw meat juices are killed off before we turn it into a drizzle sauce.
Now for the thickening magic! In a tiny separate bowl, whisk together the cornstarch and cold water until it’s completely smooth—this is called a slurry. Slowly whisk this slurry into the boiling sauce in the saucepan. Keep simmering and stirring for about 3 to 4 minutes. You’ll watch it transform from watery marinade into a thick, glossy, beautiful **honey garlic chicken** glaze right before your eyes. Once it coats the back of a spoon, pull it off the heat immediately!
Tips for Next-Level honey garlic chicken Success
You’ve baked the chicken, you’ve thickened the sauce—congratulations! But if you want to go from “good” to “I need to make this every Friday,” I have a few little secrets for your **honey garlic chicken** that really elevate it.
First, let’s talk about internal temperature. I know I said 15 to 20 minutes, but ovens are bossy and weird. Always trust your thermometer over the clock. Chicken breast needs to hit 165 degrees Fahrenheit inside. If you pull it out at 160, it’s fine because it will carry-over cook while you make the sauce, but never risk undercooking it!
My second big tip is about the sauce consistency. If your glaze looks a little thin after simmering, don’t panic! Just make a tiny bit more cornstarch slurry—a teaspoon of cornstarch mixed with a tablespoon of cold water—and whisk it in slowly while it simmers. It thickens fast, so go slow! You want that beautiful, sticky coating that clings perfectly to the **honey garlic chicken** pieces.
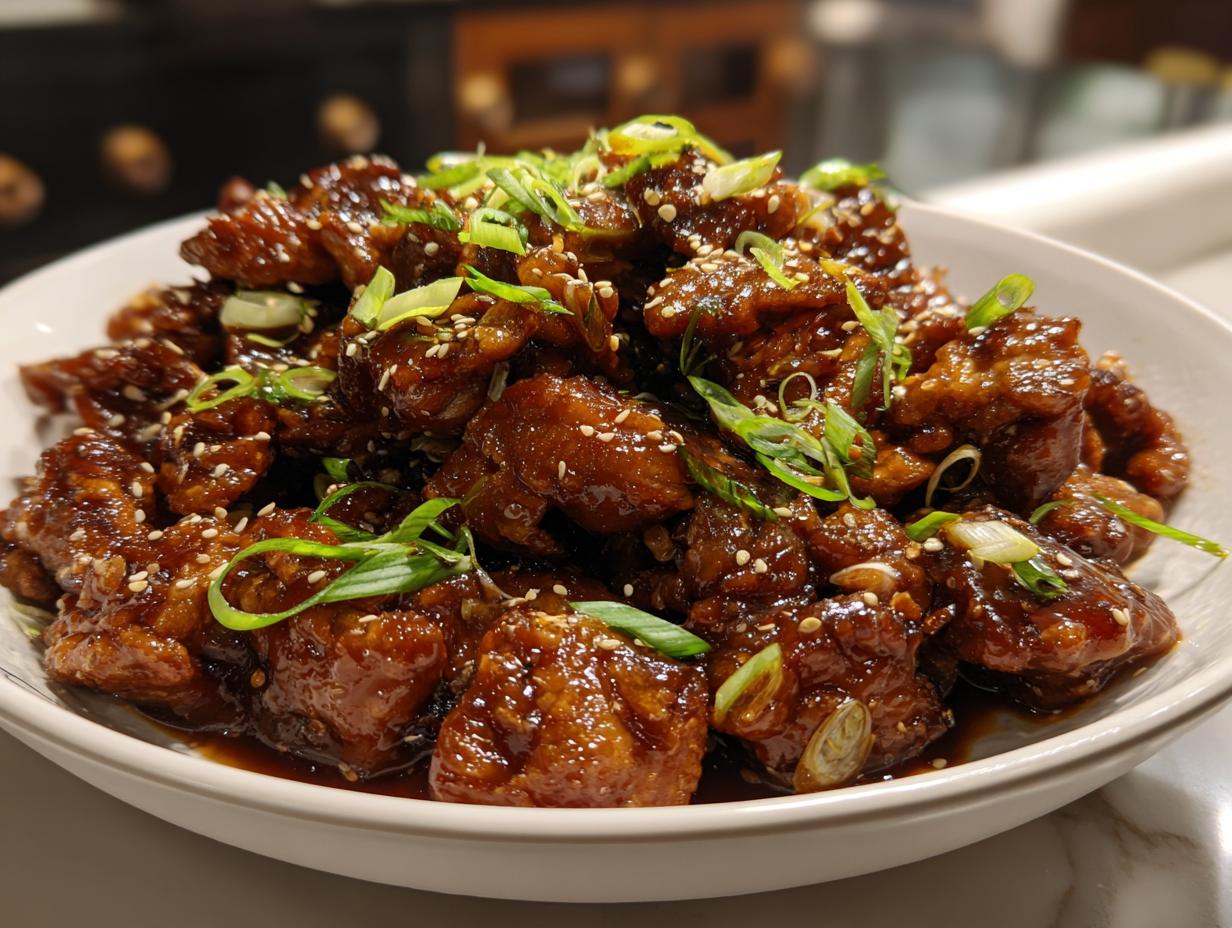
Finally, don’t forget the garnishes! While the green onions and sesame seeds are optional, they add texture and freshness that cuts through the richness. Sprinkle them on right before you serve so the onions stay crisp. It makes all the difference! You can find more great dinner ideas on our Pinterest page.
Storing and Reheating Leftover honey garlic chicken
If you manage to have any of this amazing **honey garlic chicken** leftover—which is rare in my house—storing it correctly keeps it tasting great for a few days. The key here is managing the sauce so it doesn’t get too gummy when cold.
You want to store the chicken and the extra sauce separately if you can. The chicken dries out less if it’s not swimming in sauce in the fridge. Keep the chicken tightly covered in an airtight container for up to three days. The extra glaze can go into a small jar.
When you reheat, avoid the microwave if you can, as it can make the chicken rubbery. I prefer reheating individual portions in a skillet over medium heat with a tiny splash of water or chicken broth. If the sauce is too thick, thin it out with a drop of liquid while reheating. This brings the **honey garlic chicken** right back to life! For more quick dinner inspiration, check out our guide on quick char siu chicken magic.
Quick Answers About This Recipe
I get so many questions about this recipe popping up in my inbox, which just shows how popular this easy **honey garlic chicken** is! It’s fantastic for busy nights, but sometimes folks need little tweaks depending on what they have on hand. Here are the most frequent things people ask me.
It’s so easy to adapt this recipe, but remember that changing the thickness of the chicken or the type of meat will always change the cooking time. Keep an eye on that internal temperature to be safe!
Can I use chicken thighs instead of breasts?
Oh, absolutely! Chicken thighs are actually a fantastic choice here because they are naturally more forgiving and harder to dry out than breasts. If you use boneless, skinless thighs, you should increase the baking time slightly—maybe add 5 to 8 minutes total. You’re looking for them to be very tender when pierced. They soak up that **honey garlic** flavor beautifully! Feel free to share your cooking successes with us on Facebook.
How do I make the sauce extra thick?
If your sauce didn’t get quite as thick as you wanted after simmering, don’t worry, it happens! The best way to fix it without starting over is to make a fresh, small slurry. Whisk about half a teaspoon of cornstarch with a teaspoon of cold water until it’s totally smooth. Then, slowly whisk this into your simmering sauce. Let it bubble gently for another minute or two, and it will tighten right up. Just be careful not to add too much, or you’ll end up with sticky glue instead of a glaze for your **honey garlic chicken**!
Estimated Nutritional Snapshot
Now, before you start tracking every single gram, I have to give you the standard disclaimer, even though I love sharing details! The nutrition breakdown for this **honey garlic chicken** is just an estimate based on the core ingredients listed.
Since different brands of soy sauce, honey, and chicken cutlets vary so much in sodium and fat content, these numbers (like the 33 grams of protein!) are just a general guide. If you are counting macros strictly, I always recommend plugging your exact brands into your favorite tracking app. Enjoy the taste first, and worry about the precise calculations later! If you’re looking for another quick dinner, try our honey lime chicken recipe.
Print
Amazing honey garlic chicken in 30 mins
- Total Time: 30 minutes
- Yield: 6 servings
- Diet: Omnivore
Description
This baked honey garlic chicken is juicy, tender, and coated with a sweet and savory glaze. It is an easy, 30-minute dinner using simple ingredients.
Ingredients
- 2 pounds boneless skinless chicken breasts, cut into thin cutlets
- ⅓ cup honey
- 2 tablespoons low-sodium soy sauce
- 2 tablespoons fresh lemon juice (or apple cider vinegar)
- 3 large garlic cloves, grated or minced
- 1 teaspoon cornstarch
- 1 tablespoon cold water
- 2 tablespoons sliced green onions
- 2 teaspoons sesame seeds
Instructions
- Preheat oven to 450°F. Line a large baking sheet with parchment paper.
- In a bowl, whisk together honey, soy sauce, lemon juice, and garlic.
- Add chicken cutlets and toss to coat. Let marinate while the oven heats, about 10 minutes.
- Arrange chicken in a single layer on the prepared baking sheet. Bake 15 to 20 minutes, flipping once halfway through, until golden and cooked through.
- Meanwhile, pour the leftover marinade into a small saucepan. Bring to a boil for 1 minute to ensure it is safe.
- Whisk cornstarch and water in a small bowl, then stir into the sauce. Simmer 3 to 4 minutes until thick and glossy.
- Transfer baked chicken to a serving platter and drizzle with the sauce.
- Sprinkle with green onions and sesame seeds before serving.
Notes
- Cook chicken to an internal temperature of 165°F for food safety.
- Prep Time: 10 minutes
- Cook Time: 20 minutes
- Category: Main Course
- Method: Baking
- Cuisine: American