Are you ready to meet your new favorite dessert? I’m talking about bars so tall, so rich, and so utterly decadent that your kitchen will smell like a dream factory. We are ditching standard cookies and single-layer brownies today because we are diving headfirst into the absolute best **Cookie Dough Brownie Bars** you will ever attempt. Seriously, these things are a showstopper!

I found that most layered bar recipes look incredible but are secretly fussy, requiring impossible cooling times or complicated fillings. Not this one! I spent ages getting the ratio just right so you get that perfect fudgy bottom layer, a thick blanket of safe, edible cookie dough, and a gorgeous chocolate drizzle on top. It’s the ultimate combo, and I promise you, if you can melt butter and stir, you can nail these bars.
Why I Developed This Perfect Cookie Dough Brownie Bars Recipe
My quest for the ultimate stacked bar started because I kept getting sad, thin results. The brownie layer would bake too quickly, or the cookie dough would melt right into it. It was frustrating! I wanted that beautiful height you see in bakeries, that satisfying heft when you pick up a square.
I knew I needed to establish trust right away, so I focused on two things: making the brownie base incredibly rich and ensuring the topping was genuinely safe and easy. I tested the brownie cooling times rigorously—that step is crucial! My goal was to take something that sounds intimidating, like a perfect two-layer bar, and make it totally accessible. This recipe proves you don’t need fancy equipment or pastry school training to create something truly spectacular. If you want more baking inspiration, check out my caramel apple cheesecake bars!
Gathering Your Ingredients for Cookie Dough Brownie Bars
Okay, let’s talk supplies. To get those amazing, tall **Cookie Dough Brownie Bars**, you need to pay attention to the details, especially temperature. Don’t worry; all the exact amounts are listed below in the table, but I want to highlight a few things that make a huge difference in texture.
When you look at the list, you’ll see we’re dealing with three separate components, so try to gather everything before you dive in. A little organization goes a long way when you’re building layers like this!
Selecting Ingredients for the Fudgy Brownie Base
For the brownie base, the temperature of your eggs matters more than you think. Make sure those three large eggs are at room temperature; they mix in much smoother that way. Also, when the recipe calls for melted butter, let it cool down a bit before you start mixing with the sugars. If it’s too hot, it can scramble your eggs slightly later on, and we want fudgy, not scrambled!
Essential Items for the Edible Cookie Dough Topping
This is the most important part, so listen up! For the edible cookie dough topping, you absolutely cannot skip heating the flour. I know, it seems like an extra step for a no-bake layer, but we’re doing this to kill any potential bacteria. You must heat-treat that flour—bake it first, then let it cool completely before you even touch it with the butter. It’s non-negotiable for safe, delicious cookie dough! For more dessert ideas, see my chewy pumpkin chocolate chip cookies.
Preparing the Simple Chocolate Drizzle
The drizzle is super simple, just chocolate chips and a tiny bit of oil or butter. The oil helps keep the chocolate pliable so it doesn’t crack too much when you cut the bars later on. We’ll melt this right before we need it, so just make sure you have those chips ready to go.
Equipment Needed for Perfect Cookie Dough Brownie Bars
You don’t need a ton of fancy gear for these bars, honestly! The most important item is a sturdy 9 x 13 inch baking pan. Make sure you have good parchment paper to line it—that overhang is your best friend for lifting the whole slab out later. You’ll also want a large bowl for the brownie batter and a separate medium bowl for the cookie dough. Grab your whisk for the base and a rubber spatula for careful folding.
Step-by-Step Instructions to Make Cookie Dough Brownie Bars
Now that we have our ingredients organized, let’s get to the fun part! Remember, we are working in stages here: bake the base, cool it completely, and then build the topping. Patience during the cooling stage is what guarantees those gorgeous, tall **Cookie Dough Brownie Bars**.
Baking the Fudgy Brownie Layer
First things first, get your oven warmed up to 350°F. Grease that 9×13 pan really well, and then line it with parchment paper, making sure you leave a good overhang on two sides—this is your handle later! In your large bowl, whisk together the melted butter and both sugars until they look thick and glossy. Now, whisk in the room-temperature eggs and vanilla until the mixture lightens up a bit.
In a separate bowl, you sift your dry stuff: flour, cocoa powder, salt, and baking powder. This is important for avoiding lumps! Add those dry ingredients to the wet mixture all at once. Here’s where you need to be gentle: use a spatula to *fold* everything together. Stop mixing the second you don’t see any more white flour streaks. Overmixing makes tough brownies, and we want fudgy!
Spread that batter evenly into your prepared pan. Bake it for about 22 to 28 minutes. You’re looking for a top that is set and shiny, and the edges should start pulling away from the sides of the pan. A toothpick inserted near the center should come out with moist crumbs clinging to it, not wet batter. Once you pull it out, set it on a rack and just let it cool. I mean it—completely cool. If it’s even slightly warm, the cookie dough will melt!
Preparing the Safe, Edible Cookie Dough
While the brownies are cooling, let’s tackle the cookie dough. Remember our safety rule? Take your 2 1/4 cups of flour and spread it on a baking sheet. Bake it at 300°F for about 5 to 7 minutes, stirring it halfway through. Then, you must let it cool down totally before using it. No exceptions here!
Once the flour is cool, you can make the dough. Cream the softened butter with both sugars until it’s light and fluffy, just like you would for regular cookies. Mix in your milk and vanilla. Then, reduce your mixer speed to low and slowly add the cooled, heat-treated flour and salt. Beat it just until it comes together. If it looks crumbly, add just a tiny splash more milk until it forms a thick dough that you can manage. Fold in those mini chocolate chips by hand.
Assembling and Chilling Your Cookie Dough Brownie Bars
This is the moment of truth! Take your completely cool brownie slab. Dollop spoonfuls of that edible cookie dough all over the top. Use an offset spatula or the back of a spoon to gently press and spread the dough evenly across the entire surface, right to the edges. You want a nice, thick layer!

Next, melt your drizzle chocolate chips with the oil in the microwave—short bursts, stirring in between! Drizzle that melted chocolate generously over the cookie dough layer. Now, the hardest part: chilling. You need to put the whole pan into the refrigerator for a minimum of two hours. This firms up the dough so you can get those clean, tall cuts that make these bars famous.
When it’s time to cut, use the parchment overhang to lift the whole slab onto a cutting board. Use a long, sharp knife. Wipe the knife clean between every single cut to prevent smearing the dough. Slice into 24 nice bars, and enjoy your masterpiece! If you want to see how I make my chocolate cake pops, check out that recipe!
Tips for Success with Your Cookie Dough Brownie Bars
Look, I’ve made these **Cookie Dough Brownie Bars** probably twenty times now, and I still run into little snags sometimes. The biggest issue people have is cutting them cleanly, especially because the cookie dough layer is so thick and rich. If you try to cut them while they are slightly warm or if the dough hasn’t chilled enough, you’ll get smears everywhere.
My number one tip for slicing is this: use a long knife that you run under hot water and dry completely before each cut. That heat slices right through the layers without dragging the dough. Also, if you notice your brownie base is a little too soft and gooey after cooling, just pop the pan back in the fridge for another 30 minutes before you even try to spread the dough on top.
And please, don’t get impatient during the chilling phase! That mandatory two hours in the fridge is what transforms this from a messy stack into perfect, tall **Cookie Dough Brownie Bars**.
Storing and Serving Your Cookie Dough Brownie Bars
These bars are so rich they just beg to be saved for later, but you need to store them correctly so you don’t end up with a sticky mess. Because of that beautiful, creamy edible cookie dough layer, these **Cookie Dough Brownie Bars** must stay cold. They are best served straight from the fridge! You can follow my storage tips for no-bake cookies too!
Don’t even think about leaving them on the counter for too long, especially if your kitchen runs warm. They are sturdy, but that dough layer will soften quickly.
Best Practices for Storing Leftover Cookie Dough Brownie Bars
For storage, keep them tightly covered in an airtight container in the refrigerator. I usually layer them with pieces of wax paper between the layers so they don’t stick together. If you store them this way, they stay perfect—firm and delicious—for about five days. If you need to keep them longer, they freeze like a dream!
Reheating Notes for the Best Cookie Dough Brownie Bars Experience
This is where things get interesting because we have two distinct textures. If you want to serve a slightly warmer brownie base—maybe you’re having them on a cold night—you can microwave just the brownie portion of a bar for about 10 seconds. But only do that if you’re eating it immediately! If you warm the whole bar, the cookie dough will melt, and you’ll lose that gorgeous layered effect we worked so hard for. Keep the **Cookie Dough Brownie Bars** cold for that perfect bite!
Answering Common Questions About Cookie Dough Brownie Bars
I get asked about these **Cookie Dough Brownie Bars** all the time! They look complicated, but once you know the little secrets, they are a breeze. People always have questions about the layers, especially making sure the edible dough stays safe and the brownies stay fudgy.
Can I Make the Brownie Base Ahead of Time?
Oh yes, you absolutely can! I often bake the brownie base the day before I plan to assemble everything. Once it’s baked, just leave it right in the pan, cover it tightly with plastic wrap, and stick it in the fridge overnight. Make sure it’s totally cool before you cover it, though. When you’re ready the next day, just pull it out, and it’s ready for the cookie dough topping!
What If My Cookie Dough Is Too Stiff to Spread?
This happens sometimes if your butter wasn’t quite soft enough or if you added a tiny bit too much flour. Don’t panic! If your edible dough is too stiff to spread evenly over the brownies, just mix in milk or cream, one teaspoon at a time, until it reaches a thick, spreadable consistency. Be careful not to add too much, or it will get sloppy!
What Makes This Cookie Dough Safe to Eat?
This is the most important question! The cookie dough topping is safe because we treat the flour first. We bake the flour at 300°F for about 5 to 7 minutes to kill any potential raw flour bacteria. As long as that flour is fully cooled before you mix it into the butter and sugar, you have perfectly safe, delicious **Cookie Dough Brownie Bars**! If you want to see more of my recipes, follow me on Facebook.
Share Your Cookie Dough Brownie Bars Experience
I truly hope you loved making these as much as I love sharing them with you! These **Cookie Dough Brownie Bars** are my go-to for parties because they always disappear first. Now it’s your turn to try them out! You can also save this recipe for later on Pinterest.
Head down to the comments section below and let me know how they turned out. Did you get those tall, clean layers? Don’t forget to give the recipe a star rating so other bakers know what a winner this is!
Print
Amazing 24 Cookie Dough Brownie Bars
- Total Time: 3 hours including cooling and chilling
- Yield: 24 tall bars or 16 larger bars
- Diet: N/A
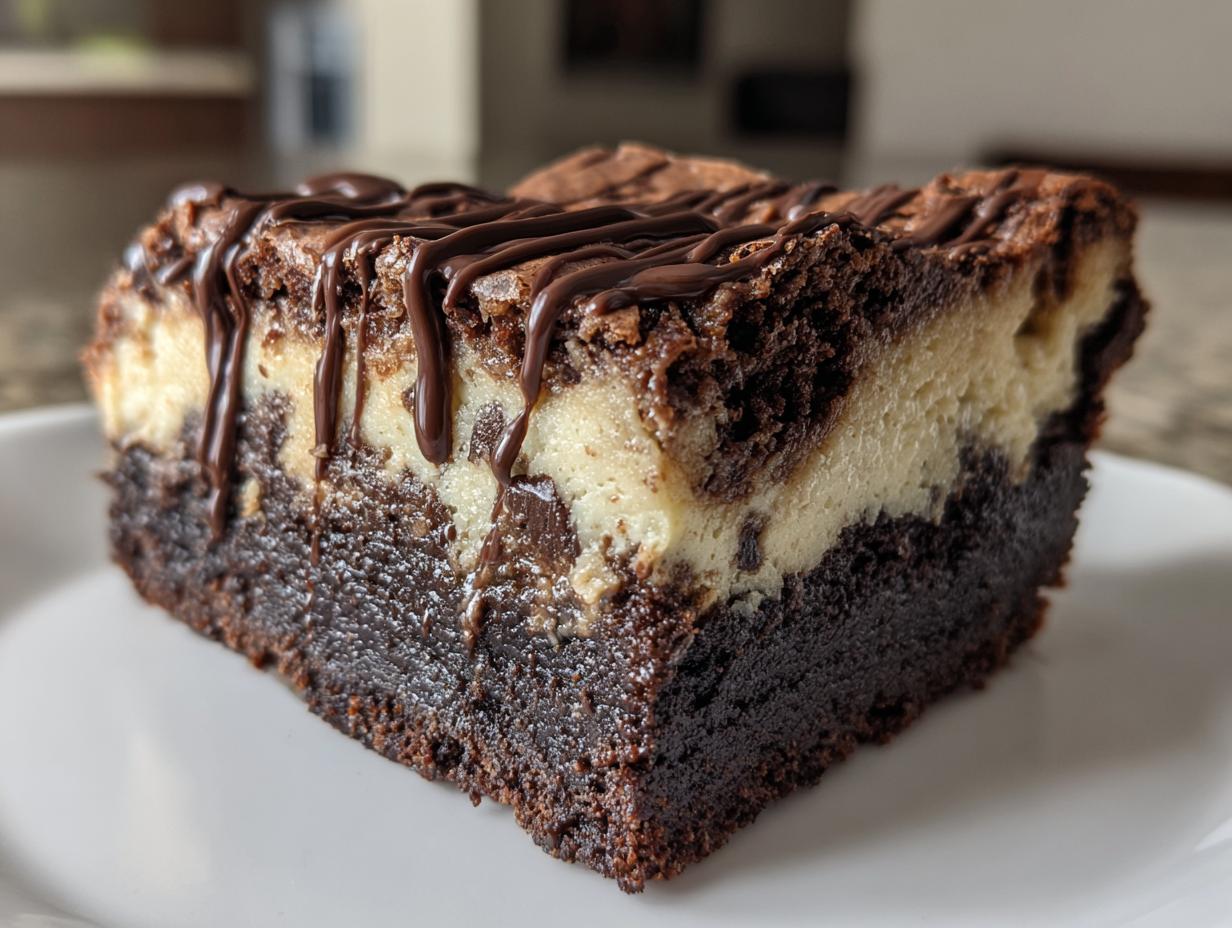
Description
Cookie Dough Brownie Bars feature a fudgy brownie base topped with safe-to-eat chocolate chip cookie dough and a chocolate drizzle, resulting in tall, stacked dessert bars.
Ingredients
- Brownie Base:
- 1 cup unsalted butter, melted and slightly cooled
- 1 cup granulated sugar
- 1 cup packed light brown sugar
- 3 large eggs, at room temperature
- 2 teaspoons vanilla extract
- 1 cup all-purpose flour, spooned and leveled
- 1 cup unsweetened cocoa powder
- 1 teaspoon fine sea salt
- 1 teaspoon baking powder
- Edible Cookie Dough Topping:
- 2 1/4 cups all-purpose flour, heat-treated and cooled
- 1 cup unsalted butter, softened
- 1 cup packed light brown sugar
- 1/2 cup granulated sugar
- 3 tablespoons milk or heavy cream, plus more as needed
- 2 teaspoons vanilla extract
- 1/2 teaspoon fine sea salt
- 1 1/2 cups mini semisweet chocolate chips
- Chocolate Drizzle:
- 1 cup semisweet chocolate chips
- 2 teaspoons neutral oil or melted butter
- For Pan:
- Neutral oil or softened butter for greasing
- Parchment paper for lining a 9 x 13 inch pan
Instructions
- Preheat the oven to 350°F. Grease a 9 x 13 inch baking pan. Line it with parchment paper, leaving an overhang on two sides.
- In a large bowl, whisk the melted butter, granulated sugar, and brown sugar until thick and glossy.
- Add the eggs and vanilla to the sugar mixture and whisk until smooth and slightly lighter in color.
- In a separate bowl, sift together the flour, cocoa powder, salt, and baking powder. Add the dry ingredients to the wet mixture.
- Gently fold the batter with a spatula until no flour streaks remain. Spread the batter evenly into the prepared pan.
- Bake for 22 to 28 minutes until the top is set and shiny, the edges pull away, and a toothpick shows moist crumbs.
- Place the pan on a wire rack and allow the brownies to cool completely.
- While the brownies cool, heat-treat the cookie dough flour by baking it at 300°F for 5 to 7 minutes, stirring, then cool it completely.
- For the cookie dough, beat the softened butter, brown sugar, and granulated sugar until light and creamy.
- Mix in the milk and vanilla until smooth. Add the cooled heat-treated flour and salt, beating on low speed until a thick dough forms. Add more milk if needed for spreadability.
- Fold in the mini chocolate chips evenly with a spatula.
- Once the brownie is cool, dollop the cookie dough over the surface. Press and spread it into an even layer edge to edge.
- Melt the drizzle chocolate chips with the oil in the microwave in short bursts, stirring until smooth.
- Drizzle the melted chocolate generously over the cookie dough layer.
- Chill the pan in the refrigerator for at least 2 hours until the cookie dough is firm and the drizzle is set.
- Use the parchment overhang to lift the slab from the pan. Cut into tall bars or squares with a long, sharp knife, wiping the blade between cuts.
- When reheating leftovers, warm the brownie portion so the base reaches 165°F or 74°C for safe serving.
Notes
- Make sure the brownie base is completely cool before adding the cookie dough to prevent melting.
- Do not skip heating the flour for the cookie dough to keep the no-bake layer safe to eat.
- Chill the assembled bars thoroughly before slicing for clean, tall layers.
- Use a hot, dry knife, wiping it between cuts, to prevent smearing the dough and drizzle.
- Store bars tightly covered in the refrigerator for up to 5 days.
- For longer storage, freeze individual bars for up to 2 months. Thaw frozen bars overnight in the refrigerator.
- Prep Time: 35 minutes plus cooling time for brownie base
- Cook Time: 25 to 30 minutes
- Category: Dessert Bars
- Method: Baking and No-Bake Assembly
- Cuisine: American