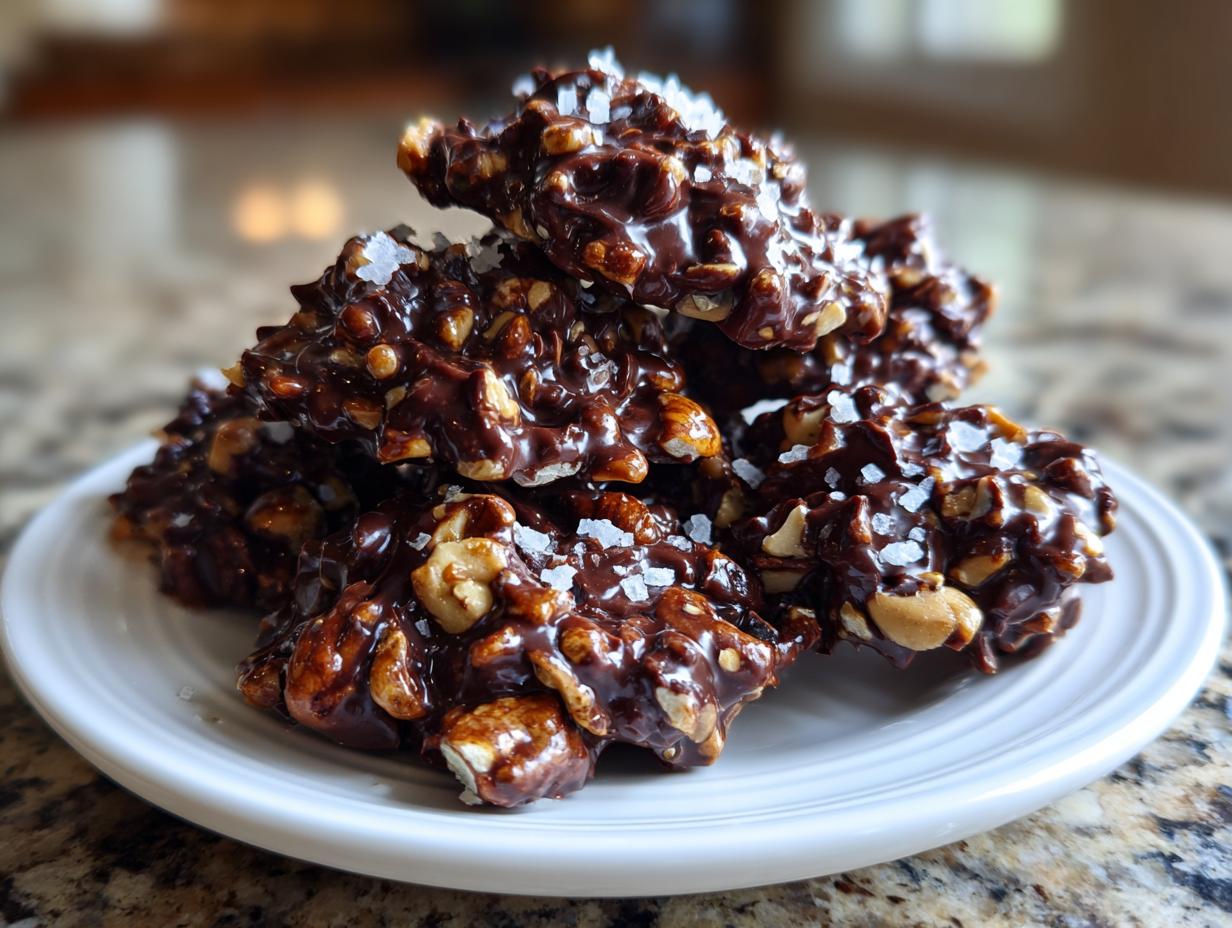
If you’ve been wanting to make a truly impressive homemade treat but you think you don’t have the time or the skill, stop right there! I’m here to tell you that my recipe for Dark Chocolate Sea Salt Nut Clusters is about to become your new best friend. Seriously, this is the easiest, crunchiest, most satisfying snack you can whip up in about fifteen minutes.
When I first started experimenting in the kitchen, I was terrified of candy making. Things always melted when they shouldn’t or tasted burnt. That’s why I developed this recipe—it’s virtually foolproof! All you need are four basic things, and the whole thing comes together before you even have time to clean up your measuring spoons. These Dark Chocolate Sea Salt Nut Clusters are perfect for last-minute gifts or just hiding in the back of the fridge for yourself.
Trust me, once you nail the ratio of salty to sweet, you’ll never buy those expensive pre-made bars again. We’re talking about pure, glorious, sweet-salty goodness!

Essential Components for Your Dark Chocolate Sea Salt Nut Clusters
The best part about these amazing Dark Chocolate Sea Salt Nut Clusters is that you don’t need a complicated grocery run. We are keeping it super simple here—just four main ingredients! That’s it! If you can open four packages, you can make this snack. I love recipes that skip the ten-step ingredient list because honestly, who has the patience for that?
The quality of these few items really shines through in the final product, especially that dark chocolate. Don’t skimp on the cocoa percentage if you can help it; that’s what gives us that wonderful salty-sweet contrast.
Gathering Ingredients for Dark Chocolate Sea Salt Nut Clusters
Here is exactly what you’ll need to gather before you even think about turning on the stove. Remember, we have to work fast once the chocolate melts, so have everything measured out and ready to go!
| Ingredient | Amount | Notes |
|---|---|---|
| Dark Chocolate Chips or Bar (70% cocoa recommended) | 10 ounces | Use good quality chocolate; it makes a huge difference! |
| Mixed Raw Nuts (almonds, cashews, pecans, walnuts) | 1½ cups | Toast these first for the best flavor. |
| Coconut Oil | 1 tablespoon | Helps the chocolate melt smoothly and adds a nice sheen. |
| Flaky Sea Salt | 1 teaspoon | This is the star salt! Don’t use table salt here. |
Preparing the Nuts: A Key Step for Flavor
Okay, listen up, because this might seem like an extra step, but it is crucial for making truly fantastic Dark Chocolate Sea Salt Nut Clusters. We absolutely must toast the nuts first. If you toss them in raw, they just taste… flat. Toasting brings out all those wonderful, deep, earthy flavors that pair perfectly with dark chocolate.
Get a dry skillet—no oil needed—and set it over medium heat. Toss in your mixed nuts and stir constantly! I mean it, keep them moving! They go from beautifully fragrant to absolutely bitter in about thirty seconds, so stay right there by the stove. You want them lightly golden and smelling amazing, not black around the edges. That’s my secret to avoiding that bitter taste in the final clusters.
Once they smell nutty and look just slightly tanned, pull them off the heat immediately and transfer them to a separate bowl to cool down for a few minutes. If you mix hot nuts with hot chocolate, you run into trouble later. This quick toast elevates these simple clusters from good to seriously addictive!
Step-by-Step Instructions for Perfect Dark Chocolate Sea Salt Nut Clusters
Now for the fun part! This is where everything comes together so quickly. Remember how I said these Dark Chocolate Sea Salt Nut Clusters are beginner-friendly? It’s because the actual assembly takes less time than it takes to brew a pot of coffee. You’ll need that baking sheet lined with parchment paper sitting right next to your freezer—that’s our workspace!
Once your toasted nuts are cool enough to handle, it’s time to focus on the chocolate. We need it liquid gold, smooth as silk, and ready to coat everything beautifully. Work quickly from this point on because the chocolate will start grabbing onto those nuts and setting up!
Melting the Chocolate Base
Take your 10 ounces of dark chocolate and that tablespoon of coconut oil and put them into a microwave-safe bowl. I know some people swear by the double boiler method, but honestly, for something this quick, the microwave is my go-to. Just be smart about it! Microwave it in short bursts—thirty seconds at a time is perfect. After each thirty seconds, pull it out and stir it really well with a rubber spatula. Don’t try to rush it by microwaving for a full two minutes straight, or you’ll scorch the chocolate, and that’s a disaster.
Keep going until it looks completely melted and glossy. The coconut oil is key here; it helps thin the chocolate just enough so it flows beautifully around every little nook and cranny of those nuts, giving you that perfect smooth coating.
Combining and Shaping Your Dark Chocolate Sea Salt Nut Clusters
As soon as the chocolate is smooth, dump those cooled, toasted nuts right in! Use your spatula and fold everything together gently but thoroughly. You want every single nut to get a nice, thick layer of chocolate. Don’t mix for too long, though, just until they are all coated.
Next, you need to portion them out onto your parchment-lined sheet. I like using a small cookie scoop for this, maybe a tablespoon size, so all my Dark Chocolate Sea Salt Nut Clusters look uniform. If you don’t have a scoop, just use two spoons to drop little mounds onto the sheet, leaving about an inch between each cluster.
This is the absolute best part: the salt! Before the chocolate has a chance to firm up even a little bit, grab your flaky sea salt. Sprinkle a tiny pinch right over the top of each mound. That flaky salt just sitting on top when it sets looks gorgeous, and the burst of saltiness when you bite into it is everything. Seriously, don’t skip salting them while they are wet!
Finally, get that whole sheet into the freezer. They only need about ten to twelve minutes to set up completely. You’ll know they are done when they are rock solid and easy to peel off the parchment. Quick, right?

Tips for Success with Dark Chocolate Sea Salt Nut Clusters
Making these Dark Chocolate Sea Salt Nut Clusters is super fast, but a couple of little tricks will make them perfect every single time. My biggest piece of advice, which I learned the hard way, is about temperature control. Remember when we toasted the nuts? You must let them cool down a bit before dumping them into the melted chocolate. If the nuts are too hot, they thin out the chocolate way too much, and you end up with a flat, oily mess instead of a sturdy cluster.
The second major tip is speed. Once those nuts hit the warm chocolate, the clock starts ticking! Chocolate starts setting up pretty quickly, especially when it’s mixed with nuts, so work quickly when you are spooning out those dollops onto the baking sheet. If you see the chocolate getting stiff while you’re still scooping, just pop the bowl back in the microwave for ten seconds to loosen it up again.
Also, if you want them all to look like they came from a fancy candy shop, use a cookie scoop! It keeps the portion sizes consistent. Following these little rules ensures your Dark Chocolate Sea Salt Nut Clusters have that great crunch and salty finish we are looking for!
Storage and Keeping Your Dark Chocolate Sea Salt Nut Clusters Fresh
These crunchy Dark Chocolate Sea Salt Nut Clusters are so good, you might want to hide them away! The main thing to remember is that they are chocolate, and chocolate hates heat. If your kitchen gets too warm, they will start to sweat and lose their snap. You need to keep them cool, which means storing them in an airtight container.
I always keep mine in the fridge, especially if it’s summer. If you want them to last longer than a week, the freezer is your best bet. They freeze beautifully! Here’s the breakdown on how to keep them perfect:
| Storage Location | Maximum Duration | Serving Tip |
|---|---|---|
| Airtight Container (Room Temp below 70°F) | Until they are gone! | Eat right away. |
| Airtight Container (Refrigerator) | Up to 2 weeks | Let them sit out for 5 minutes before eating for the best texture. |
| Freezer | Up to 2 months | Pull them out about 5 minutes before serving so they aren’t rock hard. |
Answering Common Questions About Dark Chocolate Sea Salt Nut Clusters
I get so many messages about these clusters! They are such an easy chocolate treat, but sometimes people have questions about swapping things out. Don’t worry if you don’t have the exact nuts listed; this recipe is super forgiving.
Q1. Can I use milk chocolate instead of dark chocolate?
You certainly can, but you might want to increase the salt slightly! Milk chocolate is much sweeter, so you lose some of that sharp contrast we love in the Dark Chocolate Sea Salt Nut Clusters. If you use milk chocolate, maybe add just a tiny bit more flaky salt on top.
Q2. What if I don’t have coconut oil? Can I skip it?
Please don’t skip it entirely! The coconut oil is essential because it helps the chocolate melt smoothly and gives it that perfect glossy finish when it sets. If you are out of coconut oil, butter works in a pinch, but use slightly less—maybe two teaspoons instead of a full tablespoon—because butter has more water content.
Q3. My clusters are too soft. Did I mess up the setting time?
If they are soft, they probably didn’t freeze long enough, or maybe your kitchen is warm! The freezer time is non-negotiable; they need that blast of cold to harden properly. If you plan to store them long-term, the fridge or freezer is always safer than the counter, especially for these Dark Chocolate Sea Salt Nut Clusters.
Q4. Can I add dried fruit to this easy chocolate treat?
Yes! Just make sure any dried fruit, like dried cherries or cranberries, is chopped up small. And here’s a pro tip: if you do add fruit, make sure you toast the nuts first, then let them cool completely, then mix the fruit with the nuts before adding them to the chocolate. This keeps everything from getting too sticky!
How You Can Modify Your Simple Dark Chocolate Sea Salt Nut Clusters
While the four-ingredient base for these Dark Chocolate Sea Salt Nut Clusters is perfect as is, I always encourage people to play around a little bit once they master the basic method. These clusters are so adaptable! If pecans aren’t your favorite, feel free to swap them out for pistachios or even pepitas for a different crunch.
For those who like a little warmth, try adding about half a teaspoon of ground cinnamon or maybe a tiny pinch of cayenne pepper right when you mix the nuts into the melted chocolate. That little bit of spice plays so beautifully with the dark chocolate and the flaky sea salt. Just remember, keep the additions small so you don’t throw off the balance we worked so hard to achieve in these easy chocolate treats!
If you want to see more of our quick recipes, check us out on Facebook or follow us on Pinterest!
Print
Amazing 4-Minute Dark Chocolate Sea Salt Nut Clusters
- Total Time: 15 minutes
- Yield: 16 clusters (8 servings)
- Diet: N/A
Description
Quick 15-minute dark chocolate nut clusters with sea salt. Only 4 ingredients needed for this crunchy, sweet-salty snack perfect for winter gifting.
Ingredients
- 10 ounces dark chocolate chips or chopped dark chocolate bar (70% cocoa)
- 1½ cups mixed raw nuts (almonds, cashews, pecans, walnuts)
- 1 tablespoon coconut oil
- 1 teaspoon flaky sea salt
Instructions
- Line a large baking sheet with parchment paper and place it near your freezer.
- Toast nuts in a dry skillet over medium heat for 4 to 5 minutes, stirring constantly until fragrant and lightly golden.
- Transfer toasted nuts to a bowl and let them cool for 3 minutes while you prepare the chocolate.
- Combine dark chocolate and coconut oil in a microwave-safe bowl. Microwave in 30-second intervals, stirring between each, until completely melted and smooth.
- Add cooled toasted nuts to the melted chocolate and stir with a rubber spatula until nuts are fully coated.
- Spoon tablespoon-sized portions of the chocolate-nut mixture onto the prepared baking sheet, spacing them 1 inch apart.
- Sprinkle each cluster with a small pinch of flaky sea salt while the chocolate is still wet.
- Place the baking sheet in the freezer for 10 to 12 minutes until the chocolate hardens and clusters are completely set.
- Remove from the freezer and serve immediately, or store in an airtight container keeping clusters below 70°F to prevent melting.
Notes
- Toast nuts until just fragrant but not dark brown; burnt nuts taste bitter.
- Allow nuts to cool slightly before mixing with chocolate to keep the chocolate from becoming too thin.
- Use a cookie scoop for uniform cluster sizes.
- Work quickly when forming clusters because chocolate begins to set at room temperature.
- Store clusters in the refrigerator during warm weather to maintain their shape.
- Store clusters in an airtight container in the refrigerator for up to 2 weeks or in the freezer for up to 2 months.
- Remove from the refrigerator 5 minutes before serving for the best texture.
- Prep Time: 5 minutes
- Cook Time: 10 minutes
- Category: Snack
- Method: No-bake, Stovetop/Microwave
- Cuisine: American