I’m always on the hunt for snacks that taste like a total indulgence but secretly pack a huge protein punch, and wow, have I nailed it with this one. Forget those watery, bland dips you sometimes find at parties. This Protein-Packed Nacho Yogurt Dip with Beans is the real deal! It’s super creamy, bursting with that familiar taco flavor you crave, and it comes together faster than you can argue about who gets the last chip.
The beauty of this recipe—and honestly, my favorite kind of cooking—is that it relies on simple assembly, not actual cooking! If you can stir things in a bowl and spread them in a dish, you can make this. My goal is always to get something truly satisfying on the table using minimal effort, and this layered dip proves you don’t need hours in the kitchen to create something impressive.
The secret weapon here is using Greek yogurt instead of sour cream, which immediately skyrockets the protein content. Trust me, once you layer those seasoned beans underneath and top it with cheese and pico, you won’t even notice the difference, except for feeling way better about eating half the dish yourself!

Assembling Your Protein-Packed Nacho Yogurt Dip with Beans Ingredients
Okay, let’s get organized! This dip has two distinct flavor zones that need their own seasoning mixes, so make sure you keep your bowls separate while mixing. We need to treat the bean layer and the yogurt layer like two separate, important entities working together. Don’t substitute the Greek yogurt for anything thin; we need that thick, creamy body!
It’s all about the layers here, so pay close attention to the quantities. We’re building a masterpiece, even if it only takes about ten minutes of actual work. Grab your bowls and let’s list exactly what you need for this fantastic, high-protein snack.
Essential Components for the Protein-Packed Nacho Yogurt Dip with Beans
| Ingredient | Quantity/Preparation | Notes/Purpose |
|---|---|---|
| Refried Beans | 1 can (15 ounces) | The savory bottom layer. |
| Cumin/Garlic Powder (for beans) | ½ tsp cumin, ¼ tsp garlic powder | Seasoning the bean base specifically. |
| Plain Greek Yogurt | 2 cups | Must be plain! This is the protein powerhouse. |
| Taco Seasoning | 1 tablespoon | For the main yogurt flavor. |
| Lime Juice | 1 tablespoon | Keeps the yogurt bright and zesty. |
| Spices (for yogurt) | ½ tsp chili powder, ½ tsp cumin, ½ tsp garlic powder, ½ tsp onion powder, ¼ tsp paprika | The full secondary seasoning blend. |
| Mexican Cheese Blend | 1 cup, shredded | Melty goodness on top of the yogurt. |
| Pico de Gallo or Diced Tomatoes | 1 cup | For the fresh, chunky topping layer. |
| Black Olives | ½ cup, sliced | Classic nacho topping. |
| Green Onions | ½ cup, sliced | Adds a nice sharp bite. |
| Fresh Cilantro | ¼ cup, chopped | Don’t skip this; it adds so much freshness! |
Mastering the Flavor Layers: How to Prepare Protein-Packed Nacho Yogurt Dip with Beans
This is where the magic happens, even though we aren’t turning on the stove! We’re building this dip from the ground up, and the order is super important for both structure and taste. If you rush the layers, things can get a little messy when you try to scoop it. Take your time with the spreading; it pays off big time when it’s time for dipping!
Preparing the Savory Bean Base
First things first, we tackle the refried beans. Open up that can and dump them into a small bowl. Now, don’t just use them plain! We’re adding that little bit of extra flavor right at the bottom. Mix in the half teaspoon of cumin and the quarter teaspoon of garlic powder until everything is totally incorporated. You want those seasonings to marry the beans evenly.
Once that’s mixed well, you need a 9×9 inch dish—ceramic or glass works best for me. Spread those seasoned beans out across the bottom. I mean spread them. Use the back of a spoon or a small spatula to push them right into the corners, making one solid, flat, savory foundation. Don’t leave any bare spots where the yogurt will touch the glass!
Creating the Creamy Taco Yogurt Layer
Next up: the protein star! Grab a medium bowl—and make sure it’s dry—because we are making this yogurt layer unbelievably smooth. Toss in your two cups of plain Greek yogurt. Then, add all those beautiful dry seasonings: the taco seasoning, chili powder, that extra cumin, garlic powder, onion powder, and paprika. Oh, and don’t forget the tablespoon of bright lime juice!
Now, whisk, whisk, whisk! You need to beat this mixture until it is completely smooth. I mean it—no lumps of yogurt clinging to the sides. Whisking thoroughly incorporates the spices and gives the yogurt a lighter, almost fluffy texture that contrasts perfectly with the dense beans underneath. Once it’s one uniform pale orange color, gently spread this mixture right over your bean base. Again, cover every inch of those beans!

Layering and Chilling the Protein-Packed Nacho Yogurt Dip with Beans
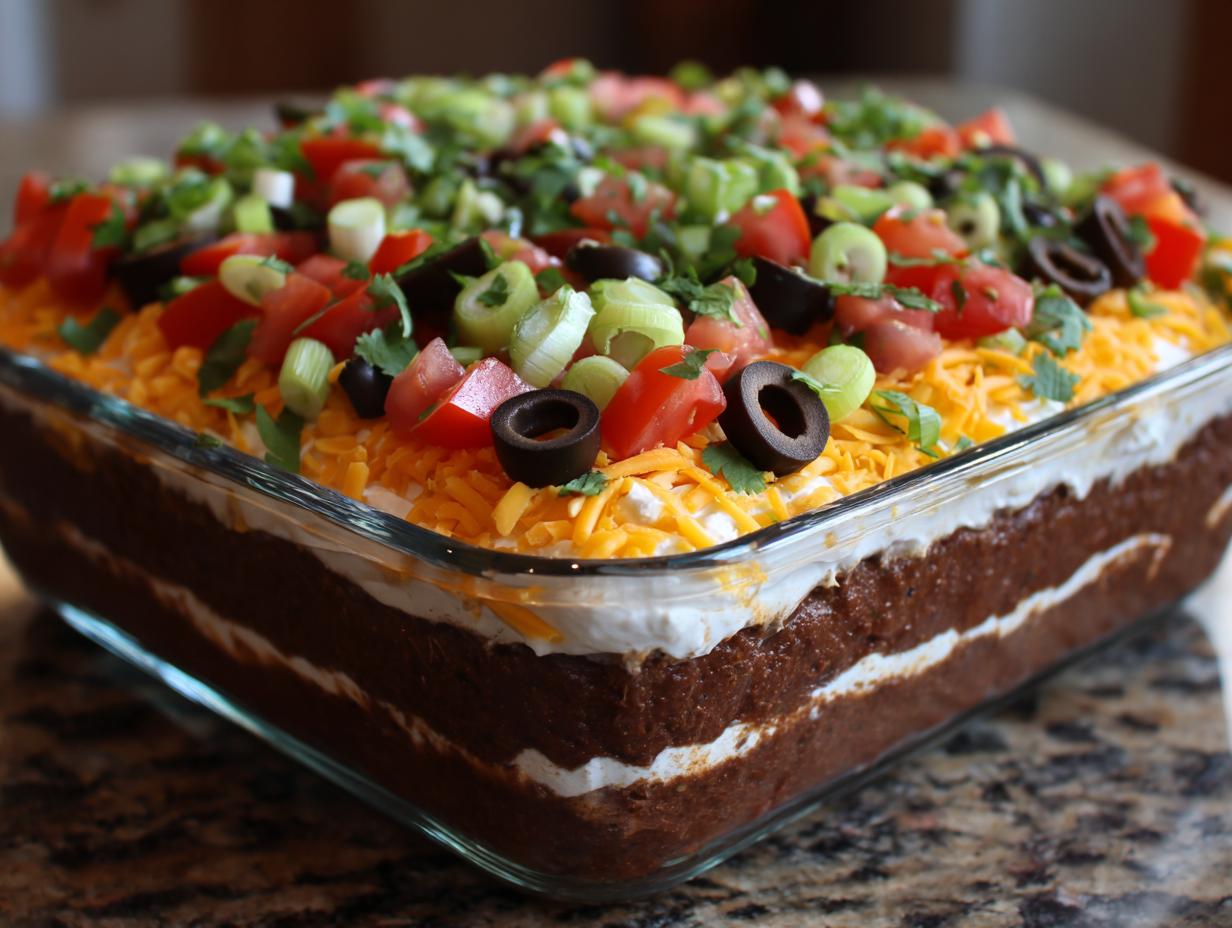
We’re almost there! Sprinkle that cup of Mexican cheese blend evenly over the yogurt. Don’t pile it up in one spot; try to get a nice, even blanket of cheese. Then, top that with your cup of pico de gallo—or diced tomatoes if you aren’t using pico—spreading it gently so you don’t disturb the cheese underneath.
Finally, add the garnish party: the sliced black olives, the green onions, and all that fresh, chopped cilantro. This is the part that looks so beautiful! Now, this is the most important, non-negotiable step: cover that dish tightly and get it into the fridge. You absolutely must let this chill for a minimum of one hour. Seriously, don’t skip this. Chilling allows the flavors to really settle into each other, and it helps the layers firm up so your dip doesn’t turn into soup when people start scooping!
Tips for Success with Your Protein-Packed Nacho Yogurt Dip with Beans
Even though this dip is super easy, a few little tricks will take it from good to absolutely legendary. My main focus when making this is always making sure those layers stay distinct and that the fresh toppings stay crisp. Trust me, presentation matters!
First, that chilling time is non-negotiable. If you try to serve this after only 15 minutes, the yogurt layer will be too soft, and it’ll mix right into the beans when you dig in. Aim for at least an hour, but honestly, if you make it the morning before a party, it’s even better! The spices really bloom overnight, making the whole thing taste deeper.
For the absolute best result, wait until just before you set the dip out to add the olives, green onions, and cilantro. If you put those fresh garnishes on before the long chill, they can sometimes wilt a little bit into the cheese. Fresh toppings mean maximum crunch and color!
Also, when you spread that yogurt mixture, be firm but gentle. You want to seal the beans completely. If you leave gaps, the moisture from the yogurt can seep down and make the bean layer a bit watery. A good, even seal ensures you get that perfect textural contrast in every single scoop.
Ingredient Notes and Substitutions for Your Dip
I get asked all the time about swapping ingredients in this layered dip, especially since the texture is so important. Listen, the Greek yogurt is the backbone of this whole high-protein concept, so please stick with plain Greek yogurt. You need that thickness!
I prefer using full-fat or 2% milkfat yogurt because the lower fat versions sometimes get a little too watery when they chill. If you use non-fat, you might notice it separates slightly. Just avoid flavored yogurts completely—we want savory taco flavor, not vanilla!
As for the cheese blend, that’s much more flexible. If you don’t have a Mexican mix, feel free to use sharp cheddar, Monterey Jack, or even Pepper Jack if you want a little extra kick! Just make sure whatever you choose is nicely shredded so it melts evenly over that beautiful yogurt layer.
Serving Suggestions for Protein-Packed Nacho Yogurt Dip with Beans
Now that you have this incredible, creamy, high-protein dip ready to go, the only question left is: what are you going to scoop it with? We want things that can handle the weight of those layers, especially the bean base!
Of course, classic tortilla chips are always a winner. I love using sturdy, restaurant-style chips that won’t snap off halfway through the scoop. But if you want to keep things lighter, we have some fantastic options mentioned in the notes that are perfect for snacking or serving at a gathering. If you are looking for other great snack ideas, check out my snack recipes!
For a great crunch and a veggie boost, definitely try dipping some crisp bell pepper strips—red and yellow peppers look so bright against the dip! Cucumber slices are surprisingly great here too; they add a cool freshness that cuts through the spice. And don’t forget whole-grain crackers if you want something a little heartier than a chip.
Honestly, I’ve even served this as a topping over baked sweet potatoes when I’m feeling extra hungry. It’s so versatile!
Storing and Reheating Your Protein-Packed Nacho Yogurt Dip with Beans
Because this dip relies heavily on fresh dairy and fresh vegetables for its texture, we treat it a little differently than, say, a hot bean dip. The good news is that it keeps really well, but you have to remember the golden rule: this dip is served cold, never hot!
The yogurt layer and the fresh vegetable toppings don’t handle heat well. If you try to microwave this, the Greek yogurt will break and get soupy, and nobody wants that! So, we keep it chilled.
| Storage Aspect | Details |
|---|---|
| Storage Duration | You can cover this tightly and keep it in the refrigerator for up to 3 days. The flavors actually get better on Day 2! |
| Best Practice | Always cover the dish tightly with plastic wrap or a solid lid to prevent the yogurt from absorbing any fridge smells. |
| Reheating Advice | Do not reheat! This dip is designed to be served cold or chilled straight from the fridge. |
| Topping Freshness | If you know you won’t eat it all in one day, consider leaving off the pico de gallo and olives until you serve the leftovers the next day. |
Frequently Asked Questions About This High-Protein Dip
I always get a flood of questions when people try this recipe for the first time, which is great because it means you’re excited to dive into this amazing high-protein snack! Here are the things I hear most often when folks are whipping up their first batch of this Protein-Packed Nacho Yogurt Dip with Beans.
Can I make this Protein-Packed Nacho Yogurt Dip with Beans ahead of time?
Yes, you absolutely can! In fact, I highly recommend it. You can assemble the entire dip—beans, yogurt, cheese, and all the sturdy toppings like olives and onions—the night before. Cover it up and let it hang out in the fridge. The chilling time allows the spices to really mingle and deepen, making the whole Greek yogurt dip taste richer. Just make sure you wait until about 30 minutes before serving to scatter the fresh pico de gallo and cilantro on top so they stay bright and crisp!
What is the best way to thin out the yogurt layer if it is too thick?
Sometimes Greek yogurt brands vary wildly in thickness, right? If you whisk your yogurt layer and it seems too stiff—like it’s hard to spread—don’t panic! You just need a tiny bit of liquid. My first choice is always to add another half teaspoon of lime juice because that keeps the flavor profile right on track. If that doesn’t help enough, add water, just a teaspoon at a time, whisking gently until it spreads nicely. Remember, we are aiming for spreadable, not runny!
Why does this Protein-Packed Nacho Yogurt Dip with Beans need to chill?
Oh, the chilling process is essential for two big reasons. First, flavor melding. When those spices sit with the yogurt and beans for an hour or more, they stop tasting like separate ingredients and start tasting like one harmonious taco flavor explosion. Second, structure! The cold temperature firms up the yogurt layer and the cheese just enough so that when you stick a chip in there, you get a clean scoop of all the layers instead of just dragging up a sloppy mess. It really sets everything perfectly.
Share Your Experience Making the Protein-Packed Nacho Yogurt Dip with Beans
I truly hope this recipe brings as much easy, delicious snacking to your house as it does to mine! I put so much love into testing these layers to make sure they were perfect for you.
Did you try it out for game day or just a Tuesday night? I’d absolutely love to hear about it! Drop a comment below and let me know how many stars you’re giving this high-protein dip. Did the family guess it was yogurt? Tell all! You can also share your creations with us on Facebook or save this recipe on Pinterest.
Print
Amazing 10-Minute Protein-Packed Nacho Yogurt Dip
- Total Time: 1 hour 10 minutes
- Yield: 8 servings
- Diet: Vegetarian
Description
Creamy nacho yogurt dip made with Greek yogurt and beans. High-protein taco-seasoned dip ready fast. Perfect for veggies or chips.
Ingredients
- 1 can (15 ounces) refried beans
- ½ teaspoon ground cumin (for beans)
- ¼ teaspoon garlic powder (for beans)
- 2 cups plain Greek yogurt
- 1 tablespoon taco seasoning
- 1 tablespoon lime juice
- ½ teaspoon chili powder
- ½ teaspoon ground cumin (for yogurt)
- ½ teaspoon garlic powder (for yogurt)
- ½ teaspoon onion powder
- ¼ teaspoon paprika
- 1 cup shredded Mexican cheese blend
- 1 cup fresh pico de gallo or diced tomatoes
- ½ cup sliced black olives
- ½ cup green onions, sliced
- ¼ cup fresh cilantro, chopped
- Optional: diced avocado or prepared guacamole
Instructions
- Combine refried beans with ground cumin and garlic powder in a small bowl and stir until well mixed.
- Spread the seasoned refried beans evenly across the bottom of a 9×9-inch glass or ceramic dish as the first layer.
- In a medium bowl, whisk together Greek yogurt, taco seasoning, lime juice, chili powder, cumin, garlic powder, onion powder, and paprika until smooth and well combined.
- Spread the taco-seasoned yogurt mixture evenly over the bean layer, reaching all edges.
- Sprinkle the shredded Mexican cheese blend evenly over the yogurt layer.
- Top with fresh pico de gallo or diced tomatoes, spreading them in an even layer.
- Garnish with sliced black olives, green onions, and fresh chopped cilantro.
- Cover and refrigerate for at least 1 hour to allow the layers to settle and flavors to meld together.
- Serve chilled with tortilla chips, vegetable sticks, or whole-grain crackers.
Notes
- Let the dip chill for at least 1 hour before serving so the layers set properly and flavors develop.
- Add the toppings just before serving to keep them fresh and crisp.
- Store the dip covered tightly in the refrigerator for up to 3 days.
- Serve with bell pepper strips, cucumber slices, and whole-grain tortilla chips.
- Prep Time: 10 minutes
- Cook Time: 0 minutes
- Category: Dip
- Method: Chilling
- Cuisine: Mexican-inspired