If you think cauliflower is only good for roasting or making rice, you’ve been missing out on breakfast magic! I’ve spent years perfecting simple, healthy swaps in my kitchen, and I’m here to tell you that these Cauliflower Hash Browns are the crispiest, most satisfying low-carb option you’ll ever try. Forget the soggy disappointment you might have experienced before; my technique locks in all the flavor and delivers that perfect golden crunch we crave.
They come together faster than waiting for a drive-thru line, and honestly, they taste better than the potato version, especially paired with the zesty garlic aioli I’ve included below. Trust me, once you master this simple trick, these will become your new go-to side dish! 
Why You Should Make These Cauliflower Hash Browns Today
Why wait for the weekend? These are so fast you can whip them up on a Tuesday morning before work. They deliver on texture and flavor without weighing you down like traditional potato versions do. We’re talking real breakfast satisfaction here!
- Super quick prep time—you’ll be eating in under 30 minutes.
- They are naturally low-carb and gluten-free friendly, so everyone can enjoy them.
- The texture is honestly the best part: crispy edges and a tender, flavorful center.
Essential Equipment for Perfect Cauliflower Hash Browns
You don’t need a ton of fancy gadgets for these, but having the right tools makes all the difference, especially when dealing with vegetables that hold water. A good pan is crucial for that beautiful crispiness we are aiming for!
- A sturdy box grater or food processor to get that perfect rice-like texture.
- A clean, absorbent kitchen towel—this is non-negotiable for squeezing out moisture!
- A large nonstick or cast-iron skillet for achieving that deep golden crust.
- A wide spatula for flipping those delicate patties without breaking them.
Gathering Ingredients for Flavorful Cauliflower Hash Browns
Alright, let’s talk about what goes into making these amazing Cauliflower Hash Browns. The key here is using fresh ingredients and making sure we distinguish between the garlic we want in the patty and the garlic we want in our dipping sauce. Seriously, the Parmesan cheese melts right into the mixture, acting like the perfect binder alongside those eggs.
Don’t stress about finding obscure items; everything listed is pretty standard, but the ratios matter a lot for getting that perfect crispiness. Once you see the list, you’ll realize how simple this breakfast really is! If you are looking for other quick breakfast ideas, check out my guide on 14 High Protein Breakfasts in 15 Minutes.
Ingredients for the Cauliflower Hash Browns
Take a peek at the main ingredient list below. For the cauliflower itself, you absolutely need to process or grate it until it resembles rice. We need about 4 cups total, which usually comes from one medium head. Pay close attention to where the Parmesan and almond flour are listed—those are essential for structure!
Ingredients for the Zesty Garlic Aioli
This aioli is what takes these hash browns from “good” to “I need to make these every Sunday.” Notice that we use minced garlic in the hash browns themselves for savory depth, but the aioli gets a finer mince of fresh raw garlic for that sharp, zesty kick. It’s a small difference, but it makes the final flavor pop!
Ingredient Preparation Notes
Before you even think about mixing things up, you have two absolute must-do steps. First, you must squeeze every drop of water out of that processed cauliflower. I mean it—wring that towel until your knuckles turn white! Second, make sure that garlic for the hash browns is minced nicely, but the garlic for the aioli should be almost paste-like so it disappears beautifully into the mayo base.
Step-by-Step Instructions for Crispy Cauliflower Hash Browns
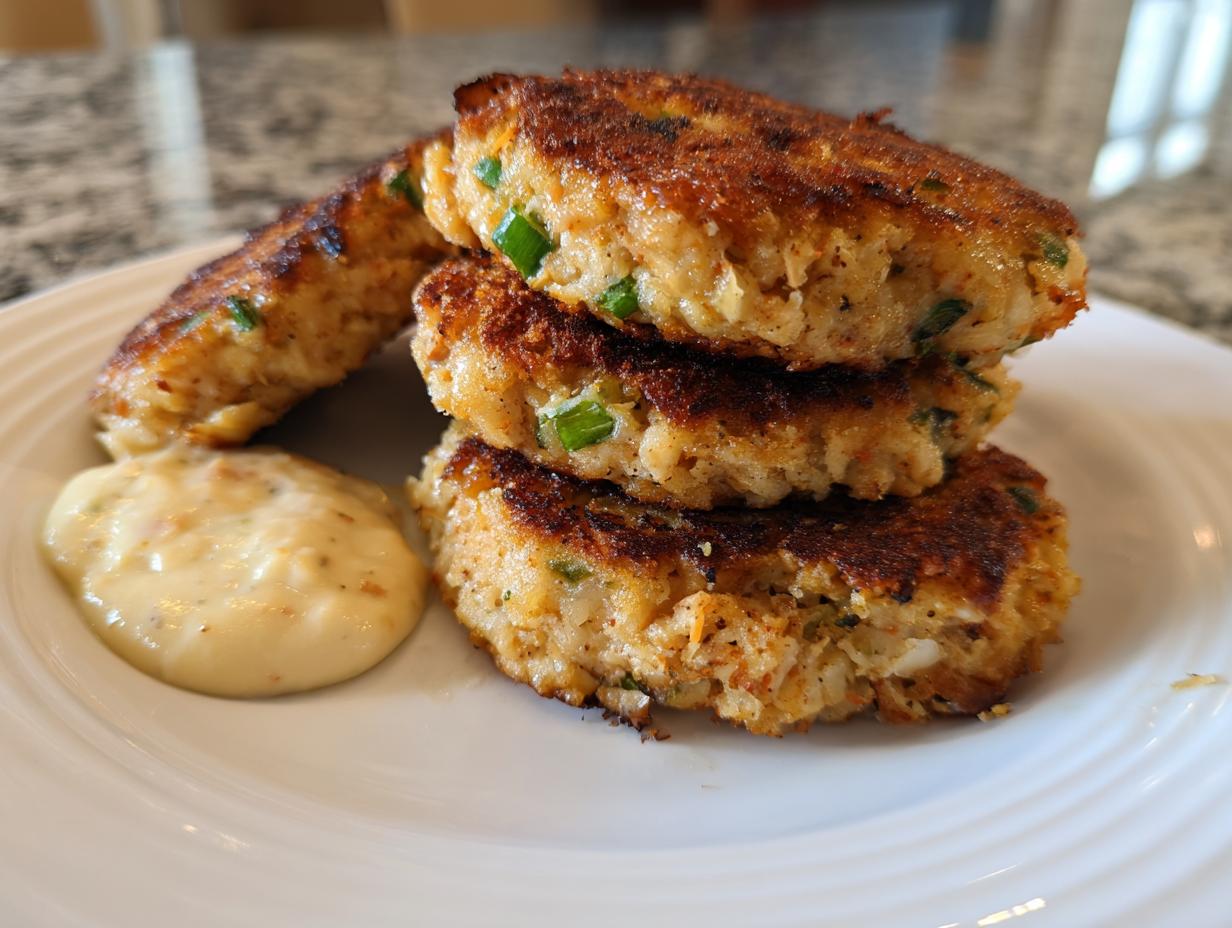
This is where the magic happens, and honestly, if you nail the prep work we talked about, the cooking part is a breeze. We’re aiming for that deep, dark golden-brown crispiness that says, “I spent hours on this,” even though we only spent about 15 minutes frying them! Remember, these Cauliflower Hash Browns need a little love to keep their shape, so be gentle when flipping them.
Preparing the Cauliflower Mixture
If you skipped the squeezing step earlier, stop right now and go wring that cauliflower out! Seriously, it’s the most important thing you’ll do. Once you have your dry, fluffy cauliflower rice, dump it into a big bowl. Now, add the eggs, the Parmesan cheese, that almond flour—which helps everything hold together—the minced garlic, and the green onions. Sprinkle in your salt and pepper, but don’t be shy with the pepper!
Mix everything really well with a big spoon or even your hands. You want to make sure that almond flour is evenly distributed so you don’t end up with pockets of dry powder. The mixture should feel moist enough to stick together easily when you squeeze a handful, but definitely not wet or sticky. If it seems too loose, add maybe another teaspoon of almond flour, but usually, the moisture you squeeze out is enough.
Cooking Your Cauliflower Hash Browns to Golden Perfection
Time to heat things up! Get a large skillet—I prefer cast iron for the best crust—over medium-high heat. You’re going to need about a tablespoon of olive oil to start. We don’t want to deep fry these, but they need enough oil to sizzle and brown nicely. Once the oil shimmers a little, it’s ready!
Scoop out about a quarter cup of the cauliflower mixture for each patty. Don’t make them too thick, or they won’t crisp up in the middle. Gently flatten them right there in the pan into little discs. Now, patience is key. Let them cook undisturbed for about three to four minutes per side. You need that deep golden color! If they are browning too fast, turn the heat down slightly. Once the bottom looks perfectly crisp, carefully flip them over. Cook the second side for another three to four minutes until they match the first side.
As you pull the finished hash browns out, place them on a plate lined with paper towels to soak up any extra oil. If you’re making a big batch, you can keep the finished ones warm on a baking sheet in a very low oven (around 200°F) while you finish the rest. Add a fresh drizzle of oil to the pan between batches! 
Whipping Up the Quick Garlic Aioli
While those hash browns are getting their final crisp on, whip up the aioli. This is so easy it feels illegal. In a small bowl, just whisk together your mayonnaise—or Greek yogurt if you’re going lighter—with that finely minced garlic clove, the fresh lemon juice, and just a pinch of salt. Give it a good stir until it’s smooth and creamy. Taste it! Does it need more zing? Add a tiny squeeze more lemon. Seriously, this sauce is addictive and pairs perfectly with our savory Cauliflower Hash Browns.
Tips for Success Making Cauliflower Hash Browns
Look, I’ve learned a few things the hard way over the years when attempting to make these low-carb wonders. If you follow these little secrets, you are guaranteed success with your Cauliflower Hash Browns. These aren’t just suggestions; they are the difference between a crisp, delicious breakfast and a sad, wet pile of cauliflower mush. The main takeaway? Moisture management is everything!
Avoiding Soggy Hash Browns
I can’t stress this enough: you have to squeeze the water out of the cauliflower. I mean, really squeeze it! Use that kitchen towel and wring it until you think you can’t get another drop out—then wring it harder. If you skip this, your hash browns will steam instead of fry, and you’ll end up with mush. Also, when you are frying them, don’t crowd the pan! If you try to squeeze too many patties in there at once, the temperature of the oil drops immediately, and they start soaking up oil instead of crisping up. Cook in batches, friend, it’s worth the extra minute!
Flavor Variations for Your Cauliflower Hash Browns
While the base recipe is perfect as is, sometimes you want to switch things up, right? If you’re keeping these strictly vegetarian, you can easily swap out that Parmesan cheese for nutritional yeast—it gives you a nice cheesy flavor without the dairy. If you want to jazz up the mixture itself, try stirring in some finely chopped fresh parsley or chives right in with the green onions. It adds a lovely color and freshness to the final patty!
Storing and Reheating Your Cauliflower Hash Browns
We all know leftovers are great, but only if they reheat well! The biggest mistake people make is trying to microwave these beauties. You just can’t get that beautiful crispiness back with a microwave. If you have leftover Cauliflower Hash Browns, you need to treat them right so they taste almost as good as fresh tomorrow.
You can safely keep the hash browns in the fridge for up to two days in an airtight container. The aioli lasts a little longer, but honestly, it’s best eaten within three days. Make sure you store the sauce separately, of course! If you want to see more great recipes, follow us on Pinterest.
Storage Table for Cauliflower Hash Browns
Here’s a quick rundown so you know exactly how long things last:
| Item | Storage Duration (Refrigerated) | Best Reheating Method |
|---|---|---|
| Cauliflower Hash Browns | Up to 2 days | Skillet over medium heat (no microwave!) |
| Garlic Aioli | Up to 3 days | Stir well before serving (no reheating needed) |
Frequently Asked Questions About These Cauliflower Hash Browns
I always get the same questions when people try this recipe for the first time, especially because we are swapping out potatoes! I tried to answer everything I could think of below, but if you have more questions about your batch of Cauliflower Hash Browns, drop them in the comments! For more recipe tips and behind-the-scenes looks, check out our Medium page.
Q1. Can I make these hash browns ahead of time for meal prepping?
Absolutely! You can form the patties and store them raw in the fridge for about 24 hours before cooking. If you cook them ahead, make sure you use the skillet reheating method described above to keep them crispy. They hold up really well!
Q2. Are these hash browns truly low-carb and gluten-free?
Yes, they are fantastic for both! Since we use almond flour instead of wheat flour, they naturally fit into a gluten-free diet. And because cauliflower is the base, they are significantly lower in carbs than traditional potato hash browns, making them perfect for low-carb mornings.
Q3. My patties keep falling apart while frying. What did I do wrong?
Nine times out of ten, this means you didn’t squeeze enough water out of the cauliflower! It needs to be bone-dry. Also, make sure you are using the Parmesan and almond flour, as they act as the glue. Don’t try to flip them until they’ve had a solid three minutes to form a crust.
Q4. Can I skip the garlic in the hash brown mixture itself?
You can, but I really wouldn’t recommend it! The raw garlic minced into the patty mixture cooks down and adds this amazing savory warmth that contrasts beautifully with the sharp, fresh garlic in the aioli. It gives the Cauliflower Hash Browns a deeper flavor profile.
Sharing Your Delicious Cauliflower Hash Browns Experience
Now that you’ve got a plate piled high with golden, crispy, low-carb goodness, I really want to hear about it! Cooking is always better when shared, right? Did you try the lemon zest in the aioli? Did they turn out as crispy as you hoped? You can share your creations with us on Facebook!
Don’t be shy! Head down to the comments section below and let me know how your batch of hash browns turned out. Rate the recipe—give it five stars if you loved that satisfying crunch! I love seeing your pictures and hearing your favorite ways to serve them up. Maybe you ate them for breakfast, lunch, or even dinner! Tell me everything!
Print
Amazing 3-Minute Cauliflower Hash Browns Crispy
- Total Time: 25 minutes
- Yield: 4 servings (2-3 hash browns per serving)
- Diet: Low Calorie
Description
Enjoy crispy, low-carb cauliflower hash browns served with a flavorful garlic aioli, perfect for a quick and healthy breakfast or side dish.
Ingredients
- 1 medium head cauliflower, grated or processed into rice-sized pieces (about 4 cups)
- 2 large eggs
- 1/2 cup grated Parmesan cheese
- 1/4 cup almond flour
- 2 cloves garlic, minced (for hash browns)
- 1/4 cup chopped green onions
- Salt and freshly ground black pepper to taste
- 3 tablespoons olive oil or avocado oil for frying
- 1/2 cup mayonnaise or vegan mayo (for aioli)
- 1 clove garlic, finely minced (for aioli)
- 1 tablespoon fresh lemon juice (for aioli)
- Salt to taste (for aioli)
Instructions
- Place grated cauliflower in a clean kitchen towel and squeeze out as much moisture as possible.
- In a large bowl, combine the cauliflower, eggs, Parmesan, almond flour, minced garlic, green onions, salt, and pepper. Mix well.
- Heat 1 tablespoon of oil in a large skillet over medium-high heat.
- Scoop 1/4 cup of the cauliflower mixture for each hash brown and flatten gently into a patty.
- Cook hash browns for 3-4 minutes per side, until golden brown and crispy. Add more oil as needed for frying.
- Remove hash browns from skillet and drain on paper towels to remove excess oil.
- Meanwhile, mix mayonnaise, garlic, lemon juice, and salt in a small bowl to make garlic aioli.
- Serve warm cauliflower hash browns with a dollop or drizzle of garlic aioli.
Notes
- Use nutritional yeast instead of Parmesan for a vegan version.
- Swap almond flour for gluten-free breadcrumbs if preferred.
- Replace mayonnaise in aioli with Greek yogurt for a lighter option.
- Add chopped herbs such as parsley or chives to the aioli for extra flavor.
- Serve with ketchup or hot sauce for alternative dipping options.
- Thoroughly squeeze moisture from cauliflower to ensure crispy hash browns.
- Avoid overcrowding the pan when frying to maintain crispiness.
- Use a nonstick or cast-iron skillet for best results.
- Prepare garlic aioli ahead to let flavors meld.
- Keep hash browns warm in a low oven while finishing the batch.
- Store leftover hash browns in the refrigerator up to 2 days in an airtight container.
- Reheat in a skillet over medium heat to restore crispiness; avoid microwaving.
- Garlic aioli can be refrigerated for up to 3 days; stir before serving.
- Prep Time: 10 minutes
- Cook Time: 15 minutes
- Category: Breakfast/Side Dish
- Method: Frying
- Cuisine: American