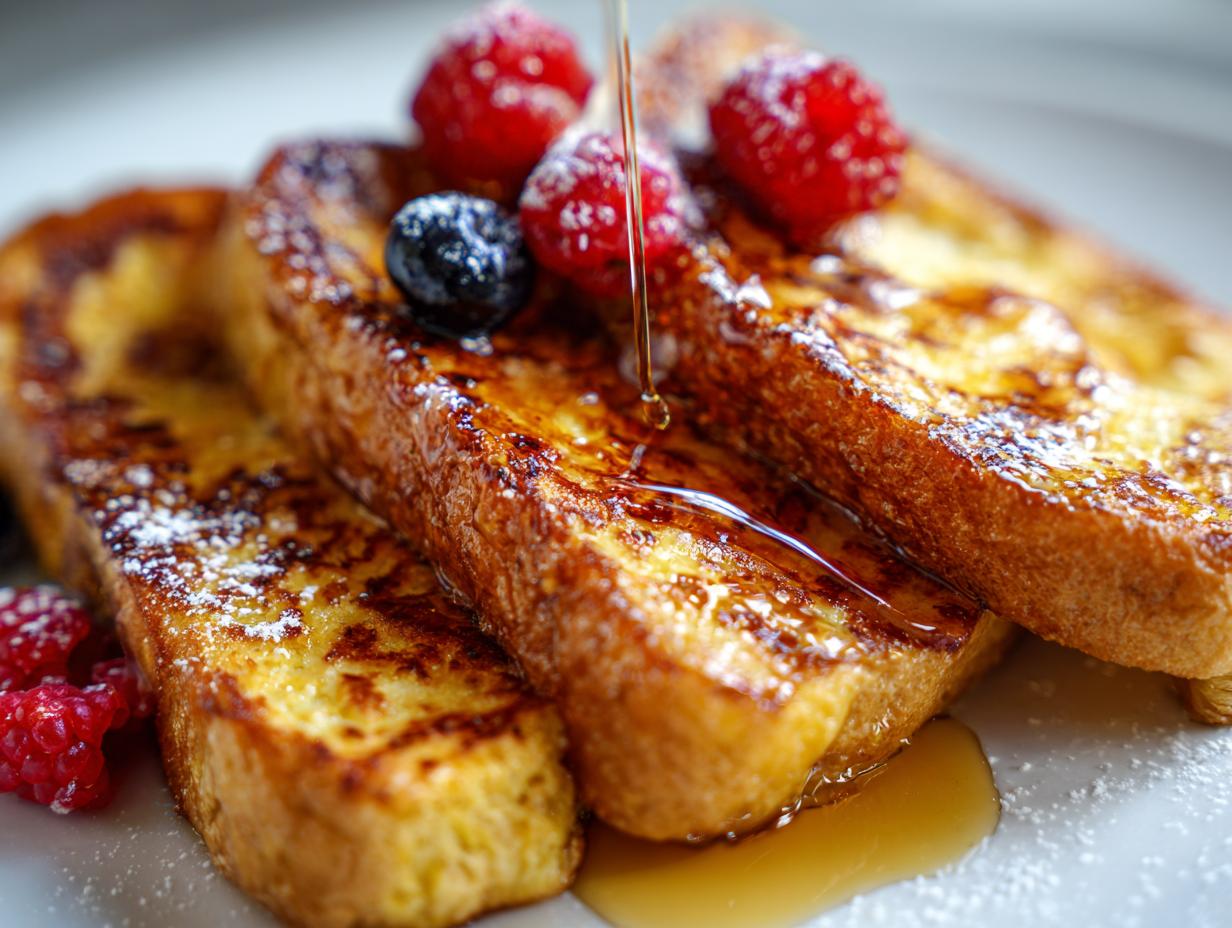
There’s just something magical about a perfectly golden, fluffy slice of French toast to start the day, isn’t there? It instantly makes any ordinary morning feel like a special occasion, even if it’s just a Tuesday! My absolute favorite thing is how incredibly easy it is to whip up my Classic Easy French Toast. Seriously, you probably have everything you need right in your pantry. I remember my mom making this for me when I was a kid, and the smell alone was enough to get me out of bed. It’s one of those simple, comforting recipes that never fails to hit the spot.
Why You’ll Love This Classic Easy French Toast
Honestly, this recipe is a lifesaver on busy mornings, but it’s also a total crowd-pleaser for weekend brunches. Here’s why it’s my go-to:
- Super Speedy: Ready in about 15 minutes from start to finish. Perfect for when you need breakfast *now*.
- So Easy: Minimal ingredients, basic steps – you really can’t mess this up!
- Deliciously Versatile: Use brioche or challah for that rich, eggy flavor, or even leftover white bread works in a pinch.
- Tastes Amazing: Perfectly golden, slightly custardy, and oh-so-satisfying.
Ingredients for Your Classic Easy French Toast
Okay, so grabbing the ingredients is honestly the hardest part, and even that’s a breeze! You’ll need just a few things to make this magic happen. Trust me, you probably have most of them hiding in your kitchen right now!
Here’s what you’ll need:
- Four thick slices of bread – brioche or challah are my absolute favorites because they’re so rich and soak up the custard beautifully. If you don’t have those, don’t sweat it, good old Texas toast or even just sturdy white bread will totally work! Check out some of my bread recipes for inspiration here: Classic Peasant Bread, Asiago Cheese Bread, or my No-Knead Skillet Bread!
- Two large eggs – these give us that lovely custardy base.
- Half a cup of whole milk – you can use skim or 2%, but whole milk makes it extra rich.
- One teaspoon of vanilla extract – this adds that cozy, comforting aroma and flavor.
- Half a teaspoon of ground cinnamon – the perfect spice to warm everything up.
- One tablespoon of sugar – just a little sweetness to balance out the flavors.
- And for cooking: Two tablespoons of unsalted butter, divided. We’ll use some to get the pan nice and hot!
Step-by-Step Guide to Making Classic Easy French Toast
Alright, let’s get this French toast party started! It’s really as simple as mixing a few things and then hitting the pan. You’ll be enjoying a warm, golden slice faster than you can brew your coffee!
First things first, let’s whip up that yummy custard. Grab a shallow bowl – one that’s wide enough to dip your bread slices without them getting all bent out of shape. Whisk those two large eggs, the whole milk, that splash of vanilla extract, the cinnamon, and the sugar together until everything is happy and combined. You really want it to be a little frothy; that’s a good sign all those flavors are buddy-buddy.
Next, get your pan ready. I love using my big nonstick skillet for this. Get it heating over medium heat. While it’s warming up, go ahead and toss in one tablespoon of that unsalted butter. Let it melt and get all shimmery. You want it to coat the bottom of the pan nicely.
Now for the fun part! Take one slice of your bread and dip it into that beautiful eggy mixture. Give it a flip to coat the other side too. You don’t want it to soak for too long, or it’ll get soggy and fall apart – just a quick dip and let any extra drip off. Think of it as a quick spa treatment for your bread! My trick for the perfect soak is to do it quickly, like butter-toasted bread secrets suggest; you want it moist, not a sponge. If you get a chance, check out these magic steps for fluffy toast!

Gently place the eggy bread slice onto your hot, buttery skillet. Let it cook for about 2 to 3 minutes on each side. You’re looking for that gorgeous golden-brown color. Flip it over and do the same on the other side. You’ll know it’s done when it’s beautifully golden and cooked through.
If you’re making more than one batch, don’t forget to add that remaining tablespoon of butter to the skillet when you start the next slices. It keeps things from sticking and adds that extra bit of deliciousness. And if you ever want to try other things with toast, these toast variations are super fun!

Tips for the Perfect Classic Easy French Toast
Okay, so you’ve got the basic idea down, but sometimes you just want that *extra* something, right? Here are a few little tricks I’ve picked up over the years that help make my Classic Easy French Toast truly shine. These aren’t complicated, but they make a world of difference!
First off, the bread is key! While you can totally use regular bread if that’s what you have, brioche or challah really are the stars. They’re a bit denser and have more fat, meaning they soak up all that eggy goodness without turning into mush. I usually try to use bread that’s a day or two old – it’s just a tiny bit drier and holds up better. If you’re ever looking for great bread recipes, you can totally check out some of my faves on the blog!
Next, don’t over-soak the bread. This is probably the *most* common mistake people make, and it’s why their French toast ends up soggy. You want the bread to absorb some of that custard, but not become completely saturated. A quick dip on each side is usually perfect. Think of it like giving it a quick bath, not a long soak! If you’re curious about other custard-based toast ideas, you might like my Yogurt Custard Toast.

When it comes to cooking, medium heat is your friend. Too high, and the outside burns before the inside cooks. Too low, and it steams instead of toasting. You want that lovely golden-brown crust, and medium heat gives you the perfect balance. Keep an eye on it, and don’t be afraid to adjust the heat slightly if needed. For something a little different but equally delicious, you could even try making French toast waffles!
Serving Suggestions for Your French Toast
Now that you’ve got your perfect slices of French toast, it’s time to dress them up! The classics are classics for a reason, right? A drizzle of warm maple syrup is non-negotiable for me – it just tastes like breakfast. And who can resist a scattering of fresh berries? They add such a beautiful pop of color and a little bit of tartness.
But don’t stop there! A dollop of fluffy whipped cream is always a good idea, or maybe even a sprinkle of powdered sugar. If you’re feeling a little fancy, a side of these Orange Cranberry Scones would be divine!

Storage and Reheating Instructions
Sometimes, you just make too much, right? Don’t you worry! If you happen to have any leftover French toast (which is rare in my house!), it stores like a dream. Just let them cool down completely, then pop them into an airtight container. They’ll keep nicely in the fridge for about 3 days. It’s like having a little slice of breakfast goodness waiting for you!
When you’re ready to enjoy them again, the trick is to reheat them carefully so they don’t get soggy. My favorite way is to pop them in the toaster for a quick crisp-up, or you can gently warm them in a skillet over medium-low heat for a minute or two per side. Either way, they’ll be almost as good as fresh!
Frequently Asked Questions About Classic Easy French Toast
What’s the best type of bread for Classic Easy French Toast?
Honestly, brioche or challah bread are my absolute favorites because they’re so rich and fluffy! They soak up that custard beautifully. But if you don’t have those on hand, don’t worry! Sturdy white bread or even day-old bread works really well too. You just want something that can hold its shape when it hits that pan.
My French toast always turns out soggy. What am I doing wrong?
Oh, I hear you! The biggest culprit is usually over-soaking the bread. You want to give it a quick dip on each side – just enough to soak up some of the custard, but not so long that it becomes totally saturated. A few seconds per side is plenty! Also, make sure your skillet is nice and hot over medium heat before you add the bread.
Can I make French toast ahead of time?
You totally can! If you have leftovers, just let them cool completely and store them in an airtight container in the fridge for up to 3 days. To reheat, I like to put them in the toaster or warm them gently in a skillet for a minute or two per side. It brings back that lovely crispiness! For more fun toast ideas, check out my Bread Toast Squares or my Cheese Toast Secrets.
How do I get that perfect golden-brown color?
That’s all about the heat and the butter! Make sure your pan is preheated to medium heat. Too high and it burns; too low and it steams. Add that tablespoon of butter and let it melt and get nicely foamy before you add your dipped bread slices. Cooking each side for about 2-3 minutes usually does the trick for that perfect golden hue!
Nutritional Information
Just a heads-up, these numbers are estimates! They can totally change depending on the type of bread you use and how much syrup you drizzle (no judgment here!). This gives you a general idea of what you’re getting:
- Serving Size: 1 serving
- Calories: ~280
- Fat: ~13g
- Carbohydrates: ~32g
- Protein: ~9g

Classic Easy French Toast
- Total Time: 15 min
- Yield: 4 servings
- Diet: Vegetarian
Description
Classic easy French toast made with simple pantry ingredients. Golden, fluffy, and ready in 15 minutes for the perfect breakfast.
Ingredients
- 4 thick slices brioche or challah bread
- 2 large eggs
- 1/2 cup whole milk
- 1 teaspoon vanilla extract
- 1/2 teaspoon ground cinnamon
- 1 tablespoon sugar
- 2 tablespoons unsalted butter divided
- Maple syrup for serving
- Fresh berries optional for serving
Instructions
- In a shallow bowl, whisk together eggs, milk, vanilla extract, cinnamon, and sugar until fully combined and slightly frothy.
- Heat a large nonstick skillet over medium heat. Add 1 tablespoon butter and let it melt.
- Dip each slice of bread into the egg mixture, turning to coat both sides evenly. Allow excess to drip off but do not oversoak.
- Place the coated bread onto the hot skillet. Cook for 2 to 3 minutes per side until golden brown and cooked through.
- Add the remaining tablespoon of butter to the skillet as needed for the next batch.
- Serve warm with maple syrup and fresh berries if desired.
Notes
- Store leftovers in an airtight container in the refrigerator for up to 3 days.
- Reheat in a toaster or skillet for best texture.
- Prep Time: 5 min
- Cook Time: 10 min
- Category: Breakfast
- Method: Pan-Frying
- Cuisine: American