
My Mother’s Peasant Bread is the simplest, best bread recipe you will ever make. Seriously, if you’ve ever been intimidated by yeast or thought baking meant spending an hour kneading dough on a counter dusted with flour, stop right there. When I first started NoobRecipes, I needed something foolproof, and this recipe, handed down from my mom, was it. It’s the ultimate beginner bread because the dough does all the hard work for you—no kneading required!

I remember trying to make sourdough in college and ending up with something closer to a brick. That failure taught me that baking needs to be accessible. This peasant bread fixes everything. You just mix a few things, let it rest, and then the magic happens in the oven. The best part? Baking it in those oven-safe bowls creates this incredible, deeply brown, rustic crust that looks like you bought it fresh from a European bakery. Trust me, when you pull those two steaming loaves out, you’ll feel like a master baker, even if you’ve never touched yeast before. It’s proof that amazing homemade bread doesn’t need complicated techniques.
Why You’ll Love My Mother’s Peasant Bread

This recipe isn’t just bread; it’s confidence in a crust. I developed it specifically so that even the newest baker at NoobRecipes can pull off something spectacular without breaking a sweat or burning out their mixer. It’s the perfect balance of minimal effort and maximum payoff.
Quick Prep Time for Busy Cooks
Honestly, the active time you spend on this is almost nothing. You’re just whisking things together and mixing. It takes maybe fifteen minutes of your time total before the dough takes over and heads off for its long rest. That’s why I call it perfect for weeknights!
The Magic of No-Knead Simplicity
That’s the secret sauce right there. You don’t need to learn any fancy folding or stretching techniques. The long, slow rise time develops all the gluten structure you need naturally. If you can stir with a fork, you can make this bread. That’s my promise as a beginner-focused cook.
Rustic Crust, Soft Interior
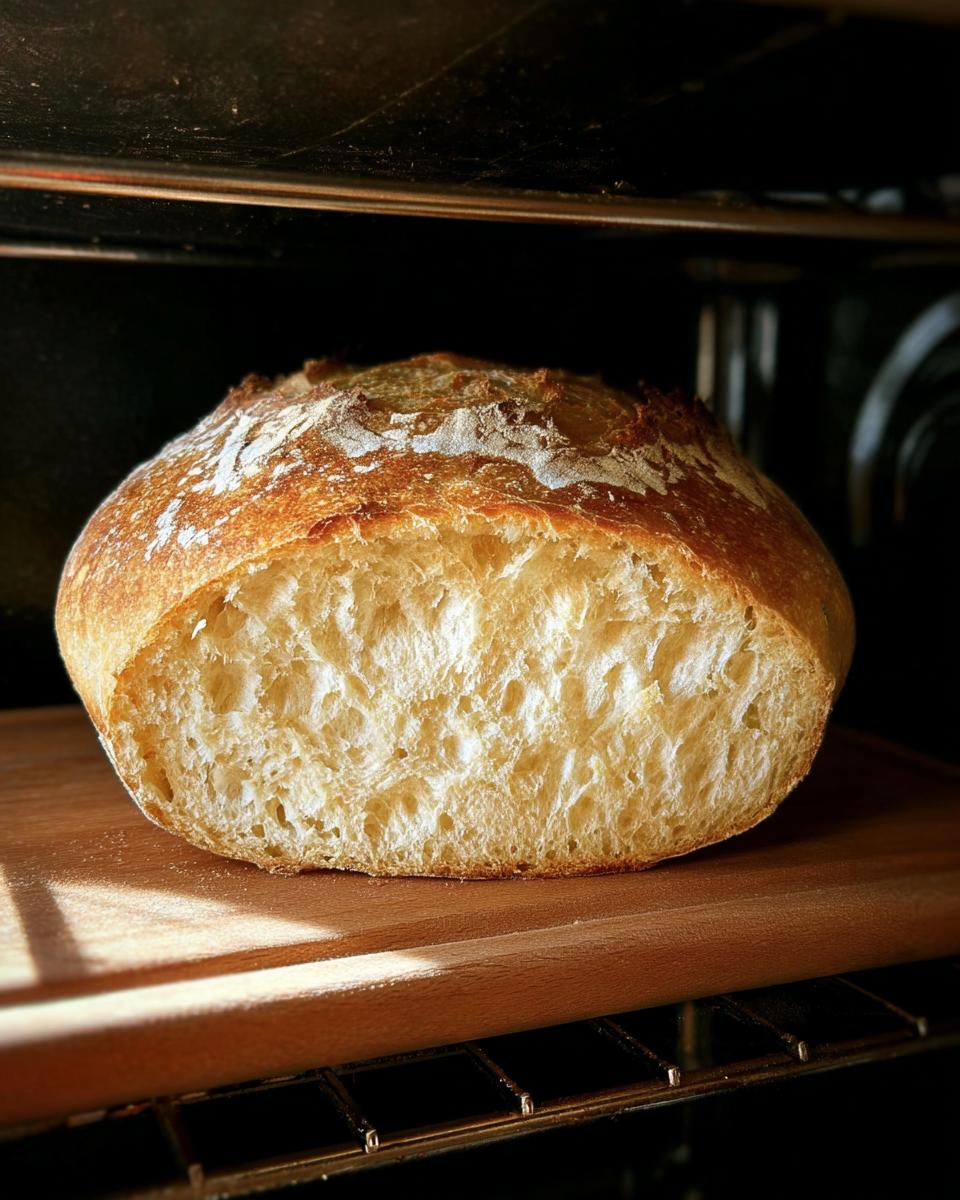
When you bake this in the hot, buttered bowls, the steam trapped inside creates a crust that shatters perfectly when you slice it. But inside? It’s fluffy, chewy, and tender. It’s everything you want in a rustic loaf without any of the fuss.
Essential Equipment for My Mother’s Peasant Bread
Look, we aren’t using any fancy stand mixers or bread machines here. That’s the beauty of this peasant bread! You really only need basic kitchen gear. Having the right containers for baking, though, is the one non-negotiable step. If you skip this, you won’t get that amazing crust we talked about.
Must-Have Baking Vessels

The recipe calls for two oven-safe bowls, and this is where you need to pay attention. We want something sturdy that can handle high heat and trap steam effectively. I always use my old Pyrex bowls, about 1-quart to 1.5-quart in size. They hold the heat perfectly and give the dough that wonderful shape. Make absolutely sure whatever bowls you pick are rated safe for oven use at 425ºF. Anything else and you’re risking a disaster, and that’s not what we do here at NoobRecipes!
Gathering Ingredients for My Mother’s Peasant Bread
Okay, let’s talk about getting your supplies ready. This recipe is amazing because it uses pantry staples you probably already have sitting around. There’s no fancy schmancy stuff here—just the basics needed to make magic happen. When I first tried this, I thought maybe I needed special bread flour, but nope! Mom insisted that regular all-purpose or even bread flour works perfectly fine. The key is making sure your yeast is fresh, because that’s what gives us the rise!
We are keeping everything simple, but please measure accurately, especially the flour and salt. Once you have everything laid out on your counter, you’re ready to go. It’s so satisfying seeing all these simple things waiting to become a beautiful loaf! If you want to see another simple bread recipe, check out my guide on 4 Ingredient Artisan Bread.
Ingredient List for My Mother’s Peasant Bread

Here is exactly what you need for two gorgeous loaves. Double-check your pantry against this list before you start mixing!
| Ingredient | Amount |
|---|---|
| Unbleached All-Purpose or Bread Flour | 4 cups (512 g) |
| Kosher Salt | 2 teaspoons (10 g) |
| Lukewarm Water | 2 cups (454 g) |
| Sugar | 2 teaspoons (8 g) |
| Instant Yeast | 2 teaspoons (8 g) |
| Room Temperature Butter (for greasing) | About 2 tablespoons |
Step-by-Step Instructions for My Mother’s Peasant Bread
This is where the magic happens, and I promise you, it’s so easy you’ll wonder why you ever bought bread before. The whole process is mostly waiting, which is my favorite kind of baking! Just follow these steps exactly, and you’ll have two beautiful, rustic loaves ready for dinner.
Mixing the Simple Dough Base

First things first: grab your biggest mixing bowl. We’re combining all the dry stuff—the flour, the salt, the sugar, and that instant yeast. Give it a good whisk just to make sure everything is distributed evenly. We want that yeast spread out! Once that’s done, pour in your lukewarm water. Don’t use hot water, or you’ll kill the yeast instantly—lukewarm is key! Mix it all together with a sturdy spoon or even a fork until you don’t see any dry flour patches left. It will look shaggy and sticky, kind of messy, but that’s exactly how it should be.
The First Rise: Patience for Flavor
Now, cover that sticky mass up tight. I usually just use plastic wrap or a clean kitchen towel. This dough needs a long, cozy nap. Find the warmest spot in your kitchen—this is critical for a good rise! If your kitchen is chilly, here’s a trick Mom taught me: turn your oven on for just one minute, then turn it completely off. Let it cool down until it’s barely warm, definitely under 100ºF. Place the covered bowl inside that warm oven for at least one hour, maybe even two if your kitchen is cold. This slow rise builds all the flavor we want in this easy bread.
Preparing for the Second Rise and Baking

Once the dough has doubled, it’s time to prep the baking vessels. Generously grease your two oven-safe bowls—Pyrex works great—with about a tablespoon of that room-temperature butter each. Next, uncover your dough. Use two forks to gently poke it down and scrape it away from the sides of the bowl. Don’t knead it! Just divide the whole thing into two equal piles right there in the bowl. Scoop each half into its prepared, buttered bowl. Now, let it rest again, uncovered, for another 20 to 30 minutes. You want it to look puffy, maybe just reaching the top edge of the bowl.
Achieving the Perfect Bake Temperature
While that second rise is happening, preheat your oven to 425ºF. When the dough is ready, put the bowls straight into that hot oven and bake for exactly 15 minutes. This high heat blasts the crust into shape. After 15 minutes, quickly reduce the temperature down to 375ºF and bake for another 15 to 17 minutes. This second stage cooks the inside without burning the crust.
Finishing and Cooling Your Loaves

Carefully remove the bowls and turn the loaves out onto a wire cooling rack. If your loaves look a little pale or soft on the outside—this happens sometimes—don’t panic! Pop them directly onto the oven rack (no bowl this time) and bake for about five more minutes until they darken up. The most important rule now is patience: let them cool for a full 10 minutes before you slice into them. Cutting too soon lets all that lovely steam escape and can make the interior gummy. Wait just a bit! If you want to see how this bread pairs with soup, try my recipe for the Best Creamy Potato Soup.
Tips for Perfect My Mother’s Peasant Bread Success
Even though this is my easiest bread recipe, there are a few tricks I’ve picked up over the years that ensure you get that bakery-quality result every single time. Don’t worry if your first loaf isn’t perfect; that’s how we learn! The biggest issues beginners run into involve checking if it’s actually done or dealing with sticky dough in humid weather.
Checking for Doneness
While the time guidelines are great, the best way to know for sure if your peasant bread is cooked through is by listening to it. Once you take the loaf out of the bowl, carefully flip it over and give the bottom a solid tap with your knuckles. If it sounds hollow, like a drum, you’re golden. If it sounds dull or soft, it needs a few more minutes naked in the oven, like I mentioned in the final step.
Adjusting for Humidity and Temperature
If you’re baking on a rainy summer day, the air is already full of moisture, so your dough will rise faster and might need less water. If it feels super sticky when you mix it, use a tiny bit less water next time, maybe just a splash less than the full 2 cups. Conversely, if your kitchen is freezing in the winter, you might need to let that first rise go a full two hours to get the volume you need. Trust your dough, not just the clock!
Storing and Reheating My Mother’s Peasant Bread
This bread is so good you’ll want to keep it fresh for days, but because it doesn’t have all those preservatives store-bought stuff has, we have to treat it right. The good news is that because of that amazing crust, it stays surprisingly fresh if you handle the cooling and storing correctly. Don’t stick it in the fridge, though—that just makes it go stale faster! I learned that the hard way when I tried saving a loaf too long.
Optimal Storage Methods
For the best texture, you want to let the bread cool completely on the racks first. Then, treat it like my mother always did. Wrap it loosely in a clean, dry kitchen towel. This lets the crust breathe a little while keeping the interior soft. Here’s the simple breakdown for keeping your homemade bread perfect:
| Storage Method | Duration | Tip |
|---|---|---|
| Wrapped in a Clean Towel | Up to 2 Days | Store at room temperature on the counter. |
| Freezing (Whole or Sliced) | Up to 3 Months | Wrap tightly in plastic wrap before freezing. |
Frequently Asked Questions About My Mother’s Peasant Bread
I get tons of questions about this recipe because it’s so popular on NoobRecipes! It’s meant to be straightforward, but sometimes yeast acts funny, or people get worried about ovens. Here are the top three things I hear most often from folks trying out this easy bread for the first time.
Can I use a different type of bowl for this easy bread?
You absolutely can use other oven-safe containers, but I highly recommend sticking to ceramic or glass bowls, like Pyrex, as specified in the notes. These materials hold heat incredibly well, which is what creates that signature rustic crust by essentially steaming the outside of the dough. Metal bowls can sometimes transfer heat too quickly, leading to a burnt bottom before the inside cooks. Stick to bowls in the 1-qt to 1.5-qt range for the right shape.
What if my dough does not rise enough?
This usually comes down to temperature. Yeast is grumpy when it’s too cold! If your dough hasn’t doubled after the first hour, it means your kitchen is too chilly. Pop it into that slightly warm, turned-off oven again, or find a warmer spot near a sunny window. If it’s still stubbornly flat after two hours, your yeast might be old. For next time, always test your yeast in a little warm water with sugar first to make sure it’s active before mixing it with all that flour!
Is this considered a beginner bread recipe?
One hundred percent yes! This is the recipe I give everyone who tells me they are terrified of yeast. It’s truly a beginner bread recipe because it’s no-knead. You skip all the hard work and technique that scares people away from baking. If you can mix ingredients in a bowl, you can master this loaf. It’s proof that you don’t need expertise to make amazing homemade bread!
Sharing Your Homemade Bread Experience

I truly hope you enjoyed making My Mother’s Peasant Bread as much as I love sharing it. Seriously, seeing your first rustic, crackly loaf pop out of the oven is the best feeling! Now that you’ve mastered this easy bread, tell me about it. Did you manage to get that perfect hollow sound when you tapped the bottom? If you want to share your results, find us on social media!
Drop your star rating below and let me know in the comments how it turned out for you. I read every single comment, and I love hearing about your successes! You can also follow our latest recipes on Pinterest or connect with us on Facebook.
 Print
Print
My Mother’s Peasant Bread: Make 2 Loaves Now
- Total Time: 2 hours 27 minutes
- Yield: 2 loaves
- Diet: N/A
Description
My Mother’s Peasant Bread is the simplest, best bread recipe you will make. This no-knead style bread bakes up beautifully in oven-safe bowls for a rustic crust.
Ingredients
- 4 cups (512 g) unbleached all-purpose or bread flour
- 2 teaspoons (10 g) kosher salt
- 2 cups (454 g) lukewarm water
- 2 teaspoons (8 g) sugar
- 2 teaspoons (8 g) instant yeast
- about 2 tablespoons room temperature butter
Instructions
- Whisk the flour, salt, sugar, and instant yeast in a large bowl.
- Add the water and mix until all flour absorbs.
- Cover the bowl and let the dough rise in a warm spot for at least one hour, up to two hours in cool conditions.
- Preheat your oven at any temperature for one minute, then turn it off to create a warm spot below 100ºF if needed.
- Preheat the oven to 425ºF.
- Grease two 1-qt or 1.5-qt oven-safe bowls with about one tablespoon of butter each.
- Punch down the dough using two forks and scrape it from the bowl sides.
- Divide the dough into two equal portions by pulling it apart with the forks.
- Scoop each dough half into a prepared bowl.
- Let the dough rise again for 20 to 30 minutes uncovered, near the oven or in a warm spot, until it reaches just below or above the bowl tops.
- Bake for 15 minutes at 425ºF.
- Reduce the temperature to 375ºF and bake for another 15 to 17 minutes.
- Remove the loaves and turn them onto cooling racks.
- If the loaves are pale or soft, return them to the oven (out of the bowls) and bake for about 5 minutes more.
- Cool the bread for 10 minutes before you cut into it.
Notes
- Use Pyrex or similar oven-safe bowls for the best results.
- Test doneness by tapping the bottom of the loaf; it should sound hollow.
- Store the bread at room temperature, wrapped in a clean towel, for up to 2 days.
- Prep Time: 15 minutes
- Cook Time: 35 minutes
- Category: Bread
- Method: Baking
- Cuisine: American


1 thought on “My Mother’s Peasant Bread: Make 2 Loaves Now”