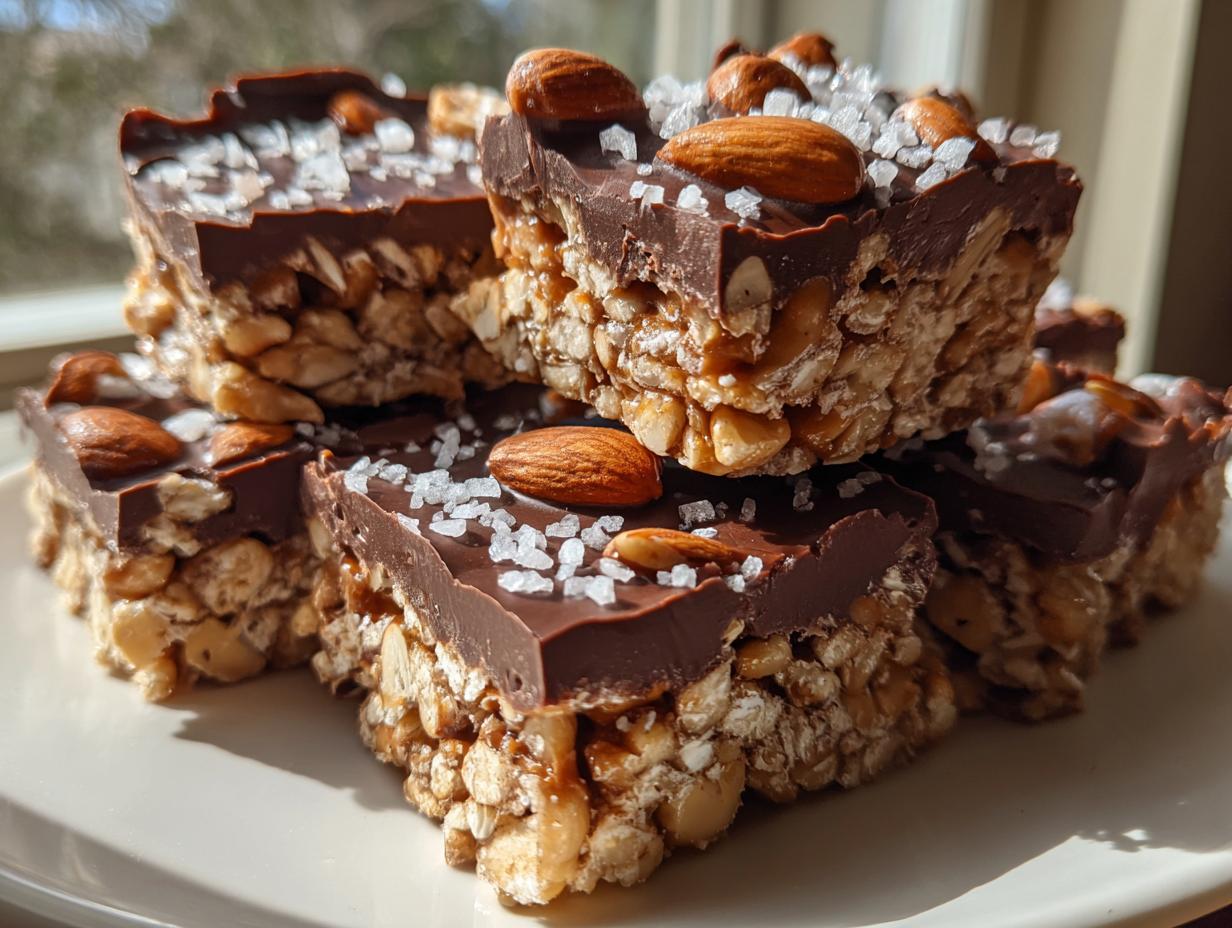
If you’re looking for that perfect snack that hits every note—crunchy, sweet, salty, and deeply chocolatey—then you’ve found your holy grail! Seriously, these Chocolate Sea Salt Nut Bars are my absolute go-to when I need something impressive without spending half the day in the kitchen. I’ve spent years perfecting this recipe, drawing on classic baking principles to ensure they turn out perfectly every single time, which is why I feel confident sharing this knowledge with you.
The best part? Even if you’ve never made a bar cookie before, this recipe is incredibly forgiving. We’re going to toast a mix of almonds, cashews, and peanuts, bind them with just the right amount of syrup, and top it all off with rich dark chocolate and that essential sprinkle of flaky salt. Trust me, once you bite into one of these, you’ll know why I’m so excited to share my expertise!

Why You Will Make These Chocolate Sea Salt Nut Bars Again and Again
I know you’re busy, but I promise these bars are worth the tiny bit of effort. They come together fast and the payoff in flavor is huge! You won’t believe these are homemade. I keep coming back to this recipe because it’s just so reliable, even when I’m rushing around.
- Quick Preparation Time for Busy Days: Seriously, the total time from start to finish is under an hour, and most of that is hands-off baking time. Prep is just 15 minutes, and the actual cook time is only 28 minutes. That’s faster than running to the store!
- Perfect Balance of Sweet and Savory: This is the magic right here. We use deep, slightly bitter dark chocolate which pairs beautifully with the savory crunch of the toasted nuts. The final sprinkle of flaky sea salt cuts through the sweetness perfectly. It keeps you coming back for just one more bite.
Gathering Your Ingredients for Chocolate Sea Salt Nut Bars
Getting the right ingredients ready before you start is half the battle won, especially with baking. For these Chocolate Sea Salt Nut Bars, the quality really shines through because there aren’t a ton of ingredients masking anything. We need things that bring texture and things that bring that incredible binding power. Don’t try to swap out the dark chocolate for anything too sweet; we need that deep flavor to stand up to the salt!
I always lay everything out on the counter first. It keeps me calm and makes sure I don’t forget that crucial pinch of salt when the syrup is piping hot.
Nuts and Cereal Base
To get that amazing crunch, we need a solid mix of nuts. Make sure they are raw because we are going to toast them ourselves—that step really wakes up their flavor!
- 1 cup raw whole almonds
- 3/4 cup raw cashew halves
- 3/4 cup raw shelled peanuts
- 1/2 cup crisp rice cereal
Binders and Flavor Enhancers
These items create the sticky, chewy center and the gorgeous, glossy finish. The brown rice syrup is non-negotiable for that specific chewiness, so try to find it!
- 1/3 cup brown rice syrup
- 1/2 teaspoon fine sea salt (for mixing into the syrup)
- 1 cup dark chocolate chips
- 2 teaspoons coconut oil (this makes the chocolate smooth for dipping!)
- 1 teaspoon flaky sea salt (don’t use regular salt here; the flakes are key for the topping!)
Essential Equipment for Perfect Chocolate Sea Salt Nut Bars
You don’t need a professional setup for these bars, which is great news! Just a few basic kitchen tools will get the job done beautifully. Having everything clean and ready beforehand makes the sticky part much less stressful, trust me on that one.
- An 8 by 8 inch square baking pan. Make sure you have parchment paper ready to line it completely!
- A large rimmed baking sheet for toasting those nuts until they smell amazing.
- A sturdy, large mixing bowl for tossing the nuts with the sticky syrup mixture.
- A small, heatproof bowl for warming up the brown rice syrup quickly in the microwave.
- A greased spatula or the bottom of a measuring cup—you need something flat and solid to press that nut mixture down firmly!
Step-by-Step Baking Instructions for Chocolate Sea Salt Nut Bars
Okay, let’s get down to business! This is where the magic happens and we transform those humble ingredients into the most incredible Chocolate Sea Salt Nut Bars you’ve ever tasted. Just follow my lead, and remember that timing is everything, especially when things start getting sticky!
Preparing and Toasting the Nut Mixture
First things first: let’s get that oven ready. Preheat it to 325°F. Then, grab your 8×8 inch pan and line it completely with parchment paper. Leave some overhang on the sides—that’s your built-in sling to lift the whole block out later, trust me, it saves so much hassle!
Next, spread out your almonds, cashews, and peanuts in a single layer on that rimmed baking sheet. Pop them into the oven and let them toast for exactly 8 minutes. You’re not trying to burn them; you want them fragrant, warm, and just starting to turn a light golden color. As soon as they smell nutty and fantastic, pull them out!
Mixing and Firmly Pressing the Bar Base
Quickly transfer those warm nuts into your big mixing bowl and toss in the crisp rice cereal. Now for the binder: microwave your brown rice syrup and the fine sea salt together for just 30 seconds. It needs to be runny enough to coat everything! Pour that warm syrup mixture over the nuts and cereal and stir like crazy until every single piece looks coated and sticky. Don’t dawdle here!
Scoop that sticky goodness into your prepared pan. This next part is vital, so listen up: Use the bottom of a greased measuring cup or a greased spatula and press that nut mixture down *so* firmly. I mean it—press out every single air gap you can. If you leave air pockets, your bars will crumble later. Once it’s a dense, flat layer, slide it back into the oven for 20 minutes until those edges look gorgeously golden brown.
Cooling, Cutting, and Chocolate Coating
Once baked, let the pan sit on the counter for a good 30 minutes. They need to cool slightly so they aren’t molten hot. Then, use that parchment overhang to lift the whole block onto your cutting board. While they are still slightly pliable—not rock hard—slice the block straight down the middle lengthwise, and then cut those two halves into 6 even bars each. This makes 12 perfect bars.
For the chocolate, combine the dark chocolate chips and coconut oil in a microwave-safe bowl. Melt this in short 30-second bursts, stirring well after each one, until it’s completely smooth and glossy. Now, you can either dip the bottom of each bar into the chocolate or drizzle it right over the tops. Immediately after topping them, sprinkle that flaky sea salt over the wet chocolate. It needs that salt right away to stick! Lay them on fresh parchment paper and into the fridge for 15 minutes to set hard. You’re done!

Tips for Making the Best Chocolate Sea Salt Nut Bars
I’ve learned a few tricks over the years that stop these bars from turning into a crumbly mess, which is the biggest pitfall when working with syrups. If you follow these little pointers, your Chocolate Sea Salt Nut Bars will always hold together perfectly, just like mine do.
First, about that syrup consistency: if your brown rice syrup seems too stiff after microwaving, give it another 10 seconds. It needs to flow easily to coat the nuts properly. If it’s too thick, you’ll end up with dry spots, and nobody wants that!
My biggest piece of advice—and I mean it—is about pressing. When you push that nut mixture into the pan, use your body weight! You need maximum compression to eliminate air gaps. A loose bar crumbles when you try to remove it. Finally, when setting the chocolate, don’t skip the fridge time. If you try to cut or handle them while the chocolate is soft, you’ll smear that beautiful flaky sea salt right off.
Storing and Reheating Your Chocolate Sea Salt Nut Bars
The great news about these bars is that they are rock-solid stable once the chocolate has set. You don’t really need to reheat them, but knowing how to store them properly keeps them tasting fresh for weeks. Since they are so sturdy, they are perfect for grabbing on your way out the door!
I usually make a double batch just so I have some tucked away. They hold up beautifully at room temperature, but if your kitchen gets warm, the fridge is your best friend. Just make sure they are fully set before you wrap them up tightly so the chocolate doesn’t stick to anything.
Storage Guidelines Table
Here’s a quick cheat sheet for keeping your bars perfect:
| Storage Location | Approximate Duration | Handling Notes |
|---|---|---|
| Pantry (Airtight Container) | Up to 1 week | Keep away from direct heat or sunlight. |
| Refrigerator | Up to 3 weeks | They will be firmer; let them sit out 5 minutes before eating. |
| Freezer | Up to 3 months | Wrap individually before freezing for best results. |
Frequently Asked Questions About Chocolate Sea Salt Nut Bars
I get so many questions when folks try this recipe for the first time, which is wonderful! It means people are actually making them! Here are a few things I hear most often about getting these crunchy bars just right.
Can I substitute the brown rice syrup in this recipe?
That’s the big question! Brown rice syrup is really what gives these bars that unique chew and flavor profile. It’s less sweet than honey or maple syrup, which helps balance the dark chocolate perfectly. If you absolutely can’t find it, you could try using light corn syrup in a pinch, but you might need to add just a touch more fine sea salt to keep that sweet/savory kick strong. I really encourage you to try the original binder first, though!
How do I know when the nuts are perfectly toasted?
Forget the clock for a second—use your nose! You’ll know the almonds, cashews, and peanuts are ready when they start smelling intensely nutty and warm, like they just came out of a roasting machine. Visually, they should just be starting to look lightly golden brown, not dark brown. If you see any black edges after just 8 minutes, pull them right out because they’ll burn fast once you add the syrup!
Can I use milk chocolate instead of dark chocolate?
You certainly can, but you’ll change the whole vibe of the bar! Remember how I talked about that incredible contrast between the salt and the chocolate? Milk chocolate is much sweeter, so that sharp, savory flavor from the flaky sea salt won’t pop nearly as much. If you use milk chocolate, I’d suggest using only half a teaspoon of the flaky salt on top, or you risk it tasting too salty next to the sweet coating.
Sharing Your Homemade Chocolate Sea Salt Nut Bars
I truly hope you loved making these as much as I love eating them! If you whipped up a batch of these incredible bars, please let me know how they turned out in the comments below. I always read every note, and I’d love to see what you think! You can also follow along for more easy recipes on our Facebook page.
If you snapped a picture, tag me on social media so I can admire your chocolate drizzle skills! Happy baking, everyone! Check out our Pinterest profile for more inspiration.
Print
Amazing 12 Chocolate Sea Salt Nut Bars
- Total Time: 43 minutes
- Yield: 12 bars
- Diet: Vegetarian
Description
Crunchy homemade nut bars featuring roasted almonds, cashews, and peanuts coated in dark chocolate with a savory sea salt finish.
Ingredients
- 1 cup raw whole almonds
- 3/4 cup raw cashew halves
- 3/4 cup raw shelled peanuts
- 1/2 cup crisp rice cereal
- 1/3 cup brown rice syrup
- 1/2 teaspoon fine sea salt
- 1 cup dark chocolate chips
- 2 teaspoons coconut oil
- 1 teaspoon flaky sea salt
Instructions
- Preheat the oven to 325°F and line an 8 by 8 inch square baking pan with parchment paper.
- Spread the almonds, cashews, and peanuts in a single layer on a large rimmed baking sheet.
- Bake the nuts for 8 minutes until fragrant and lightly golden.
- Transfer the toasted warm nuts to a large mixing bowl and add the crisp rice cereal.
- Combine the brown rice syrup and fine sea salt in a small heatproof bowl and microwave for 30 seconds to make the liquid runny.
- Pour the warm syrup mixture over the nuts and cereal and stir vigorously until every piece is thoroughly coated and sticky.
- Transfer the sticky nut mixture into the prepared parchment-lined pan.
- Press the mixture down very firmly into an even layer using the back of a greased spatula or the bottom of a measuring cup to eliminate air gaps.
- Bake the bars for 20 minutes until the edges are golden brown.
- Remove the pan from the oven and allow the bars to cool at room temperature for 30 minutes before lifting the parchment out to a cutting board.
- Slice the block in half lengthwise and then cut each half into 6 even bars while they are still slightly pliable.
- Combine the dark chocolate chips and coconut oil in a microwave-safe bowl and melt in 30 second intervals, stirring until completely smooth.
- Dip the bottom of each bar into the chocolate or drizzle the chocolate generously over the tops and immediately sprinkle with flaky sea salt.
- Place the bars on a clean sheet of parchment paper and refrigerate for 15 minutes to set the chocolate before serving.
- Wash hands thoroughly before packaging the bars for storage to maintain food safety.
Notes
- These bars store perfectly in the pantry or freezer.
- The recipe yields 12 bars.
- Prep Time: 15 minutes
- Cook Time: 28 minutes
- Category: Snack Bar
- Method: Baking
- Cuisine: American