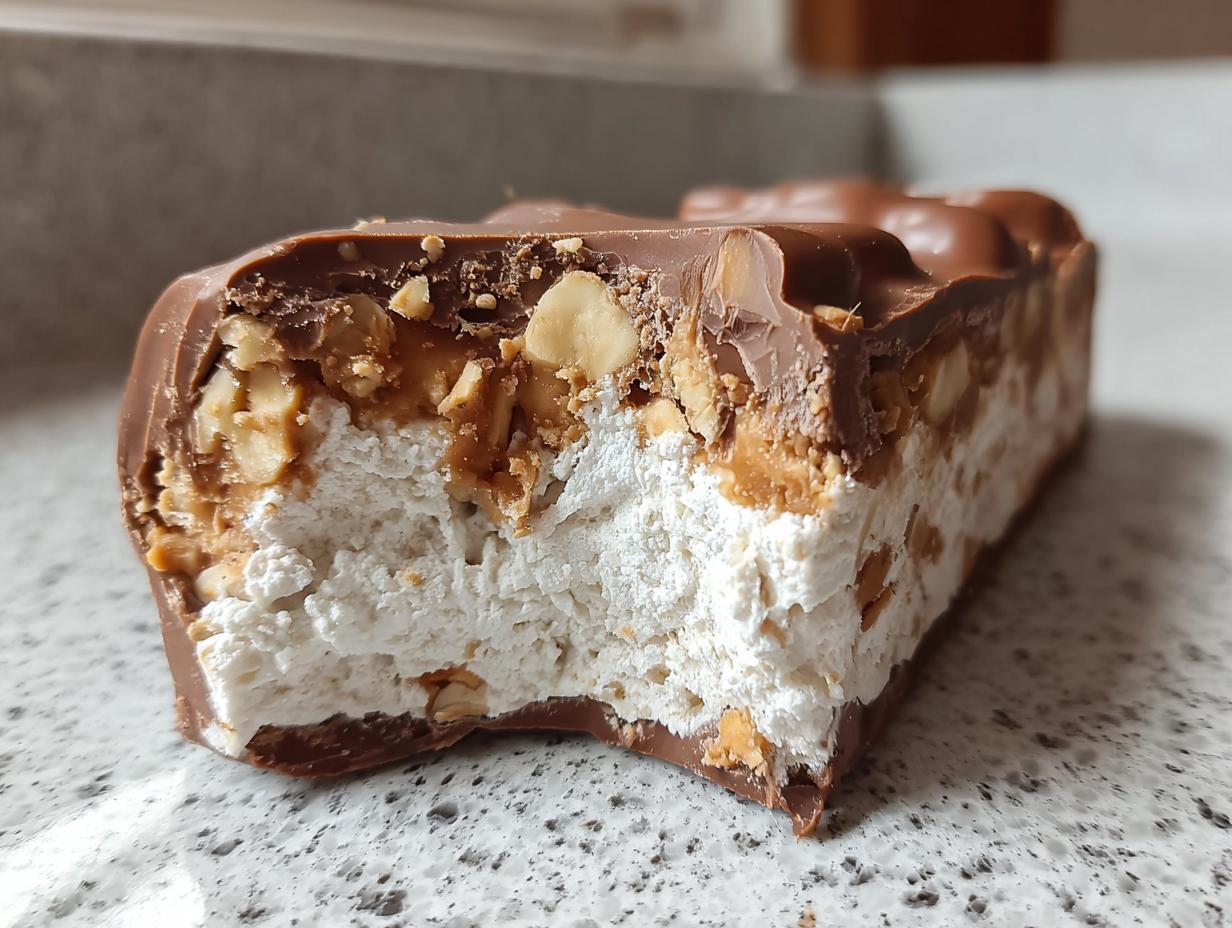
Listen, I know what you’re thinking. Another protein bar recipe that tastes like chalk mixed with disappointment? Absolutely not! I spent way too many years forcing down those dry, sad pucks before I cracked the code on something truly indulgent that actually fuels you. These snickers protein bars are my secret weapon.
Forget the oven! The best part about this recipe is that we’re not turning the stove on once. It’s all about layering creamy, salty, sweet goodness and letting the freezer do the heavy lifting. Seriously, if you can stir ingredients together, you can master these.
I struggled for ages getting the texture right—too sticky one day, too crumbly the next. But once I figured out the right ratio of oat milk to almond flour, everything clicked. These are rich, they taste exactly like that candy bar you crave, but they’re packed with the good stuff you want in a high-protein snack. Trust me, you’ll want to make a double batch right away!

Essential Ingredients for Your snickers protein bars
Okay, this is where we separate the good bars from the *great* bars. Since these are no-bake, the quality of what you put in really shines through. You can’t hide cheap ingredients here! For the best texture and that true Snickers vibe, we need specific things, especially in that protein base.
I learned the hard way that not all protein powders play nice. For this recipe, you absolutely must use a vanilla whey or plant-based protein powder that is on the thicker side. If you use a super watery or thin powder, your base is going to turn into a sticky mess, and we don’t want that! Precision matters here, so grab your measuring cups!
Base Layer Components
The base is crucial; it’s the foundation that holds the whole bar together. We’re using almond flour because it keeps things low-carb and dense, which is perfect for mimicking a candy bar structure. The maple syrup is just there for a touch of sweetness and binding—we don’t want too much, or the base gets weirdly chewy. Remember, the oat milk is your adjuster here; start small!
The Creamy Peanut Filling
This layer is pure joy. The coconut oil is essential because it solidifies beautifully in the freezer, giving us that nice snap when you bite in. And please, use roasted peanuts! If you use plain, raw ones, the flavor is just flat. Roasting them brings out that deep, salty crunch we associate with the real deal. A tiny pinch of sea salt in the filling balances all that sweetness, too. Don’t skip it!
Chocolate Coating Requirements
For the coating, I insist on using dark chocolate chips. Since the base is already sweet, the slight bitterness of dark chocolate cuts through perfectly. The extra bit of coconut oil mixed in isn’t just for shine; it keeps the chocolate coating from cracking into a million pieces when you pull the bars out of the freezer. It makes dipping so much smoother!
Ingredient Table
Here’s the master list. I wrote this out so you can easily check off things as you gather them. Make sure you have creamy peanut butter—chunky will throw off the smooth texture of the middle layer!
| Component | Ingredient | Amount |
|---|---|---|
| Base Layer | Vanilla Protein Powder | 1/3 cup |
| Base Layer | Almond Flour | 1/2 cup |
| Base Layer | Maple Syrup | 2 tablespoons |
| Base Layer | Oat Milk | 4–6 tablespoons (as needed) |
| Peanut Layer | Creamy Peanut Butter | 1/2 cup |
| Peanut Layer | Melted Coconut Oil | 2 tablespoons |
| Peanut Layer | Maple Syrup | 2 tablespoons |
| Peanut Layer | Roasted Peanuts | 1/3 cup |
| Peanut Layer | Sea Salt | 1 pinch |
| Chocolate Coating | Dark Chocolate Chips | 1 1/2 cups |
| Chocolate Coating | Coconut Oil | 1 1/2 tablespoons |
Step-by-Step Preparation for snickers protein bars
Alright, time to get messy! Since we aren’t dealing with heat, the main tool here is your freezer. It does all the hardening work for us, which is why timing the chill steps is super important. Don’t rush these pauses, or your layers will blend together like a smoothie instead of distinct layers!
Constructing the Protein Base Layer
First things first, grab that loaf pan—I always line mine completely with parchment paper, letting the ends hang over the sides. This is your handle for lifting the whole block out later, trust me on this one! Now, in a medium bowl, toss in your vanilla protein powder, almond flour, and the two tablespoons of maple syrup.
Start mixing this dry stuff together. Now, slowly drizzle in that oat milk. You are aiming for a really thick, pliable dough—like playdough, not cake batter. If it’s too dry and crumbly, add milk one teaspoon at a time until it just holds together when you squeeze it. Once you hit that perfect texture, press it firmly and evenly into the bottom of your lined pan. Don’t leave any thin spots!
Once it’s pressed, pop that pan into the freezer for a quick 20 minutes. This sets the base so the peanut layer doesn’t sink in.
Assembling the Peanut Center
While the base is chilling, switch gears to the filling. In a separate bowl—no need to wash the first one, we’re going for efficiency here—mix your creamy peanut butter, the melted coconut oil, the other two tablespoons of maple syrup, and that tiny pinch of sea salt. Whisk it until it looks smooth and glossy. Now, fold in those roasted peanuts. You want them distributed, not sitting in a huge clump.
Pull your base out of the freezer. It should be firm to the touch. Spoon that peanut mixture right over the top of the chilled base. Use an offset spatula or the back of a spoon to spread it out gently so it forms a nice, even second layer. I always sprinkle a few extra peanuts right on top here for looks and texture!
Achieving the Perfect Freeze Before Coating
This is the longest wait, but it’s non-negotiable for clean dipping. The peanut layer needs to be rock solid so it doesn’t smear when you try to coat it. Put the whole pan back in the freezer for at least one full hour, maybe even two if your freezer isn’t super cold. We need it firm enough that you can slice it cleanly without the layers squishing.
Mastering the Chocolate Dipping Technique
Once that peanut layer is totally firm, lift the whole thing out using the parchment paper handles and slice it into your desired bar shapes—I usually get about seven nice bars. Now, let’s melt the chocolate. Put the dark chocolate chips and the remaining coconut oil in a microwave-safe bowl.
Melt this in 30-second bursts, stirring well after every interval. Don’t try to rush it by microwaving for a full minute; you’ll burn it! Stir until it’s completely smooth and liquidy. Dip each frozen bar into the chocolate, letting the excess drip off. You can use a fork or dipping tools if you have them. Lay the coated bars back onto fresh parchment paper. Pop them in the freezer one last time for about 30 minutes until that chocolate shell is completely set and hard. Then, enjoy your *snickers protein bars*!

Tips for Perfect snickers protein bars Every Time
Even though these are no-bake, there are definitely places where things can go wrong if you rush or eyeball things too much. I’ve made every mistake in the book, so let me save you some trouble! Getting the texture right in the base and the shine right on the chocolate makes all the difference between a homemade treat and a store-bought powerhouse.
Controlling Dough Consistency
The biggest culprit for a failed base is usually the oat milk. Every brand is different, and even humidity plays a role! When you mix that base, remember we are going for thick—think firm cookie dough that you can press easily. If you dump in too much milk, the protein powder gets soupy, and your base will freeze hard as a rock instead of staying slightly yielding. If it seems too dry, add the milk *one teaspoon* at a time until it just barely comes together when you squeeze a bit in your hand. That’s the sweet spot!
Ensuring a Smooth Chocolate Finish
When you melt chocolate, the enemy is water or steam—that’s what makes it seize up and turn grainy. Make sure your bowl and spatula are completely dry. Also, that little bit of coconut oil we add is your insurance policy against a thick, cracking coating. If your melted chocolate seems too stiff for dipping after you take it out of the microwave, just stir in half a teaspoon more coconut oil. This keeps the coating thin enough to drip off cleanly, giving you those beautiful, smooth shells on your finished bars.
Equipment Needed for No-Bake snickers protein bars
You really don’t need much fancy stuff for these, which is why I love them for busy days. It’s mostly about bowls and pans. Before you start gathering ingredients, make sure you have these basics ready to go!
- One standard loaf pan (about 8×4 or 9×5 inches)
- Parchment paper (essential for easy lifting!)
- Two medium mixing bowls
- A whisk or sturdy spoon for mixing
- A microwave-safe bowl for melting chocolate
- A spatula for spreading and dipping
Storing and Enjoying Your snickers protein bars
Since these bars rely on coconut oil and peanut butter to stay firm, the freezer is their happy place. I made a batch once and left them on the counter, and let’s just say it was a very sticky disaster—not pretty! They are designed to be eaten straight from the cold, which is perfect for a grab-and-go high protein snack.
Freezer Storage Best Practices
The key to keeping these perfect for months is airtight storage. Once the chocolate coating is fully set, you need to wrap them individually or stack them between layers of parchment paper inside a freezer-safe container. If you just toss them all into one bag, they stick together, and you end up ripping off half the chocolate layer when you try to separate them. Keep them wrapped tight to prevent any weird freezer smells from creeping in!
Storage and Handling Table
Here’s the quick reference guide so you always know how to keep your stash fresh. Honestly, they disappear so fast around here, I rarely get to test the 3-month mark, but they should definitely last that long if you follow these steps!
| Location | Best Practice | Approximate Shelf Life |
|---|---|---|
| Freezer | Airtight container, separated by parchment | Up to 3 Months |
| Refrigerator | Airtight container | Up to 5 Days |
| Countertop | Not recommended (too soft) | Max 1 Hour |
Frequently Asked Questions About snickers protein bars
I get so many questions about these bars because everyone wants them to be perfect! It’s easy to tweak things, but some ingredients are non-negotiable if you want that classic candy bar experience in a high-protein snack format. Here are the things I hear most often.
Can I Substitute the Protein Powder Flavor?
You certainly can try, but I really caution against it! Vanilla is the perfect neutral base because it lets the peanut butter and chocolate shine through, just like a real Snickers. If you use chocolate protein powder, you’ll end up with something extremely rich and potentially too bitter once the dark chocolate is added. Unflavored powder works too, but you might need an extra splash of sweetener because it won’t have that vanilla sweetness to start with. Stick to vanilla for your first batch!
How Long Do These snickers protein bars Last?
The freezer is your best friend here. Because they contain no eggs or dairy that spoils quickly, they hold up beautifully when frozen solid. I always recommend storing them in a truly airtight container for up to three months. If you just leave them in the fridge, they are still great for about five days, but they get quite hard when cold, so let them sit on the counter for 10 minutes before eating!
Are These Bars Gluten-Free?
That’s a great question, especially since we are using almond flour which is naturally gluten-free. However, you have to check your other ingredients! Protein powders are sometimes processed on shared equipment, and some oat milks can contain gluten unless they are specifically labeled GF. If you need these to be strictly gluten-free, make sure your protein powder and oat milk both carry the certified gluten-free label. Otherwise, you’ve got a fantastic, naturally low-carb base!
Sharing Your Homemade snickers protein bars Success
I seriously can’t wait for you to try these! When you nail that perfect salty-sweet layer and snap into that hard chocolate shell, you’ll want to shout it from the rooftops. Please don’t keep this magic to yourself! Come share your results!
When you make a batch, come back here and leave me a rating—five stars if you’re obsessed like I am! And snap a picture of your bars! I love seeing how everyone’s no-bake creations turn out. Tell me what you thought of the texture! You can also find more inspiration on our Pinterest page.
Print
Amazing 7 snickers protein bars you crave
- Total Time: 140 minutes (20 minutes active + 2 hours chilling)
- Yield: 7 bars
- Diet: Vegetarian
Description
No-bake Snickers protein bars layered with peanut butter, nuts, and chocolate. These bars offer the nostalgic candy flavor in a high-protein, lower-sugar format. They are easy to prepare and suitable for freezer storage.
Ingredients
- Base layer: 1/3 cup vanilla protein powder
- 1/2 cup almond flour
- 2 tablespoons maple syrup
- 4–6 tablespoons oat milk (as needed for dough texture)
- Peanut layer: 1/2 cup creamy peanut butter
- 2 tablespoons melted coconut oil
- 2 tablespoons maple syrup
- 1/3 cup roasted peanuts
- 1 pinch sea salt
- Chocolate coating: 1 1/2 cups dark chocolate chips
- 1 1/2 tablespoons coconut oil
Instructions
- Line a loaf pan with parchment paper.
- In a bowl, mix protein powder, almond flour, maple syrup, and oat milk until a thick dough forms. Press evenly into the pan and freeze for 20 minutes.
- In another bowl, stir together peanut butter, melted coconut oil, maple syrup, and sea salt. Fold in peanuts.
- Spread the peanut layer over the chilled base and sprinkle with extra peanuts. Freeze for 1 to 2 hours until firm.
- In a microwave-safe bowl, melt chocolate chips and coconut oil in 30-second intervals, stirring until smooth.
- Remove bars from the freezer, slice, and dip each in melted chocolate to coat.
- Place on parchment paper and freeze for 30 minutes until set.
- Store in an airtight container in the freezer.
Notes
- The oat milk amount adjusts based on the desired dough texture.
- These bars store well in the freezer.
- Prep Time: 20 minutes
- Cook Time: 0 minutes
- Category: Snack
- Method: No-Bake
- Cuisine: American