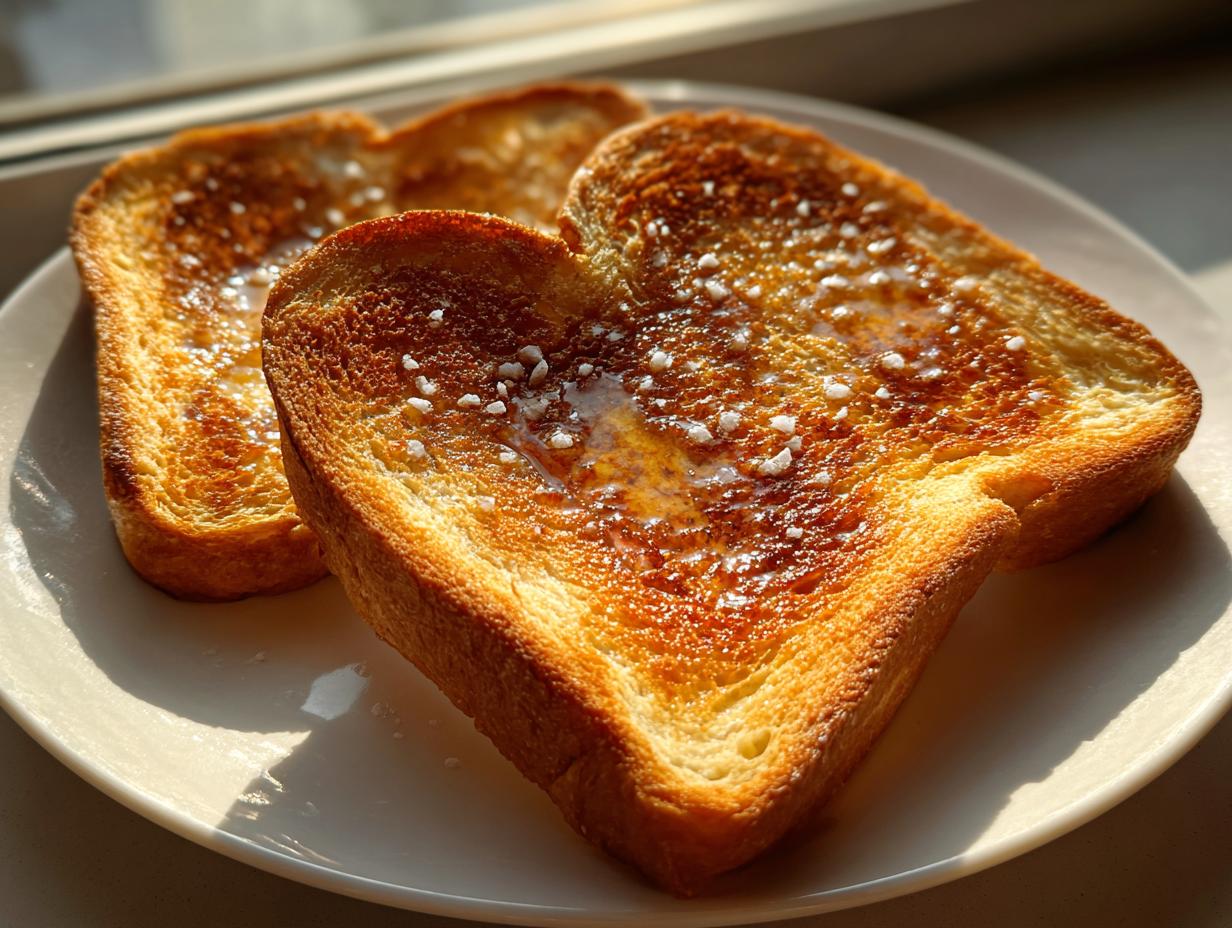
You know, sometimes you just need toast, but you don’t want to wait for that clunky toaster to warm up, or maybe you don’t even own one! That’s why I’m obsessed with this method for making the best butter toast right in your skillet. Forget dry, pale toast; we are aiming for that perfect hug of crisp edges meeting a totally soft, buttery center. This stovetop technique is my secret weapon for a quick breakfast.
I learned this back when I was in college and my toaster finally gave up the ghost halfway through finals week. I panicked! But desperation leads to innovation, right? I grabbed the nearest nonstick pan, and honestly, the result was miles better than my old machine ever produced. It’s so simple, but the control you get over the browning is amazing. Trust me, once you try this skillet toast, you won’t go back to the pop-up kind.
This is the ultimate quick breakfast hack, and it takes less than ten minutes from start to finish. Let’s dive into making this incredible butter toast!

Essential Ingredients for Incredible Butter Toast
Honestly, since this recipe has so few components, the quality of each one really jumps out. You can’t hide weak ingredients here! When I first started making this, I just grabbed whatever white bread was on sale. Big mistake! It either crumbled or turned into a hard cracker. The bread is the star, so treat it right.
Selecting Your Bread
For the best texture in your butter toast, you absolutely need bread that’s about half an inch thick. If it’s too thin, it just gets crispy all the way through, and we want that soft middle! Standard sandwich bread works great, but if you find a slightly heartier white or even a good sourdough slice that hits that half-inch mark, go for it. It gives the butter something substantial to melt into.
The Role of Butter and Salt in Your Butter Toast
You have to use real unsalted butter, and it must be softened. Seriously, don’t try to melt it in the microwave first—it turns oily too fast. You need that creamy texture so you can spread it evenly right up to the edges. We only need a tiny pinch of salt sprinkled right on top of the buttered side; it just wakes up all the flavor of the bread and butter. Don’t skip that tiny bit of salt!
Equipment Needed for Stovetop Butter Toast
The beauty of this method is how little equipment you actually need. You don’t need any fancy gadgets, which is fantastic for beginners or small kitchens. Forget the toaster—we’re keeping it simple and effective!
- A good quality nonstick skillet. This is non-negotiable because we are using butter, and we don’t want anything sticking!
- A flexible silicone or rubber spatula for flipping gently.
- A butter knife for spreading that glorious softened butter.
That’s it! Seriously, just those three things, and you are ready to make some amazing skillet toast.
Step-by-Step Instructions for Perfect Butter Toast
Okay, now we get to the fun part—the actual cooking! Remember, we are aiming for gentle, even heat here. Rushing this process is the number one way to end up with burnt butter and pale, soggy bread. Patience is your friend when making this skillet toast.
We only need four slices of bread, so you can easily do this in batches if you’re feeding a crowd. Don’t crowd the pan, or the bread will steam instead of toast, and that defeats the whole purpose of making amazing butter toast!
Preparing the Pan and Bread
First things first: get your nonstick skillet onto the burner and set the heat to medium-low. I cannot stress this enough—medium-low! If it’s too high, the butter scorches before the bread even gets warm. While that pan is slowly warming up, grab your softened butter. You want to spread that softened butter generously and evenly across one side of each slice of bread. Make sure you get it all the way to the edges; crispy edges are the best part!
Once the butter is spread, take your tiny bit of salt and sprinkle it lightly right over the buttered surfaces. This is your flavor boost! Now, test your pan. If you flick a tiny drop of water onto the surface, it should sizzle gently, not explode aggressively. Once it’s ready, carefully lay the bread slices into the skillet, butter-side down. Make sure they aren’t touching each other. We want them to toast individually!
Achieving Golden Brown Butter Toast
This first side is where most of the magic happens. Let it cook for about two to three minutes. You’ll notice the edges start to look deeply golden brown, and you might see the butter bubbling gently. That’s your cue to check! Use your spatula to peek underneath one slice. When you see that gorgeous, even golden color on the bottom, it’s time to flip. This is the moment that separates good skillet toast from truly great butter toast.
Flip them over gently. The second side doesn’t need as long because the pan is already hot and the bread is warmed through. Cook the second side for just one to two minutes. You are looking for a lighter golden color here—we want contrast! The first side should be deeply browned and crisp, and the second side should be warm, slightly crisp, and perfectly golden. As soon as they look right, pull them out immediately onto a plate. That heat continues cooking them even after they leave the pan, so pulling them slightly early is better than overcooking them!

Expert Tips for Truly Great Butter Toast
You’ve got your perfect golden slices now, but I want to make sure your next batch of butter toast is even better. A lot of people stop after following the steps, but the real pros—and I count anyone who masters this simple technique among them!—pay attention to the little details that make the difference between good toast and *amazing* toast.
It’s all about control and knowing your ingredients. If you follow these small pieces of advice, you’ll be serving up flawless skillet toast every single time.
Heat Control Secrets for Flawless Butter Toast
I mentioned medium-low heat, but let’s talk about how to manage it. If you see the butter start to smoke or turn brown too quickly, pull the pan completely off the heat for about 30 seconds before putting it back on. Burnt butter tastes bitter, and we want pure, nutty butter flavor! If your pan seems too hot, just turn the burner down a notch. The goal is slow, even browning that melts the butter deep into the bread without scorching the surface.
Bread Quality Matters for Your Butter Toast
I’ve tried this with thin, flimsy bread, and it’s just sad. The bread needs enough structure to hold up to the butter and the heat. When you press down gently with your spatula during the first flip, you want to feel a little resistance, not just mush. Using a good quality, slightly thicker loaf guarantees that beautiful contrast: the outside will be shatteringly crisp, and the inside will still be soft and almost steamy. Don’t skimp on the bread for your quick breakfast!
Frequently Asked Questions About Butter Toast
I get so many questions about this simple recipe because people are always surprised how much better skillet toast is than the machine-toasted version! Here are some of the things I hear most often when people try making this perfect butter toast for the first time.
Can I use a different fat instead of butter for my Butter Toast?
You absolutely can, but I strongly recommend butter because that’s where the flavor comes from! If you must substitute, clarified butter or ghee works well because they have a higher smoke point, meaning they won’t burn as easily. You could try a high-quality olive oil, but the resulting flavor won’t be the same rich, comforting taste we are aiming for in this quick breakfast. Margarine just doesn’t brown the same way, so stick to real fat if you can!
How to keep Butter Toast warm before serving?
This is a great question, especially when you’re making toast for more than one person! Since this is a quick breakfast, the best method is to preheat your oven to its lowest setting—maybe 170 or 200 degrees Fahrenheit—and place a wire rack inside. Once the toast is done, arrange the slices in a single layer on that rack. This keeps the bottom from getting soggy while the residual heat keeps the tops crisp until you’re ready to serve your batch of butter toast.
Storing and Reheating Your Butter Toast
Even though this skillet toast is truly best eaten immediately—warm, buttery, and fresh—sometimes life happens, and you end up with leftovers. Don’t throw it out! We just need to be smart about how we store and reheat it so we can bring back that amazing texture. You don’t want floppy toast when you go back for seconds later, right?
Storage Guidelines for Leftover Butter Toast
If you have leftover butter toast, the key is keeping air away from it. Pop the slices into a zip-top bag or an airtight container. Don’t stack them too tightly if you can avoid it, but honestly, just getting them sealed up is the most important part. They should be fine at room temperature for about a day, but if you need them longer, the fridge is better. Just remember, refrigeration can make them a little stiff.
Reheating to Recreate the Perfect Butter Toast Texture
Never, ever microwave your leftover toast! It will just turn into hot, chewy rubber. To get that crispness back, you have two great options. The best way is honestly putting it right back into that dry, warm nonstick skillet over medium heat for about a minute per side. Or, if you have a lot, spread them on a baking sheet and pop them into a 350-degree oven for five minutes. Either way, you’ll bring that perfect texture right back to your butter toast!
Serving Suggestions for Your Butter Toast
Now that you’ve mastered the art of skillet toast, you might be wondering what to serve alongside this perfect base. This isn’t just breakfast bread; it’s a fantastic vehicle for all sorts of simple toppings! Since this butter toast is so richly flavored on its own, you don’t need anything complicated.
For a classic, quick breakfast, a simple smear of strawberry jam or orange marmalade is divine. The slight tartness cuts through the richness of the butter beautifully. If you’re leaning savory, try a fried or poached egg right on top—let the yolk run down into those buttery crevices! If you want more sweet ideas, check out our apple cider whoopie pies recipe for inspiration.
For something a little fancier but still super easy, a thin layer of avocado mashed with a squeeze of lemon juice and a dash of black pepper makes this a gourmet treat in minutes. Enjoy your perfect, homemade butter toast! If you want to see more of our quick recipes, follow us on Pinterest.
Print
Amazing 4-min Butter toast secret revealed
- Total Time: 8 minutes
- Yield: 2 servings
- Diet: Omnivore
Description
Easy pan-toasted butter bread with crisp edges and a soft center. A quick stovetop method for perfect toast without a toaster.
Ingredients
- 4 slices sandwich bread about 1/2 inch thick
- 2 tablespoons unsalted butter softened
- 1/8 teaspoon salt
Instructions
- Heat a large nonstick skillet over medium low heat.
- Spread butter evenly on one side of each bread slice.
- Sprinkle the buttered sides lightly with salt.
- Place the bread butter side down in the skillet in a single layer.
- Cook for 2 to 3 minutes until golden brown on the bottom.
- Flip and cook the second side for 1 to 2 minutes until lightly crisp and warmed through.
- Remove from the skillet and serve immediately.
Notes
- Use good quality bread for the best texture.
- Adjust heat as needed to prevent burning the butter.
- Prep Time: 3 minutes
- Cook Time: 5 minutes
- Category: Breakfast
- Method: Stovetop
- Cuisine: American