Okay, listen up, because I have found the absolute easiest, most guaranteed-to-please dessert you will ever make. Seriously, if you think baking is too fiddly or you just don’t have the time, these Brownie Dirt Pudding Cups Easy No Bake Dessert creations are about to change your life. They are pure, unadulterated childhood joy layered in a little glass cup!
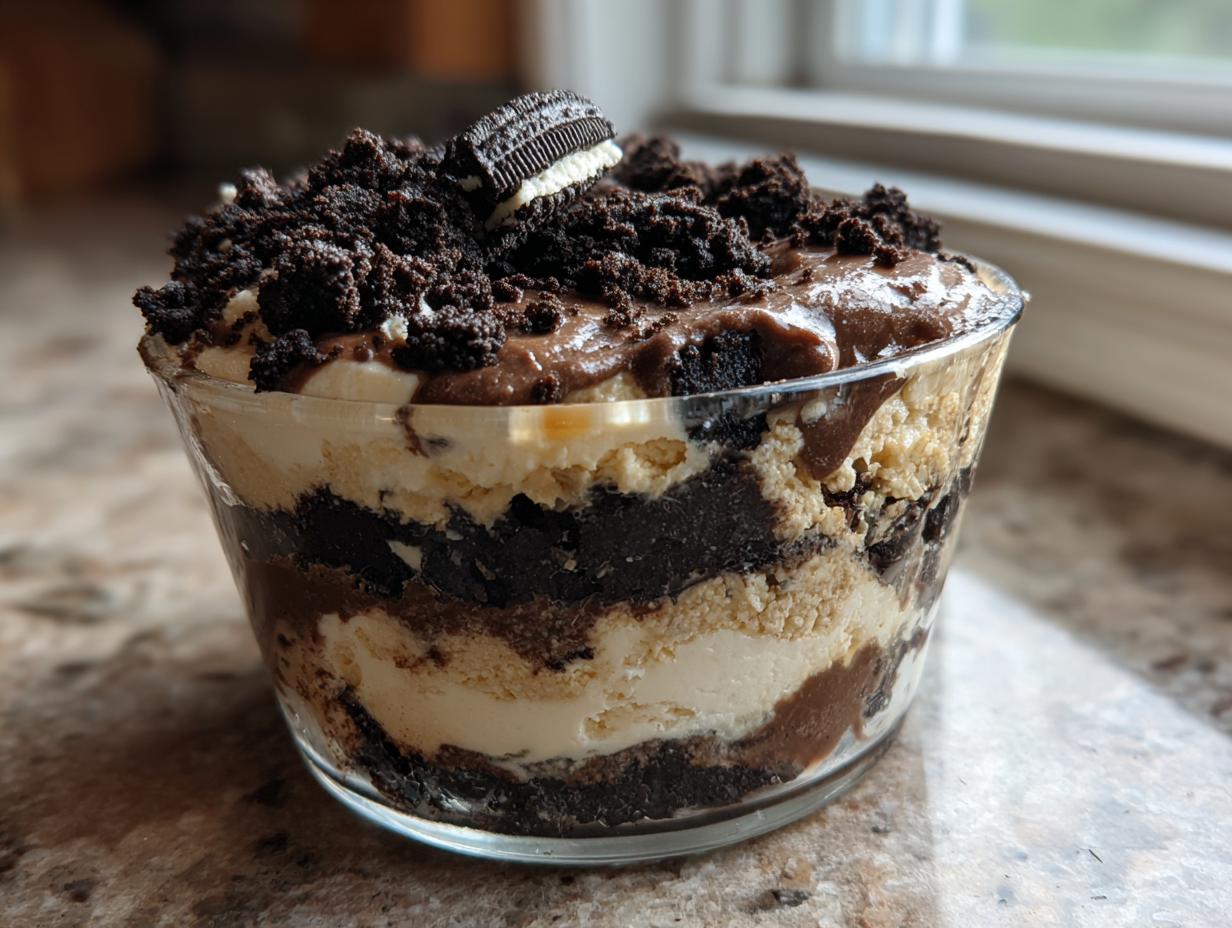
I’m not kidding when I say these are foolproof. Remember those dirt cups we ate as kids? Well, I took that concept and made it ten times better by swapping out plain cake for actual fudgy brownies. It’s the perfect texture combination: dense, slightly chewy brownie, followed by the silkiest chocolate pudding you can imagine, all topped with crunchy cookie “dirt.”

My philosophy here is simple: dessert should be fun, not stressful. This recipe requires zero oven time for the final product, uses simple pantry staples, and comes together so fast you’ll be licking the spoon before your guests even arrive. If you’re new to making desserts or just need something spectacular for a potluck with zero fuss, this is your new go-to recipe. Trust me, everyone will ask for the secret!
Why You’ll Love This Brownie Dirt Pudding Cups Easy No Bake Dessert
I know you’re busy, and that’s why this recipe is a permanent fixture in my rotation. When you need a show-stopping treat that takes less time than ordering takeout, these Brownie Dirt Pudding Cups Easy No Bake Dessert layers are the answer. They look fancy, but honestly, they are so simple!
- They seriously require zero actual baking time for the final assembly—just using store-bought (or leftover!) brownies keeps things incredibly fast.
- The texture contrast is divine: soft, rich brownie meets smooth, cold pudding and crunchy cookies.
- It’s the ultimate crowd-pleaser. Adults and kids alike lose their minds over this combination.
Quick Assembly Time
The best part? The active work time is ridiculously short. We are talking about 25 minutes of mixing and layering, tops! Because there’s no baking involved in the final steps, you can literally whip these up while dinner is finishing. The only thing you have to wait for is the chill time, which is just your excuse to go pour yourself a nice glass of milk.
Gathering Your Brownie Dirt Pudding Cups Easy No Bake Dessert Ingredients
Alright, let’s talk ingredients! This is where the magic starts, and honestly, it’s why making these Brownie Dirt Pudding Cups Easy No Bake Dessert is so simple. We aren’t making anything from scratch here except the pudding layer itself. I love that I can usually pull everything I need right from my pantry and fridge. The quality of your starting ingredients really shines through here, especially since there’s no baking involved to hide any flavor gaps!
You only need five main components to build these incredible layered desserts. Don’t skip the sweetened condensed milk—that’s the secret weapon that makes the pudding layer unbelievably rich and creamy without needing any heavy cream or complicated cooking. It’s what elevates this from standard pudding to something truly decadent. Get everything measured out before you start mixing, because once you start whipping up that pudding, you’ll want to keep moving quickly!
Precise Ingredient Measurements for Brownie Dirt Pudding Cups Easy No Bake Dessert
Precision matters when you aren’t baking, especially with the pudding, so let’s nail down these amounts. First, for the brownie layer, you’ll need a full 9×9 inch pan of brownies. Make sure those are completely cooled—warm brownies melt the pudding layer, and that would be a disaster! For the pudding, you must use cold milk; warm milk turns instant pudding into soup, and we absolutely do not want soup.
Next, the whipped topping needs to be fully thawed but not deflated. If it’s still icy, it won’t fold in correctly. Finally, the cookies—you need about 10 full chocolate sandwich cookies, and make sure you crush them finely. We want dirt, not giant cookie chunks on top!
| Component | Ingredient | Amount |
|---|---|---|
| Brownie Layer | Pre-baked Brownies (9×9 pan worth) | Cooled and cut |
| Pudding Layer | Instant Chocolate Pudding Mix (3.9 oz box) | 1 box |
| Pudding Layer | Cold Milk | 1/2 cup |
| Pudding Layer | Sweetened Condensed Milk (14 oz can) | 1 can |
| Pudding Layer | Whipped Topping (thawed) | 8 ounces |
| Topping | Chocolate Sandwich Cookies | 10, finely crushed |
Essential Equipment for Your Easy No Bake Dessert
You won’t need much fancy gear for this, which is part of the fun! Organization is key when you are layering quickly. Make sure you have your serving vessels ready—small glasses, mason jars, or even clear plastic cups work best so everyone can see those beautiful layers. You’ll definitely need a good, sturdy mixing bowl for the pudding base.
Next up is a reliable whisk to get that pudding smooth and lump-free, and a spatula is essential for gently folding in the whipped topping. Having everything ready to go means you can move seamlessly from crushing cookies to layering brownies without missing a beat!
Step-by-Step Guide to Making Brownie Dirt Pudding Cups Easy No Bake Dessert
Okay, here’s the fun part where everything comes together! We are moving fast, but remember, this is still a relaxing process. Don’t panic if the pudding thickens quicker than you expect; that’s the beauty of instant mix! Follow these steps precisely, and you’ll have the most impressive layered dessert ready in no time.
Preparing the Brownie Base for Your Brownie Dirt Pudding Cups Easy No Bake Dessert
First things first: your brownies must be completely cool. I mean it! If they are even slightly warm, they will turn your beautiful pudding into a sad, soupy mess. Once they are cool, take your 9×9 pan of brownies and cut them into shapes that fit nicely into the bottom of your chosen serving cups. Circles or squares work great, depending on your cup shape.
Here’s a little trick Grandma taught me about slicing: use a piece of dental floss or a very thin, sharp knife. Once you have your base piece cut, take that piece and slice it horizontally right down the middle. We want thin brownie discs, not thick chunks! Place one of these thinner layers right into the bottom of each cup. That’s your foundation!
Creating the Creamy Chocolate Pudding Filling
Now for the smooth part. Grab your large bowl. You need to get the instant pudding mix, the cold milk, and that glorious can of sweetened condensed milk in there together. Whisk this vigorously! You need to whisk until it looks thick and smooth—no lumps allowed! This usually takes a good minute or two with the instant mix.
Once it’s thickened up nicely, it’s time to lighten it. Take your thawed whipped topping and add it in stages. Use a rubber spatula for this part, not the whisk! Gently fold the topping in. You want to keep all that air you just whipped in there. Keep folding until it’s just combined and looks uniformly creamy. Stop folding as soon as you don’t see white streaks anymore; overmixing here will deflate your pudding.
Assembling and Layering the Brownie Dirt Pudding Cups Easy No Bake Dessert
With your brownie bases set in the cups, it’s time to layer! Spoon or pipe that gorgeous chocolate pudding mixture right on top of the brownie layer until it’s about two-thirds full. If you’re using a piping bag, this is super neat, but a spoon works just fine if you smooth the top gently.
We are making these Brownie Dirt Pudding Cups Easy No Bake Dessert layers count! Ensure the pudding layer is even across all the cups. If one cup has way more pudding, the cookie ratio will be off later, and we want perfect balance in every single bite!

The Final ‘Dirt’ Topping and Chilling Time
Time for the dirt! Take those 10 chocolate sandwich cookies and crush them up. I like to put them in a heavy-duty zip-top bag and gently smash them with the bottom of a heavy pan—this gives you a nice mix of fine powder and small crumbles, just like real dirt! Sprinkle this mixture generously over the top of the pudding layer until you can’t see any pudding peeking through.
This last step is non-negotiable: chilling. You must refrigerate these for a minimum of two hours. That time allows the pudding to fully set up and for the brownie layer to absorb just a tiny bit of moisture from the pudding, making it even fudgier. Don’t rush this, or your beautiful layers will slide!
Pro Tips for Perfect Brownie Dirt Pudding Cups Easy No Bake Dessert
Even though this recipe is super easy, a few little things I’ve learned over the years can take your pudding cups from great to absolutely legendary. First, if you want an extra layer of texture, try crushing half the cookies for the dirt topping and leaving the other half in slightly bigger chunks—it adds a nice surprise crunch!
Also, if you happen to have leftover brownies that are a bit dry, don’t worry! They actually work perfectly here because they soak up the moisture from the pudding layer while chilling, making them incredibly fudgy by the time you serve them. It’s like the pudding rehydrates them! Remember, these are best served cold, straight from the fridge. If you want to see more of my favorite easy recipes, check out my easy taco dip!
Make-Ahead Assembly Advice
This is truly the busy host’s dream dessert because you can assemble them well in advance. I often make these the morning of a party, or even the night before, and they hold up beautifully in the refrigerator. You can safely assemble the entire thing, right up to the cookie topping, up to eight hours ahead of time.
If you are planning ahead more than six hours, I suggest keeping the crushed cookies separate. Store them in an airtight container on the counter. Crushing them right before you top the set pudding keeps that cookie crunch completely intact. If you leave them on too long, they can get a little soft, and while I love soft cookies, we’re going for that contrast here! For more quick dessert ideas, see my recipe for vanilla frozen custard.
Common Questions About This Easy No Bake Dessert
I get asked about these cups all the time, especially when I bring them to gatherings. People always want to know if they can be changed up, or if the base ingredients are super strict. Since this is such a popular treat, I’ve gathered the most frequent questions I hear about making these Brownie Dirt Pudding Cups Easy No Bake Dessert.
Here are the quick answers to make your experience smooth! You can also follow along with me on Facebook for video tips.
Can I use pre-made pudding cups instead of mixing my own?
You absolutely *can*, but I really don’t recommend it if you want that rich flavor. The richness in this recipe comes specifically from whisking the instant mix with cold milk AND the sweetened condensed milk. Using a pre-made pudding cup won’t give you the necessary density or the creamy texture needed to hold up against the brownies and cookies in this layered dessert.
What if I don’t have chocolate sandwich cookies?
If you’re in a pinch and out of Oreos, you can substitute! Crushed chocolate wafers or even finely ground chocolate graham crackers work in a pinch for the “dirt.” Just remember, you lose a little bit of that classic, dark cookie flavor that makes the contrast so good against the sweet chocolate pudding.
Can I skip the brownies and just do pudding and cookies?
Sure, you can! But then it stops being a brownie dirt cup, right? The brownies are crucial because they absorb moisture while chilling, which makes them unbelievably fudgy. If you skip them, you lose that signature chewy layer and the overall structure of the dessert. For more baking tips, check out my guide on homemade Asiago cheese bread.
How long do these last in the fridge?
They hold up great for a couple of days! Because the pudding is stabilized by the condensed milk and whipped topping, they stay fresh for about two to three days in the refrigerator, covered tightly. They actually taste even better on day two!
Storing Your Leftover Brownie Dirt Pudding Cups Easy No Bake Dessert
If, by some miracle, you have any of these incredible cups left over, storing them is super easy, but you need to treat them right so they stay perfect. Since these are no-bake and rely on chilled ingredients, the refrigerator is their best friend. You don’t want to leave them sitting on the counter for too long, especially if it’s warm!
The key to keeping them fresh is airtight coverage. I usually use plastic wrap pressed directly onto the surface of the cookie “dirt” if I’m worried about moisture loss, or just put the lids on the jars/cups tightly. They taste even better the next day once the flavors have really married! For more storage advice, see my tips on easy oven baked fries.
| Storage Method | Duration | Reheating Suitability |
|---|---|---|
| Refrigerated (Airtight) | 2–3 Days | Not recommended (Serve chilled) |
And please, don’t even think about the microwave! Heating these up will just melt your beautiful pudding layer into a sad, warm puddle. These are definitely best served cold straight from the fridge. Don’t forget to save my recipe on Pinterest!
Sharing Your Brownie Dirt Pudding Cups Easy No Bake Dessert Success
I truly hope you loved making these as much as I love eating them! Once you’ve finished chilling and dug into that perfect layered dessert, I’d love to hear what you thought. Did you use little mason jars or clear glasses? Drop a comment below and let me know how fast your family devoured these Brownie Dirt Pudding Cups Easy No Bake Dessert!
Print
Amazing Brownie Dirt Pudding Cups Easy No Bake Dessert 1
- Total Time: 25 minutes plus chilling
- Yield: 6 servings
- Diet: Vegetarian
Description
These brownie dirt pudding cups layer fudgy brownies, creamy chocolate pudding, and cookie crumbs for an easy crowd pleasing dessert.
Ingredients
- Brownie layer: One 9 by 9 inch pan baked brownies cooled and cut
- Pudding layer: One 3.9 ounce box instant chocolate pudding mix
- Pudding layer: 1/2 cup cold milk
- Pudding layer: One 14 ounce can sweetened condensed milk
- Pudding layer: 8 ounces whipped topping thawed
- Topping: 10 chocolate sandwich cookies finely crushed
Instructions
- Cut the cooled brownies into circles or squares that fit the bottom of small serving cups. Slice each piece in half horizontally to create thinner layers.
- Place one brownie layer in the bottom of each serving cup.
- In a large bowl, whisk together the pudding mix, cold milk, and sweetened condensed milk until smooth and thickened.
- Gently fold in the whipped topping until fully combined and creamy.
- Spoon or pipe the pudding mixture evenly over the brownie layer in each cup.
- Sprinkle the crushed cookies generously over the top to create a dirt effect.
- Refrigerate for at least 2 hours until fully set before serving.
Notes
- These can be assembled up to 8 hours in advance and kept chilled until ready to serve.
- Prep Time: 25 minutes
- Cook Time: 0 minutes
- Category: Dessert
- Method: No Bake
- Cuisine: American