Moist Red Velvet Cake Pops are the perfect entry point for anyone who thinks baking is too complicated, and believe me, I completely get it! When I first started NoobRecipes, I was terrified of anything that required precise temperature control or complicated frosting techniques. I remember trying to make regular cupcakes once and accidentally turning the kitchen into a sticky, red disaster zone—it looked like a small, sugary crime scene.
That’s why these cake pops are my go-to confidence booster. They use a simple cake mix, which is totally beginner-proof, and the magic happens when you crumble the baked cake and mix it with frosting! It’s like edible playdough, and honestly, it’s so much fun. You can’t really mess up the texture because the frosting does all the binding work for you. Plus, hiding all that deliciousness under a smooth shell of white chocolate means nobody even cares if your crumbles weren’t perfectly round at first glance.
No heading needs to be written for the introduction. This recipe proves you can create something show-stopping and rich without needing three mixers and a culinary degree. Trust me, if I can master these, anyone can!

Why You Will Love These Moist Red Velvet Cake Pops
These aren’t just cute; they are genuinely foolproof, which is exactly what we aim for here at NoobRecipes! You get that amazing, rich red velvet flavor in one perfect bite. They travel well, they look impressive, and they are surprisingly simple to assemble. Seriously, these Moist Red Velvet Cake Pops are a total win for parties or just when you need a little treat.
- Incredibly moist texture thanks to the frosting binder.
- Uses a store-bought cake mix—no scary scratch baking required!
- Perfect portion control since they are already bite-sized.
Quick Preparation for Busy Bakers
Because we lean heavily on that cake mix, the baking part is super fast. You bake it, you chill it, and then you get to the fun part: rolling! This speed means you can whip up a batch of these Moist Red Velvet Cake Pops after work or school without dedicating an entire afternoon to dessert prep.
Gathering Your Ingredients for Moist Red Velvet Cake Pops
Okay, let’s get organized! The beauty of using a boxed cake mix is that you only need three main things to make these Moist Red Velvet Cake Pops happen. Seriously, three things! But you do need to make sure you have everything ready before you start crumbling the cake, or things get messy fast when you bring in the frosting.
We are keeping this super simple, which means almost everything is ready to go right out of the package or container. Remember, we aren’t adding any extra eggs or oil here because the cake mix box already tells you what liquids to use in the first step. For the coating, candy melts are so much easier than trying to temper real white chocolate—trust me on that one!
Essential Components for Moist Red Velvet Cake Pops
Here is exactly what you need to gather up before we even think about turning on that oven. Make sure your cake mix brand is one you like, as that flavor carries through!
Ingredient Table
| Item | Quantity | Notes |
|---|---|---|
| Red Velvet Cake Mix | 1 standard package | Use your favorite brand, like Duncan Hines or Betty Crocker. |
| Cream Cheese Frosting | 1/3 cup | This acts as the binder, so don’t skip it! Needs to be smooth. |
| White Candy Melts | 12 ounces | For dipping. These melt beautifully and harden easily. |
Equipment Needed for Perfect Cake Pops
Since this is a ‘NoobRecipes’ special, we want tools that make your life easy! You won’t need a stand mixer for this one, just some basic kitchen gear. Having everything ready before you bake means less panic later when things start chilling down.
- Large mixing bowl for crumbling the cake.
- A 9×9-inch baking dish (or two 8×8-inch round pans).
- Cookie scoop (about 1.5 tablespoons size) for uniform balls.
- Styrofoam block or tall glass to stand the pops up while drying.
- Lollipop or cake pop sticks.
Step-by-Step Instructions for Moist Red Velvet Cake Pops
This is where the magic happens! Even though these are easy, timing is everything, especially with the chilling steps. If you rush the chilling, your balls will fall apart when you try to dip them. So, put on some music, grab a snack, and let’s follow these steps precisely to get the best Moist Red Velvet Cake Pops ever!
Baking and Crumb Preparation
First up, bake that cake mix according to the box directions. I usually use a 9×9-inch square dish because it gives me a nice, thick layer to crumble later. Get that cake baked at 350°F until your toothpick comes out clean—usually about 30 to 35 minutes. Crucially, you must let this cake cool down completely. I mean, totally cold! Warm cake mixed with frosting equals soup, and we definitely don’t want soup.
Once it’s cool, grab a big bowl and use a fork to crumble the whole thing up. Don’t be shy; you want fine crumbs, almost sandy. Now, take about half a cup of those lovely red crumbs and set them aside. We’re using those later for decoration—they look so pretty sprinkled on top! Stir the 1/3 cup of cream cheese frosting into the remaining cake crumbs. Mix it until it feels like thick, slightly sticky dough. Cover this mixture and pop it into the freezer for at least 30 minutes until it’s firm enough to handle.
Shaping and Freezing the Cake Balls
Once the mixture is firm, it’s time to roll! Use a small cookie scoop if you have one—it keeps everything uniform, which is key for even dipping later on. Roll the mixture between your palms into small balls. Aim for about 1 to 1.5 inches wide. Place these on a parchment-lined baking sheet.
Here’s another critical chill time: back into the freezer with these rolled balls for at least another hour, or until they are rock solid. If they aren’t frozen solid, they will totally collapse when you try to put the stick in! Seriously, don’t skip this freezing stage for your Moist Red Velvet Cake Pops.
Dipping Technique for a Smooth White Chocolate Coating
Now for the coating! Melt your 12 ounces of white candy melts according to the package directions. Usually, this is just short bursts in the microwave, stirring well in between. You want it perfectly smooth.
Take your frozen cake balls out. Dip the very tip of a lollipop stick about half an inch into the melted chocolate and immediately push it into a frozen cake ball, going about halfway through. The chocolate acts like super glue! Put the sticked pops back into the freezer for 10 minutes so that glue hardens. This prevents the ball from falling off during the main dip. Once those sticks are secure, you can do the full dip. Tilt your bowl slightly and roll the pop in the chocolate, then gently lift it out, letting the excess drip back in.

Finishing and Setting Your Moist Red Velvet Cake Pops
As soon as that first coat is on, take those reserved red cake crumbs and sprinkle them right over the wet white chocolate. Work quickly, because the chocolate sets fast, especially around frozen pops! After decorating, stand the pops upright in a styrofoam block or even a tall glass filled with dry rice.
Let them sit there undisturbed until the chocolate is completely hard—this usually takes about 20 to 30 minutes at room temperature, or faster if your kitchen is cool. Once they are set, you have successfully made gorgeous, professional-looking Moist Red Velvet Cake Pops!
Tips for Making Your Moist Red Velvet Cake Pops Shine
Even though these are simple, we need to talk about two things that can ruin a batch: stick failure and chocolate cracking. If you follow the freezing steps I mentioned, your stick should stay put, but if you’re having trouble, try dipping the stick tip into the melted chocolate first—it’s like adding a little cement base before inserting it into the ball.
For the coating, if your white chocolate starts getting thick or seizing up while you work, don’t try to thin it with water; that makes it worse! Just put the bowl back in the microwave for 10-second bursts until it loosens up again. If your coating gets too thin and runny, you can add a teaspoon of vegetable shortening to help it thicken slightly for better coverage on those Moist Red Velvet Cake Pops. Patience during the dipping and setting phase is what makes them look professional! If you want to see more of my baking tips, check out my Pinterest page for visual guides.
Storing Your Delicious Moist Red Velvet Cake Pops
These treats are fantastic for making ahead of time, which is perfect for busy folks like us! Since they contain cream cheese frosting mixed in, they really prefer the cold. You can keep your beautiful Moist Red Velvet Cake Pops fresh for up to a week in the fridge. If you need them to last longer, freezing is the way to go, but you have to thaw them correctly so the chocolate doesn’t sweat.
| Storage Method | Duration | Notes |
|---|---|---|
| Airtight Container (Fridge) | Up to 1 week | Keep them cool to maintain freshness. |
| Freezer | Up to 6 weeks | Wrap well to prevent freezer burn or odor absorption. |
Proper Thawing for Best Texture
Never take frozen cake pops straight from the freezer to the counter! That temperature shock causes condensation, which makes the white chocolate coating look weird and sticky. The best way to thaw your Moist Red Velvet Cake Pops is slow and steady. Move them from the freezer directly into the refrigerator overnight. Let them chill there for about 8 to 10 hours before you plan to serve them. This slow transition keeps that chocolate shell perfectly crisp.
Common Questions About Cake Pops
It’s totally normal to have questions when you’re trying a new recipe, especially when chilling times are involved! Don’t worry, I’ve tackled the most common hurdles readers run into when making these Moist Red Velvet Cake Pops. Remember, almost every baking issue can be traced back to temperature or measurement, so let’s nail those down!
Can I Use Different Frosting When Making Moist Red Velvet Cake Pops
Yes, you absolutely can change the binder, but the result will change slightly! The cream cheese frosting gives that perfect tangy flavor and the ideal density for rolling. If you use plain vanilla frosting, the flavor won’t be quite as rich, and sometimes they can be a little softer. If you want to go dairy-free, you can try a firm vegan cream cheese frosting, but make sure it’s stiff enough to hold a ball shape once chilled. The key is that whatever binder you use must be thick!
Why Are My Cake Balls Falling Apart Before Dipping
This is almost always a temperature issue! If your cake balls are too warm when you try to roll them or stick the lollipop stick in, they will crumble. You need them frozen solid for dipping—I can’t stress that enough. If the balls are too soft, they collapse under the weight of the chocolate coating. Make sure you are freezing them for the full hour after rolling and that your hands aren’t warming them up too much while you shape them.
How Far in Advance Can I Make These Cake Pops
You can prep the baked cake and crumble it up a day ahead of time and keep it covered in the fridge. However, for the best texture and that signature moistness, I recommend assembling and dipping them within two days of baking. If you freeze the finished pops, they last for ages, but fresh is usually best! If you want to share your baking journey, feel free to tag us on Facebook.
Sharing Your Baking Success
I truly hope you loved making these super simple Moist Red Velvet Cake Pops! They are such a fun treat, and I always love seeing your creations pop up online. Did you try the white chocolate coating, or did you switch to dark chocolate? If you are looking for other easy dessert ideas, check out our collection of easy cake recipes.
Snap a picture and tag me on Instagram or drop a comment below and let me know how they turned out for your first time. I read every single comment, and your feedback helps me keep these recipes beginner-friendly!
Estimated Nutritional Data for Moist Red Velvet Cake Pops
Since we used a boxed mix and candy melts, the exact numbers can vary a bit depending on the brand you choose. But to give you a general idea of what you’re getting when you enjoy one of these sweet bites, here is a rough estimate for a single cake pop.
| Nutrient | Estimate Per Pop |
|---|---|
| Calories | 180-220 kcal |
| Fat | 10g – 14g |
| Carbohydrates | 20g – 25g |
| Protein | 2g – 3g |

Moist Red Velvet Cake Pops: 3 Great Bites
- Total Time: 2 hours 5 minutes (includes chilling and setting time)
- Yield: About 24 cake pops
- Diet: N/A
Description
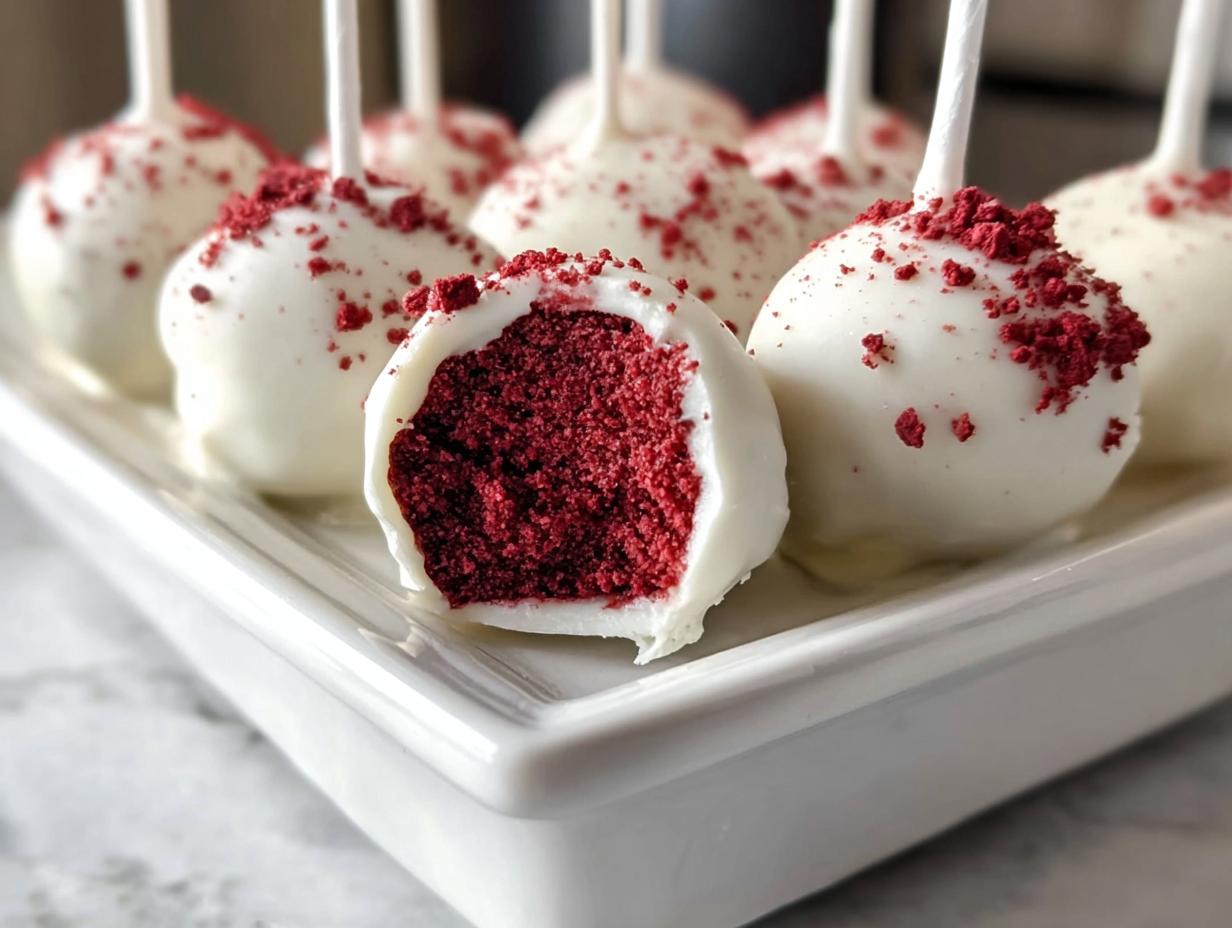
Moist Red Velvet Cake Pops offer a rich, bite-sized treat, combining the classic flavor of red velvet cake with a creamy texture, all coated in smooth white chocolate.
Ingredients
- 1 package red velvet cake mix (such as Duncan Hines)
- 1/3 cup cream cheese frosting
- 12 oz white candy melts (for easy dipping)
Instructions
- Prepare and bake the cake according to package directions using the mix, water, vegetable oil, and eggs. Pour batter into a greased 9×9-inch dish or two 8×8-inch round dishes. Bake at 350°F until a toothpick comes out clean. Cool the cake completely.
- Crumble the cooled cake with a fork in a large bowl. Set aside 1/2 cup of the crumbled cake for decoration. Stir the cream cheese frosting into the remaining crumbled cake until combined. Cover and freeze the mixture until firm.
- Use a cookie scoop and your hands to roll the cake and frosting mixture into small, evenly sized balls. Place them on a baking sheet and freeze until firm again.
- Gently re-roll the firm cake balls to smooth them and place them back on a cookie sheet. Melt the white candy melts until smooth. Dip the tip of a lollipop stick into the melted chocolate and insert it into a frozen cake ball. Return the pops to the freezer until the sticks are set.
- Dip each cake pop into the melted chocolate, letting excess drip off, or drizzle the chocolate over them. Decorate immediately by sprinkling the reserved crumbled cake onto the wet chocolate coating.
- Place the coated cake pops upright in a styrofoam block or cardboard box. Let the chocolate harden completely before serving.
Notes
- Perfect for parties, bake sales, and celebrations.
- For best results, your cake balls must be completely chilled before dipping.
- Store cake pops in an airtight container in the fridge for up to one week.
- Freeze cake pops for up to six weeks. Thaw overnight in the refrigerator before serving.
- Prep Time: 30 minutes
- Cook Time: 35 minutes
- Category: Dessert
- Method: Baking and Dipping
- Cuisine: American