Oh my gosh, you HAVE to try making these! Forget those fussy, complicated desserts you see online. I’m here to tell you that making the most incredible, bite-sized, velvety treats is totally within your reach. Seriously, these red velvet cake pops are my secret weapon for parties because people *always* ask for the recipe, and I just smile because they’re secretly so simple!
I remember the first time I tried making cake pops—it was a disaster. They crumbled, they fell off the sticks, and the chocolate looked like cracked pavement. I almost gave up! But my sister, who is way more organized than I am, showed me this trick using a box mix and a specific way of binding the crumbs. It completely changed the game. Now, I can whip up a batch of these rich, creamy little beauties faster than I can decide what movie to watch.
If you’ve ever been intimidated by baking or dipping, this recipe is your new best friend. They turn out perfectly moist and delicious every single time. Trust me on this one; these are going to be your new favorite way to enjoy that classic red velvet flavor! 
Why These red velvet cake pops Are Perfect for Beginners
The biggest hurdle in any recipe is usually the base, right? Well, we’re skipping the whole from-scratch baking drama here! Using a good quality red velvet cake mix is step one toward guaranteed success. It gives you that beautiful, vibrant color and flavor right out of the gate, and it bakes up beautifully moist—which is exactly what we need for the next step.
The real magic happens when we turn the baked cake into a truffle consistency. This binding process is where most people go wrong, but I’ve tested this dozens of times. We only use a small amount of cream cheese frosting, added just a tablespoon at a time. Why? Because you need that mixture to feel like firm play-dough, not sticky batter. I promise, if you mix it until you can roll a perfect little sphere without it sticking to your palms, you’ve got the right texture. It’s tested, it’s simple, and it’s why these red velvet cake pops never fall apart on the stick!
Gathering Your Ingredients for red velvet cake pops
Okay, let’s get our mise en place ready! For these red velvet cake pops, we’re keeping things streamlined, but precision matters, especially when it comes to the chocolate coating. Don’t try to substitute the white chocolate for milk or dark chocolate unless you are prepared to adjust the thinning agent—it behaves differently! I always lay everything out before I even turn the oven on. It just prevents that frantic searching halfway through.
We are leaning heavily on that cake mix, but the binding agent is key. That little bit of cream cheese frosting makes all the difference in flavor and texture! If you want another great dessert idea, check out these red velvet crinkle cookies.
Essential Components for Perfect red velvet cake pops
Here is exactly what you need to gather. Make sure your cake mix is the standard size box, not the specialized thin kind!
| Ingredient | Amount | Notes |
|---|---|---|
| Red Velvet Cake Mix | 1 box | Standard size |
| Large Eggs | 3 | Room temperature is best, but not critical |
| Vegetable Oil | \u00bd cup | Any neutral oil works |
| Water | 1 cup | Tap water is fine |
| Cream Cheese Frosting | \u2153 cup | Store-bought is perfect here! |
| White Candy Melts or White Chocolate Chips | 12 ounces | For dipping |
| Coconut Oil | 1 teaspoon | Essential for thinning the coating |
| Red or Pink Sprinkles | As needed | For decoration |
| Lollipop Sticks | 15–18 | Standard cake pop size |
Equipment Needed for Making red velvet cake pops
You don’t need any fancy gadgets, which is why I love this recipe! A 9×13 pan is required for baking, and parchment paper is your best friend for cleanup. You’ll also need a large mixing bowl, a sturdy spatula, and a foam block or a tall glass to stand the finished pops up in while they set. Safety note: When melting the chocolate, always use short bursts in the microwave, or you’ll burn the coating—and burnt chocolate smells awful!
Step-by-Step Instructions for Amazing red velvet cake pops
This is where the fun really starts! We break this down into four manageable chunks: bake, mix, chill, and dip. If you follow the chilling times, I guarantee you won’t have any sad, broken cake pops rolling around on your counter.
Baking the Red Velvet Base
First things first, get that oven warmed up to 350 degrees Fahrenheit. You need a 9×13-inch pan, and make sure you grease it well! Mix up your cake according to the box directions—just the eggs, oil, and water. Don’t overmix it once you add the dry ingredients; we want a light cake, not a hockey puck. It should take about 30 minutes to bake. When you poke a toothpick in the center, it needs to come out clean—no wet batter clinging to it! Once it’s done, let it cool completely. I mean it, completely cool. If you try to crumble a warm cake, it just turns into sticky sludge, and that’s not what we want for our red velvet cake pops.
Creating the Cake Ball Mixture
Once the cake is totally cool, it’s time to crumble. Dump the whole thing into a big bowl and use your hands to break it down into fine crumbs. Think soft dirt, not big chunks. Now for the binding! Take your cream cheese frosting and add it one tablespoon at a time. This is super important—if you dump it all in, it’s going to be too wet. Mix it in with your hands. You’re looking for a consistency where you can squeeze a piece and it holds its shape perfectly, like play-dough. Scoop out about a tablespoon and a half of the mixture and roll it firmly between your palms into a nice, smooth ball. Place these on parchment-lined baking sheets and get them into the freezer for 30 minutes. This initial freeze is non-negotiable!
Chilling and Securing the Sticks
We need these balls rock solid before we try to dip them, or they’ll just disintegrate in the chocolate. While they chill, melt your white chocolate or candy melts. Remember that teaspoon of coconut oil? Stir that in until it’s perfectly smooth. Now, take about 15 of your cake balls out of the freezer. Dip the very tip of a lollipop stick about half an inch into the melted coating, then carefully push that stick into the center of a chilled cake ball. The dipped tip acts like glue! Put the pops back in the freezer for another 10 minutes. This second chill locks that stick right in place so it won’t wobble when you dip the whole thing later.
Coating and Decorating Your red velvet cake pops
Time for the grand finale! Take your pops out of the freezer. Hold the stick and dip the chilled ball straight down into the warm, smooth coating. You want to submerge almost the entire ball. Gently lift it out and rotate it slowly over the bowl. Tap the stick lightly against the rim of the bowl to shake off any excess coating—too much excess means thick, bumpy edges. Do this quickly because once they are out of that cold, the chocolate starts setting fast! While the coating is still wet, immediately sprinkle on your decorations. You have to be fast here! Place the finished red velvet cake pops standing upright in a foam block or a tall glass and let them set up at room temperature until the chocolate is completely hard. 
Tips for Success with Your red velvet cake pops
I’ve learned a few hard lessons over the years making these little gems, and I want to save you the headache! The two biggest issues people have are the coating cracking when they bite into it, or the cake ball slipping right off the stick. We can avoid both with simple checks.
For the cracking coating: This happens because the cake ball warms up too fast when it hits the chocolate. That’s why those two freezing steps are crucial. If your balls are rock solid when they hit the warm coating, the temperature shock is minimized, and the chocolate sets evenly without stress fractures. Also, make sure your melted chocolate isn’t *too* hot. If you’re using candy melts, they usually melt perfectly around 100 to 110 degrees Fahrenheit. If it feels searing hot, let it cool for five minutes before dipping.
To stop the dreaded stick slip, always use the ‘glue’ trick we talked about: dipping the tip first and freezing it. If you skip that, the stick just pushes through the soft cake mixture, and gravity takes over later. Another pro-tip—when you insert the stick, push it straight into the center, not off to one side. If you hit the side of the ball, it creates a weak spot that will absolutely cause it to break later when you try to lift it out of the coating.
Finally, if you notice your coating getting really thick while you’re working, don’t try to thin it with water—that will make it seize up and become unusable! Just pop the bowl back in the microwave for 10 seconds and stir well. That little bit of coconut oil should keep it workable for a long time, but a quick zap keeps everything moving smoothly. If you enjoy easy baking, you might also like this recipe for easy white chocolate strawberries.
Flavor Variations for red velvet cake pops
While the classic cream cheese frosting binder gives us that perfect, slightly tangy truffle flavor that screams red velvet, we can have fun with the exterior without making the recipe complicated. These variations are all about decoration and simple flavor touches that you can add right at the end!
You absolutely must stick with the cream cheese frosting for the interior binding—it’s what gives us that classic texture we worked so hard to achieve. But for the outside? Go wild!
- Drizzle Delight: Instead of just using sprinkles, melt a small amount of dark or milk chocolate separately. Once your white-coated pops are firm, put the dark chocolate into a piping bag or a small Ziploc bag (snip a tiny corner off). Drizzle thin lines back and forth across the set white coating. It looks so professional, but seriously, it’s just melting chocolate!
- Nutty Crunch: If you aren’t worried about nut allergies, finely chopped pecans or walnuts make a wonderful textural contrast to the smooth truffle center. As soon as you pull the pop out of the white coating (before the sprinkles), gently roll the bottom half in finely chopped nuts. It adds a lovely, earthy flavor that pairs surprisingly well with the cocoa notes.
- Festive Colors: For holidays, you don’t need a new recipe, just new colors! For Valentine’s Day, I use pink sprinkles or even crushed freeze-dried raspberries mixed with sugar for a tart, bright topping. For Christmas, I stick to white sanding sugar and a red chocolate drizzle. It’s all about accessorizing the perfect base!
These easy additions keep the core of the recipe simple—cake mix, frosting, melt, dip—but they let you customize your red velvet cake pops for any occasion! If you are looking for a great drink pairing, try this cranberry sparkling mocktail.
Storing and Serving Your red velvet cake pops
One of the best things about these little treats is that they are incredibly stable! Unlike cupcakes, these cake truffles hold up really well, which makes them perfect for making ahead of time for parties. You don’t want to rush the decorating process, so planning ahead is key.
The key here is that once the chocolate shell is completely hard, it acts like a protective seal around the moist interior. This means we have a few options for storage, depending on how long you need them to last. I usually keep mine out on the counter if they are going to be eaten within a day or two, because the chocolate coating gets a little soft in the fridge and I worry about condensation.
Here is my go-to guide for keeping your red velvet cake pops looking and tasting perfect:
| Storage Location | Maximum Storage Time | Best For |
|---|---|---|
| Room Temperature (Airtight Container) | Up to 3 days | Short-term freshness, best coating texture |
| Refrigerated (Airtight Container) | Up to 5 days | Longer storage, but coating may soften slightly |
If you do refrigerate them, make sure they are in a truly airtight container—otherwise, they can absorb funky smells! When you take them out to serve, let them sit on the counter for about 20 minutes before eating. This lets the cake interior soften back up and brings out that rich red velvet flavor that gets a little muted when they are ice cold. You can find more great recipes like this on our Pinterest page.
Frequently Asked Questions About red velvet cake pops
I get so many questions once people see how amazing these turn out! It’s all about locking in that moisture and getting that coating just right. Here are the three things I hear asked most often about making perfect cake truffles.
Can I use a different type of frosting in my red velvet cake pops?
This is a tricky one because the cream cheese frosting isn’t just for flavor, it’s crucial for texture! It has a certain fat and sugar ratio that binds the crumbs perfectly into that firm, rollable dough. If you use standard buttercream, it’s often too sugary and greasy, and your balls might end up too soft or start melting at room temperature. If you absolutely cannot use cream cheese frosting, you need a very thick, rich, cooked frosting, or you can try using a small amount of softened cream cheese mixed with powdered sugar until you reach that firm dough texture. But honestly, stick to the cream cheese—it’s what gives these red velvet cake pops their signature taste!
How do I prevent the white chocolate coating from looking streaky on the red velvet cake pops?
Streaky or dull coating is usually a sign of temperature issues or moisture contamination. First, make sure your cake balls are completely frozen when you dip them—if the cold ball warms up too fast in the chocolate, it causes condensation on the surface, which ruins the shine. Second, the coconut oil is your best friend here! It’s a thinning agent, not a flavor agent. It lowers the viscosity of the chocolate so you can get a thin, even shell. If your coating looks thick, stringy, or dull, add just a tiny bit more coconut oil (maybe a quarter teaspoon at a time) and stir until it flows like thin maple syrup. Never let water get near your melting chocolate, or it will seize up instantly!
One more thing: make sure you are using good quality white candy melts or good melting wafers. Sometimes cheaper chips have too many stabilizers that prevent them from melting smoothly, no matter how much oil you add. Stick to the recommended ingredients, and you’ll get that beautiful, glossy finish every time! If you want to see more of our baking successes, check out our Medium page.
Q. My stick keeps falling out when I try to dip them! What am I doing wrong?
You missed the crucial second chill! The first 30-minute freeze firms up the ball. The step where you dip the stick tip in chocolate and refreeze for 10 minutes is what locks that stick in place. That little bit of hardened chocolate acts like cement holding the stick to the cake ball. If you skip that 10-minute freeze, gravity and the weight of the coating will pull the stick right out!
Sharing Your red velvet cake pops Creations
Seriously, when you finish these incredible red velvet cake pops, I want to see them! Tag me in your photos or let me know how they turned out in the comments below. Did the white chocolate set perfectly? Did your family devour them in five minutes flat? Drop a star rating so other new bakers know they can conquer this recipe too. Happy dipping, everyone! You can also follow us on Facebook for more quick tips.
Print
Awesome red velvet cake pops in 4 simple steps
- Total Time: 1 hour 35 minutes
- Yield: 15–18 cake pops
- Diet: Omnivore
Description
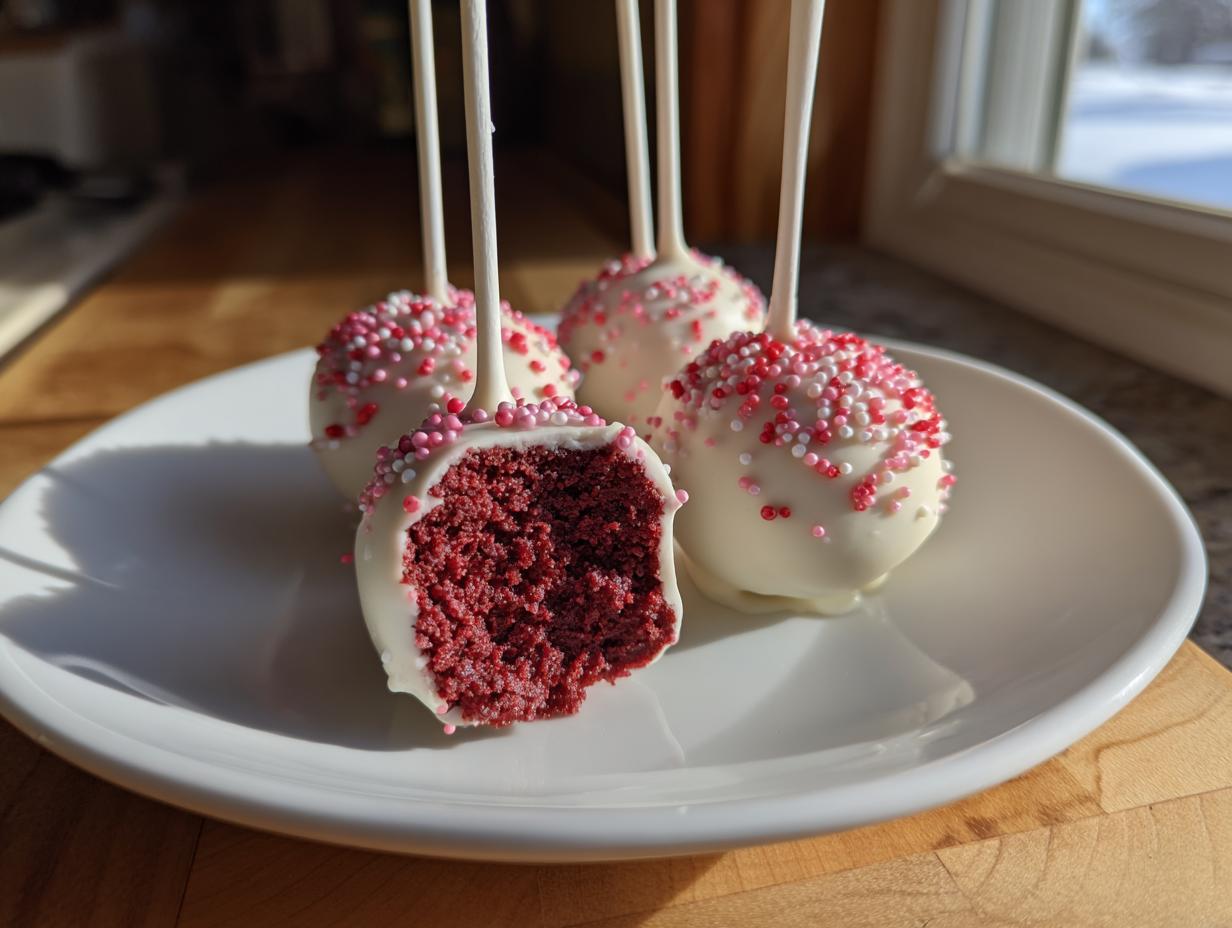
These red velvet cake pops offer a rich, creamy, bite-sized dessert experience. They feature the classic red velvet flavor in a soft, moist truffle texture, coated in smooth white chocolate. These are simple to prepare and ideal for celebrations or as gifts.
Ingredients
- 1 box red velvet cake mix
- 3 large eggs
- ½ cup vegetable oil
- 1 cup water
- ⅓ cup cream cheese frosting
- 12 ounces white candy melts or white chocolate chips
- 1 teaspoon coconut oil (for thinning chocolate)
- Red or pink sprinkles for decoration
- 15–18 lollipop sticks
Instructions
- Preheat your oven to 350°F. Grease a 9×13-inch baking pan.
- Prepare the cake mix following package directions, using the eggs, oil, and water. Bake for 28–32 minutes, or until a toothpick inserted in the center comes out clean.
- Cool the cake completely. Crumble the cake into fine crumbs in a large bowl.
- Add the cream cheese frosting, one tablespoon at a time. Mix with your hands until the mixture binds together like dough.
- Scoop and roll the mixture into 1½-inch balls. Place these balls on a parchment-lined tray and freeze them for 30 minutes until firm.
- Melt the white candy melts with the coconut oil in a microwave-safe bowl using 30-second bursts, stirring until the mixture is smooth.
- Dip the tip of one lollipop stick into the melted coating. Insert the stick halfway into a chilled cake ball. Freeze for another 10 minutes to secure the stick.
- Dip each pop into the melted coating, gently rotating it to coat evenly. Tap off any excess coating. Decorate immediately with sprinkles.
- Place the finished cake pops upright in a foam block or tall glass to set at room temperature until firm.
Notes
- Store the finished cake pops in an airtight container at room temperature for up to 3 days.
- Refrigerate the cake pops for up to 5 days for longer storage.
- Prep Time: 1 hour
- Cook Time: 35 minutes
- Category: Dessert
- Method: Baking and Dipping
- Cuisine: American