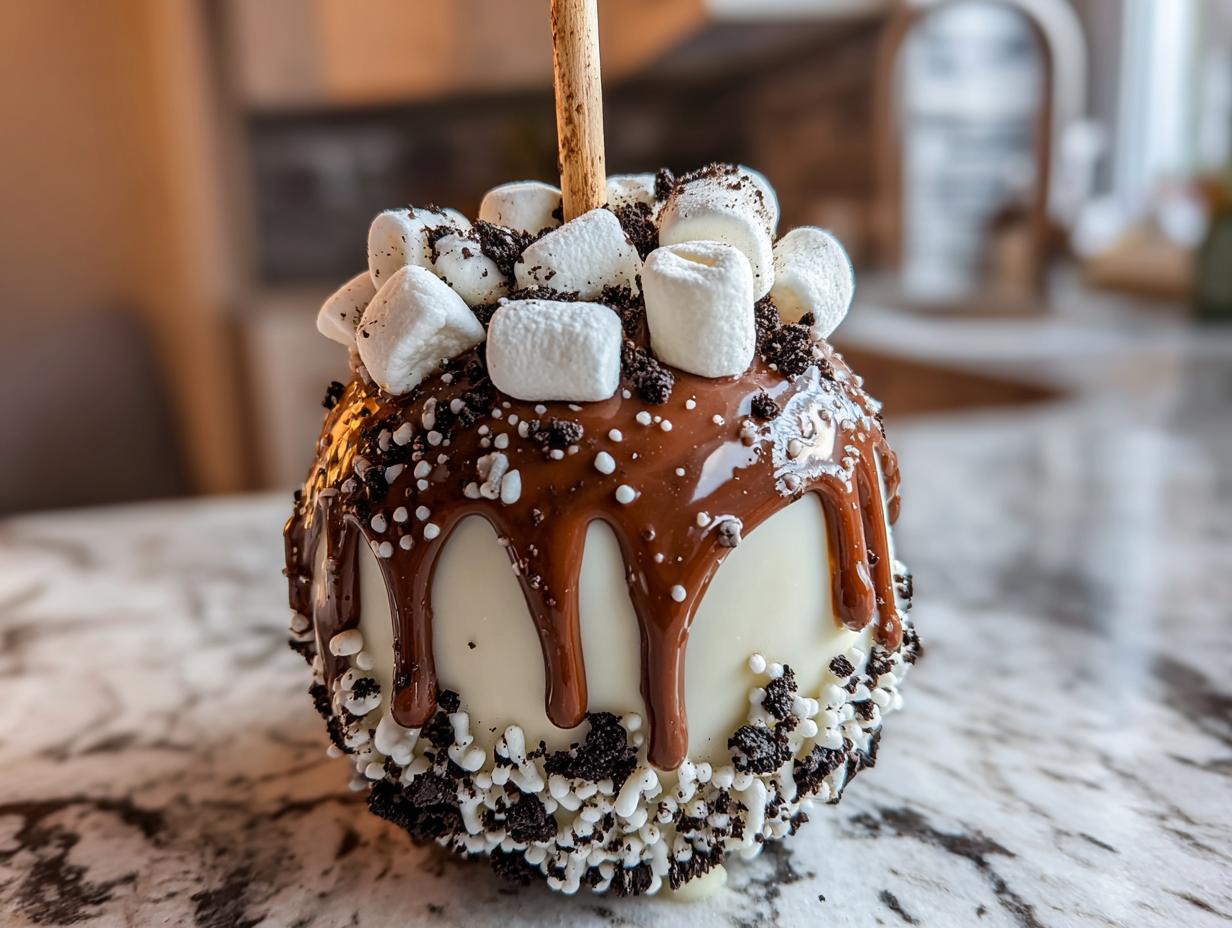
No heading needs to be written for the introduction. Okay, I have to tell you about these Hot Chocolate Candy Apples! Seriously, these are the coziest, most fun things you can make when the weather outside is just too cold for anything else. Forget those plain red apples; we are leveling up winter snacking big time. This recipe looks fancy, I know, but trust me when I say this is totally beginner-friendly, and that’s why I love it so much.
I remember the first time I tried to make hard candy—it was a disaster! It crystallized instantly, and I almost threw the pot out. But this recipe, with the cream of tartar and the gentle heat instructions, made the candy coating shatter perfectly every single time. It’s the ultimate winter treat because you get that crisp snap from the candy, followed by that rich, gooey hot chocolate layer, and finally, the crunch of cookies and soft marshmallows. It sounds like a lot of steps, but we’ll take it slow. By the time you finish making your first batch of Hot Chocolate Candy Apples, you’ll feel like a candy-making wizard!
Essential Equipment for Your Hot Chocolate Candy Apples
You can’t just wing hard candy, folks, especially when you’re dealing with molten sugar! Having the right gear ready before you even turn on the stove makes all the difference between success and a sticky mess. Trust me, I learned the hard way that grabbing the right tools first is half the battle.
Tools Needed for Dipping and Coating
The absolute must-have here is a reliable candy thermometer. We need that sugar to hit exactly 300 degrees, and eyeballing it just won’t cut it—safety first! You’ll also need a medium, heavy saucepan because thin pots scorch the sugar easily.
- A reliable candy thermometer.
- A medium, heavy saucepan for the candy.
- Sturdy wooden sticks or paper straws for handles.
- A large baking sheet lined with parchment paper or a silicone mat to set the apples on.

Gathering Ingredients for Hot Chocolate Candy Apples
Okay, now that we have our gear sorted, let’s talk about what we need to buy! Getting the right ingredients is key, especially for the candy shell. You can’t substitute the corn syrup in that hard candy base—it keeps the sugar from crystallizing, which is our biggest enemy here. We need a good mix of crunchy, gooey, and chocolatey things to make these Hot Chocolate Candy Apples truly special.
Don’t skimp on the apples, either! They need to be firm so they don’t break when you dip them in that hot syrup.
Crisp Apples and Candy Base Components
For the base, grab about 6 to 8 small crisp apples—think Honeycrisp or Granny Smith, something that holds up well. For the actual candy, you’ll need 2 ½ cups of granulated sugar, 1 cup of light corn syrup, 1 cup of water, and just a tiny bit of cream of tartar to help stabilize everything. Don’t forget the vanilla extract for flavor right at the end!
The Rich Hot Chocolate Toppings
This is where the fun starts! For the chocolate layer, we are using 1 ½ cups of milk chocolate chips mixed with 2 teaspoons of coconut oil for smooth melting. Then you need 1 ½ cups of those cute little mini marshmallows, and about ½ cup of crushed chocolate sandwich cookies or graham crackers for the crunch.
For the final drizzle and dust, keep 1 teaspoon of coconut oil with ¼ cup of white chocolate chips handy. And finally, grab 2 tablespoons of unsweetened cocoa powder for that perfect hot chocolate finish!
Step-by-Step Instructions for Hot Chocolate Candy Apples
Alright, put on your apron! This is the main event. Making these Hot Chocolate Candy Apples is really just two main parts: making the hard candy shell and then decorating it like a decadent mug of hot cocoa. I know hard candy sounds scary, but if you follow these steps exactly, you’ll do great. Just remember, patience in the beginning saves you from a sticky disaster later!
Preparing the Apples and Candy Syrup Base
First things first, you absolutely have to wash those apples in warm water—this gets off any wax that stops the candy from sticking. Then, dry them until you think they can’t possibly be any drier. Seriously, dry them again! Once they are totally dry, push those sturdy sticks right down into the center of each one. Now, get your baking sheet ready by lining it with parchment or a silicone mat, and give that liner a tiny bit of grease.
For the candy base, grab your heavy saucepan. You’ll combine the sugar, corn syrup, water, and cream of tartar. Stir it gently, just until everything looks wet and mixed together. That’s the last stirring we do for a while, so pay attention!
Cooking the Hard Candy to Perfection
Time for the heat! Put that saucepan over medium-high heat and let it boil. Do not stir it once it starts bubbling, okay? If you stir, it might crystallize on you. You need to let it cook until your candy thermometer reads exactly 300°F—that’s the hard-crack stage. It takes patience, but don’t walk away! As soon as it hits 300°F, yank that pan off the burner immediately. Stir in your vanilla extract quickly, and now you’re ready to dip.
Dipping and Setting the Base Candy Layer
Tilt your pan slightly so the syrup pools nicely on one side. Carefully take an apple by the stick and dip it into the hot candy, turning it around until it’s coated all over. Let the extra syrup drip right back into the pan—this helps keep the shell thin, not chunky. Set the apples down on your prepared baking sheet. They need to cool and harden completely before we do any decorating. Give them a good 20 minutes, maybe more.
Building the Signature Hot Chocolate Candy Apples Coating
While those are setting up, melt your milk chocolate chips and 2 teaspoons of coconut oil. Microwave in short bursts, stirring often, until it’s completely smooth. Now, dip each hard candy apple into the melted chocolate, or just spoon it over the top, letting those rich drips run down the sides. Before that chocolate sets, this is your chance to press the mini marshmallows around the bottom half of the apple so they stick tight. Then, sprinkle those crushed chocolate cookies or graham crackers right over the chocolatey marshmallow section.

Final Drizzle and Setting the Hot Chocolate Candy Apples
For the final flourish, melt your white chocolate chips with the remaining 1 teaspoon of coconut oil. Drizzle this lightly over the tops of the apples in those pretty, thin, wispy lines. While that white chocolate is still soft—and this is important for that hot cocoa look—sprinkle a light dusting of cocoa powder right over the top. Let these beauties sit at cool room temperature for at least 20 to 30 minutes until everything is totally set and dry to the touch before you try to move them!
Tips for Making the Best Hot Chocolate Candy Apples
I’ve learned a few things along the way that keep these from turning into a sticky nightmare, which, trust me, happens fast when you’re dealing with that high sugar temperature! These aren’t just little tricks; they are non-negotiable steps if you want that beautiful, hard, glossy shell that defines a great candy apple.
Mastering the Apple Surface Preparation
I can’t stress this enough: the apples have to be bone dry. If there is even a hint of water left on the skin after washing, the hot candy syrup will bubble up and refuse to stick evenly. It looks like the coating is crawling right off the apple! Wipe them down, then let them sit on a towel for ten minutes, and then wipe them again. You want the surface slick and dry so the candy grips immediately when you dip.
Working Safely and Quickly with Hot Candy
Once that sugar hits 300 degrees, you have maybe 30 seconds to dip all your apples before it starts getting too thick and seizing up. Be prepared! Have your dipped apples right next to the stove. Also, wear long sleeves if you can, because hot candy is unforgiving, and you don’t want to accidentally splash yourself while tilting the pan. Remember, once it’s off the heat, you still need to work fast but carefully!
Ingredient Notes and Flavor Variations for Your Hot Chocolate Candy Apples
Even though my recipe for these Hot Chocolate Candy Apples is pretty set in stone, I always encourage people to tweak things slightly to make them their own. The beauty of a layered dessert like this is that you can play around with the textures and flavors underneath that hard candy shell. Don’t feel locked into just the milk chocolate, either!
Chocolate and Cookie Substitutions
If you prefer a deeper, richer flavor profile that cuts through the sweetness of the candy, go ahead and swap the milk chocolate chips for dark chocolate chips. It’s fantastic! Also, if you don’t have chocolate sandwich cookies on hand, plain graham crackers work beautifully and give you a slightly milder, buttery crunch that lets the chocolate coating shine more.
Adding Subtle Spice Notes
For a real cozy twist that reminds you of a holiday drink, try this little secret: mix a tiny pinch of cinnamon right into your unsweetened cocoa powder before you dust the apples at the very end. It’s such a subtle change, but that little hint of spice with the chocolate and marshmallow is just heavenly. It really elevates the whole experience!
Storing and Serving Your Hot Chocolate Candy Apples
One thing about candy apples—especially ones loaded up with marshmallows and chocolate like these—is that they don’t love humidity or crazy temperature swings! You have to treat them gently once all that hard work is done. They are best enjoyed the day you make them, but lucky for you, they hold up pretty well if you follow a couple of simple rules about keeping them cool.
The main goal is keeping the chocolate firm and the marshmallows from getting gooey. If you try to refrigerate them too soon or seal them up tight, you risk getting condensation, and nobody wants a melted, sticky mess!
Proper Storage Guidelines
You should aim to store these at a cool room temperature, maybe around 65 to 70 degrees, loosely covered. If your kitchen is warm—say, over 75 degrees—or if you need them to last past two days, then the fridge is your friend. But if you do refrigerate, just make sure they are wrapped loosely so they don’t sweat when they come out. They generally last up to two days at room temperature, or three days if they are tucked into the fridge.
| Storage Location | Maximum Duration |
|---|---|
| Cool Room Temperature | Up to 2 days |
| Refrigerated (Loosely Covered) | Up to 3 days |
Frequently Asked Questions About Hot Chocolate Candy Apples
I get asked these questions all the time, especially when people are nervous about making hard candy for the first time. Don’t worry! Most problems with these delicious Hot Chocolate Candy Apples come down to temperature or moisture. Here are a few things that might pop into your head as you plan your baking day.
Can I Make the Candy Apples Ahead of Time?
You absolutely can prep them ahead, but I wouldn’t go too far in advance. They are best enjoyed within two days. If you are making them for a big party, I’d aim to finish the decorating step (marshmallows and all) no more than 24 hours before you plan to serve them. The fresh marshmallow topping doesn’t love sitting around for days, even if the hard candy shell is sturdy!
Why Does My Candy Coating Feel Sticky?
Sticky coating usually means two things: either you didn’t cook the sugar quite long enough to hit that hard-crack stage (300°F), or your kitchen is super humid that day. Humidity is the enemy of hard candy! If it’s raining outside, you might need to cook the syrup for an extra minute or two past 300°F just to burn off that extra moisture. A sticky coating means the sugar absorbed too much water from the air.
What is the Best Apple Type for This Winter Treat?
For this decadent Winter Treat, you need an apple that is firm and has some tartness to balance all that sweetness from the candy and chocolate coating. I always reach for Granny Smith apples because they hold up beautifully to the heat and their tartness cuts through the richness. Honeycrisp or even Fuji work well too, as long as they are small and very, very crisp!
Sharing Your Delicious Hot Chocolate Candy Apples
Well, I hope you’re ready to impress everyone with these amazing Hot Chocolate Candy Apples! They look like they came from a fancy fair stall, but you made them right in your own kitchen. Once you’ve polished off that last marshmallow, I really want to know what you thought. Did you use dark chocolate? Did your candy set perfectly the first time? Drop a comment below and let me know how your candy-making adventure went! You can also follow along for more fun recipes on our Facebook page.
Print
Glorious Hot Chocolate Candy Apples in 1 Step
- Total Time: 50 minutes
- Yield: 6 to 8 candy apples
- Diet: Omnivore
Description
Cozy up with hot chocolate candy apples topped with marshmallows and cookie crumbs for a fun winter treat that’s perfect for January. This recipe combines crisp apples with hard candy, milk chocolate, marshmallows, and cookie crumbs.
Ingredients
- 6 to 8 small crisp apples
- 6 to 8 sturdy wooden sticks or paper straws
- 2 ½ cups granulated sugar
- 1 cup light corn syrup
- 1 cup water
- ½ teaspoon cream of tartar
- ½ teaspoon vanilla extract
- 1 ½ cups milk chocolate chips
- 2 teaspoons coconut oil
- 1 ½ cups mini marshmallows
- ½ cup crushed chocolate sandwich cookies or graham crackers
- ¼ cup white chocolate chips
- 1 teaspoon coconut oil
- 2 tablespoons unsweetened cocoa powder or hot cocoa mix
Instructions
- Wash the apples in warm water and dry them very well. Remove any stems and push a wooden stick straight down into the center of each apple.
- Line a large baking sheet with parchment or a silicone mat. Lightly grease the liner.
- In a medium heavy saucepan, combine the sugar, corn syrup, water, and cream of tartar. Stir gently just until everything is evenly moistened.
- Bring the mixture to a boil over medium-high heat without stirring. Cook until it reaches 300°F, the hard-crack stage, using a candy thermometer. Remove from the heat and stir in the vanilla extract.
- Tilt the pan slightly. Carefully dip each apple into the hot candy syrup, turning to coat evenly. Let excess drip back into the pan before setting the apples on the prepared baking sheet to cool and harden completely.
- Place the milk chocolate chips and 2 teaspoons coconut oil in a microwave-safe bowl. Heat in short bursts, stirring between each, until smooth and fluid.
- Dip each set candy apple into the melted milk chocolate or spoon the chocolate over the top, letting it run down the sides in a thick layer. Allow any extra to drip off.
- While the milk chocolate is still wet, press mini marshmallows all around the bottom half of each apple so they cling to the coating.
- Sprinkle the crushed chocolate cookies or graham crackers over the chocolate-coated top and sides.
- Melt the white chocolate chips with 1 teaspoon coconut oil in the microwave in short bursts, stirring until smooth. Drizzle it lightly over the tops of the apples in wispy lines.
- Finish each apple with a light dusting of unsweetened cocoa powder or hot cocoa mix over the top while the white chocolate is still soft so it sticks.
- Let the decorated hot chocolate candy apples stand at room temperature for 20 to 30 minutes, or until all chocolate is set and dry to the touch before serving.
Notes
- Use dark chocolate chips instead of milk chocolate for a richer flavor.
- Swap chocolate sandwich cookies for plain graham crackers for a milder crunch.
- Use mini dehydrated marshmallows if you plan to package or gift the apples to keep them firm longer.
- Add a pinch of cinnamon to the cocoa powder before dusting for a spiced twist.
- Store apples at cool room temperature, loosely wrapped, for up to 2 days. Refrigerate for up to 3 days if the kitchen is warm.
- Do not freeze candy apples.
- Prep Time: 30 minutes
- Cook Time: 20 minutes
- Category: Dessert
- Method: Dipping and Coating
- Cuisine: American